

QUILTsocial | Issue 01 Fall 2014 Premiere Issue
Premiere issue of the FREE magazine for quilters! Follow our blog at www.QUILTsocial.com for daily tips, techniques, and patterns.
Premiere issue of the FREE magazine for quilters! Follow our blog at www.QUILTsocial.com for daily tips, techniques, and patterns.

You also want an ePaper? Increase the reach of your titles
YUMPU automatically turns print PDFs into web optimized ePapers that Google loves.
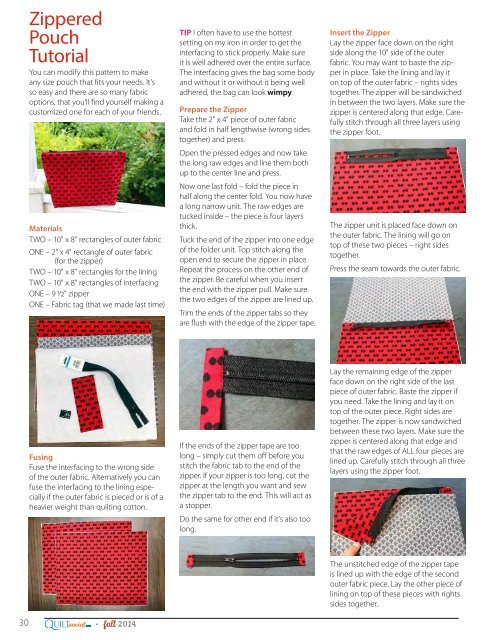
Zippered<br />
Pouch<br />
Tutorial<br />
You can modify this pattern to make<br />
any size pouch that fits your needs. It’s<br />
so easy and there are so many fabric<br />
options, that you’ll find yourself making a<br />
customized one for each of your friends.<br />
Materials<br />
TWO – 10" x 8" rectangles of outer fabric<br />
ONE – 2" x 4" rectangle of outer fabric<br />
(for the zipper)<br />
TWO – 10" x 8" rectangles for the lining<br />
TWO – 10" x 8" rectangles of interfacing<br />
ONE – 9 1⁄2" zipper<br />
ONE – Fabric tag (that we made last time)<br />
TIP I often have to use the hottest<br />
setting on my iron in order to get the<br />
interfacing to stick properly. Make sure<br />
it is well adhered over the entire surface.<br />
The interfacing gives the bag some body<br />
and without it or without it being well<br />
adhered, the bag can look wimpy.<br />
Prepare the Zipper<br />
Take the 2" x 4" piece of outer fabric<br />
and fold in half lengthwise (wrong sides<br />
together) and press.<br />
Open the pressed edges and now take<br />
the long raw edges and line them both<br />
up to the center line and press.<br />
Now one last fold – fold the piece in<br />
half along the center fold. You now have<br />
a long narrow unit. The raw edges are<br />
tucked inside – the piece is four layers<br />
thick.<br />
Tuck the end of the zipper into one edge<br />
of the folder unit. Top stitch along the<br />
open end to secure the zipper in place.<br />
Repeat the process on the other end of<br />
the zipper. Be careful when you insert<br />
the end with the zipper pull. Make sure<br />
the two edges of the zipper are lined up.<br />
Trim the ends of the zipper tabs so they<br />
are flush with the edge of the zipper tape.<br />
Insert the Zipper<br />
Lay the zipper face down on the right<br />
side along the 10" side of the outer<br />
fabric. You may want to baste the zipper<br />
in place. Take the lining and lay it<br />
on top of the outer fabric – rights sides<br />
together. The zipper will be sandwiched<br />
in between the two layers. Make sure the<br />
zipper is centered along that edge. Carefully<br />
stitch through all three layers using<br />
the zipper foot.<br />
The zipper unit is placed face down on<br />
the outer fabric. The lining will go on<br />
top of these two pieces – right sides<br />
together.<br />
Press the seam towards the outer fabric.<br />
Fusing<br />
Fuse the interfacing to the wrong side<br />
of the outer fabric. Alternatively you can<br />
fuse the interfacing to the lining especially<br />
if the outer fabric is pieced or is of a<br />
heavier weight than quilting cotton.<br />
If the ends of the zipper tape are too<br />
long – simply cut them off before you<br />
stitch the fabric tab to the end of the<br />
zipper. If your zipper is too long, cut the<br />
zipper at the length you want and sew<br />
the zipper tab to the end. This will act as<br />
a stopper.<br />
Do the same for other end if it's also too<br />
long.<br />
Lay the remaining edge of the zipper<br />
face down on the right side of the last<br />
piece of outer fabric. Baste the zipper if<br />
you need. Take the lining and lay it on<br />
top of the outer piece. Right sides are<br />
together. The zipper is now sandwiched<br />
between these two layers. Make sure the<br />
zipper is centered along that edge and<br />
that the raw edges of ALL four pieces are<br />
lined up. Carefully stitch through all three<br />
layers using the zipper foot.<br />
Q<br />
30 ●<br />
.com fall 2<strong>01</strong>4<br />
UILTsocial<br />
The unstitched edge of the zipper tape<br />
is lined up with the edge of the second<br />
outer fabric piece. Lay the other piece of<br />
lining on top of these pieces with rights<br />
sides together.


