

QUILTsocial | Issue 01 Fall 2014 Premiere Issue
Premiere issue of the FREE magazine for quilters! Follow our blog at www.QUILTsocial.com for daily tips, techniques, and patterns.
Premiere issue of the FREE magazine for quilters! Follow our blog at www.QUILTsocial.com for daily tips, techniques, and patterns.

Create successful ePaper yourself
Turn your PDF publications into a flip-book with our unique Google optimized e-Paper software.
Quilting the<br />
On-the-<br />
Go<br />
Place-mat<br />
Now that the placemat is all sewn together it’s time to do some<br />
quilting. Some people love the piecing process of a quilt<br />
while others prefer the quilting stage. I enjoy the whole process<br />
and love to see how the piece changes as each step is completed.<br />
I thought about how to quilt the place-mat and decided to keep<br />
it nice and simple with straight lines using the IDT system which<br />
is the built-in walking foot on the Pfaff Quilt Expression 4.2. I<br />
acquired an open toe decorative foot for the machine which will<br />
make it much easier to see my stitching lines and hopefully keep<br />
me going in a straight line. This foot is great for applique and<br />
decorative stitching since it has a large open area in which to see<br />
your work and where you’re stitching. Definitely one of my favorite<br />
feet and a must-have foot with any machine I use.<br />
Sandwiching the Layers for Quilting<br />
The Layers<br />
It isn’t a real sandwich but in quilting it’s called a sandwich of<br />
layers. Sandwich is kind of appropriate though considering this<br />
project is made specifically for picnics and food events.<br />
The layers include the quilt top, or place-mat top in this case, batting<br />
and the backing. I am using a cotton batting which is nice<br />
and thin and will lay flat when quilted. That will make it easier for a<br />
plate to sit on the place-mat. Both the backing and batting need<br />
to be at least an inch larger all the way around than the quilt top<br />
for a small project like this and 2 inches larger all the way around<br />
for a large project. This is just in case there is any movement of the<br />
layers while quilting.<br />
Basting Methods<br />
To prevent movement of these layers when quilting it’s a good<br />
idea to baste them together. I prefer to baste with curved safety<br />
pins made specifically for this purpose and I usually place them<br />
about a fist width apart. Yes, I use a lot of pins and I have a lot of<br />
pins. The other methods that can be used are to spray baste with<br />
a product such as 505 Spray Basting Glue or to hand baste with<br />
thread, which I find is very time consuming.<br />
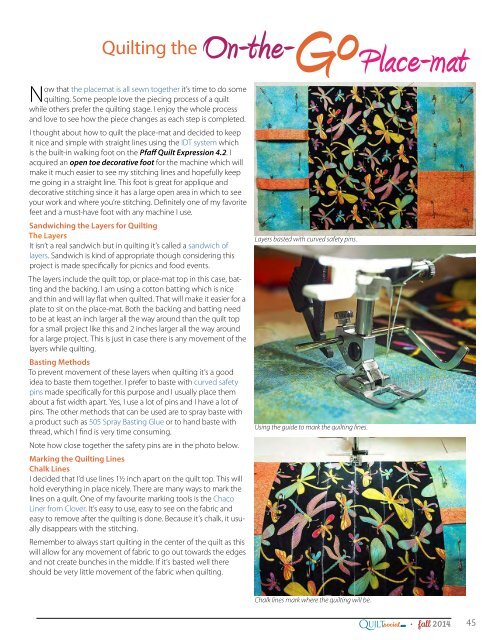
Note how close together the safety pins are in the photo below.<br />
Marking the Quilting Lines<br />
Chalk Lines<br />
I decided that I’d use lines 1½ inch apart on the quilt top. This will<br />
hold everything in place nicely. There are many ways to mark the<br />
lines on a quilt. One of my favourite marking tools is the Chaco<br />
Liner from Clover. It’s easy to use, easy to see on the fabric and<br />
easy to remove after the quilting is done. Because it’s chalk, it usually<br />
disappears with the stitching.<br />
Remember to always start quilting in the center of the quilt as this<br />
will allow for any movement of fabric to go out towards the edges<br />
and not create bunches in the middle. If it’s basted well there<br />
should be very little movement of the fabric when quilting.<br />
Layers basted with curved safety pins.<br />
Using the guide to mark the quilting lines.<br />
Chalk lines mark where the quilting will be.<br />
Q<br />
UILTsocial<br />
.com<br />
●<br />
fall 2<strong>01</strong>4<br />
45


