View the Enertrols Main Catalog featuring industrial shock ...
View the Enertrols Main Catalog featuring industrial shock ...
View the Enertrols Main Catalog featuring industrial shock ...

You also want an ePaper? Increase the reach of your titles
YUMPU automatically turns print PDFs into web optimized ePapers that Google loves.
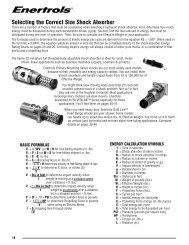
Installation Recommendations and TipsMaking Shock Absorber Adjustments<strong>Enertrols</strong> <strong>shock</strong> absorbers are to be adjusted at installation start up. Shock absorbers are shipped with adjustment preset at90º, which is midway between "hard" and "soft". A properly adjusted <strong>shock</strong> absorber should show no noticeable impact at <strong>the</strong>beginning of <strong>the</strong> deceleration stroke and no hard set-down at <strong>the</strong> end of stroke.1. Starting with a properly sized and installed <strong>shock</strong> absorber.2. Loosen dial lock screw and set to mid range (number 9 on dial).3. Cycle <strong>the</strong> machine and observe: Hard bump end of stroke,adjust in gradual increments to a lower number. Hard bump atbeginning of stroke, adjust in gradual increments to a highernumber. Repeat procedure and adjust until no bump is noticedat ei<strong>the</strong>r end of stroke. In most installations, you will notbe able to see <strong>the</strong> actual deceleration when properly adjusted.4. Lock <strong>the</strong> dial set screw after final adjustment.5. If <strong>the</strong> final adjustment is set less than "2", a larger unit should beconsidered for <strong>the</strong> application.NOTE: Installations with 2 or more <strong>shock</strong>s; adjust simultaneously with final setting <strong>the</strong> same on each.General Installation Tips For All Applications1. Make certain you have properly sized and selected <strong>the</strong> <strong>shock</strong> absorber with appropriate mounting options for <strong>the</strong> application.2. Shock alignment must be set for <strong>the</strong> moving load to strike <strong>the</strong> button or rod squarely. The load contact should strike morethan half of <strong>the</strong> surface of <strong>the</strong> button or rod. Rotary applications refer to Tip number 15.3. The machine structure must be adequate for <strong>the</strong> application. Example: With a flange mount <strong>shock</strong> <strong>the</strong> attaching structureshould be at least as thick as <strong>the</strong> <strong>shock</strong> absorbers flange.4. For models or mounting options that do not include positive stops make certain <strong>the</strong> <strong>shock</strong> absorber piston does notbottom out at end of stroke. The <strong>shock</strong> absorber must be positioned to prevent piston travel 1/32" to 1/16" from bottom.Metric 0.75mm to 1.5mm from bottom stroke.5. Do not short stroke a <strong>shock</strong> absorber. The result will be excessive energy transmitted to <strong>the</strong> machine, overheating andpossible permanent damage <strong>the</strong> <strong>shock</strong> absorber.6. Mounting Stop Collar installations: make sure <strong>the</strong> attaching structure is <strong>the</strong> specified thickness for <strong>the</strong> <strong>shock</strong> installation.Failure may result in short stroke or bottoming out of <strong>the</strong> <strong>shock</strong> absorber.7. Check clearances of moving parts near <strong>the</strong> <strong>shock</strong> absorber to prevent damage.8. Check ambient temperature around <strong>shock</strong>s Over 125º F. or 52º C. Consult factory.9. Check for any foreign material that will affect <strong>the</strong> <strong>shock</strong>, such as chemicals, acids, steam, high degree of weld flash, abrasivedust, etc.10. Do not paint any part of a <strong>shock</strong> absorber. This may cause <strong>the</strong> piston rod to stick, oil to leak or overheating. All resulting inloss of functionality. Remove paint only with a material that will not have an effect on nitrite rubber, polyurethane or any sealingsurfaces.11. Never weld any part of a <strong>shock</strong> absorber.12. Make certain <strong>the</strong> personnel using <strong>the</strong> <strong>shock</strong> understand how <strong>the</strong> dial adjustment indicator works: LOWER NUMBER-moreresistance; HIGHER NUMBER-less resistance.13. If 2 or more <strong>shock</strong>s are used for one deceleration direction, <strong>the</strong> dial setting should be <strong>the</strong> same. Do not use different strokesor manufacturer brands toge<strong>the</strong>r.14. Air cylinders with cushions should be set fully open when used with <strong>shock</strong> absorbers.15. Rotary installations: <strong>shock</strong>s must be mounted to minimize side loads and located so <strong>the</strong>y are perpendicular to <strong>the</strong> rotatingload at mid-stroke. Maximum side load for miniature <strong>shock</strong>s are 3º all o<strong>the</strong>rs are 5º. Poly pads are not recommended to be usedin rotary applications.2723435 Industrial Park Dr., Farmington Hills, MI 48335 • p: 734-595-4500f: 734-595-6410 • customerservice@enertrols.com • www.enertrols.com