CHAPTER 4: SCREENING FOR CERVICAL CANCER
CHAPTER 4: SCREENING FOR CERVICAL CANCER
CHAPTER 4: SCREENING FOR CERVICAL CANCER

Create successful ePaper yourself
Turn your PDF publications into a flip-book with our unique Google optimized e-Paper software.
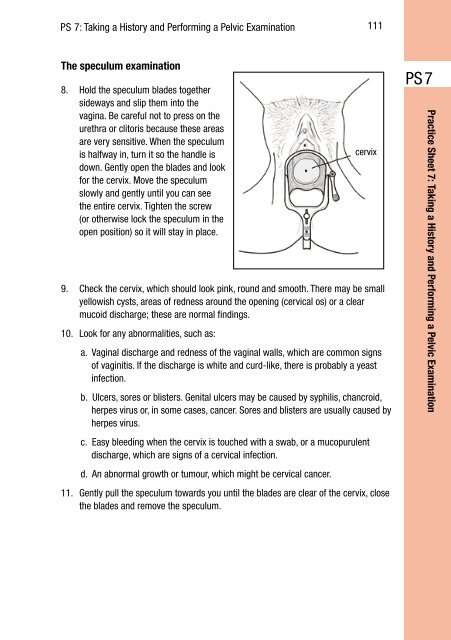
PS 7: Taking a History and Performing a Pelvic Examination111The speculum examination8. Hold the speculum blades togethersideways and slip them into thevagina. Be careful not to press on theurethra or clitoris because these areasare very sensitive. When the speculumis halfway in, turn it so the handle isdown. Gently open the blades and lookfor the cervix. Move the speculumslowly and gently until you can seethe entire cervix. Tighten the screw(or otherwise lock the speculum in theopen position) so it will stay in place.9. Check the cervix, which should look pink, round and smooth. There may be smallyellowish cysts, areas of redness around the opening (cervical os) or a clearmucoid discharge; these are normal findings.10. Look for any abnormalities, such as:a. Vaginal discharge and redness of the vaginal walls, which are common signsof vaginitis. If the discharge is white and curd-like, there is probably a yeastinfection.b. Ulcers, sores or blisters. Genital ulcers may be caused by syphilis, chancroid,herpes virus or, in some cases, cancer. Sores and blisters are usually caused byherpes virus.c. Easy bleeding when the cervix is touched with a swab, or a mucopurulentdischarge, which are signs of a cervical infection.d. An abnormal growth or tumour, which might be cervical cancer.cervix11. Gently pull the speculum towards you until the blades are clear of the cervix, closethe blades and remove the speculum.PS 7Practice Sheet 7: Taking a History and Performing a Pelvic Examination