Armo Tempest Wrap Instructions - Trakker Products
Armo Tempest Wrap Instructions - Trakker Products
Armo Tempest Wrap Instructions - Trakker Products

You also want an ePaper? Increase the reach of your titles
YUMPU automatically turns print PDFs into web optimized ePapers that Google loves.
<strong>Trakker</strong> <strong>Products</strong> Ltd<br />
Unit C5, Nunnery Drive<br />
Parkway Industrial Estate<br />
Sheffield, S2 1TA<br />
Tel: +44 (0)1142 727 783<br />
Fax: +44 (0)1142 725 904<br />
info@trakkerproducts.co.uk<br />
www.trakkerproducts.co.uk<br />
www.trakkerproducts.co.uk TRARM/TPW<br />
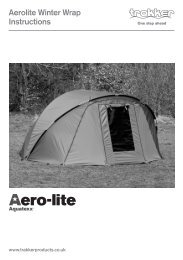
<strong>Armo</strong><br />
<strong>Tempest</strong> <strong>Wrap</strong><br />
<strong>Instructions</strong><br />
Please read these instructions<br />
carefully before using your<br />
<strong>Tempest</strong> <strong>Wrap</strong> for the first time.
<strong>Instructions</strong><br />
Erect your <strong>Tempest</strong> Bivvy in<br />
the normal manner, unfold<br />
your wrap and assemble<br />
the three section pole,<br />
ensuring that all the spigots<br />
are fully inserted.<br />
<strong>Armo</strong> <strong>Tempest</strong> <strong>Wrap</strong> <strong>Instructions</strong> <strong>Armo</strong> <strong>Tempest</strong> <strong>Wrap</strong> <strong>Instructions</strong><br />
Cover the <strong>Tempest</strong> with the<br />
winter wrap, starting by pulling<br />
the back of the wrap over the<br />
front of the bivvy. (Fig. 1)<br />
Pull the elastics over the three<br />
rear central pegs (Fig. 2) and<br />
then come to the front and<br />
peg the front two pegs, either<br />
side of the door in to position.<br />
It helps if the door is in a<br />
closed position while you<br />
peg these points out. (Fig 3).<br />
Fig. 1
<strong>Armo</strong> <strong>Tempest</strong> <strong>Wrap</strong> <strong>Instructions</strong> <strong>Armo</strong> <strong>Tempest</strong> <strong>Wrap</strong> <strong>Instructions</strong><br />
Fig. 2 Fig. 3<br />
Now peg down the base<br />
plates at the ends of the pole,<br />
so as to tension the fabric.<br />
Once this has been done, you<br />
can peg out the rest of the<br />
winter wrap.<br />
If the wrap does not look fully<br />
tensioned, you can readjust<br />
any of the peg points. Also<br />
check that all the spigots in<br />
the poles are inserted fully<br />
and that the pole is not<br />
twisted, re-adjust if necessary.<br />
Please note: Condensation<br />
will form in the single skin<br />
porch area or if the two skins<br />
are allowed to touch.
Storage<br />
Storage is one of the most<br />
important aspects of bivvy care.<br />
Your wrap should be packed<br />
away dry. If packed away wet, it<br />
should be dried within 24-hours<br />
of returning from your session.<br />
If the wrap is left wet, mildew<br />
will form, which can severely<br />
damage the material and tape<br />
seals. It is worth checking your<br />
wrap frequently for signs of wear<br />
and tear, which may require<br />
attention.<br />
Remember: Store your wrap in a<br />
cool dry place away from sources<br />
of heat. The carry bag should be<br />
left unzipped if stored for<br />
extended periods.<br />
Reproof with Fabsil Gold at<br />
least once annually (available<br />
from the <strong>Trakker</strong> website: www.<br />
trakkerproducts.co.uk). Cleaning<br />
and reproofing your wrap will<br />
strengthen the fabric and improve<br />
its ability to repel water.<br />
<strong>Armo</strong> <strong>Tempest</strong> <strong>Wrap</strong> <strong>Instructions</strong> <strong>Armo</strong> <strong>Tempest</strong> <strong>Wrap</strong> <strong>Instructions</strong><br />
Cleaning<br />
Never use detergents on your<br />
wrap and instead use warm water<br />
and then dry thoroughly in the<br />
shade.<br />
– Do not use detergents to clean<br />
as they may harm the proofing.<br />
– Never machine wash or<br />
tumble dry.<br />
– Avoid contact with abrasive<br />
scrubbing agents/cloths.<br />
– Avoid contact with fuel, oil<br />
and chemicals. Your warranty<br />
does not cover contact with<br />
the aforementioned agents/<br />
chemicals.<br />
Zips<br />
<strong>Trakker</strong> endeavour to use the<br />
best zips available to ensure<br />
optimum performance. Zip<br />
performance can be hindered<br />
by mud or dirt. If you encounter<br />
a problem, do not force the zip<br />
as you risk damaging the teeth.<br />
Clean with soapy water and then<br />
rinse thoroughly. It is worthwhile<br />
periodically spraying your zippers<br />
with a purpose designed silicone<br />
zipper spray.<br />
Warranty<br />
All <strong>Trakker</strong> shelters and wraps<br />
are covered by a 12-Month<br />
Manufacturer Warranty supplied<br />
as standard. The warranty runs<br />
from the date of purchase and<br />
covers replacement at our<br />
expense and discretion (with the<br />
same or similar model from our<br />
current range) or repair including<br />
parts and labour in the event of<br />
a manufacturing fault appearing<br />
with your shelter. Your warranty<br />
cover excludes faults arising from<br />
misuse, incorrect or negligent<br />
repairs or “Acts of God”. Fabric<br />
damaged caused by mildew,<br />
incorrect washing or improper<br />
storage is not covered by the<br />
<strong>Trakker</strong> warranty.<br />
This guarantee is only valid<br />
when used for recreational<br />
purposes, not including<br />
commercial usage i.e. hiring, use<br />
by outdoor centres etc. Please<br />
ensure that all products are clean<br />
and dry prior to being returned.<br />
No consequential loss may be<br />
claimed under this guarantee.<br />
Your warranty is provided in<br />
addition to any statutory rights.<br />
For more information on products<br />
and a full list of retailers, checkout<br />
www.trakkerproducts.co.uk