MicroLogix 1400 Programmable Controllers
MicroLogix 1400 Programmable Controllers
MicroLogix 1400 Programmable Controllers
- No tags were found...

Create successful ePaper yourself
Turn your PDF publications into a flip-book with our unique Google optimized e-Paper software.
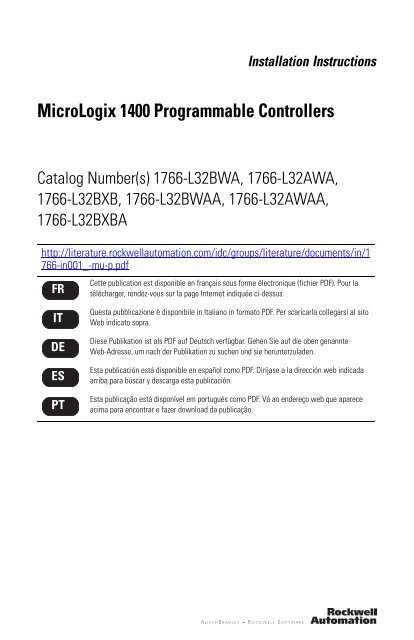
Installation Instructions<strong>MicroLogix</strong> <strong>1400</strong> <strong>Programmable</strong> <strong>Controllers</strong>Catalog Number(s) 1766-L32AWA, 1766-L32AWAA,1766-L32BWA, 1766-L32BWAA, 1766-L32BXB,1766-L32BXBATopicPageImportant User Information 4Additional Resources 7Overview 8Controller Description 9Hazardous Location Considerations 11Mount the Controller 13Connect 1762 I/O Expansion Modules 18Wire the Controller 20Specifications 27
4 <strong>MicroLogix</strong> <strong>1400</strong> <strong>Programmable</strong> <strong>Controllers</strong>Important User InformationSolid state equipment has operational characteristics differing from those of electromechanical equipment.Safety Guidelines for the Application, Installation and Maintenance of Solid State Controls (PublicationSGI-1.1 available from your local Rockwell Automation sales office or online athttp://literature.rockwellautomation.com) describes some important differences between solid stateequipment and hard-wired electromechanical devices. Because of this difference, and also because of thewide variety of uses for solid state equipment, all persons responsible for applying this equipment mustsatisfy themselves that each intended application of this equipment is acceptable.In no event will Rockwell Automation, Inc. be responsible or liable for indirect or consequential damagesresulting from the use or application of this equipment.The examples and diagrams in this manual are included solely for illustrative purposes. Because of the manyvariables and requirements associated with any particular installation, Rockwell Automation, Inc. cannotassume responsibility or liability for actual use based on the examples and diagrams.No patent liability is assumed by Rockwell Automation, Inc. with respect to use of information, circuits,equipment, or software described in this manual.Reproduction of the contents of this manual, in whole or in part, without written permission of RockwellAutomation, Inc., is prohibited.Throughout this manual, when necessary, we use notes to make you aware of safety considerations.WARNINGIdentifies information about practices or circumstances that can cause an explosion ina hazardous environment, which may lead to personal injury or death, propertydamage, or economic loss.IMPORTANTATTENTIONIdentifies information that is critical for successful application and understanding ofthe product.Identifies information about practices or circumstances that can lead to personal injuryor death, property damage, or economic loss. Attentions help you identify a hazard,avoid a hazard and recognize the consequences.SHOCK HAZARDLabels may be on or inside the equipment (for example, drive or motor) to alert peoplethat dangerous voltage may be present.BURN HAZARDLabels may be on or inside the equipment (for example, drive or motor) to alert peoplethat surfaces may reach dangerous temperatures.Publication 1766-IN001A-EN-P - July 2008
<strong>MicroLogix</strong> <strong>1400</strong> <strong>Programmable</strong> <strong>Controllers</strong> 7Additional ResourcesResource<strong>MicroLogix</strong> <strong>1400</strong> <strong>Programmable</strong> <strong>Controllers</strong> UserManual 1766-UM001<strong>MicroLogix</strong> <strong>1400</strong> Instruction Set ReferenceManual1766-RM001Installation Instructions 1762-INxxxIndustrial Automation Wiring and GroundingGuidelines 1770-4.1DescriptionA more detailed description of how to install and useyour <strong>MicroLogix</strong> <strong>1400</strong> programmable controller andexpansion I/O system.A reference manual that contains data and functionfiles, instruction set, and troubleshooting informationfor <strong>MicroLogix</strong> <strong>1400</strong>.Information on installing and using 1762 expansion I/Omodules.More information on proper wiring and groundingtechniques.If you would like a manual, you can:• download a free electronic version from the internet:http://literature.rockwellautomation.com• purchase a printed manual by contacting your local Allen-Bradley distributor orRockwell Automation representativePublication 1766-IN001A-EN-P - July 2008
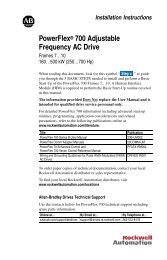
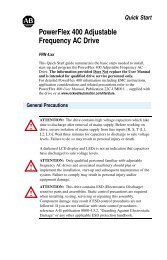
<strong>MicroLogix</strong> <strong>1400</strong> <strong>Programmable</strong> <strong>Controllers</strong> 9Controller Description12 3 45 6 71ESCOK4451413 1211109844515Left side viewTop viewDescription1 Comm port 2 - 9-pin D-Shell RS-232C connector2 Memory module (refer to <strong>MicroLogix</strong> <strong>1400</strong> Memory Module Installation Instructions, publication1766-IN010A for instructions on installing the memory module).3 User 24V (for 1766-L32BWA and 1766-L32BWAA only)4 Input terminal block5 LCD Display Keypad (ESC, OK, Up, Down, Left, Right)6 Battery compartment7 1762 expansion bus connector8 Battery connector9 Output terminal block10 LCD Display11 Indicator LED panel12 Comm port 1 - RJ45 connector13 Comm port 0 - 8-pin mini DIN RS-232C/RS-485 connectorPublication 1766-IN001A-EN-P - July 2008
10 <strong>MicroLogix</strong> <strong>1400</strong> <strong>Programmable</strong> <strong>Controllers</strong>Controller Input and Output DescriptionCatalogNumberDescriptionInputPowerUserPowerEmbeddedDiscrete I/OEmbeddedAnalog I/OComm.Ports1766-L32BWA1766-L32AWA1766-L32BXB1766-L32BWAA1766-L32AWAA1766-L32BXBA100/240V AC24 V DC100/240V AC24V DC24V DCNone24V DCNone12 Fast 24V DC Inputs8 Normal 24V DC Inputs12 Relay Outputs20 120V AC Inputs12 Relay Outputs12 Fast 24V DC Inputs8 Normal 24V DC Inputs6 Relay Outputs3 Fast DC Outputs3 Normal DC Outputs12 Fast 24V DC Inputs8 Normal 24V DC Inputs12 Relay Outputs20 120V AC Inputs12 Relay Outputs12 Fast 24V DC Inputs8 Normal 24V DC Inputs6 Relay Outputs3 Fast DC Outputs3 Normal DC OutputsNone4 Voltage Inputs2 VoltageOutputs1 RS232/RS485 (1)1 Ethernet/IP1 RS232 (2)(1)Isolated RS-232/RS-485 combo port. Same as ML1100 Comm 0(2) Non-isolated RS-232. Standard D-sub connectorPublication 1766-IN001A-EN-P - July 2008
<strong>MicroLogix</strong> <strong>1400</strong> <strong>Programmable</strong> <strong>Controllers</strong> 11Hazardous Location ConsiderationsThis equipment is suitable for use in Class I, Division 2, Groups A, B, C, D or non-hazardouslocations only. The following WARNING statement applies to use in hazardous locations.WARNINGEXPLOSION HAZARD• Substitution of components may impair suitability for Class I, Division 2.• Do not replace components or disconnect equipment unless power has been switchedoff.• Do not connect or disconnect components unless power has been switched off.• This product must be installed in an enclosure. All cables connected to the productmust remain in the enclosure or be protected by conduit or other means.• All wiring must comply with N.E.C. article 501-10(b) and/or in accordance withSection 18-1J2 of the Canadian Electrical Code, and in accordance with the authorityhaving jurisdiction.Use only the following communication cables in Class I, Division 2 hazardous locations.Environment ClassificationClass I, Division 2 Hazardous EnvironmentCommunication Cables1761-CBL-AC00 Series C or later1761-CBL-AM00 Series C or later1761-CBL-AP00 Series C or later1761-CBL-PM02 Series C or later1761-CBL-HM02 Series C or later2707-NC9 Series C or later1763-NC01 Series A or later1747-CP3 SeriesPublication 1766-IN001A-EN-P - July 2008
12 <strong>MicroLogix</strong> <strong>1400</strong> <strong>Programmable</strong> <strong>Controllers</strong>Environnements dangereuxCet équipement est conçu pour une utilisation en environnements dangereux de Classe I,Division 2, Groupes A, B, C, D ou non dangereux. La mise en garde suivante s’applique àutilisation en environnements dangereux.WARNINGDANGER D’EXPLOSION• La substitution de composants peut rendre cet équipement impropre à une utilisationen environnement de Classe I, Division 2.• Ne pas remplacer de composants ou déconnecter l’équipement sans s’être assuré quel’alimentation est coupée.• Ne pas connecter ou déconnecter des composants sans s’être assuré quel’alimentation est coupée.• Ce produit doit être installé dans une armoire. Tous les câbles connectés à l’appareildoivent rester dans l’armoire ou être protégés par une goulotte ou tout autre moyen.• L’ensemble du câblage doit être conforme à la réglementation en vigueur dans lespays où l’appareil est installé.Utilisez uniquement les câbles de communication suivants dans les environnementsdangereux de Classe I, Division 2.Classification des environnementsEnvironnement dangereux de Classe I, Division 2Câbles de communication1761-CBL-AC00 série C ou ultérieure1761-CBL-AM00 série C ou ultérieure1761-CBL-AP00 série C ou ultérieure1761-CBL-PM02 série C ou ultérieure1761-CBL-HM02 série C ou ultérieure2707-NC9 série C ou ultérieure1763-NC01 série A ou ultérieuresérie 1747-CP3ATTENTIONUNSUPPORTED CONNECTIONDo not connect the Comm0 port on the <strong>MicroLogix</strong> <strong>1400</strong> controller to another <strong>MicroLogix</strong>family controller such as <strong>MicroLogix</strong> 1000, <strong>MicroLogix</strong> 1200, or <strong>MicroLogix</strong> 1500 using a1761-CBL-AM00 (8-pin mini-DIN to 8-pin mini-DIN) cable or equivalent.This type of connection will cause damage to the RS-232/485 communication port(Channel 0) of the <strong>MicroLogix</strong> <strong>1400</strong> and/or the controller itself. Communication pins usedfor RS-485 communications are alternately used for 24V power on the other <strong>MicroLogix</strong>controllers.Publication 1766-IN001A-EN-P - July 2008
<strong>MicroLogix</strong> <strong>1400</strong> <strong>Programmable</strong> <strong>Controllers</strong> 13Mount the ControllerGeneral ConsiderationsMost applications require installation in an industrial enclosure to reduce the effects ofelectrical interference and environmental exposure. Locate your controller as far as possiblefrom power lines, load lines, and other sources of electrical noise such as hard-contactswitches, relays, and ac motor drives. For more information on proper grounding guidelines,see the Industrial Automation Wiring and Grounding Guidelines, publication 1770-4.1.ATTENTIONMount the controller horizontally only. Vertical mounting is not supported due tothermal considerations.ATTENTIONBe careful of metal chips when drilling mounting holes for your controller orother equipment within the enclosure or panel. Drilled fragments that fall intothe controller could cause damage. Do not drill holes above a mounted controllerif the protective debris strips have been removed.WARNINGDo not place the MLX<strong>1400</strong> <strong>Programmable</strong> Controller in direct sunlight.Prolonged exposure to direct sunlight could degrade the LCD display.WARNINGThe local programming terminal port is intended for temporary use only andmust not be connected or disconnected unless the area is assured to benonhazardous.Publication 1766-IN001A-EN-P - July 2008
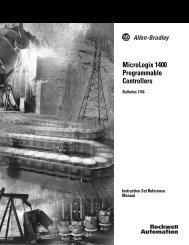
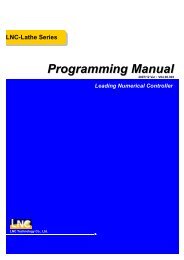
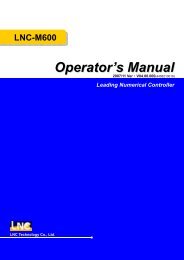
14 <strong>MicroLogix</strong> <strong>1400</strong> <strong>Programmable</strong> <strong>Controllers</strong>Mounting DimensionsCAB445161766-L32BWA, 1766-L32AWA, 1766-L32BXB,1766-L32BWAA, 1766-L32AWAA, 1766-L32BXBADimensionABCHeight90 mm (3.5 in.)180 mm (7.087 in.)87 mm (3.43 in.)Controller SpacingThe controller mounts horizontally, with the expansion I/O extending to the right of thecontroller. Allow 50 mm (2 in.) of space on all but the right side for adequate ventilation, asshown below.TopESCSideOKBottom44517Publication 1766-IN001A-EN-P - July 2008
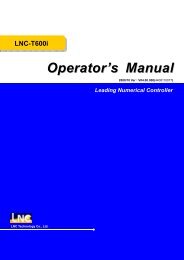
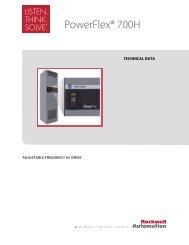
<strong>MicroLogix</strong> <strong>1400</strong> <strong>Programmable</strong> <strong>Controllers</strong> 15DIN Rail MountingThe maximum extension of the latch is 14 mm (0.55 in.) in the open position. A flat-bladescrewdriver is required for removal of the controller. The controller can be mounted toEN50022-35x7.5 or EN50022-35x15 DIN rails. DIN rail mounting dimensions are shownbelow..BAC44518DimensionABCHeight90 mm (3.5 in.)27.5 mm (1.08 in.)27.5 mm (1.08 in.)Follow these steps to install your controller on the DIN rail.1. Mount your DIN rail. Make sure that the placement of the controller on the DIN railmeets the recommended spacing requirements (see Controller Spacing on page 14for more information). Refer to the mounting template inside the back cover of thisdocument.2. If it is open, close the DIN latch.3. Hook the top slot over the DIN rail.4. While pressing the controller down against the top of the rail, snap the bottom of thecontroller into position.5. Leave the protective debris strip attached until you are finished wiring the controllerand any other devices.Follow these steps to remove your controller from the DIN rail.1. Place a flat-blade screwdriver in the DIN rail latch at the bottom of the controller.Publication 1766-IN001A-EN-P - July 2008
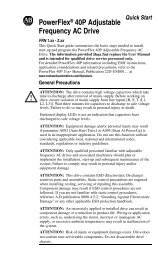
ESCOK16 <strong>MicroLogix</strong> <strong>1400</strong> <strong>Programmable</strong> <strong>Controllers</strong>2. Holding the controller, pry downward on the latch until the latch locks in the openposition.3. Repeat steps 1 and 2 for the second DIN rail latch.4. Unhook the top of the DIN rail slot from the rail.OpenClosed4451944520Panel MountingMount to panel using #8 or M4 screws. Follow these steps to install your controller usingmounting screws.1. Remove the mounting template from inside the back cover of this document.2. Secure the template to the mounting surface. Make sure your controller is spacedproperly (see Controller Spacing on page 14 for more information).3. Drill holes through the template.4. Remove the mounting template.Mounting Template5. Mount the controller.6. Leave the protective debris stripin place until you are finishedwiring the controller and anyother devicesESCOK44521Publication 1766-IN001A-EN-P - July 2008
<strong>MicroLogix</strong> <strong>1400</strong> <strong>Programmable</strong> <strong>Controllers</strong> 17Using the BatteryThe <strong>MicroLogix</strong> <strong>1400</strong> controller is equipped with a replaceable battery (catalog number1747-BA). The Battery Low indicator on the LCD display of the controller shows the statusof the replaceable battery. When the battery is low, the indicator is set (displayed as a solidrectangle). This means that either the battery wire connector is disconnected, or the batterymay fail within 2 days if it is connected.IMPORTANTThe <strong>MicroLogix</strong> <strong>1400</strong> controller ships with the battery wire connector connected.Ensure that the battery wire connector is inserted into the connector port if yourapplication needs battery power. For example, when using a real-time clock(RTC).Replacing the battery when the controller is powered down will lose all userapplication memory. Replace the battery when the controller is powered on.Refer to the SLC 500 Lithium Battery Installation Instructions, publication1747-IN515, for more information on installation, handling, usage, storage, anddisposal of the battery.WARNINGWhen you connect or disconnect the battery an electrical arc can occur. Thiscould cause an explosion in hazardous location installations. Be sure that thearea is nonhazardous before proceeding.For Safety information on the handling of lithium batteries, including handlingand disposal of leaking batteries, see Guidelines for Handling Lithium Batteries,publication AG 5-4.Follow these steps to connect the replaceable battery.1. Insert the replaceable battery wire connector into the controller’s battery connector.Publication 1766-IN001A-EN-P - July 2008
18 <strong>MicroLogix</strong> <strong>1400</strong> <strong>Programmable</strong> <strong>Controllers</strong>2. Secure the battery connector wires so that it does not block the 1762 expansion busconnector as shown below.Battery compartment1762 I/Oexpansion busconnectorBattery wireconnectorBattery connectorBattery wirestwisted pair44522Connect 1762 I/O Expansion ModulesATTENTIONRemove power from the system before installing or removing expansion I/O or damage tothe controller may result.Connect 1762 I/O after mounting the controller.1. Remove the expansion port cover to install expansion I/O modules.2. Plug the ribbon cable connector into the bus connector.Publication 1766-IN001A-EN-P - July 2008
<strong>MicroLogix</strong> <strong>1400</strong> <strong>Programmable</strong> <strong>Controllers</strong> 193. Replace the cover as shown below.44523The <strong>MicroLogix</strong> <strong>1400</strong> controller is designed to support up to any seven 1762 expansion I/Omodules.For detailed information on using expansion I/O, refer to the installation instructions foryour expansion module.Publication 1766-IN001A-EN-P - July 2008
20 <strong>MicroLogix</strong> <strong>1400</strong> <strong>Programmable</strong> <strong>Controllers</strong>Wire the ControllerTerminal Block LayoutsWARNINGWhen you connect or disconnect the Removable Terminal Block (RTB) with fieldside power applied, an electrical arc can occur. This could cause an explosion inhazardous location installations. Be sure that power is removed or the area isnonhazardous before proceeding.WARNINGWhen used in a Class I, Division 2, hazardous location, this equipment must bemounted in a suitable enclosure. All wiring must be in accordance with Class I,Division 2 wiring methods of Article 501 of the National Electrical Code and/orin accordance with Section 18-1J2 of the Canadian Electrical Code, and inaccordance with the authority having jurisdiction.TIPThe shading in the following terminal block illustrations indicates whichterminals are tied to which commons.1766-L32BWA/L32BWAAInput Terminal Block+24 V COM +24 V DCIN0IN2COM 1IN5IN7IN8IN10COM 3 IN13 IN15 IN17 IN19IV0(+)IV2(+)COM 0IN1IN3IN4 IN6 COM 2IN9IN11IN12 IN14 IN16 IN18 COMANAIV1(+)IV3(+)VACL1VACL2/NOUT0 OUT1 OUT2 OUT3 OUT4VACDC5OUT7 OUT8 OUT10COMANAOV1DC0VACDC1VACDC2VACDC3VACDC4VACOUT5OUT6 DC6 OUT9 OUT11 OV0VACOutput Terminal Block44524Publication 1766-IN001A-EN-P - July 2008
<strong>MicroLogix</strong> <strong>1400</strong> <strong>Programmable</strong> <strong>Controllers</strong> 211766-L32AWA/L32AWAAInput Terminal BlockIN0IN2COM 1IN5IN7IN8IN10COM 3 IN13 IN15 IN17 IN19IV0(+)IV2(+)COM 0IN1IN3IN4 IN6 COM 2IN9IN11IN12 IN14 IN16 IN18 COMANAIV1(+)IV3(+)VACL1VACL2/NOUT0 OUT1 OUT2 OUT3 OUT4VACDC5OUT7 OUT8 OUT10COMANAOV1DC0VACDC1VACDC2VACDC3VACDC4VACOUT5OUT6 DC6 OUT9 OUT11 OV0VACOutput Terminal Block 445251766-L32BXB/L32BXBAInput Terminal BlockIN0IN2COM 1IN5IN7IN8IN10COM 3 IN13 IN15 IN17 IN19IV0(+)IV2(+)COM 0IN1IN3IN4 IN6 COM 2IN9IN11IN12 IN14 IN16 IN18 COMANAIV1(+)IV3(+)VDC+24VDCNEUTOUT0 OUT1 OUT2 OUT4 OUT6COM 2OUT8 OUT9 OUT10COMANAOV1DC0VACDC1VACDC1VDC2OUT3OUT5OUT7DC3VACDC4VACDC5VACOUT11OV0Output Terminal Block 44526Wire TypeWire SizeSolid wire Cu-90°C (194°F) 14...22 AWGStranded wire Cu-90°C (194°F) 16...22 AWGWiring torque = 0.791Nm (7 in-lb) rated.Publication 1766-IN001A-EN-P - July 2008
22 <strong>MicroLogix</strong> <strong>1400</strong> <strong>Programmable</strong> <strong>Controllers</strong>WARNINGIf you connect or disconnect wiring while the field-side power is on, an electricalarc can occur. This could cause an explosion in hazardous location installations.Be sure that power is removed or the area is nonhazardous before proceedingWARNINGThe local programming terminal port is intended for temporary use only andmust not be connected or disconnected unless the area is assured to benonhazardous.Wiring RecommendationWhen wiring without spade lugs, keep the finger-safe covers in place. Loosen the terminalscrew and route the wires through the opening in the finger-safe cover. Tighten the terminalscrew, making sure the pressure plate secures the wire.Finger-safe cover44527ATTENTIONBe careful when stripping wires. Wire fragments that fall into the controllercould cause damage. Once wiring is complete, be sure the controller is free ofall metal fragments before removing the protective debris strip. Failure toremove the strip before operating can cause overheating.Publication 1766-IN001A-EN-P - July 2008
<strong>MicroLogix</strong> <strong>1400</strong> <strong>Programmable</strong> <strong>Controllers</strong> 23Spade Lug RecommendationThe diameter of the terminal screw head is 5.5 mm (0.220 in.). The input and outputterminals of the <strong>MicroLogix</strong> <strong>1400</strong> controller are designed for the following spade lugs. Theterminals will accept a 6.35mm (0.25 in.) wide spade (standard for #6 screw for up to 14AWG) or a 4 mm (metric #4) fork terminal.When using spade lugs, use a small, flat-blade screwdriver to pry the finger-safe cover fromthe terminal blocks, then loosen the terminal screw.Finger-safe cover44528TIPIf you wire the terminal block with the finger-safe cover removed, you may notbe able to put it back on the terminal block if the wires are in the way.Surge SuppressionATTENTIONInductive load devices such as motor starters and solenoids require the use ofsome type of surge suppression to protect the controller output. Switchinginductive loads without surge suppression can significantly reduce the life ofrelay contacts or damage transistor outputs. By using suppression, you alsoreduce the effects of voltage transients caused by interrupting the current tothat inductive device, and prevent electrical noise from radiating into systemwiring. Refer to the <strong>MicroLogix</strong> <strong>1400</strong> <strong>Programmable</strong> Controller User Manual,publication 1766-UM001, for more information on surge suppression.Publication 1766-IN001A-EN-P - July 2008
24 <strong>MicroLogix</strong> <strong>1400</strong> <strong>Programmable</strong> <strong>Controllers</strong>Grounding the ControllerIn solid-state control systems, grounding and wire routing helps limit the effects of noise dueto electromagnetic interference (EMI). Run the ground connection from the ground screw ofthe controller to the ground bus prior to connecting any devices. Use AWG #14 wire. ForAC-powered controllers, this connection must be made for safety purposes.You must also provide an acceptable grounding path for each device in your application. Formore information on proper grounding guidelines, refer to the Industrial Automation Wiringand Grounding Guidelines, publication 1770-4.1.Wiring Your Analog ChannelsAnalog input circuits can monitor voltage signals and convert them to serial digital data asshown in the following illustration.Analog InputSensor 2(V) VoltageSensor 0(V) VoltageInput Terminal Block/7I/8 I/10COM 3 I/13 I/15 I/17 I/19IV0(+)IV2(+)COM 2I/9 I/11I/12 I/14 I/16 I/18 COMANAIV1(+)IV3(+)Sensor 1(V) VoltageSensor 3(V) Voltage44529Publication 1766-IN001A-EN-P - July 2008
<strong>MicroLogix</strong> <strong>1400</strong> <strong>Programmable</strong> <strong>Controllers</strong> 25The controller does not provide loop power for analog inputs. Use a power supply thatmatches the transmitter specifications as shown.The analog output can support a voltage function as shown in the following illustration.Analog OutputVoltage LoadO/3 O/4VACDC5O/7 O/8 O/10COMANAOV13CDC4VACO/5O/6 DC6 O/9 O/11 OV0VACOutput Terminal BlockVoltage Load44680Analog Input Transmitter Specifications2-Wire Transmitter+-Transmitter+ -ControllerIV0(+), IV1(+), IV2(+) or IV3(+)COM ANA3-Wire TransmitterPowerSupplyTransmitterSupply SignalGNDController+IV0(+), IV1(+), IV2(+) or IV3(+)- COM ANA4-Wire TransmitterPower +Supply -Supply+-TransmitterSignal+-ControllerIV0(+), IV1(+), IV2(+) or IV3(+)COM ANA44530Publication 1766-IN001A-EN-P - July 2008
26 <strong>MicroLogix</strong> <strong>1400</strong> <strong>Programmable</strong> <strong>Controllers</strong>Minimizing Electrical Noise on Analog ChannelsInputs on analog channels employ digital high-frequency filters that significantly reduce theeffects of electrical noise on input signals. However, because of the variety of applications andenvironments where analog controllers are installed and operated, it is impossible to ensurethat all environmental noise will be removed by the input filters.Several specific steps can be taken to help reduce the effects of environmental noise onanalog signals:• Install the <strong>MicroLogix</strong> <strong>1400</strong> system in a properly rated (NEMA) enclosure. Make surethat the <strong>MicroLogix</strong> <strong>1400</strong> system is properly grounded.• Use Belden cable #8761 for wiring the analog channels, making sure that the drainwire and foil shield are properly earth grounded, (see Grounding Your Analog Cableon page 26 for more information).• Route the Belden cable separately from any AC wiring. Additional noise immunity canbe obtained by routing the cables in grounded conduit.Grounding Your Analog CableUse shielded communication cable(Belden #8761). The Belden cablehas two signal wires (black andclear), one drain wire, and a foilshield. The drain wire and foilshield must be grounded at oneend of the cable.InsulationFoil ShieldBlack WireDrain WireClear Wire44531IMPORTANTDo not ground the drain wire and foil shield at both ends of the cable.Publication 1766-IN001A-EN-P - July 2008
<strong>MicroLogix</strong> <strong>1400</strong> <strong>Programmable</strong> <strong>Controllers</strong> 27SpecificationsGeneral SpecificationsDescription 1766-L32AWAA 1766-L32BWAA 1766-L32BXBADimensionsHxWxDShipping weightNumber of I/O90 x 180 x 87 mm3.5 x 7.087 x 3.43 in.0.9 kg (2.0 lbs)24 inputs (20 digital and 4 analog) and 14 outputs (12 digital and 2 analog)Power supply voltage 100...240V AC (-15%, +10%) at 47...63 Hz 24V DC (-15%, +10%)Class 2 SELVHeat dissipation Refer to the <strong>MicroLogix</strong> <strong>1400</strong> <strong>Programmable</strong> <strong>Controllers</strong> User Manual,Publication 1766-UM001.Power supply inrushcurrent120V AC: 25 A for 8 ms240V AC: 40A for 4 msPower consumption 100 VA 120 VA 50W24V DC sensor power none 24V DC at 250 mA none400 µF max.24V DC:15 A for 20 msInput circuit type Digital: 120V ACAnalog: 0...10V DCDigital: 24V DCsink/source(standard and high-speed)Analog: 0...10V DCDigital: 24V DCsink/source(standard and high-speed)Analog: 0...10V DCOutput circuit type Relay Relay/FETEnclosure type rating None (open-style)Wire size 0.25... 2.5 mm 2 (22...14 AWG) solid or stranded copper wire rated at 90 °C(194 °F ) or greater.Wiring category (1) 2 - on signal ports2 - on power ports3 - on communications portsTerminal screw torque 0.79 Nm (7.0 in-lb) ratedPilot duty ratingR300, C300Expansion bus Supports up to seven 1762 modules, up to a maximum of 5V, 1500 mA and 24 V,1500 mA.North American temp T3Ccode(1)Use this Conductor Category information for planning conductor routing. Refer to Industrial Automation Wiring andGrounding Guidelines, publication 1770-4.1.Publication 1766-IN001A-EN-P - July 2008
28 <strong>MicroLogix</strong> <strong>1400</strong> <strong>Programmable</strong> <strong>Controllers</strong>Specifications for InputsDigital InputsDescription 1766-L32AWA/A 1766-L32BWA/A, 1766-L32BXB/AOn-state voltagerangeOff-state voltagerangeOperatingfrequencyOn-state currentMininumNominalMaximumOff-StateLeakage CurrentNominalImpedanceInrush Current(max.) at 120V ACInputs 0 through 11(12 high-speed DC inputs)79 ...132 V AC 4.5...24V DC, Class 2(4.5...26.4V DC @ 65°C/149°F)(4.5...30V DC @ 30°C/86°F)0...20 V AC 0...1.5V DC 0...5V DCInputs 12 and higher(8 standard DC inputs)10...24V DC, Class 2(10...26.4V DC @ 65°C/149°F)(10...30V DC @ 30°C/86°F)47...63 Hz 0 Hz...100 kHz 0 Hz...1 kHz(scan time dependent)5.0 mA @ 79 V AC12 mA @ 120 V AC16.0 mA @ 132 V AC7.1 mA @ 4.5V DC9.9 mA @ 24V DC10.5 mA @ 30V DC3.2 mA @ 10V DC5.3 mA @ 24V DC5.5 mA @ 30V DC2.5 mA max. 0.2 mA max. 1.5 mA max.12 kΩ at 50 Hz10 kΩ at 60 Hz250mA2.4 kΩ 4.5 kΩAnalog InputsDescription1766-L32AWAA, -L32BWAA, -L32BXBAVoltage Input Range0 ...10.0V DC - 1 LSBType of Data12-bit unsigned integerInput Coding (0 to 10.0V DC - 1 LSB) 0 ...4,095Voltage Input Impedance>199 kΩInput Resolution12 bitNon-linearity±1.0% of full scaleOverall accurarcy±1.0% of full scale-20...+65 °C (-4...+149 °F)Voltage input overvoltage protectionField wiring to logic isolation10.5 V DCNon-isolated with internal logicPublication 1766-IN001A-EN-P - July 2008
<strong>MicroLogix</strong> <strong>1400</strong> <strong>Programmable</strong> <strong>Controllers</strong> 29Analog OutputsDescription1766-L32AWAA, -L32BWAA, -L32BXBANumber of inputs2 single-endedVoltage output range0...10 V DC - 1 LSBType of data12 bit unsigned integerStep response 2.5 ms @ 95%Load rangeVoltage output1 KΩOutput resolution12 bitAnalog output setting time3 ms (max.)Overall Accurarcy-20...65 °C (-4...149 °F) ±1.0% of full scaleElectrical isolationCable lengthNon-isolated with internal logic30 m (98 ft) shielded cablePublication 1766-IN001A-EN-P - July 2008
30 <strong>MicroLogix</strong> <strong>1400</strong> <strong>Programmable</strong> <strong>Controllers</strong>Specifications for Outputs in Hazardous Locations(Class 1, Division 2, Groups A, B, C, D)Relay and FET OutputsDescription1766-L32AWA/A,1766-L32BWA/A1766-L32BXB/AMaximum Controlled Load 1440 VA 1080 VAMaximum Continuous Current:Current per Channel and Group Common 2.5 A per channel8A max channel 8...11 common2.5 A per channelCurrent per Controller at 150V max 28 A or total of per-point loads,whichever is lessat 240V max 20 A or total of per-point loads,whichever is lessRelay OutputsDescription1766-L32AWA/A, 1766-L32BWA/A, 1766-L32BXB/ATurn On Time/Turn Off Time 10 msec (maximum) (1)Load Current10 mA (minimum)(1)Scan time dependentMaximum Volts Amperes Amperes Volt-AmperesMake BreakContinuousMake Break240V AC 7.5 A 0.75 A 3.0 A 1800 VA 180 VA120V AC 15.0 A 1.5 A 3.0 A 1800 VA 180 VA250V DC 0.11 A 1.0 A 28 VA125V DC 0.22 A 1.0 A 28 VAPublication 1766-IN001A-EN-P - July 2008
<strong>MicroLogix</strong> <strong>1400</strong> <strong>Programmable</strong> <strong>Controllers</strong> 31Specifications for Outputs in (Non-Hazardous) Locations only1766-L32BXB, 1766-L32BXBA FET OutputMaximum Output Current (temperature dependent):FET Current per PointFET Total Current2.08.01.751.51.5A, 30°C (86°F)7.06.06.0A , 30°C (86°F)1.255.0Current (Amps)1.00.750.50.25ValidRange0.75A, 60°C (140°F)Current (Amps)4.03.02.01.0ValidRange3.0A , 60°C (140°F)10°C(50°F)30°C 50°C(86°F) (122°F)Temperature70°C(158°F)80°C(176°F)10°C(50°F)30°C(86°F)50°C(122°F)70°C(158°F)80°C(176°F)Temperature44532 44533Description General Operation High Speed Operation (1)Power Supply Voltage 24V DC (-15%, 10%) Class 2On-State Voltage Drop:at maximum load currentat maximum surge currentCurrent Rating per Pointmaximum loadminimum loadmaximum leakageSurge Current per Point:peak currentmaximum surge durationmaximum rate of repetition at 30 °C (86 °F)maximum rate of repetition at 65 °C (149 °F)1V DC2.5V DCSee graphs below1.0 mA1.0 mA4.0 A10 msonce every secondonce every 2 seconds(Output 2, 3 and 4 Only)Not ApplicableNot Applicable100 mA20 mA1.0 mATurn-On Time (maximum) 11 μs 28 nsTurn-Off Time (maximum) 89 μs 2.3 μsNot ApplicableNot ApplicableNot ApplicableNot Applicable(1) Output 2, 3 and 4 are designed to provide increased functionality over the other FET outputs. Output 2, 3 and 4 may be usedlike the other FET transistor outputs, but in addition, within a limited current range, they may be operated at a higher speed.Output 2, 3 and 4 also provide a pulse train output (PTO) or pulse width modulation output (PWM) function.Publication 1766-IN001A-EN-P - July 2008
32 <strong>MicroLogix</strong> <strong>1400</strong> <strong>Programmable</strong> <strong>Controllers</strong>Working VoltageWorking Voltage for 1766-L32AWA/ADescriptionPower Supply Input toBackplane IsolationInput Group to BackplaneIsolationInput Group to Input GroupIsolationOutput Group to BackplaneIsolationOutput Group to OutputGroup IsolationRecommendationVerified by one of the following dielectric tests: 1836V AC for 1 second or2596V DC for 1 second265V AC Working Voltage (IEC Class 2 reinforced insulation)Verified by one of the following dielectric tests:1517V AC for 1 second or2145V DC for 1 second132V AC Working Voltage (IEC Class 2 reinforced insulation)Verified by one of the following dielectric tests:1517V AC for 1 second or2145V DC for 1 second132V AC Working Voltage (basic insulation)Verified by one of the following dielectric tests: 1836V AC for 1 second or2596V DC for 1 second265V AC Working Voltage (IEC Class 2 reinforced insulation)Verified by one of the following dielectric tests: 1836V AC for 1 second or2596V DC for 1second265V AC Working Voltage (basic insulation), 150V AC Working Voltage (IECClass 2 reinforced insulation)Working Voltage for 1766-L32BWA/ADescriptionPower Supply Input toBackplane IsolationInput Group to BackplaneIsolation and Input Group toInput Group IsolationOutput Group to BackplaneIsolationOutput Group to OutputGroup IsolationRecommendationVerified by one of the following dielectric tests:1836V AC for 1 second or2596V DC for 1 second265V AC Working Voltage (IEC Class 2 reinforced insulation)Verified by one of the following dielectric tests: 1100V AC for 1 second or1697V DC for 1 second75V DC Working Voltage (IEC Class 2 reinforced insulation)Verified by one of the following dielectric tests: 1836V AC for 1 second or2596V DC for 1 second265V AC Working Voltage (IEC Class 2 reinforced insulation).Verified by one of the following dielectric tests: 1836V AC for 1 second or2596V DC for 1 second265V AC Working Voltage (basic insulation) 150V Working Voltage (IEC Class 2reinforced insulation)Publication 1766-IN001A-EN-P - July 2008
<strong>MicroLogix</strong> <strong>1400</strong> <strong>Programmable</strong> <strong>Controllers</strong> 33Working Voltage for 1766-L16BXB/ADescriptionInput Group to BackplaneIsolation and Input Group toInput Group IsolationFET Output Group toBackplane IsolationRelay Output Group toBackplane IsolationRelay Output Group to RelayOutput Group and FETOutput Group IsolationRecommendationVerified by one of the following dielectric tests: 1100V AC for 1 second or1697V DC for 1 second75V DC Working Voltage (IEC Class 2 reinforced insulation)Verified by one of the following dielectric tests: 1100V AC for 1 second or1697V DC for 1 second75V DC Working Voltage (IEC Class 2 reinforced insulation)Verified by one of the following dielectric tests: 1836V AC for 1 second or2596V DC for 1 second265V AC Working Voltage (IEC Class 2 reinforced insulation)Verified by one of the following dielectric tests: 1836V AC for 1 second or2596V DC for 1 second265V AC Working Voltage (basic insulation), 150V Working Voltage(IEC Class 2 reinforced insulation)Environmental SpecificationsDescription 1766-L32AWA/A 1766-L32BWA/A 1766-L32BXB/ATemperature, operating IEC 60068-2-1 (Test Ad, Operating Cold),IEC 60068-2-2 (Test Bd, Operating Dry Heat),IEC 60068-2-14 (Test Nb, Operating Thermal Shock):-20... 60 °C (-4 ...140 °F)Temperature, storage IEC 60068-2-1 (Test Ab, Unpackaged Non-operating Cold),IEC 60068-2-2 (Test Bb, Unpackaged Non-operating Dry Heat),IEC 60068-2-14 (Test Na, Unpackaged Non-operating Thermal Shock):-40…85 °C (-40…185 °F)-40...85 °C (-40... 185 °F)Relative humidity IEC 60068-2-30 (Test Db, Unpackaged Damp Heat):5...95% non-condensingVibrationIEC 60068-2-6 (Test Fc, Operating):5g @ 10... 500 HzShock, operating IEC 60068-2-27 (Test Ea, Unpackaged Shock):30 gShock, nonoperating IEC 60068-2-27 (Test Ea, Unpackaged Shock):Panel mount - 50 gDIN mount - 40 gEmissions CISPR 11Group 1, Class APublication 1766-IN001A-EN-P - July 2008
34 <strong>MicroLogix</strong> <strong>1400</strong> <strong>Programmable</strong> <strong>Controllers</strong>Description 1766-L32AWA/A 1766-L32BWA/A 1766-L32BXB/AESD immunity IEC 61000-4-2:4 kV contact discharges8 kV air dischargesRadiated RF immunity IEC 61000-4-3:10V/m with 1 kHz sine-wave 80% AM from 80…1000 MHz3 V/m with 1 kHz sine-wave 80% AM from 1.4...2.0 GHz1 V/m with 1 kHz sine-wave 80% AM from 2.0...2.7 GHzEFT/B immunity IEC 61000-4-4:±2 kV at 5 kHz on power ports±2 kV at 5 kHz on signal ports±1 kV at 5 kHz on communications portsSurge transientimmunityIEC 61000-4-5:±1 kV line-line(DM) and ±2 kV line-earth(CM) on AC power ports±1 kV line-line(DM) and ±2 kV line-earth(CM) on signal ports±1 kV line-earth(CM) on communications portsConducted RF immunity IEC 61000-4-6:10V rms with 1 kHz sine-wave 80% AM from 150 kHz...80 MHzVoltage Variation IEC 6100-4-11:60% dip for 10 periods on AC supply ports30% dips for 25 periods at 0° and 180° on AC supply ports100% dip for 250 periods at 0° and 180° on AC supply ports100% dip for 0.5 periods, arbitrary angle, on AC supply portsPublication 1766-IN001A-EN-P - July 2008
<strong>MicroLogix</strong> <strong>1400</strong> <strong>Programmable</strong> <strong>Controllers</strong> 35Certifications for 1766-32AWA/A, 1766-L32BWA/A,1766-L32BXB/ACertification (whenproduct is marked) (1)ULCEC-TickValueUL Listed for Class I, Division 2 Group A,B,C,D Hazardous Locations.See UL File E10314.European Union 2004/108/EC EMC Directive, compliant with:EN 61000-6-2; Industrial ImmunityEN 61000-6-4; Industrial EmissionsEN 61131-2; <strong>Programmable</strong> <strong>Controllers</strong> (Clause 8, Zone A & B)EN 61131-2; <strong>Programmable</strong> <strong>Controllers</strong> (Clause 11)Australian Radiocommunications Act, compliant with:AS/NZS CISPR 11; Industrial Emissions(1)See the Product Certification link at http://www.ab.com for Declaration of Conformity, Certificates, and other certificationdetails.Publication 1766-IN001A-EN-P - July 2008
36 <strong>MicroLogix</strong> <strong>1400</strong> <strong>Programmable</strong> <strong>Controllers</strong>Publication 1766-IN001A-EN-P - July 2008
180.0 mm(7.087 in.)165.8 mm(6.528 in.)25.81 mm(1.016 in.)0.164DIN rail center line.Ligne médiane du rail DIN.Mittellinie der DIN-Schiene.Línea central del riel DIN.Linea centrale della guida DIN.linha de centro do trilho DIN.Expansion I/OExtension d'E/SE/A -ErweiterungsmoduleEspansione deimoduli I/O100.06 mm(3.939 in.)Expansión de E/SExpansão de E/S1766-L32AWA, 1766-L32AWAA1766-L32BWA, 1766-L32BWAA1766-L32BXB, 1766-L32BXBA
INPUTSINPUTS0 1 2 3 4 5 6 7 8 9 10 11 12 13 14 15 16 17 18 190 1 2 3 4 5 6 7 8 9 10 11OUTPUTS0 1 2 3 4 5 6 7 8 9 10 11 12 13 14 15 16 17 18 190 1 2 3 4 5 6 7 8 9 10 11OUTPUTSL32AWAL32AWAA
VACL11766-L32AWA1766-L32AWACOM0VACL11766-L32AWAA1766-L32AWAACOM0VACL2/NOUT0OUT1OUT2OUT3OUT4VACDC5OUT7OUT8OUT10NCNCVACDC0VACDC1VACDC2VACDC3VACDC4OUT5OUT6VACDC6OUT9OUT11NCCOMIN0 IN2 IN5 IN7 IN81COMIN10 IN13 IN15 IN17 IN19 NC NC3COMIN1 IN3 IN4 IN6 IN9 IN11 IN12 IN14 IN16 IN18 NC NC NC2VACL2/NVACDC0OUT0VACDC1OUT1VACDC2OUT2VACDC3OUT3VACDC4OUT4OUT5VACDC5OUT6OUT7OUT8OUT10COMANAVAC OUT OUTDC6 9 11OV0OV1COMIN0 IN2 IN5 IN7 IN81COMIN10 IN13 IN15 IN17 IN19 IV0 IV23COM2COMANAIN1 IN3 IN4 IN6 IN9 IN11 IN12 IN14 IN16 IN18 IV1 IV3L32AWAAL32AWA953203-16
INPUTSINPUTS0 1 2 3 4 5 6 7 8 9 10 11 12 13 14 15 16 17 18 190 1 2 3 4 5 6 7 8 9 10 11OUTPUTS0 1 2 3 4 5 6 7 8 9 10 11 12 13 14 15 16 17 18 190 1 2 3 4 5 6 7 8 9 10 11OUTPUTSL32BWAL32BWAA
VACL11766-L32BWA1766-L32BWACOM0VACL11766-L32BWAA1766-L32BWAACOM0VACL2/NOUT0OUT1OUT2OUT3OUT4VACDC5OUT7OUT8OUT10NCNCVACDC0VACDC1VACDC2VACDC3VACDC4OUT5OUT6VACDC6OUT9OUT11NCCOMIN0 IN2 IN5 IN7 IN81COMIN10 IN13 IN15 IN17 IN19 NC NC3COMIN1 IN3 IN4 IN6 IN9 IN11 IN12 IN14 IN16 IN18 NC NC NC2VACL2/NVACDC0OUT0VACDC1OUT1VACDC2OUT2VACDC3OUT3VACDC4OUT4OUT5VACDC5OUT6OUT7OUT8OUT10COMANAVAC OUT OUTDC6 9 11OV0OV1COMIN0 IN2 IN5 IN7 IN81COMIN10 IN13 IN15 IN17 IN19 IV0 IV23COM2COMANAIN1 IN3 IN4 IN6 IN9 IN11 IN12 IN14 IN16 IN18 IV1 IV3L32BWAAL32BWA953203-16
INPUTSINPUTS0 1 2 3 4 5 6 7 8 9 10 11 12 13 14 15 16 17 18 190 1 2 3 4 5 6 7 8 9 10 11OUTPUTS0 1 2 3 4 5 6 7 8 9 10 11 12 13 14 15 16 17 18 190 1 2 3 4 5 6 7 8 9 10 11OUTPUTSL32BXBAL32BXB
1766-L32BXBA+24VDCVDCNUETVACDC0OUT0VACDC1OUT1VDC2OUT2OUT3OUT4OUT5OUT6OUT7COM2VACDC3OUT8OUT9OUT10COMANAVAC VAC OUTDC4 DC5 11OV0OV11766-L32BXBACOMIN0 IN2 IN5 IN7 IN81COMIN10 IN13 IN15 IN17 IN19 IV0 IV23COM0COM2COMANAIN1 IN3 IN4 IN6 IN9 IN11 IN12 IN14 IN16 IN18 IV1 IV31766-L32BXB+24VDCVDCNEUTVACDC0OUT0VACDC1OUT1VDC2OUT2OUT3OUT4OUT5OUT6OUT7COM2VACDC3OUT8OUT9OUT10NCVAC VAC OUTDC4 DC5 11NCNC1766-L32BXBCOMIN0 IN2 IN5 IN7 IN81COMIN10 IN13 IN15 IN17 IN19 NC NC3COM0COMIN1 IN3 IN4 IN6 IN9 IN11 IN12 IN14 IN16 IN18 NC NC NC2L32BXBL32BXBA953203-16
Publication 1766-IN001A-EN-P - June 2008
Rockwell Automation SupportRockwell Automation provides technical information on the Web to assist you in using its products. Athttp://support.rockwellautomation.com, you can find technical manuals, a knowledge base of FAQs,technical and application notes, sample code and links to software service packs, and a MySupport featurethat you can customize to make the best use of these tools.For an additional level of technical phone support for installation, configuration and troubleshooting, weoffer TechConnect support programs. For more information, contact your local distributor or RockwellAutomation representative, or visit http://support.rockwellautomation.com.Installation AssistanceIf you experience a problem with a hardware module within the first 24 hours of installation, pleasereview the information that's contained in this manual. You can also contact a special Customer Supportnumber for initial help in getting your module up and running:United StatesOutside United States1.440.646.3434 Monday – Friday, 8am – 5pm ESTPlease contact your local Rockwell Automation representative for any technicalsupport issues.New Product Satisfaction ReturnRockwell Automation tests all of its products to ensure that they are fully operational when shipped fromthe manufacturing facility. However, if your product is not functioning and needs to be returned, followthese procedures.United StatesOutside United StatesContact your distributor. You must provide a Customer Support case number (seephone number above to obtain one) to your distributor in order to complete the returnprocess.Please contact your local Rockwell Automation representative for return procedure.Allen-Bradley, Rockwell Automation, <strong>MicroLogix</strong>, and TechConnect are trademarks of Rockwell Automation, Inc.Trademarks not belonging to Rockwell Automation are property of their respective companies.Publication 1766-IN001A-EN-P - June 2008 PN 953203-13Copyright © 2008 Rockwell Automation, Inc. All rights reserved. Printed in Singapore.