Turbo Select Manual - Grill-Repair.com
Turbo Select Manual - Grill-Repair.com
Turbo Select Manual - Grill-Repair.com

You also want an ePaper? Increase the reach of your titles
YUMPU automatically turns print PDFs into web optimized ePapers that Google loves.
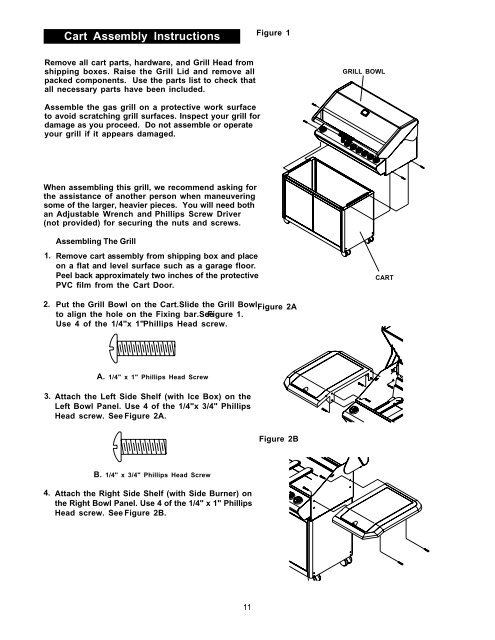
Cart Assembly InstructionsFigure 1Remove all cart parts, hardware, and <strong>Grill</strong> Head fromshipping boxes. Raise the <strong>Grill</strong> Lid and remove allpacked <strong>com</strong>ponents. Use the parts list to check thatall necessary parts have been included.GRILL BOWLAssemble the gas grill on a protective work surfaceto avoid scratching grill surfaces. Inspect your grill fordamage as you proceed. Do not assemble or operateyour grill if it appears damaged.When assembling this grill, we re<strong>com</strong>mend asking forthe assistance of another person when maneuveringsome of the larger, heavier pieces. You will need bothan Adjustable Wrench and Phillips Screw Driver(not provided) for securing the nuts and screws.Assembling The <strong>Grill</strong>1. Remove cart assembly from shipping box and placeon a flat and level surface such as a garage floor.Peel back approximately two inches of the protectivePVC film from the Cart Door.CART2.Put the <strong>Grill</strong> Bowl on the Cart.Slide the <strong>Grill</strong> Bowlto align the hole on the Fixing bar.See Figure 1.Use 4 of the 1/4"x 1" Phillips Head screw.Figure 2AA. 1/4" x 1" Phillips Head Screw3.Attach the Left Side Shelf (with Ice Box) on theLeft Bowl Panel. Use 4 of the 1/4"x 3/4" PhillipsHead screw. See Figure 2A.Figure 2B4.B. 1/4" x 3/4" Phillips Head ScrewAttach the Right Side Shelf (with Side Burner) onthe Right Bowl Panel. Use 4 of the 1/4" x 1" PhillipsHead screw. See Figure 2B.11