Real Time Triplex Stand Alone DVR 23 - Security Camera World
Real Time Triplex Stand Alone DVR 23 - Security Camera World
Real Time Triplex Stand Alone DVR 23 - Security Camera World

You also want an ePaper? Increase the reach of your titles
YUMPU automatically turns print PDFs into web optimized ePapers that Google loves.
<strong>Real</strong> <strong>Time</strong> <strong>Triplex</strong> <strong>Stand</strong> <strong>Alone</strong> <strong>DVR</strong>ContentsCHAP 7. PLAYBACK – TRIPLEX FUNCTION ……..........……… 61CHAP 8. PLAYBACK – TRICKPLAY & MULTI CH. DISPLAY .. 62CHAP 9. CD/USB BACKUP MODE ...…………………….………. 63CHAP 10. NETWORK VIEWER …………………………………… 661. System Requirement …………………………………………. 662. Network Environment ………………………………………… 663. Network Viewer Installation ………………………………….. 664. Functions and Network Setup ……………………………….. 675. Operation ………………………………………………………. 715.1 Live Video Mode ………………………………………….. 715.2 Playback Mode …………………………………………… 725.3 Drive Scan Mode …………………………………………. 735.4 File / USB Back-up Playback Mode ……………………. 745.5 CD Playback Mode ………………………………………. 755.6 Snap Shot and Print ……………………………………… 76CHAP 11. WEB VIEWER …………………………………………. 771. System Requirement …………………………………………. 772. Network Environment ………………………………………… 773. Connect <strong>DVR</strong> via Web Browser …………………………….. 774. Web Browser setup to enable Web Viewer ………………… 785. Functions and Network Setup ……………………………….. 796. Log In …………………………………………………………... 807. Playback ……………………………………………………….. 81CHAP 12. SYSTEM INFORMATION ……………………………. 82CHAP 13. Q & A …………………………………………………… 834
<strong>Real</strong> <strong>Time</strong> <strong>Triplex</strong> <strong>Stand</strong> <strong>Alone</strong> <strong>DVR</strong>SAFETY WARNING AND CAUTIONThe following are warning and caution statements for the safety of the users and for theprevention of any property damage. Please read below thoroughly.Warning and Caution signsWarningIf you are not aware of thiswarning, you may beinjured or be killed.CautionIf you are not aware of thiswarning, you may beinjured or cause property loss.6
<strong>Real</strong> <strong>Time</strong> <strong>Triplex</strong> <strong>Stand</strong> <strong>Alone</strong> <strong>DVR</strong>7
<strong>Real</strong> <strong>Time</strong> <strong>Triplex</strong> <strong>Stand</strong> <strong>Alone</strong> <strong>DVR</strong>8
<strong>Real</strong> <strong>Time</strong> <strong>Triplex</strong> <strong>Stand</strong> <strong>Alone</strong> <strong>DVR</strong>9
<strong>Real</strong> <strong>Time</strong> <strong>Triplex</strong> <strong>Stand</strong> <strong>Alone</strong> <strong>DVR</strong>10
<strong>Real</strong> <strong>Time</strong> <strong>Triplex</strong> <strong>Stand</strong> <strong>Alone</strong> <strong>DVR</strong>CHAP 1. INTRODUCTION1. OverviewDigital Video Recorder (<strong>DVR</strong>) is the latest in surveillance technology that offers full digital recording, remotesurveillance access, remote device control and more. The <strong>DVR</strong> system is a computerized surveillancesystem that combines all the features of a traditional videotape system by integrating a color quad processor,motion sensors, multiplexer, pan & tilt controls, time-lapse recorder and accessories to one unit. <strong>DVR</strong>images are stored on a Hard Disk Drive (HDD). This not only preserves the picture qualityin its original state, but also allows fast data retrieval and larger storage capacity.Unlike time-laps VCRs and low-end <strong>DVR</strong>s, <strong>Triplex</strong> <strong>DVR</strong>s allow playback of recorded video footage andremote access through internet while in recording mode simultaneously. <strong>DVR</strong>s are used in mission criticalenvironments where security systems are on and it would be dangerous for the security officer toturn off recording just to view recorded data.Our new <strong>Triplex</strong> <strong>DVR</strong>s can meet any required request from the industry and the customers with highquality and reliability, which will satisfy all of you and bring a big smile to you.2. Common features• <strong>Real</strong>-time 480/240/120 (16CH/8CH/4CH) fps live display & 120 fps recording / playback• <strong>Triplex</strong> function : simultaneous recording, playback, backup and network transmission• Dynamic IP and Web browser based remote monitoring support• CD Back up available• Composite Video, S-Video and VGA output available• Alarm notification to registered e-mail address• <strong>Real</strong> time single or multi-screen display• 1 CH audio recording / playback function• 720 x 480 digital video recordings and clear video quality in MJPEG• Live camera viewing; no delay• Various types of display modes such as Full, CIF, PIP, Zoom and Auto-Switch• Independent color adjustment of each camera• Hidden camera function• Multiple language OSD supported• Stores large amounts of video on Hard Disk Drive (HDD).• Motion and event recording supported• Easy retrieval of recordings organized by date, time and event• Search by date/time list, event list, date/time.• Multi-screen playback• Pan/ Tilt/ Zoom camera control by RS-485 communication port• IR remote control• Loop-through connections• User-friendly GUI (Graphic User Interface) & easy to operation• Remote control through any PC with internet (The network viewer program provided)• Self-diagnose system : error checking and restoring function• Little or no maintenance11
<strong>Real</strong> <strong>Time</strong> <strong>Triplex</strong> <strong>Stand</strong> <strong>Alone</strong> <strong>DVR</strong>CHAP 1. INTRODUCTION4. ContentsPlease make sure the following parts are included with the main <strong>DVR</strong> when you open the product package.Parts<strong>DVR</strong>DC Power AdaptorPower CableRemote ControllerBatteriesUser’s Manual and Install CDLAN Cable1 unit1 pc1 pc1 pc2 pcs1 pc1 pcQuantity<strong>DVR</strong>BatteriesRemoteControllerDC AdaptorLAN CableInstall CDPower CableWe strongly recommend you to fully understand this user’s manual before installation.NoteThis equipment has been tested and found to comply with the limits for a CLASS A digitaldevice, pursuant to Part 15 of FCC Rules. These limits are designed to providereasonable protection against harmful interference when the equipment is operated in acommercial environment.PLEASE READ THIS GUIDE BOOK THOROUGHLY FOR EFFECTIVE AND SAFE USAGEOF THE DEVICE.13
<strong>Real</strong> <strong>Time</strong> <strong>Triplex</strong> <strong>Stand</strong> <strong>Alone</strong> <strong>DVR</strong>CHAP 1. INTRODUCTION5. Front Panel<strong>23</strong>4561213141519201791116 17810181. 1 to 16 Channel Selection / Direction Button• To select a channel to be viewed as full-size screen during live display or playback.• To navigate, press Up(1) / Down(2) / Left(3) / Right(4).2 ~ 5. LED Signs• There are four LED signs that indicate current status.2. POWER : <strong>DVR</strong> power status3. NET : ON means connection status via network.If someone accesses the <strong>DVR</strong> via network, LED light turns on.4. PLAY : ON means the <strong>DVR</strong> is in playback mode.5. REC : ON means the <strong>DVR</strong> is recording mode.6. Remote Controller Sensor7. Multi Button• It converts to live display mode directly.• To surf various live display modes like 16CH, 13CH, 9CH, 8CH, 6CH and 4 CH displayby pressing the button repeatedly.8. PIP Button• To convert to PIP mode (Picture in Picture ).• To surf various PIP modes like 1PIP, 2PIPs and 3PIPs by pressing the button repeatedly.9. AUTO Button• To convert to auto switch mode.• If you press AUTO on the front panel, channels will be automatically switched as follows.- Ch1 -> Ch2 -> Ch3 ->….-> Ch14 -> Ch15 -> Ch16 -> 16Ch in CIF -> Ch1 -> Ch2 …keeping this order until you press Auto button again to release the function.14
<strong>Real</strong> <strong>Time</strong> <strong>Triplex</strong> <strong>Stand</strong> <strong>Alone</strong> <strong>DVR</strong>CHAP 1. INTRODUCTION10. TRI Button• To convert to triplex function like 8 channel live display and 8 channel playback in the screensimultaneously.• Press the button first, you will have CH1 ~ CH 8 live displays and playbacks and press it again,you will do other channels like CH9 ~ CH16 live displays and playbacks.- When you press the button in live display mode, you will see 8 channel live displays and8 channel playbacks with no video. To retrieve video from hard drive, press Playback button.- When you press the button in playback mode, you will see 8 channel live displays and8 channel playbacks that have selected.11. INFO (information) Button / BACKUP Button• To show system information of <strong>DVR</strong>• During Playback mode, it works as USB / CD backup button12. CD-Burner• To burn CD for data back-up13. Rewind (◀◀) Button• It supports REW1, REW2, REW3 and REW4.14. Play ( ▶) and Pause (II) Button• To play and pause the recorded videos15. Faster Forward (▶▶) Button• It supports FF1, FF2, FF3, FF4 and FF516. Stop (■) Button• To stop playback17. Record Button• To start and stop recording.18. Search Button• To access recordings from HDD19. Enter Button• To enter a selection20. Menu Button• To access System Setup Menu.15
<strong>Real</strong> <strong>Time</strong> <strong>Triplex</strong> <strong>Stand</strong> <strong>Alone</strong> <strong>DVR</strong>CHAP 1. INTRODUCTION6. Rear Panel1 2412 13[ 16CH <strong>DVR</strong> ]35 6 7 8 9 10 111. Cooling Fan2. Power Switch3. AC Power Switch4. 16 BNC connectors for camera input5. 16 BNC connectors for monitor output• These are mainly for monitors. And also you can use these for VCR recorder backup.6. Audio In / Out Port7. USB Port8. RS-<strong>23</strong>2 Port (9 Pin D-Sub Connector)• It is for factory use.9. Alarm In / Out and RS-485 Port (25 Pin D-Sub Connector)• It is to communicate with external sensors, alarm and PTZ camera to control.10. S-Video Output11. LAN Terminal• It is to connect to LAN or Internet.12. BNC connectors for monitor output• These are mainly for monitors. And also you can use these for VCR recorder backup.13. VGA Output Port• This is mainly for PC monitors.16
<strong>Real</strong> <strong>Time</strong> <strong>Triplex</strong> <strong>Stand</strong> <strong>Alone</strong> <strong>DVR</strong>CHAP 2. INSTALLATION1. HDD Installation1Unscrew the sides, rear of the <strong>DVR</strong> and remove the top cover.2Fix HDDs to rack mount by screwing as left.3Install the HDDs on the HDD plate and screw as left.HDD Jumper Setting InformationBefore install the Hard Disk Drives, please read the jumper settinginformation on the label. If the jumper is not set properly,the system will be disordered.4Make sure that the HDDs are set to “Master” & “Slave” properlyand then connect the power cable and IDE cable as left.Check if HDD has no problem after HDD installation becauserecord function may not work well due to HDD problem.It may reboot automatically when HDD has problems or it doesn’tdetect HDD.Contact your local distributor and exchange with new one whenyou find your HDD has a problem.5Close the top cover and screw and turn on the power.18
<strong>Real</strong> <strong>Time</strong> <strong>Triplex</strong> <strong>Stand</strong> <strong>Alone</strong> <strong>DVR</strong>CHAP 2. INSTALLATION3. PTZF <strong>Camera</strong> & Sensor Connection Diagram1) RS-<strong>23</strong>2 (9 Pin D-Sub Connector)1) RS-<strong>23</strong>22) Alarm In/Out& RS-4853) VGA5 4 3 2 19 8 7 6No1<strong>23</strong>45DescriptionN/CTX <strong>23</strong>2CRX <strong>23</strong>2CN/CGND6 ~ 9 N/C* N/C : Connection Not Required20
<strong>Real</strong> <strong>Time</strong> <strong>Triplex</strong> <strong>Stand</strong> <strong>Alone</strong> <strong>DVR</strong>CHAP 2. INSTALLATION2) Alarm In/Out & RS-485 (25 Pin D-Sub Connector)13 12 111098765432125 24 <strong>23</strong> 22 21 20 1918171615 14Description16CH <strong>DVR</strong>8CH <strong>DVR</strong>4CH <strong>DVR</strong>Sensor Input1~161,3,5,7,9,11,13,151~4GND17~202,8,10,12,14,17,19,21,<strong>23</strong>,255~13,14,17~20Alarm Out COM211621Alarm Out NC221822Alarm Out NO<strong>23</strong>20<strong>23</strong>485B242224485A252425RS<strong>23</strong>2C Rx-415RS<strong>23</strong>2C Tx-6163) VGA (15 Pin D-Sub Connector)543211098761514 131211No1<strong>23</strong>4 ~ 12131415DescriptionRED (Red Video [75ohm, 0.7Vp-p])GREEN (Green Video [75ohm, 0.7Vp-p])BLUE (Blue Video [75ohm, 0.7Vp-p])ReservedHSYNC or CSYNC (Horizontal or Composite Sync.)VSYNC (Vertical Sync.)Reserved21
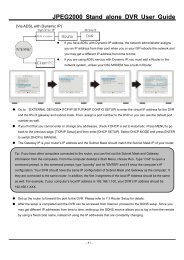
<strong>Real</strong> <strong>Time</strong> <strong>Triplex</strong> <strong>Stand</strong> <strong>Alone</strong> <strong>DVR</strong>CHAP 2. INSTALLATION4. Network Connection4.1 Using Static (Public) IP AddressYou can use one of Static IP addresses, Subnet Mask and Gateway provided by your ISP (InternetService Provider) for network connection between <strong>DVR</strong> and Net / Web Viewer. And you can connect<strong>DVR</strong> to your multi-port Broadband Modem directly.BROADBANDMODEM4.2 Using Dynamic IP AddressYou can use Router with your Dynamic IP broadband modem. In this case, you should set theconfiguration of Router properly for network connection between <strong>DVR</strong> and Net / Web Viewer.Please follow the instruction in next section to configure your Router correctly.BROADBANDMODEMROUTERIf your Broadband Modem does not support internal loop back (port forwarding)function, and if you want to monitor <strong>DVR</strong> using a PC located in same Intranet,you should use Direct IP instead of D<strong>DVR</strong>LS in the connection menu of NetViewer.If your PC is located out of Intranet, you can use both D<strong>DVR</strong>LS and Direct IPto connect to <strong>DVR</strong> even though your Broadband Modem has limited features.You will know about D<strong>DVR</strong>LS and Direct IP in Chapter 9, Network Viewer.22
<strong>Real</strong> <strong>Time</strong> <strong>Triplex</strong> <strong>Stand</strong> <strong>Alone</strong> <strong>DVR</strong>CHAP 2. INSTALLATION4.3 Router ConfigurationIf your <strong>DVR</strong> is connected to network through Router, you should configure Router properly.There are 3 steps as follows.1. WAN Setting2. DHCP Setting3. Virtual Server SettingAnd 3 Routers from D-Link, Net Gear and Linksys are quoted as examples in this manual.4.3.1 WAN SettingWhen you connect to your Router, you can find menu for Wan setting. Please confirm the WANsetting. If you are using DSL service, you should select PPPoE, and you will see sub-menu totype in DSL user name and password.<strong>23</strong>
<strong>Real</strong> <strong>Time</strong> <strong>Triplex</strong> <strong>Stand</strong> <strong>Alone</strong> <strong>DVR</strong>CHAP 2. INSTALLATION24
<strong>Real</strong> <strong>Time</strong> <strong>Triplex</strong> <strong>Stand</strong> <strong>Alone</strong> <strong>DVR</strong>CHAP 2. INSTALLATION4.3.2 DHCP SettingTo assign <strong>DVR</strong> an unique private IP address in your intranet environment, please check theStarting and Ending IP address used by DHCP server.You can assign any private IP address to your <strong>DVR</strong>, if it is out of the DHCP range.25
<strong>Real</strong> <strong>Time</strong> <strong>Triplex</strong> <strong>Stand</strong> <strong>Alone</strong> <strong>DVR</strong>CHAP 2. INSTALLATION26
<strong>Real</strong> <strong>Time</strong> <strong>Triplex</strong> <strong>Stand</strong> <strong>Alone</strong> <strong>DVR</strong>CHAP 2. INSTALLATION4.3.3 Virtual Server SettingYou should register your <strong>DVR</strong> as a virtual server to Router. Please type in the private IPaddress of <strong>DVR</strong> to IP address field. (e.g. 192.168.0.110)Protocol Type is TCP, and Private/Public Port numbers should be same with the Port numbersin <strong>DVR</strong>. And you can change the Video signal Port number in Network Setup menu to avoid theconflict with other network servers.The default Port number in <strong>DVR</strong> is 9310. (It is for Video signal, and the Port number for Controlsignal is generated automatically as 9311, Video Port number + 1.)You need to register both <strong>DVR</strong> Video Port and Control Port to Router as Network servers.And please make sure that your Router dose not block the control / data to / from the <strong>DVR</strong> withfilter and firewall features.931093109311931127
<strong>Real</strong> <strong>Time</strong> <strong>Triplex</strong> <strong>Stand</strong> <strong>Alone</strong> <strong>DVR</strong>CHAP 2. INSTALLATION931093119310..931128
<strong>Real</strong> <strong>Time</strong> <strong>Triplex</strong> <strong>Stand</strong> <strong>Alone</strong> <strong>DVR</strong>CHAP 2. INSTALLATION9310 931129
<strong>Real</strong> <strong>Time</strong> <strong>Triplex</strong> <strong>Stand</strong> <strong>Alone</strong> <strong>DVR</strong>CHAP 3. SETUP MENUGetting StartedFirst, it is important to make sure that the <strong>DVR</strong> power is off before connecting all the necessary video, monitorand power cables to the <strong>DVR</strong>.[ System initializing ] [ HDD detected properly ]You will see the above screen when you power on the <strong>DVR</strong> system properly.It shows that the <strong>DVR</strong> starts and succeeds in detecting HDDs as master and slave.1. Check if HDD has no problem after HDD installation because record function may notwork well due to HDD problem.2. Contact your local distributor and exchange with new one when you find your HDD hasa problem.You will see information of current available hard drives and CD burner, USB memory stick as well asfirmware version, when you press Info button. To exit to normal display, press Info button again.30
<strong>Real</strong> <strong>Time</strong> <strong>Triplex</strong> <strong>Stand</strong> <strong>Alone</strong> <strong>DVR</strong>CHAP 3. SETUP MENUSystem Setup MenuBefore starting full operation of the <strong>DVR</strong> system, you have to set the desired system configuration using theSetup Menu. Press MENU button to access the Setup Menu.• You can navigate through the 6 options up and down by pressing channel selection buttons( CH1 : Up, CH2 : Down. CH3 : Left, CH4 : Right ) on the front panel of <strong>DVR</strong> or the directionbuttons of the IR remote controller unit.• To get into a sub menu, press ENTER button where the pointer is located.• To exit the main menu, press MENU button.• If you are in a sub menu, you can always return to main menu by pressing MENU button.31
<strong>Real</strong> <strong>Time</strong> <strong>Triplex</strong> <strong>Stand</strong> <strong>Alone</strong> <strong>DVR</strong>CHAP 3. SETUP MENU2. System Setup2.1 HDD SetupThis menu enables HDD setup.1) Overwrite ON/OFFTo enable (ON) or disable (OFF) to overwrite HDD.2) Record OSD ON/OFFTo show “REC” in green in the right bottom of screen during recording mode.Note-“MA-REC“ shows videos are recorded in master hard disk.-“SL-REC” shows videos are recorded in slave hard disk.3) FormatTo format the HDD, press ENTER button and then select YES.You have to make sure of it before HDD format.Once HDD formatted, you will not be able to retrieve any video that hasbeen recorded previously.• To return to main menu, press MENU button.33
<strong>Real</strong> <strong>Time</strong> <strong>Triplex</strong> <strong>Stand</strong> <strong>Alone</strong> <strong>DVR</strong>CHAP 3. SETUP MENU2.2 Password SetupThis menu allows to set system passwords. It supports both Admin and User level passwords.Admin can access and control all information and User can access limited info without the ability tochange the setup configuration.1) Select ON/OFFTo enable (ON) or disable (OFF) a password.2) Registration of PasswordsTo set your desired 4 letter password among 0~9, press ENTER & direction button. To use both remotecontroller and buttons on front panel, you can use only 1~4 or 1~8 buttons if you have 4 or 8 channel <strong>DVR</strong>.To return to the sub menu, press MENU button after completing password input.• To return to main menu, press MENU button.34
<strong>Real</strong> <strong>Time</strong> <strong>Triplex</strong> <strong>Stand</strong> <strong>Alone</strong> <strong>DVR</strong>CHAP 3. SETUP MENU3) Input of PasswordsTo input your 4 letter password among 0~9, press numeric buttons of remote control unit or front panel.The cursor moves to right when <strong>DVR</strong> receives each number.Recording start and Playback functions do not require password even though <strong>DVR</strong> is Password Oncondition.• To return to main menu, press MENU button.NoteRemember that the Admin password was set to 1111 in factory mode.And 2222, 3333, 4444 are the default passwords for User1, 2, and 3.If you forgot the password and can not control <strong>DVR</strong>, please contact towhom sold <strong>DVR</strong> to you. He/She might be able to restore the defaultpassword.35
<strong>Real</strong> <strong>Time</strong> <strong>Triplex</strong> <strong>Stand</strong> <strong>Alone</strong> <strong>DVR</strong>CHAP 3. SETUP MENU2.3 Channel Name SetupTo make camera names easy to remember, you can assign names to individual channels up to 8characters per channel. For example, if your one external camera is located in a factory, you canname it as “factory”. You can see videos with this name on the screen during operation.1) Live ON/OFF2) PB ON/OFF- When turned ON, it enables display of camera names.- When turned OFF, it disables display of camera names.3) CH 1 ~ CH 16 ■■CH ■1/2/…/16 ■ ■- When the pointer is located next to CAMERA1/2/3/4…/14/15/16,1. Press ENTER button2. See the active cursor on the first letter of ■ which means a blank.3. Surf along letters by pressing Up/Down button.4. When you find your desired letter, press Right/Left button to move the active cursor to the nextletter.5. After the naming process is complete, press ENTER button and then press Up/Down buttonto move to other cameras.To exit main menu, press MENU button.36
<strong>Real</strong> <strong>Time</strong> <strong>Triplex</strong> <strong>Stand</strong> <strong>Alone</strong> <strong>DVR</strong>CHAP 3. SETUP MENU2.4 Date/ <strong>Time</strong> SetupEverybody agrees that surveillance digital video recorders must indicate the exact date and timeinformation in which an event took place in order to be used as evidence. Therefore, configuring the<strong>DVR</strong> to correct time and date is very important..1) Live ON/OFF2) PB ON/OFF- When turned ON, it enables Display of camera names.- When turned OFF, it disables Display of camera names.3) Type YY/MM/DD, DD/MM/YY, MM/DD/YY4) Date 2005/09/245) <strong>Time</strong> 19:44:00- When the pointer is located next to Date or <strong>Time</strong>,1. Press ENTER button2. Set Date or <strong>Time</strong>- Select it by pressing Up/Down button- Move to the next by pressing Left/Right button3. When you finish setting Date/ <strong>Time</strong>, press MENU button and then press Up/Down button tomove to other sub menu.To return to main menu, press MENU button.37
<strong>Real</strong> <strong>Time</strong> <strong>Triplex</strong> <strong>Stand</strong> <strong>Alone</strong> <strong>DVR</strong>CHAP 3. SETUP MENU2.5 Beep & PTZ SetupThis menu enables recording beep and external Pan/ Tilt & Zoom/ Focus cameras setup tocommunicate with.1) PAN/ TILT Pelco-D / Pelco-P / LG / Hitron / DongyangSelect a desired protocol which is used for communication between the external Pan/ Tilt cameraand the <strong>DVR</strong> set.NoteCompatible Pan/ Tilt camera list- Pelco-D, Pelco-P, LG, Hitron, Dongyang protocol.2) Rec Beep ON/OFFTo enable recording beep when pressing REC button to start and release the function.3) HDD Fail ON/OFFTo enable to beep when the <strong>DVR</strong> detects a bad sector of HDD in recording mode or playback mode.It skips the bad sector that detected and records videos or plays recorded videos in the next sectorof HDD automatically.HDD is logically divided to a large amount of sectors. It may have some bad sectors out of a largeamount of it. When this function is on, you are recommended to exchange with new one in order topreventing from any potential problems caused by the HDD with bad sectors.• To return to main menu, press MENU button.38
<strong>Real</strong> <strong>Time</strong> <strong>Triplex</strong> <strong>Stand</strong> <strong>Alone</strong> <strong>DVR</strong>CHAP 3. SETUP MENU2.6 System Reset ON/OFFTo reset the system, press Enter button and select YES. Then system parameters go back to defaultvalues.• To return to main menu, press MENU button.You have to make sure of it before system reset.Once system reset, all data that you have selected previously, such as password,are converted to the factory default settings.39
<strong>Real</strong> <strong>Time</strong> <strong>Triplex</strong> <strong>Stand</strong> <strong>Alone</strong> <strong>DVR</strong>CHAP 3. SETUP MENU3. Display Setup3.1 Blank Channel SetupTo enable to make channels hidden on the screen during live display mode as below.CH 1 ~ CH 16 ON/OFFTo hide the channels on the monitor even though it is recorded, you can set ON for each channels.To return to main menu, press MENU button.NoteEven though some channels are hidden in the screen during live display mode,the <strong>DVR</strong> has been recording them in HDD.40
<strong>Real</strong> <strong>Time</strong> <strong>Triplex</strong> <strong>Stand</strong> <strong>Alone</strong> <strong>DVR</strong>CHAP 3. SETUP MENU3.2 PIP Channel SetupYou can select PIP ( Picture In Picture ) options. PIP mode offers a convenient way of monitoringmultiple channels while focusing more attention on a specific channel. It has a main video channeland up to 3 sub video channels on the screen.Main CH 1 ~ CH 16Sub 1 CH 1 ~ CH 16Sub 2 CH 1 ~ CH 16Sub 3 CH 1 ~ CH 16To define which channel is the main channel for full screen or sub channel among 16 channels.• To return to main menu, press MENU button41
<strong>Real</strong> <strong>Time</strong> <strong>Triplex</strong> <strong>Stand</strong> <strong>Alone</strong> <strong>DVR</strong>CHAP 3. SETUP MENU3.3 Adjust Channel SetupThis menu allows video adjustment options for individual cameras.1) Channel CH1 ~ CH 16- To select your desired channel to adjust video display.2) CON (Contrast) 50- To control light and shade of video display.3) HUE 50- To control color tone of video display.4) BRI (Brightness) 50- To control brightness of video display.5) COL (Color) 50- To control saturation of color of video display.• To return to main menu, press MENU button.NoteDefault factory mode was set to 50.Remember that the values range from 01 to 99.42
<strong>Real</strong> <strong>Time</strong> <strong>Triplex</strong> <strong>Stand</strong> <strong>Alone</strong> <strong>DVR</strong>CHAP 3. SETUP MENU3.4 Video Signal Type NTSC/PALTo select your local video signal type between NTSC and PAL, press Enter button and select it.It reboots the system automatically after your selection.It reboots the system automatically after your selection.Once it reboots, all data that you have selected previously is set to factory default.3.5 Sequence 1 sec ~ 1 minTo select interval time of Auto Switch.With the Auto Switch feature, a range of interval time among some different views can be selected.• To return to menu, press MENU button.43
<strong>Real</strong> <strong>Time</strong> <strong>Triplex</strong> <strong>Stand</strong> <strong>Alone</strong> <strong>DVR</strong>CHAP 3. SETUP MENU3.6 Boundary White/Black/OFFTo select the boundary color that is divided into each channel.3.7 Background Blue/BlackTo select the background color of no video channels between two colors.• To return to menu, press MENU button.44
<strong>Real</strong> <strong>Time</strong> <strong>Triplex</strong> <strong>Stand</strong> <strong>Alone</strong> <strong>DVR</strong>CHAP 3. SETUP MENU3.8 VGA SetupIt supports 3 output resolutions, 800x600, 1024x768 and 1280x1024.Output Contrast, Brightness and Color can be adjusted.• To return to menu, press MENU button.45
<strong>Real</strong> <strong>Time</strong> <strong>Triplex</strong> <strong>Stand</strong> <strong>Alone</strong> <strong>DVR</strong>CHAP 3. SETUP MENU4. Event SetupThis screen enables simple set up of <strong>DVR</strong> motion detection, alarm and external sensor configurations4.1 REC <strong>Time</strong> 30 sec ~ 30 minOnce event recording is triggered, that channel is recorded for that period. Each channels worksindependently.4.2 Sensor In N.O/N.CThe Sensor-in terminals of the <strong>DVR</strong> are used to connect external motion sensors or door/windowcontacts.There are two types of general sensors in the market. The one is "normal mode-open“, N.O, whichmeans two sensor lines are not connected (open) in the normal mode but the lines are to be connected(close) in the activation mode. The other is "normal mode-close“, N.C, which means two sensor linesare connected (close) in the normal mode but the lines are to be disconnected (open)in the activation mode.• To return to menu, press Menu button.You have to make sure of sensor type between N.O and N.C before installation.Otherwise, it may not work properly.- N.O : Normal Open type sensor- N.C : Normal Close type sensor46
<strong>Real</strong> <strong>Time</strong> <strong>Triplex</strong> <strong>Stand</strong> <strong>Alone</strong> <strong>DVR</strong>CHAP 3. SETUP MENU4.3 Event ActionTo select notice method in order to make users get more attention when event recording occurs.1) Alarm Out ON/OFFYou can set to enable (ON) or disable (OFF) the outbound signal from the <strong>DVR</strong>.2) Sensor ON/OFFWhen <strong>DVR</strong> detects signals from external sensors, <strong>DVR</strong> will beep or OSD to get your attention.- BEEP + OSD : Beeps and shows “A” letter together. <strong>DVR</strong> records channels which are activated by sensor.- OSD : On-Screen-Display only. <strong>DVR</strong> records channels which are activated by sensor.- OFF : Disables to activate the alarm action* 4 CH model records all 4 channels, when any one or more sensors are activated with BEEP+OSD or OSDoption. But 8/16 CH models record each channel activated by sensor.3) Video Loss BEEP+OSD/ OSD/ OFFIf video signal from the cameras does not reach the <strong>DVR</strong>, a beep will sound to get your attention.- BEEP+OSD : Beeps and shows “L” letter together. No recording.- OSD : On-Screen-Display only. No recording.- OFF : Disables to activate the alarm action4) Motion BEEP+OSD/ OSD/ OFFWhen <strong>DVR</strong> detects motion on certain part of the screen, <strong>DVR</strong> will beep or OSD to get your attention.- BEEP + OSD : Beeps and shows “M” letter together. <strong>DVR</strong> records channels which are activated by motion.- OSD : On-Screen-Display only. <strong>DVR</strong> records channels which are activated by motion.- OFF : Disables to activate the alarm action* 4 CH model records all 4 channels, when any one or more video motion are activated with BEEP+OSD orOSD option. But 8/16 CH models record each channel activated by video motion.• To return to main menu, press MENU button47
<strong>Real</strong> <strong>Time</strong> <strong>Triplex</strong> <strong>Stand</strong> <strong>Alone</strong> <strong>DVR</strong>CHAP 3. SETUP MENU4.4 Motion SetupThis menu enables users to set motion functions.1) Channel CH1~CH16You must manually set each channel for the motion detection area. Select a channel for this motiondetection.2) Sensitivity 1~15It offers 1 to 15 level of sensitivity. Remember that the higher level is more sensitive to detectmotions.3) Area OFF/FULL/SET- OFF : Disable to select motion areas.- FULL : Select full area as motion area.- SET : To select the area as you desire, move to POSITON menu.4) Position- Press Enter button and surf areas in the desired channel by pressing direction button and thenpress ENTER button to select, press it again to release.- Once you select the areas, you don’t need to select them again when you get back fromother modes like OFF or FULL. It gives you easy-operation.• To return to main menu, press MENU button48
<strong>Real</strong> <strong>Time</strong> <strong>Triplex</strong> <strong>Stand</strong> <strong>Alone</strong> <strong>DVR</strong>CHAP 3. SETUP MENU5. Record SetupHere you can set recording options.5.1 Record Type 720 / 360There are two recording modes: 720x240 and 360x240.If you set it to 720 mode, <strong>DVR</strong> records the full size videos of 16 different channels.If you set it to 360 mode, <strong>DVR</strong> records the half size videos of 16 different channels.5.2 Record Speed 1~60 F/S, 120F/S (only available in 360 mode)You can select various recording speed in field per second (F/S).60 F/S in 720 mode means that it records 60 images per second.Higher field per second requires more HDD space.Depending on NTSC or PAL mode, range of fps available varies.NTSC and PAL have the following fps available:- NTSC : 1~120 F/S- PAL : 1~100 F/S5.3 Quality Level 1~6It is to set video recording quality of level 1~6. 6 is the highest quality.Higher video quality, more HDD space required.49
<strong>Real</strong> <strong>Time</strong> <strong>Triplex</strong> <strong>Stand</strong> <strong>Alone</strong> <strong>DVR</strong>CHAP 3. SETUP MENU5.4 Color Enrich ON / OFFYou can select color recording format.ON supports better color, but OFF supports less HDD space for recording.5.5 PB Speed AUTO, 1~60 F/S, 120F/S (Only available in 360 mode)You can select various playback speed in field per second (F/S).“AUTO” (Default) means that it plays videos at the same rate of recording speed.60 F/S in each mode means that it plays 60 images per second even though the video was recorded indifferent recoding speed.5.6 Channel Enables CH1 ~ CH16 / Group 1~Group 4 (120 F/S recording in 360 mode)- ON : Enable to record the channels- OFF : Disenable to record the channels- Each group indicates each 4 channels. (For example, group 1 shows CH1 ~ CH4)* 4CH model does not support Record Channel Enable function. All 4 CHs are enabled.50
<strong>Real</strong> <strong>Time</strong> <strong>Triplex</strong> <strong>Stand</strong> <strong>Alone</strong> <strong>DVR</strong>CHAP 3. SETUP MENU5.7 Audio Setup1) Channel CH1~CH16It is to select one audio channel among 16 channels.2) Icon Display ON/OFFTo enable icon of audio function in right top of screen as below.5.8 Schedule Setup1) Schedule ON/OFFTo disable (OFF) or enable (ON) Schedule recording feature.2) Day Daily/ SUN~SATSelect the desired day for schedule recording.- Daily, Sun, Mon, Tue, Wed, Thu, Fri, Sat3) <strong>Time</strong>When you finish to set Day, press ENTER button to go into the <strong>Time</strong>line. Surf left or right in thetimeline by pressing Left or Right button. If the cursor is on the desired time for schedule recording,press Up button to set or Down button to release.51
<strong>Real</strong> <strong>Time</strong> <strong>Triplex</strong> <strong>Stand</strong> <strong>Alone</strong> <strong>DVR</strong>CHAP 3. SETUP MENU6. Network SetupTo monitor and control videos remotely through network, you need to input the correct values.6.1 IP Address *000.000.000.000Set IP address of your <strong>DVR</strong> using arrow buttons. To move to other sub-menu, move cursor tothen press up or down button.6.2 Subnet Mask *255.255.255.000Set Subnet Mask of your <strong>DVR</strong> using arrow buttons. To move to other sub-menu, move cursor tofirst, then press up or down button.position first,position6.3 Gateway *000.000.000.000Set Gateway of your <strong>DVR</strong> using arrow buttons. To move to other sub-menu, move cursor tothen press up or down button.position first,6.4 Type INTERNET / INTRANET- Internet : It is recommended in Internet connection. And its display speed is slower than “INTRANET”, butit guaranties no crashed video at any network traffic condition.- Intranet : It is recommended in Intranet connection. Its display speed is faster than “INTERNET”. But thevideo will be crashed, if the network condition is not fast enough.Set INTERNET/INTRANET using Left/right button.6.5 Sequence ON / OFF- ON : It is recommended in Internet connection. It sends each channels sequentially, so Client can receiveeach channels at same speed. But if network traffic is low, it will cause lower speed of transmission.- OFF : It is recommended in Intranet connection. Some channels will be updated slowly comparing others.6.6 Network ID ******** ( up to 8 letters)6.7 Password ******** ( up to 8 letters)You Must Register Your Network ID using Network Viewer first.Press Enter button and set Network ID & Password using direction button.To access <strong>DVR</strong> through Network Viewer program, you need to set same Network ID & Password to <strong>DVR</strong>.To return to main menu, press MENU button. (All setting is in effective after when you exit the menu.)52
<strong>Real</strong> <strong>Time</strong> <strong>Triplex</strong> <strong>Stand</strong> <strong>Alone</strong> <strong>DVR</strong>CHAP 3. SETUP MENU1. we would like to recommend you to check your local Firewall or personalnetwork security programs. Sometimes they block certain ports for networksecurity purpose.2. If you don’t have right information about network configuration, please contactyour network administrator.NoteTo check and change Mac. Address, Network Server IP and Port number ofyour <strong>DVR</strong>, press CH6 button in network setup mode.The main reason of hidden menu of Mac. Address, Network Server IP and Portnumber is to prevent accidental changes by the user.53
<strong>Real</strong> <strong>Time</strong> <strong>Triplex</strong> <strong>Stand</strong> <strong>Alone</strong> <strong>DVR</strong>CHAP 4. DISPLAY MODEYou can enjoy this “live mode” functions in display mode.1. Live ModeIt converts to 16 channel live display on the screen as below by pressing Multi button.You can surf 13 CH / 9 CH / 8 CH / 6 CH / 4 CH / 1 CH display by pressing Multi button repeatedly.[ 13 CH display Mode] [ 9 CH display Mode][ 8 CH display Mode][ 6 CH display Mode]54
<strong>Real</strong> <strong>Time</strong> <strong>Triplex</strong> <strong>Stand</strong> <strong>Alone</strong> <strong>DVR</strong>CHAP 4. DISPLAY MODE[ 4 CH display Mode] [ 1 CH display Mode]2. PIP ModeYou can select PIP ( Picture In Picture ) options by pressing PIP button repeatedly. PIP mode offers aconvenient way of monitoring multiple channels while focusing more attention on a particular channel. Ithas a main video channel view and up to 3 small video channel views on the screen.You can surf 1 PIP/ 2 PIPs/ 3 PIPs mode with 4 positions by pressing PIP button repeatedly.To release this mode, press other function button on the front panel.3. Auto ModeIf you select Auto Mode, channels will be switched automatically among 17 types of display in the order of“CH 1-CH 2-CH3- …- CH 15- CH 16-16 channel Mode” and keep the order until you press other functionbutton. The <strong>DVR</strong> skips channels with no video.You can find that the <strong>DVR</strong> indicates Auto Mode in the upper left of the screen in this mode.To release this mode, press other function button on the front panel.55
<strong>Real</strong> <strong>Time</strong> <strong>Triplex</strong> <strong>Stand</strong> <strong>Alone</strong> <strong>DVR</strong>CHAP 4. DISPLAY MODE4. Pan/ Tilt/ Zoom/Focus <strong>Camera</strong> ControlControlling an external Pan/ Tilt/ Zoom/Focus camera4.1 Pan/ Tilt FunctionIndicates Pan/Tilt function.1) 16 channel display mode1. First press P/ T button in the remote controller.2. Select your desired channel by pressing P/T button repeatedly.3. Control the camera with the direction buttons (Up/ Down/ Right/ Left).4. To release this function, press P/T button repeatedly until “P/T” disappears on the screen.2) One channel Mode1. First select your desired channel installed Pan/Tilt camera by pressing channel selection button.2. And then you will see a full-size screen.3. Press P/T button in the remote controller.4. Control the camera with the direction buttons (Up/ Down/ Right/ Left).5. To release this function, press P/T button again in the remote controller.56
<strong>Real</strong> <strong>Time</strong> <strong>Triplex</strong> <strong>Stand</strong> <strong>Alone</strong> <strong>DVR</strong>CHAP 4. DISPLAY MODE4.2 Zoom/ Focus Function1) 16 channel display modeIndicates Zoom Focus function.1. First press Z/ F button in the remote controller.2. Select your desired channel by pressing Z/F button repeatedly.3. Control the camera with the direction buttons (Up/ Down/ Right/ Left).4. To release this function, press Z/F button repeatedly until “Z/F” disappears on the screen.2) One channel Mode1. First select your desired channel installed Zoom/Focus camera by pressing channel selection button.2. And then you will see a the full-size screen.3. Press Z/F button in the remote controller.4. Control the camera with the direction buttons (Up/ Down/ Right/ Left).5. To release this function, press Z/F button again in the remote controller.57
<strong>Real</strong> <strong>Time</strong> <strong>Triplex</strong> <strong>Stand</strong> <strong>Alone</strong> <strong>DVR</strong>CHAP 4. DISPLAY MODE5. Digital ZoomYou can magnify a certain part of the full size screen two times digitally when you use this functionas described below. This function can be applied to all display and search modes.You can operate this function with only remote controller.1. Select the desired channel among 16 channels.2. Press Zoom button in the remote controller.3. Select the area by pressing Left/Right/Up/Down buttonin the remote controller .And then press Zoom button again.4. You can see the video that is magnified two times digitally.5. To exit this mode, push Zoom button againin the remote controller.6. PanoramaThis function enables you to monitor each channel with 16 split-channel panorama mode in the screen.It can be applied in playback modes.1. Play your desired video in the recording list first.2. Press Panorama button in the remote controller.3. Select your desired channel by pressing Panorama button repeatedly.4. To exit this function, press Multi button.58
<strong>Real</strong> <strong>Time</strong> <strong>Triplex</strong> <strong>Stand</strong> <strong>Alone</strong> <strong>DVR</strong>CHAP 5. RECORDING MODE3211. If you press REC button, you will see REC in green on the right bottom of the screen. It means the <strong>DVR</strong> isin the recording process.- MA-REC : It records videos in Master HDD.-SL-REC : It records videos in Slave HDD.• To release REC function, press REC button again.2. It indicates that playback function is on in live display mode, which is one of our main features,that is simultaneous multi-function operation in one screen.-MA-PLAY :It plays videos that have been stored in Master HDD.-SL-PLAY :It plays videos that have been stored in Slave HDD.You will know how to initiate Playback mode in following 2 sections, Search Mode and <strong>Triplex</strong> Function.3. It means that audio function is set to channel 1.59
<strong>Real</strong> <strong>Time</strong> <strong>Triplex</strong> <strong>Stand</strong> <strong>Alone</strong> <strong>DVR</strong>CHAP 6. PLAYBACK - SEARCH MODE[ Search Menu ]With <strong>Triplex</strong> function, you can enter search modewhile the <strong>DVR</strong> is in live or recording mode.So you don’t need to stop recording to initiatePlayback mode.Press SEARCH button and move to one option to retrievevideo using “Up/Down” button.Then press ENTER button to enter the selected searchoption.To watch a desired recorded video, press ENTER button atthe event highlighted. Then <strong>DVR</strong> replay the video.Also you can designate exact date and time to retrievevideo using DATE/TIME SEARCH option.You can stop the video at any time by pressing “STOP”button. Also FF, REW, PAUSE are available in Playback mode.1. Date / <strong>Time</strong> List SearchSelect Master or Slave using SER button.It shows a list of recordings triggered by Manual or Schedule Recording.<strong>DVR</strong> generates separate event list at every hours, even though yourecord for long time for easy operation.It supports up to 1,000 recordings.You can select your desired date/ time in each recording list.• To return to search menu, press MENU button again.And press MENU button in search menu, to exit to live display mode.2. Event List SearchSelect Master or Slave using SER button.It shows a list of recordings triggered by the motion and external event.It supports up to 1,000 recordings.You can select your desired date/ time in each recording list.• To return to search mode, press MENU button again.And press MENU button in search menu, to exit to live display mode.3. Date / <strong>Time</strong> SearchSelect Master or Slave using SER button.You can designate a specific date and time to retrieve video. If you inputInvalid date/time, <strong>DVR</strong> will display the closest video.• To return to search mode, press MENU button.And press MENU button in search menu, to exit to live display mode.60
<strong>Real</strong> <strong>Time</strong> <strong>Triplex</strong> <strong>Stand</strong> <strong>Alone</strong> <strong>DVR</strong>CHAP 7. PLAYBACK - TRIPLEX FUNCTIONYou can now experience triplex function (simultaneous recording, playback and network transmission)with our new line of Digital Video Recorders.- Press TRI button in live or recording mode, thenyou will see 1~8 live channels and 1~8 PBchannels.To start playback, press PLAY button, then PBchannels will display continuing last retrieved video.- To see 9~16 channels live display and playback,press Up/Down button.- To distinguish live and playback channels in onescreen, channel names of playback are displayedas PB 1~16.Date/<strong>Time</strong> in white means current real-time.Date/<strong>Time</strong> in green means playback date/time.-If you press channel button in this mode, you cansee the full channel video of playback mode in thescreen.- To see all 16 channels playback, press PB button,and to go back to <strong>Triplex</strong> mode, press TRI button.- To exit to live display mode, press Multi button.NoteTo switch the hard drive between Master and Slave, press All button(remote control unit) or SER (front panel) in one of three sub-search menu.61
<strong>Real</strong> <strong>Time</strong> <strong>Triplex</strong> <strong>Stand</strong> <strong>Alone</strong> <strong>DVR</strong>CHAP 8. PLAYBACK – TRICKPLAY & MULTI CH. DISPLAYYou can get FF, REW and Pause during Playback mode. It supports 5 steps of FF and 4 steps of REW.To change the FF/REW speeds, press FF/REW buttons repeatedly.In Playback mode, there are two display mode. The one is single channel mode and the other is multichannels mode.To see one channel full screen display, press channel number buttons. And to go back to multi channelsdisplay mode, press current single channel button again, then you will see multiple channels on thescreen. To change the split mode, press Up/Down buttons to find your favorite multi channels displaymode.62
<strong>Real</strong> <strong>Time</strong> <strong>Triplex</strong> <strong>Stand</strong> <strong>Alone</strong> <strong>DVR</strong>CHAP 9. CD / USB BACKUP MODEYou can copy video stored in <strong>DVR</strong> into CD or USB memory stick in Playback mode. During CD/USB backup,all other operation are prohibited. You can retrieve video from CD/USB memory stick using our Net Viewereasily. You can burn whole blank CD / USB memory stick or stop burning in the middle of burning process.1. Insert blank CD into CD-Burner or insert USB memory stickto USB port.2. Press SER button and select your desired video in the list.3. Play the selected video.63
<strong>Real</strong> <strong>Time</strong> <strong>Triplex</strong> <strong>Stand</strong> <strong>Alone</strong> <strong>DVR</strong>CHAP 9. CD / USB BACKUP MODE4. Press Info button of Front panel, then you will see menu to selecteither CD or USB backup.Or press CD Backup / USB Backup button of Remote Controller,then you can get in its Backup mode.5. To backup to USB memory stick, select USB using Left () button,and press Select button on the Remote Control Unit.Then it starts writing playback video/audio to USB memory stick.When it completes burning, it goes into Pause mode. Also you canstop USB backup using Left () button on Remote Control Unit.6. To backup to CD, select CD and press Select button on the RemoteControl Unit. Then <strong>DVR</strong> checks the CD burner and blank CD available.7. If <strong>DVR</strong> is ready to burn CD, you will see the READY condition.- Ready : shows that it is ready for CD backup.64
<strong>Real</strong> <strong>Time</strong> <strong>Triplex</strong> <strong>Stand</strong> <strong>Alone</strong> <strong>DVR</strong>CHAP 9. CD / USB BACKUP MODE8. Press ENTER button, then it starts CD backup showing the statusat bottom of screen as below.- Burning : shows that it is in the process.9. When it completes burning, it shows CLOSE during its closingprocedure. Also you can stop CD burning using button (Remotecontrol unit).- Close : shows that it finishes the process.NoteSome CD-R or CD-RW can not be burnt fully or hascompatibility problem. In this case, <strong>DVR</strong> can not burnfull 730MB data into CD and we recommend to useUSB backup.10. Take out the CD or USB memory stick from <strong>DVR</strong>.If you want to see the video stored in CD / USB memory stick,put CD into PC or insert USB memory stick to PC which NetViewer is installed in.You can retrieve backup data from USB memory stick or CDusing File playback or CD Playback functions of Net Viewer.11. To return to live display mode, press MENU button.65
<strong>Real</strong> <strong>Time</strong> <strong>Triplex</strong> <strong>Stand</strong> <strong>Alone</strong> <strong>DVR</strong>CHAP 10. NETWORK VIEWER1. System Requirement- Pentium III or above recommended- O/S : Microsoft Windows XP, 2000- 256MB RAM or above recommended- Super VGA 16M or above recommended- 10/100 Base T network card for LAN operation2. Network EnvironmentMinimumRecommendClient PCMore than 128 KbpsMore than 3 Mbps<strong>DVR</strong>More than 128 KbpsMore than 3 Mbps3. Network Viewer InstallationTo start network viewer installation,1. Start Microsoft Windows.2. Insert installation CD into the CD-ROM drive.3. Execute Setup.exe, then it installs NetViewer automatically and generates Icon on the Desk Top screen.4. Click the NetViewer Icon, then network viewer will appear on the screen as below.66
<strong>Real</strong> <strong>Time</strong> <strong>Triplex</strong> <strong>Stand</strong> <strong>Alone</strong> <strong>DVR</strong>CHAP 10. NETWORK VIEWER4. Functions and Network Setup13 14 151 2 3 4 5 678 9101211No Names Description1 Play / Pause Get video or Pause in each operation mode2 Reverse Step Play Reverse frame Advance3 Forward Step Play Forward frame advance4 Go to Start Move to the start point of video5 Go to End Move to the end point of video6 Channel Selection Select a channel in single channel mode7 Operation Mode Select operation mode8 Log In (Connect) Connect to <strong>DVR</strong> with network IP & Password or <strong>DVR</strong> IP address9 Record Make remote <strong>DVR</strong> start or stop recording10 Display Mode Select display split mode67
<strong>Real</strong> <strong>Time</strong> <strong>Triplex</strong> <strong>Stand</strong> <strong>Alone</strong> <strong>DVR</strong>CHAP 10. NETWORK VIEWER11 LED<strong>DVR</strong>Show that the <strong>DVR</strong> is controlled by NetViewerAVIShow that video is stored into local PC in AVI file formatLocal Show that video is stored into local PC in MJPEG file formatConnect Show that NetViewer is connected to <strong>DVR</strong>Disconnect Show that NetViewer is not connectedRead Show NetViewer is reading data from the CD, USB or HDD of local PC12 Close Close the netViewer13 Local Store the video in MJPEG format into local PC14 AVI Store the video in AVI format into local PC15 Setup Configuration of NetViewerNoteHow to record video in AVI or MJPEG formatYou can enjoy this function in all mode.1. Record in AVI formatTo start recording, press AVI button and to stop it, press same button again.When you press Setup button to select AVI codec resided in your PC,you might see several AVI codec. During the installation of the NetworkViewer, please try to use those codec one by one to figure out whichone works fine. Some of AVI codec in the list might not work properly.And please remember the AVI codec, which you selected, to use itcontinuously. You should register proper AVI codec, before run NetViewer.2. Record by Local (MJPEG) formatTo start recording, press Local button and to stop it, press same button again.All videos are recorded in the default directory.And also each LED (AVI or Local) is activated when the function is on.NoteDefault directory is as below.1. AVI file - C:\<strong>DVR</strong> 2. Local (MJPEG) file – C:\<strong>DVR</strong>NoteYou should setup network configuration during installation of <strong>DVR</strong>and Network Viewer for remote control and monitoring through Network.1. Click Log In (Connect) button and register your own network ID, Passwordand E-mail address for Dynamic IP Support and Event Notification. It isrequired only for the first connection during installation of <strong>DVR</strong> and NetworkSetup . If you use more than one <strong>DVR</strong> in a intranet, you should set differentPort numbers to each <strong>DVR</strong>s.2. ID and Password are composed of 8 letters. You should get your ownunique ID through authentication process first. Then you can type in yourown Password and E-mail address.3. You should type same ID and Password into Network Setup menu of <strong>DVR</strong>.4. If you want to use static IP address for <strong>DVR</strong>, please type <strong>DVR</strong> IP addressinto IP address field.68
<strong>Real</strong> <strong>Time</strong> <strong>Triplex</strong> <strong>Stand</strong> <strong>Alone</strong> <strong>DVR</strong>CHAP 10. NETWORK VIEWERNoteNETWOK ID RegistrationWhen you press Log In button, you will see Connect Manager.If you are installing <strong>DVR</strong> and Network Viewer now, please press Setting.Press Create NETWORK ID and type in your desired Network ID and E-MAILaddress. Ann Click Register button.Then Network Viewer will check the availability and ask you to try different ID if it isregistered already by other <strong>DVR</strong> users.To receive Alarm notification from <strong>DVR</strong> when events are happened, select ReceiveNotification Mail option. Then <strong>DVR</strong> will send an e-mail to you e-mail address when itdetects events triggered by sensors and/or video motions.And you can use Update Account Information to change your E-mail address.69
<strong>Real</strong> <strong>Time</strong> <strong>Triplex</strong> <strong>Stand</strong> <strong>Alone</strong> <strong>DVR</strong>CHAP 10. NETWORK VIEWERNote3. Dynamic IP ConnectionOur D<strong>DVR</strong>LS (Dynamic <strong>DVR</strong> Locator Service) enables you connecting to <strong>DVR</strong> onlywith your registered Network ID and password4. Direct (Static) IP ConnectionAlso you can use Direct IP connection with type in <strong>DVR</strong> IP address and Password.NoteAddress BookYou can manage and access multiple <strong>DVR</strong>s easily using Address Book.After when you register each <strong>DVR</strong>s to D<strong>DVR</strong>LS, you can register IDs of each <strong>DVR</strong>sinto Address Book.Then you can connect to each <strong>DVR</strong> and switch one to another using this function.If you try to add ID which is not registered, you will see error message.70
<strong>Real</strong> <strong>Time</strong> <strong>Triplex</strong> <strong>Stand</strong> <strong>Alone</strong> <strong>DVR</strong>CHAP 10. NETWORK VIEWER5. OperationThis NetViewer program has 5 types of operation modes.[ Live View / Playback / Drive Scan / File / USB Backup Playback / CD Backup Playback ]Each operation mode is designed for its own purpose.Please refer to the details for your use.If you want to disconnect Remote access connected from unknown client, press INFO button thenpress STOP button at <strong>DVR</strong> side.No Mode Description1 Live View To monitor live display2 Playback To playback videos in the HDD of <strong>DVR</strong>3 Drive Scan4File / USB Backup Playback5 CD Backup Playback To play videos stored in CDTo search videos from <strong>DVR</strong> HDD in connection with local PCTo play videos stored in Local PC or USB memory stick5.1 Live View ModeTo connect to <strong>DVR</strong>,1. Press Setup button and select options.2. Press Log In (Connect) button and type in your ID and password.* <strong>DVR</strong> sends only channels which are displayed on NetViewer. If you choose only one channel, itsends only selected channel to increase frame rate over the network.71
<strong>Real</strong> <strong>Time</strong> <strong>Triplex</strong> <strong>Stand</strong> <strong>Alone</strong> <strong>DVR</strong>CHAP 10. NETWORK VIEWER5.2 Playback ModeThis mode enables you to access the recording list in the remote <strong>DVR</strong>.When this function is on, “<strong>DVR</strong>” LED below is activated.1<strong>23</strong>4No Names Description1 HDD Selection Select HDD between master and slave2 Event List Access event list in the remote <strong>DVR</strong>3 Record List Access manual / schedule recording list in the remote <strong>DVR</strong>4 Date/<strong>Time</strong> Search Search the video at specific date/time in the remote <strong>DVR</strong>• To connect to Playback mode,1. Press Setup button and select options.2. Press Log In button and type in your ID and password.3. Click operation mode and select PLAYBACK mode.• To access event list or all recording list,1. Select a HDD between master and slave in the HDD selection menu.2. Press Select button to see the list.3. Event or all recording list will be shown in the screen.4. Select your desired one from the list, then click OK button.5. Press Play button and you will get playback of the video.To pause the video, press Play button again.72
<strong>Real</strong> <strong>Time</strong> <strong>Triplex</strong> <strong>Stand</strong> <strong>Alone</strong> <strong>DVR</strong>CHAP 10. NETWORK VIEWER5.3 Drive Scan ModeYou can take out HDD from <strong>DVR</strong> and plug it into your PC. And you can see the video from that HDDusing this function.12No Names Description1 Playback Speed Select playback speed2 HDD Selection Select the HDD• To connect to Drive Scan mode,1. Click operation mode and select Drive Scan mode.2. Set playback speed and select HDD which was used in <strong>DVR</strong> to record video.3. Press Play button.4. You will get the videos from the HDD.73
<strong>Real</strong> <strong>Time</strong> <strong>Triplex</strong> <strong>Stand</strong> <strong>Alone</strong> <strong>DVR</strong>CHAP 10. NETWORK VIEWER5.4 File / USB Back-up Playback ModeThis mode enables you to retrieve date stored in local PC or USB memory stick.12No Names Description1 Track Bar Click and drag to go to any point of the file2 Open Click Open button to select file to retrieve.• To connect to File / USB Back-up Playback mode,1. Click operation mode and select FILE PLAY mode.2. Select the file from hard drive or USB memory stick using OPEN button.3. Press Play button to start Playback and to Pause, press same button.74
<strong>Real</strong> <strong>Time</strong> <strong>Triplex</strong> <strong>Stand</strong> <strong>Alone</strong> <strong>DVR</strong>CHAP 10. NETWORK VIEWER5.5 CD Playback ModeThis mode enables you to play video back up CD.12No Names Description1 Drive Selection Select the drive that CD-ROM is inserted2 Start / Stop It saves CD data as a file in Local PC• To connect to CD Play mode,1. Press Setup button and select options.2. Press Log In button and type in your ID and password.3. Click operation mode and select CD Play mode.• To play data backup CD,1. Select the drive that CD-ROM is inserted in the Drive Selection menu.2. To play video from CD, press Play button and to Pause, press same button.3. To save the video from CD to your local hard drive, use Start and Stop buttons.75
<strong>Real</strong> <strong>Time</strong> <strong>Triplex</strong> <strong>Stand</strong> <strong>Alone</strong> <strong>DVR</strong>CHAP 10. NETWORK VIEWER5.6 Snap shot and PrintThis mode enables you to capture and print video.• To save video and print it,1. Select any channel and click right button of your mouse.2. Then you will see 3 sub-menu.3. You can capture one channel or all available channels in JPEG format, also you can print itusing the default printer which is registered in your PC.76
<strong>Real</strong> <strong>Time</strong> <strong>Triplex</strong> <strong>Stand</strong> <strong>Alone</strong> <strong>DVR</strong>CHAP 11. WEB VIEWER - CONNECT <strong>DVR</strong> VIA WEB BROWSER1. System Requirement- Pentium III or above recommended- O/S : Microsoft Windows XP, 2000- 256MB RAM or above recommended- Super VGA 16M or above recommended- 10/100 Base T network card for LAN operation2. Network EnvironmentMinimumRecommendClient PCMore than 128 KbpsMore than 3 Mbps<strong>DVR</strong>More than 128 KbpsMore than 3 Mbps3. Connect <strong>DVR</strong> via Web Browser1. Confirm the registration of Network ID and Password using Network Viewer during installation of <strong>DVR</strong>.2. Confirm Network ID and Password in Network Setup Menu of <strong>DVR</strong> during installation of <strong>DVR</strong>..3. You should register Network ID and Password before connecting <strong>DVR</strong> via web browser.4. Launch Web Browser.5. Go to www.dvrviewer.com, then you will get the screen below. (If your computer system blocks ActiveXcontrol, please see next section, 4. Web Browser setup to enable Web Viewer, to enable this function.)77
<strong>Real</strong> <strong>Time</strong> <strong>Triplex</strong> <strong>Stand</strong> <strong>Alone</strong> <strong>DVR</strong>CHAP 11. WEB VIEWER - CONNECT <strong>DVR</strong> VIA WEB BROWSER4. Web Browser setup to enable Web ViewerNoteIf you experience that your web browser protect Web Viewer,1. Enable all option regarding ActiveX controls.2. Open web browser, select Tools / Internet Options /<strong>Security</strong> /Custom Level,and select Enable following to the example below.3. Go to www.dvrviewer.com again.78
<strong>Real</strong> <strong>Time</strong> <strong>Triplex</strong> <strong>Stand</strong> <strong>Alone</strong> <strong>DVR</strong>CHAP 11. WEB VIEWER - CONNECT <strong>DVR</strong> VIA WEB BROWSER5. Functions and Network Setup1 2 34 5 6789No Names Description1 Log In Connect to <strong>DVR</strong>2 Record Start <strong>DVR</strong> record start3 Record Stop <strong>DVR</strong> record stop4 Record into PC Record coming video from <strong>DVR</strong>, Record Start/Stop toggle5 Image Capture Still image capture in JPEG format6 Playback Playback videos in <strong>DVR</strong> and local PC7 Channel Selection Select channel for each video window8 Video Adjustment Adjust Brightness, Contrast, Hue and Saturation for each channel9 Display Mode Select display mode79
<strong>Real</strong> <strong>Time</strong> <strong>Triplex</strong> <strong>Stand</strong> <strong>Alone</strong> <strong>DVR</strong>CHAP 11. WEB VIEWER - CONNECT <strong>DVR</strong> VIA WEB BROWSER6. Log InTo connect to <strong>DVR</strong>,1. Press Log In button and type in your Network ID and password or IP address of <strong>DVR</strong>.Please remember that Network ID and Password should be authenticated during installationof <strong>DVR</strong> and Network Viewer.2. Press OK button and then you will get live display.80
<strong>Real</strong> <strong>Time</strong> <strong>Triplex</strong> <strong>Stand</strong> <strong>Alone</strong> <strong>DVR</strong>CHAP 11. WEB VIEWER - CONNECT <strong>DVR</strong> VIA WEB BROWSER7. PlaybackTo retrieve video from <strong>DVR</strong> or local PC,1. Press Playback button, then you will see sub window.2. You can retrieve video from <strong>DVR</strong> in 3 different ways.- Select master or slave HDD of <strong>DVR</strong>.- Press Event List button, to get sensor, motion and network driven recording list.- Press Record List button, to get schedule and manual recording list.- Set Calendar and time, to get recording list of a specific time period.- Press Play and Stop button to start and stop playback.3. You can retrieve video from local PC.- Press directory button, to designate the video file in your PC.- Use 6 buttons for Go-to-start, Reverse frame advance, Playback, Stop, Forward frame advanceand Go-to-end.81
<strong>Real</strong> <strong>Time</strong> <strong>Triplex</strong> <strong>Stand</strong> <strong>Alone</strong> <strong>DVR</strong>CHAP 12. SYSTEM INFORMATIONIt shows all information about the <strong>DVR</strong> system like HDD, CD-burner and software version.You can access system information easily just by pressing INFO (Information) button.1) MASTER- Model : It shows the model no. of Master HDD.- Size : It shows the size of Master HDD.- Rec. : It means the capacity of used HDD.- Over : It means how many times the HDD is overwritten.2) SLAVE- Model : It shows the model no. of Master HDD.- Size : It shows the size of Master HDD.- Rec. : It means the capacity of used HDD.- Over : It means how many times the HDD is overwritten.3) CD-RW- It shows the model no. of CD-Burner installed in the <strong>DVR</strong>.4) USB DRIVE- It shows available space in USB memory stick.5) Version- It shows current software version of <strong>DVR</strong>.• To exit from this menu, press INFO (Information) button again.82
<strong>Real</strong> <strong>Time</strong> <strong>Triplex</strong> <strong>Stand</strong> <strong>Alone</strong> <strong>DVR</strong>CHAP 13. Q & A1 The system power does not turn on.☞ Check if the power cable is connected correctly.☞ Check if the input voltage is correct.☞ If the system power does not turn on when the power cable is connected correctly,please contact the local distributor or manufacturer.2 The system power is turned on, but no video is displayed on the monitor.☞ Check if the monitor power cable is connected properly☞ Check to make sure the monitor is turned on.☞ Check if the video output cable of the <strong>DVR</strong> is properly connected to the monitor.☞ Unplug the power cable and plug in again.3 The camera numbers are displayed on the screen, but camera images are not displayed.☞ Check if the camera video output is connected to the <strong>DVR</strong> system correctly.☞ Check if the power cable on the camera is connected correctly.☞ Check if the video cable connecting the camera to the <strong>DVR</strong> system has a problem.☞ This problem can occur because of weak video signal if the video is coming throughthe video splitter when the video is connected to multiple systems. Connect the cameradirectly to the <strong>DVR</strong>.☞ Turn off <strong>DVR</strong> system and turn it on again.4 The camera video is shown on the screen, but the system doesn’t record video.☞ Check to make sure the recording mode in the recording setting mode is not set to “NONE”.☞ Turn off the <strong>DVR</strong> and turn it on again.5 It is impossible to search through the recorded video.☞ Check if there is a recorded video data at the time that you are trying to search on the table.☞ If there is no recorded video data, check to make sure the recording mode in the recordingsetting mode is not set to “NONE”.83
<strong>Real</strong> <strong>Time</strong> <strong>Triplex</strong> <strong>Stand</strong> <strong>Alone</strong> <strong>DVR</strong>CHAP 12. Q & A6 Audio data recorded with video data is not playing.☞ Check if the audio recording option is correctly set to the camera you wish to record audio.☞ Check if the audio mute is enabled.☞ Check if the microphone and speaker port on the rear of <strong>DVR</strong> system are connected correctly.☞ Check if the connected microphone is working properly.☞ Check if the connected speaker is working properly.7Color of videos are strange or videos are shown abnormally.☞ Check if the camera connected to the system has a problem. Check to make sure the camera isnot damaged by trying another camera into a working video output.☞ Check if the video system setting is the same with your camera system. Depending on yourregion, the camera system can support either PAL, or NTSC. Depending on the camera system,the video process can differ greatly, therefore it can be difficult to recognize the video data if thevideo system setting is different from the camera system.8There are a lot of (screen) noise on the image.☞ Check if the video signal output from the camera has a problem.Check to make sure the camerais not damaged by trying another camera into a working video output.☞ Check if the video cable connecting the camera and the <strong>DVR</strong> is cut, cross-wired, or shorted.☞ Check if there is a high voltage wire around the video cable connecting the camera to the <strong>DVR</strong>system. It can cause the noise problem to decrease video quality.☞ Check if the video cable connecting the camera to the <strong>DVR</strong> system is the correct video cable.When a normal power-supplying cable is used instead of the video cable, screen noise can begenerated.9Sometimes the system restarts itself.☞ The system can restart itself due to watchdog function when any problem occurs to the <strong>DVR</strong>.10The connected sensor is not operating.☞ Check if the type of sensor in Event Setup menu is the same with the connected sensor.☞ Check if the system is set to use the sensor in recording schedule window in the recordingsetting menu.☞ Check if the power cable of the sensor is properly connected.☞ Check if the signal cable of the sensor is properly connected.84