How to build a cat enclosure - City of Tea Tree Gully
How to build a cat enclosure - City of Tea Tree Gully
How to build a cat enclosure - City of Tea Tree Gully

Create successful ePaper yourself
Turn your PDF publications into a flip-book with our unique Google optimized e-Paper software.
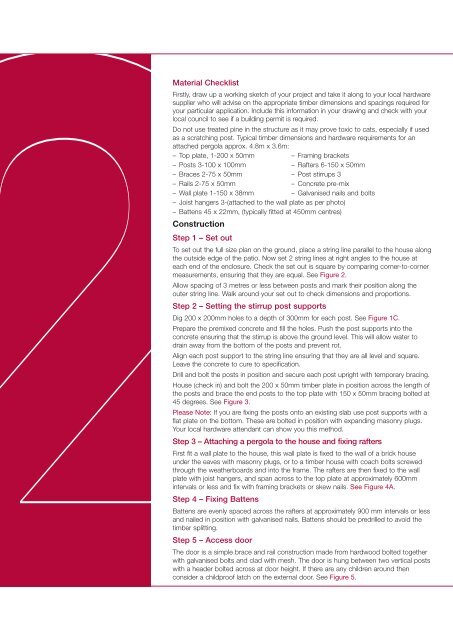
Material ChecklistFirstly, draw up a working sketch <strong>of</strong> your project and take it along <strong>to</strong> your local hardwaresupplier who will advise on the appropriate timber dimensions and spacings required foryour particular appli<strong>cat</strong>ion. Include this information in your drawing and check with yourlocal council <strong>to</strong> see if a <strong>build</strong>ing permit is required.Do not use treated pine in the structure as it may prove <strong>to</strong>xic <strong>to</strong> <strong>cat</strong>s, especially if usedas a scratching post. Typical timber dimensions and hardware requirements for anattached pergola approx. 4.8m x 3.6m:– Top plate, 1-200 x 50mm – Framing brackets– Posts 3-100 x 100mm – Rafters 6-150 x 50mm– Braces 2-75 x 50mm – Post stirrups 3– Rails 2-75 x 50mm – Concrete pre-mix– Wall plate 1-150 x 38mm – Galvanised nails and bolts– Joist hangers 3-(attached <strong>to</strong> the wall plate as per pho<strong>to</strong>)– Battens 45 x 22mm, (typically fitted at 450mm centres)ConstructionStep 1 – Set outTo set out the full size plan on the ground, place a string line parallel <strong>to</strong> the house alongthe outside edge <strong>of</strong> the patio. Now set 2 string lines at right angles <strong>to</strong> the house ateach end <strong>of</strong> the <strong>enclosure</strong>. Check the set out is square by comparing corner-<strong>to</strong>-cornermeasurements, ensuring that they are equal. See Figure 2.Allow spacing <strong>of</strong> 3 metres or less between posts and mark their position along theouter string line. Walk around your set out <strong>to</strong> check dimensions and proportions.Step 2 – Setting the stirrup post supportsDig 200 x 200mm holes <strong>to</strong> a depth <strong>of</strong> 300mm for each post. See Figure 1C.Prepare the premixed concrete and fill the holes. Push the post supports in<strong>to</strong> theconcrete ensuring that the stirrup is above the ground level. This will allow water <strong>to</strong>drain away from the bot<strong>to</strong>m <strong>of</strong> the posts and prevent rot.Align each post support <strong>to</strong> the string line ensuring that they are all level and square.Leave the concrete <strong>to</strong> cure <strong>to</strong> specifi<strong>cat</strong>ion.Drill and bolt the posts in position and secure each post upright with temporary bracing.House (check in) and bolt the 200 x 50mm timber plate in position across the length <strong>of</strong>the posts and brace the end posts <strong>to</strong> the <strong>to</strong>p plate with 150 x 50mm bracing bolted at45 degrees. See Figure 3.Please Note: If you are fixing the posts on<strong>to</strong> an existing slab use post supports with aflat plate on the bot<strong>to</strong>m. These are bolted in position with expanding masonry plugs.Your local hardware attendant can show you this method.Step 3 – Attaching a pergola <strong>to</strong> the house and fixing raftersFirst fit a wall plate <strong>to</strong> the house, this wall plate is fixed <strong>to</strong> the wall <strong>of</strong> a brick houseunder the eaves with masonry plugs, or <strong>to</strong> a timber house with coach bolts screwedthrough the weatherboards and in<strong>to</strong> the frame. The rafters are then fixed <strong>to</strong> the wallplate with joist hangers, and span across <strong>to</strong> the <strong>to</strong>p plate at approximately 600mmintervals or less and fix with framing brackets or skew nails. See Figure 4A.Step 4 – Fixing BattensBattens are evenly spaced across the rafters at approximately 900 mm intervals or lessand nailed in position with galvanised nails. Battens should be predrilled <strong>to</strong> avoid thetimber splitting.Step 5 – Access doorThe door is a simple brace and rail construction made from hardwood bolted <strong>to</strong>getherwith galvanised bolts and clad with mesh. The door is hung between two vertical postswith a header bolted across at door height. If there are any children around thenconsider a childpro<strong>of</strong> latch on the external door. See Figure 5.