How to build a cat enclosure - City of Tea Tree Gully
How to build a cat enclosure - City of Tea Tree Gully
How to build a cat enclosure - City of Tea Tree Gully

Create successful ePaper yourself
Turn your PDF publications into a flip-book with our unique Google optimized e-Paper software.
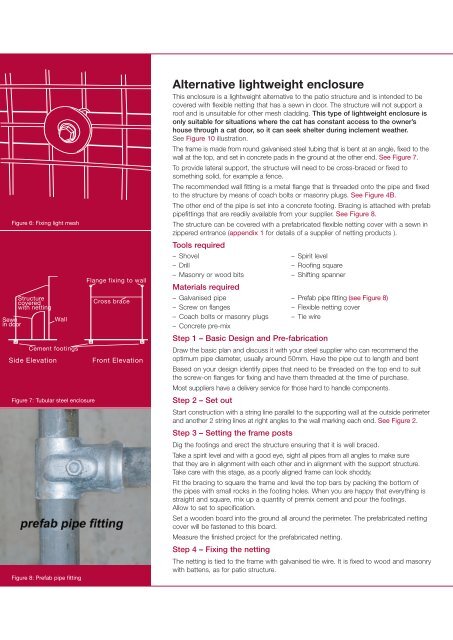
Figure 6: Fixing light meshSewnin doorStructurecoveredwith nettingWallCement footingsSide ElevationFigure 7: Tubular steel <strong>enclosure</strong>Figure 8: Prefab pipe fittingFlange fixing <strong>to</strong> wallCross braceFront ElevationAlternative lightweight <strong>enclosure</strong>This <strong>enclosure</strong> is a lightweight alternative <strong>to</strong> the patio structure and is intended <strong>to</strong> becovered with flexible netting that has a sewn in door. The structure will not support aro<strong>of</strong> and is unsuitable for other mesh cladding. This type <strong>of</strong> lightweight <strong>enclosure</strong> isonly suitable for situations where the <strong>cat</strong> has constant access <strong>to</strong> the owner’shouse through a <strong>cat</strong> door, so it can seek shelter during inclement weather.See Figure 10 illustration.The frame is made from round galvanised steel tubing that is bent at an angle, fixed <strong>to</strong> thewall at the <strong>to</strong>p, and set in concrete pads in the ground at the other end. See Figure 7.To provide lateral support, the structure will need <strong>to</strong> be cross-braced or fixed <strong>to</strong>something solid, for example a fence.The recommended wall fitting is a metal flange that is threaded on<strong>to</strong> the pipe and fixed<strong>to</strong> the structure by means <strong>of</strong> coach bolts or masonry plugs. See Figure 4B.The other end <strong>of</strong> the pipe is set in<strong>to</strong> a concrete footing. Bracing is attached with prefabpipefittings that are readily available from your supplier. See Figure 8.The structure can be covered with a prefabri<strong>cat</strong>ed flexible netting cover with a sewn inzippered entrance (appendix 1 for details <strong>of</strong> a supplier <strong>of</strong> netting products ).Tools required– Shovel – Spirit level– Drill – Ro<strong>of</strong>ing square– Masonry or wood bits – Shifting spannerMaterials required– Galvanised pipe – Prefab pipe fitting (see Figure 8)– Screw on flanges – Flexible netting cover– Coach bolts or masonry plugs – Tie wire– Concrete pre-mixStep 1 – Basic Design and Pre-fabri<strong>cat</strong>ionDraw the basic plan and discuss it with your steel supplier who can recommend theoptimum pipe diameter, usually around 50mm. Have the pipe cut <strong>to</strong> length and bentBased on your design identify pipes that need <strong>to</strong> be threaded on the <strong>to</strong>p end <strong>to</strong> suitthe screw-on flanges for fixing and have them threaded at the time <strong>of</strong> purchase.Most suppliers have a delivery service for those hard <strong>to</strong> handle components.Step 2 – Set outStart construction with a string line parallel <strong>to</strong> the supporting wall at the outside perimeterand another 2 string lines at right angles <strong>to</strong> the wall marking each end. See Figure 2.Step 3 – Setting the frame postsDig the footings and erect the structure ensuring that it is well braced.Take a spirit level and with a good eye, sight all pipes from all angles <strong>to</strong> make surethat they are in alignment with each other and in alignment with the support structure.Take care with this stage, as a poorly aligned frame can look shoddy.Fit the bracing <strong>to</strong> square the frame and level the <strong>to</strong>p bars by packing the bot<strong>to</strong>m <strong>of</strong>the pipes with small rocks in the footing holes. When you are happy that everything isstraight and square, mix up a quantity <strong>of</strong> premix cement and pour the footings.Allow <strong>to</strong> set <strong>to</strong> specifi<strong>cat</strong>ion.Set a wooden board in<strong>to</strong> the ground all around the perimeter. The prefabri<strong>cat</strong>ed nettingcover will be fastened <strong>to</strong> this board.Measure the finished project for the prefabri<strong>cat</strong>ed netting.Step 4 – Fixing the nettingThe netting is tied <strong>to</strong> the frame with galvanised tie wire. It is fixed <strong>to</strong> wood and masonrywith battens, as for patio structure.