How to build a cat enclosure - City of Tea Tree Gully
How to build a cat enclosure - City of Tea Tree Gully
How to build a cat enclosure - City of Tea Tree Gully

Create successful ePaper yourself
Turn your PDF publications into a flip-book with our unique Google optimized e-Paper software.
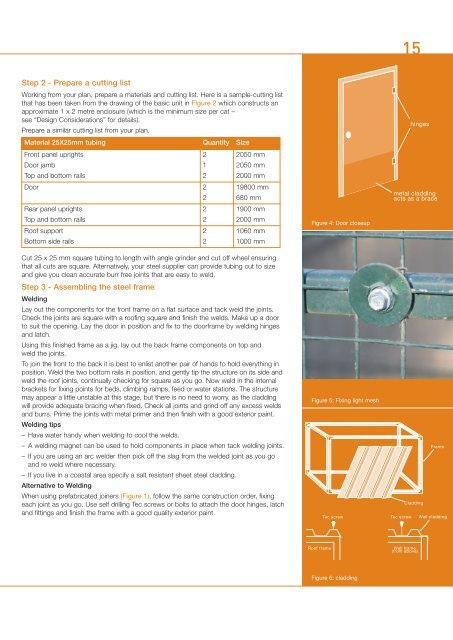
15Step 2 - Prepare a cutting listWorking from your plan, prepare a materials and cutting list. Here is a sample-cutting listthat has been taken from the drawing <strong>of</strong> the basic unit in Figure 2 which constructs anapproximate 1 x 2 metre <strong>enclosure</strong> (which is the minimum size per <strong>cat</strong> –see “Design Considerations” for details).Prepare a similar cutting list from your plan.Material 25X25mm tubing Quantity SizeFront panel uprightsDoor jambTop and bot<strong>to</strong>m rails2122050 mm2050 mm2000 mmDoor 2219800 mm680 mmRear panel uprightsTop and bot<strong>to</strong>m rails221900 mm2000 mmRo<strong>of</strong> supportBot<strong>to</strong>m side rails221060 mm1000 mmFigure 4: Door closeuphingesmetal claddingacts as a braceCut 25 x 25 mm square tubing <strong>to</strong> length with angle grinder and cut <strong>of</strong>f wheel ensuringthat all cuts are square. Alternatively, your steel supplier can provide tubing cut <strong>to</strong> sizeand give you clean accurate burr free joints that are easy <strong>to</strong> weld.Step 3 - Assembling the steel frameWeldingLay out the components for the front frame on a flat surface and tack weld the joints.Check the joints are square with a ro<strong>of</strong>ing square and finish the welds. Make up a door<strong>to</strong> suit the opening. Lay the door in position and fix <strong>to</strong> the doorframe by welding hingesand latch.Using this finished frame as a jig, lay out the back frame components on <strong>to</strong>p andweld the joints.To join the front <strong>to</strong> the back it is best <strong>to</strong> enlist another pair <strong>of</strong> hands <strong>to</strong> hold everything inposition. Weld the two bot<strong>to</strong>m rails in position, and gently tip the structure on its side andweld the ro<strong>of</strong> joints, continually checking for square as you go. Now weld in the internalbrackets for fixing points for beds, climbing ramps, feed or water stations. The structuremay appear a little unstable at this stage, but there is no need <strong>to</strong> worry, as the claddingwill provide adequate bracing when fixed. Check all joints and grind <strong>of</strong>f any excess weldsand burrs. Prime the joints with metal primer and then finish with a good exterior paint.Welding tips– Have water handy when welding <strong>to</strong> cool the welds.– A welding magnet can be used <strong>to</strong> hold components in place when tack welding joints.– If you are using an arc welder then pick <strong>of</strong>f the slag from the welded joint as you goand re weld where necessary.– If you live in a coastal area specify a salt resistant sheet steel cladding.Alternative <strong>to</strong> WeldingWhen using prefabri<strong>cat</strong>ed joiners (Figure 1), follow the same construction order, fixingeach joint as you go. Use self drilling Tec screws or bolts <strong>to</strong> attach the door hinges, latchand fittings and finish the frame with a good quality exterior paint.Figure 5: Fixing light meshTec screwFrameCladdingTec screw Wall claddingRo<strong>of</strong> frameWall frame(from above)Figure 6: cladding