Tun SQL â Data Access - Esker
Tun SQL â Data Access - Esker
Tun SQL â Data Access - Esker
- No tags were found...

Create successful ePaper yourself
Turn your PDF publications into a flip-book with our unique Google optimized e-Paper software.
<strong>Tun</strong> <strong>SQL</strong> – <strong>Data</strong> <strong>Access</strong>
<strong>Tun</strong> Plus 2009Issued May 2008Copyright © 1989-2008 <strong>Esker</strong> S.A. All rights reserved.© 1998-2002 The OpenSSL Project; © 1994-2003 Sun Microsystems, Inc.; © 1996 Wolfgang Platzer (wplatzer@iaik.tugraz.ac.at);© 1995-1998 Eric Young (eay@cryptsoft.com). All rights reserved. <strong>Tun</strong> contains components which are derivedin part from OpenSSH software. See the copyright.txt file on the <strong>Tun</strong> CD for additional copyright notices, conditions of useand disclaimers. Use and duplicate only in accordance with the terms of the Software License Agreement - <strong>Tun</strong> Products.North and South American distributions of this manual are printed in the U.S.A. All other distributions are printed in France.Information in this document is subject to change without notice. No part of this document may be reproduced or transmittedin any form or by any means without the prior written consent of <strong>Esker</strong> S.A..<strong>Esker</strong> S.A., 10 rue des Émeraudes, 69006 Lyon, FranceTel: +33 (0)4.72.83.46.46 ♦ Fax: +33 (0)4.72.83.46.40 ♦ info@esker.fr ♦ www.esker.fr<strong>Esker</strong>, Inc., 1212 Deming Way, Suite 350, Madison, WI 53717 USATel: +1.608.828.6000 ♦ Fax: +1.608.828.6001 ♦ info@esker.com ♦ www.esker.com<strong>Esker</strong> Australia Pty Ltd. (Lane Cove - NSW) ♦ Tel: +61 (0)2 8596 5100 ♦ info@esker.com.au ♦ www.esker.com.au<strong>Esker</strong> GmbH (München) ♦ Tel: +49 (0) 89 700 887 0 ♦ info@esker.de ♦ www.esker.de<strong>Esker</strong> Italia SRL (Milano) ♦ Tel: +39 02 57 77 39 1 ♦ info@esker.it ♦ www.esker.it<strong>Esker</strong> Ibérica, S.L. (Madrid) ♦ Tel: +34 91 552 9265 ♦ info@esker.es ♦ www.esker.es<strong>Esker</strong> UK Ltd. (Derby) ♦ Tel: +44 1332 54 8181 ♦ info@esker.co.uk ♦ www.esker.co.uk<strong>Esker</strong>, the <strong>Esker</strong> logo, <strong>Esker</strong> Pro, Extending the Reach of Information, <strong>Tun</strong>, and <strong>Tun</strong> Emul are trademarks, registered trademarksor service marks of <strong>Esker</strong> S.A. in the U.S., France and other countries.The following are trademarks of their respective owners in the United States and other countries: Microsoft, Windows, Back-Office, MS-DOS, XENIX are registered trademarks of Microsoft Corp. Netscape and Netscape Navigator are registered trademarksof Netscape Communications Corp. IBM, AS/400, and AIX are registered trademarks of IBM Corp. SCO is a registeredtrademark of Caldera International, Inc. NetWare is a registered trademark of Novell, Inc. Sun, Sun Microsystems and Java aretrademarks of Sun Microsystems, Inc. Oracle is a registered trademark of Oracle Corp. Informix is a registered trademark ofInformix Software Inc. Sybase is a registered trademark of Sybase, Inc. Progress is a registered trademark of Progress SoftwareCorp. All other trademarks mentioned are the property of their respective owners.
PREFACE<strong>Tun</strong> <strong>SQL</strong> - <strong>Data</strong> <strong>Access</strong> is an applications and server suite that enablesPCs to work in client/server mode with remote databases (Informix,Oracle, Sybase, DB2, Progress and C-ISAM). <strong>Tun</strong> <strong>SQL</strong> uses theODBC architecture defined by Microsoft.<strong>Tun</strong> <strong>SQL</strong> runs on the following platforms: Windows 3.x, Windows 95,Windows 98, Windows NT 3.51 and Windows NT 4.0, Windows 2000,Citrix WinFrame, Citrix MetaFrame and Windows NT TSE.<strong>Tun</strong> <strong>SQL</strong> is part of the <strong>Tun</strong> software product range, as shown below:<strong>Esker</strong> TCP/IPStackNetworkresource access(<strong>Tun</strong> NET)Applicationsaccess(<strong>Tun</strong> EMUL)<strong>Data</strong> access(<strong>Tun</strong> <strong>SQL</strong>)TCP/IPNetworkServicesWindows Version(excludingCitrix/Microsoft NT TSE)TCP/IP communicationstack for Windows 3.x(DLL)TCP/IP(NIS, NFS Client andServer, PING, Printerredirection and sharing,FTP Client and Server,TELNET, RSH Clientand Server, TAR,WALL, TFTP, TIME)Components in a multiuserenvironmentN/Aapplications TCP/IPTerminal(asynchronous, IBM3270and IBM5250 emulation,3287/3812 printer)applications(NIS, NFS Client andServer, PING, Printerredirection and sharing,FTP Client and Server,TELNET VT320, RSHClient, TAR, WALL)emulator Terminalemulator(asynchronous, IBM3270and IBM5250 emulation,3287/3812 printer)ODBC drivers for ODBC drivers forTCP/IP Client/Server TCP/IP Client/Servermode (Oracle, Informix, mode (Oracle, Informix,Sybase, DB2, Progress Sybase, DB2, Progressand C-ISAM DBMSs) and C-ISAM DBMSs)and database revamping and database revampingtooltoolNIS Browser, printerredirection and sharingPrinter redirection andsharing
Most of the functionalities and procedures described in this manualapply equally to Windows 3.x, Windows 95, Windows 98,Windows NT 3.51, Windows NT 4.0, Windows 2000 orCitrix/Windows NT TSE. However, some functionalities andprocedures apply to only one or more of these platforms. In this case,the paragraph or section in question is indicated as follows:Win 3.xWindows 3.xWin 95Windows 95 and Windows 98Win NT2000NT 4.02000NT 3.51Windows NT (Windows NT 3.51 and Windows NT 4.0, includingmulti-user environment if no indication) and Windows 2000Windows NT 4.0, including Citrix/Windows NT TSE if no indicationWindows NT 3.51, including multi-user environmentWin 3232-bit Windows (Windows 95, Windows NT 3.51 and WindowsNT 4.0, including multi-user environment if no indication andWindows 2000)Multi-user environmentExcluding multi-user environment<strong>Tun</strong> <strong>SQL</strong> for Windows is also delivered with <strong>Tun</strong> PLUS whichincludes all the modules mentioned above. The <strong>Tun</strong> PLUS installationprocedure proposes to install <strong>Tun</strong> <strong>SQL</strong>.Except for the <strong>Tun</strong> PLUS for Multi-User Windows version, you caninstall <strong>Tun</strong> <strong>SQL</strong> independently of <strong>Tun</strong> PLUS.Note:In the entire document, Windows 95 features correspond to Windows98 features.
TABLE OF CONTENTSPART 1 PRESENTATION AND USECHAPTER 1 - Introduction to <strong>Tun</strong> <strong>SQL</strong>............................................ 1-9The ODBC mechanism................................................................. 1-9The Client/Server model............................................................. 1-11ODBC and the <strong>SQL</strong> Client/Server model................................... 1-13<strong>Tun</strong> <strong>SQL</strong> ..................................................................................... 1-13CHAPTER 2 - Configuration and use in Windows.......................... 2-17Verifying the functioning of <strong>Tun</strong> <strong>SQL</strong> ....................................... 2-17Creating a database..................................................................... 2-21Creating a data source................................................................. 2-21Transferring the demonstration database.................................... 2-29Creating a virtual data source ..................................................... 2-31Character conversion tables........................................................ 2-33CHAPTER 3 - C-ISAM ................................................................... 3-37Introduction to C-ISAM ............................................................. 3-37Using sqltools ............................................................................. 3-39PART 2 DATABASE REVAMPINGCHAPTER 4 - Revamping............................................................... 4-51Virtual databases......................................................................... 4-51Revamping in <strong>Tun</strong> <strong>SQL</strong>.............................................................. 4-53CHAPTER 5 - <strong>Tun</strong> DB Revamp general use ................................... 5-57General options........................................................................... 5-57Importing data source environments........................................... 5-59Creating an environment............................................................. 5-60Creating a virtual table................................................................ 5-60Creating a field ........................................................................... 5-61Assigning field filters ................................................................. 5-64Inter-table links........................................................................... 5-66Querying real and virtual databases............................................ 5-68Validating an environment ......................................................... 5-70Exporting data source environments........................................... 5-71Updating a virtual data source .................................................... 5-72Creating a virtual data source ..................................................... 5-73Displaying warnings ................................................................... 5-73
Local revamped data source management .................................. 5-74Field identification...................................................................... 5-75PART 3 APPENDICESAPPENDIX A - Reference............................................................... A-79APPENDIX B - <strong>SQL</strong> statements used in C-ISAM........................... B-95Principle instructions .................................................................. B-95<strong>SQL</strong> statement syntax................................................................. B-96<strong>Data</strong> types ................................................................................. B-130INDEX...............................................................................................................I-137
PART 1PRESENTATION AND USE
1INTRODUCTION TO TUN <strong>SQL</strong>The ODBC mechanismIn the world of databases, programmers traditionally use a mechanismcalled "Embedded <strong>SQL</strong>" to provide an interface between theirapplications and a specific database. Embedded <strong>SQL</strong> lets you insert<strong>SQL</strong> requests into programs written in COBOL or C. It has theadvantage of making applications more widely portable on differentmachines.Embedded <strong>SQL</strong>, however, has several disadvantages:• There are as many Embedded <strong>SQL</strong>s as there are DBMS engines onthe market. Applications using <strong>SQL</strong> can only interface with oneDBMS at a time. They must be rewritten or at least modified ifthey're to interface with other databases. For applications that needto interface with all the databases on the market, it's inconceivableto use the Embedded <strong>SQL</strong> mechanism.• Embedded <strong>SQL</strong> is relatively undeveloped, quite restrictive anddifficult to use. It doesn't let databases be used to full advantage,and it's sometimes preferable to use the API provided by the DBMSdirectly.! Introduction to <strong>Tun</strong> <strong>SQL</strong> 1 - 9
To compensate for the disadvantages of Embedded <strong>SQL</strong>, Microsoftconceived a new approach based on the ODBC mechanism (Open<strong>Data</strong>base Connectivity). ODBC is a further development of WOSA(Windows Open System Architecture).Application 1 Application 2 Application 3ODBC.LIB ODBC.LIB ODBC.LIBODBC.DLLDRIVER1.DLL DRIVER2.DLL DRIVER3.DLLDBMS 1 DBMS 2 DBMS 3ODBC is a well-defined set of C functions that makes it possible toretrieve data from, or update data in, a DBMS. These functions havebeen assembled in a DLL (Dynamic Link Library) that can be used byany Windows application. The functions of the ODBC DLL(ODBC.DLL) analyze <strong>SQL</strong> requests. They then pass them to ODBCdrivers whose job it is to convert the calls to suit the particular API ofthe DBMS you're using. An ODBC driver lets you view the DBMSinterface. You can then enable your application to use it just like anyother ODBC-compliant DBMS.Microsoft supplies the ODBC.DLL library and all the tools required touse it. They don't, however, supply ODBC drivers for all the DBMSson the market. Microsoft is happy supplying drivers for its proprietarystorage systems (Excel, Word, <strong>Access</strong>...).ODBC drivers for specific databases are supplied directly by the DBMSpublisher or by third parties who specialize in this domain (<strong>Esker</strong>).1 - 10 <strong>Data</strong> <strong>Access</strong> !
Finally, ODBC provides maximum interoperability. A simple Windowsapplication can access different management systems even if it wasn'tspecifically designed to do so. ODBC lets developers program, compileand deliver programs without having to worry about the DBMS theprogram will be used with. The users only have to provide the rightdriver so the application on which they're working cooperates with theirDBMS.ODBC is a valuable mechanism for multi-domain applications such asspreadsheets, word processing applications, and development tools thatmanipulate information from DBMSs without knowing a priori whichDBMS is being used.The Client/Server modelFor some years, the term Client/Server has been on the lips of everyonein the computing industry. In its widest sense, the Client/Server modelis a computing model in which at least two units cooperate to supply aparticular service.The "Gartner Group" has identified six principal types of Client/Servermode applications which they've classified according to the number offunctions performed by the client or the server.1 2 3 4 5 6<strong>Data</strong>Management<strong>Data</strong>ProcessingPresentation<strong>Data</strong>Management<strong>Data</strong>Processing<strong>Data</strong>Management<strong>Data</strong>Management<strong>Data</strong>Processing<strong>Data</strong>Management<strong>Data</strong>Management<strong>Data</strong>ProcessingSERVERPresentationPresentation<strong>Data</strong>ProcessingPresentationREVAMPING X WINDOW NFS<strong>Data</strong>ProcessingPresentation<strong>Data</strong>Management<strong>Data</strong>ProcessingPresentation<strong>Data</strong>Management<strong>Data</strong>ProcessingPresentationDISTRIBUTEDDATABASECLIENT! Introduction to <strong>Tun</strong> <strong>SQL</strong> 1 - 11
The applications that make the least demands on the "client" are"revamping" applications or X-WINDOWS servers. The applicationsthat make the most demands on the "client" are those that usedistributed databases.When the computing industry speaks about the Client/Server model, itoften means applications concerned with distributed databases.The most common illustration of this mode is shown in the followingschematic:Erreur! Des objets ne peuvent pas être créés à partir des codes dechamps de mise en forme.A "client" PC has a conventional management system that works ingraphic mode. The data is stored centrally on an UNIX server andmanaged by a Relational <strong>Data</strong>base Management System (RDBMS). Toretrieve or update data, the client sends an <strong>SQL</strong> request to the server.The server executes the request and returns the reply to the client overthe network.The principal advantages of this architecture are the following:• The end-user has a graphic, user-friendly Man/Machine interface onhis Windows PC.• The PC can be used for tasks other than normal applications (officeapplications, calculations, personal applications...).• From his machine, the user can access centralized data on a server atthe same time as other users.• The server is relieved of applications tasks and all its power can beconcentrated on serving data. There is a balanced distribution of theworkload between the client and the server.• The network is only used to send essential application data: It isn'toverloaded with presentation information.<strong>SQL</strong> Client/Server mode as described above is a modernized version ofthe transactional mode as is still encountered in a Mainframesynchronousterminal environment.1 - 12 <strong>Data</strong> <strong>Access</strong> !
ODBC and the <strong>SQL</strong> Client/Server modelAs well as facilitating access to all data management systems, ODBCcan also be used on a remote database. In this context, ODBC enables aWindows application to use any sort of DBMS. It also enables multidomainapplications such as "Excel", "Word" or "<strong>Access</strong>" to use thecompany's centralized information. In a Client/Server context, theODBC mechanism lets you increase the number of applications whichcan use the company's data.The implementation of this type of architecture at the present time is nosimple matter. Users who already have a local PC network, a UNIXserver and a DBMS must also acquire the following components toimplement an <strong>SQL</strong> Client/Server architecture with ODBC:• The network server part of the DBMS (Informix Net, Sql Net...).• The PC client part of the DBMS (Informix Net PC, Sql Net PC...).• The appropriate ODBC driver.• A Winsock-compatible TCP/IP stack for the PC.DBMS software houses always supply the first two components. Thisisn't always the case with the ODBC driver and is never the case for theTCP/IP stack. The last two components must be obtained elsewhere,with particular attention being paid to the question of compatibility.<strong>Tun</strong> <strong>SQL</strong><strong>Tun</strong> <strong>SQL</strong> was designed to supply a definitive solution to the aboveproblem. It integrates all the components mentioned above, as well aspowerful database revamping functionality and a virtual ODBC driverfor access to the revamped databases, into one homogenous softwarepackage. Even the network components of the DBMS (client andserver) are included in <strong>Tun</strong> <strong>SQL</strong>. This represents a considerable savingwhen it comes to equipping a large PC installation. It especially makesthings very simple when it comes to implementing <strong>SQL</strong> Client/Serverarchitecture.! Introduction to <strong>Tun</strong> <strong>SQL</strong> 1 - 13
UNIX ServerPC Client under WindowsDB Revamp(revamping<strong>Tun</strong> <strong>SQL</strong>)WindowsAppliWindowsAppliDBMS(Oracle, Informix,...)ODBC Manager(ODBC.DLL)DBMS Network Server(<strong>Tun</strong> <strong>SQL</strong>)ODBC Driver(<strong>Tun</strong> <strong>SQL</strong>)ODBC Driver(<strong>Tun</strong> <strong>SQL</strong>)TCP/IP(UNIX)TCP/IP(<strong>Tun</strong> <strong>SQL</strong>)TCP/IP Network" A single ODBC driver for most of the DBMSs on themarketTo limit the number of software products required for the PC client,<strong>Tun</strong> <strong>SQL</strong> features a single ODBC driver to access the followingDBMSs indifferently:• Oracle version 7.• Informix versions 5 and 7.• Sybase version 10.• DB2 version 2.• Progress versions 6, 7 and 8• C-ISAM files (versions 4 through 7)." <strong>Data</strong>base revamping<strong>Tun</strong> <strong>SQL</strong>, with the help of an integrated user-friendly application, letsyou redefine the tables in a database and make them more accessible tothe end-user (through customized table reorganization, modification oftable and field names, and preset functions)." A virtual ODBC driver for revamped databasesTo use a database that's been revamped (redefined), <strong>Tun</strong> <strong>SQL</strong> includesa virtual ODBC driver which translates requests made to virtual tablesinto requests that a normal ODBC driver can handle.1 - 14 <strong>Data</strong> <strong>Access</strong> !
" The server part of the DBMS is included in <strong>Tun</strong> <strong>SQL</strong>The server part of each of the DBMSs is installed on the UNIX or NTmachine and is supplied as standard with <strong>Tun</strong> <strong>SQL</strong> for the followingoperating systems:• ScoUnix 3.2x v.4.2 and 5.0• SunOs 4.1.3• Solaris 2.5• AIX 3.2 and 4.1• HP-UX 9.x and 10.x• OSF1 v.3.2• Windows NT• IBM MVSThis feature saves <strong>Tun</strong> <strong>SQL</strong> users the cost of the server side of theirDBMSs." TCP/IP stack delivered as standard (16-bit Windows)Win 3.xLike all the software in the <strong>Tun</strong> range, <strong>Tun</strong> <strong>SQL</strong> is delivered with<strong>Esker</strong> TCP/IP Stack as standard. The stack has an excellentperformance record and has been tested with all of <strong>Tun</strong> <strong>SQL</strong>'scomponents. The inclusion of the stack in the <strong>Tun</strong> <strong>SQL</strong> package savesyou the trouble of having to obtain a stack elsewhere." Simple installation and administrationThe objective of <strong>Tun</strong> <strong>SQL</strong> is to facilitate the implementation of aClient/Server architecture based on Windows and UNIX. Consequently,<strong>Tun</strong> <strong>SQL</strong> has a simple installation procedure for UNIX and Windowsand comes with complete documentation.In addition to the ODBC driver, two Windows applications are suppliedfor testing and implementing the Client/Server architecture:• <strong>Tun</strong> DB Show tests the Client/Server connection from end to end.The application can query the UNIX server to find out whichDBMSs are installed: It can also query some DBMSs to find outwhich databases they manage.• <strong>Tun</strong> DB Script executes <strong>SQL</strong> batch files on the Windows machineto create databases on the remote DBMS.! Introduction to <strong>Tun</strong> <strong>SQL</strong> 1 - 15
In addition to the security offered by UNIX and the different DBMSs,<strong>Tun</strong> <strong>SQL</strong> includes a feature that denies certain Windows applicationsaccess to sensitive databases.Lastly, the integration of the NIS (Network Information Service) into<strong>Tun</strong> <strong>SQL</strong> permits the centralized management of network resourcesand facilitates access to remote resources. For more information on theNIS, please consult the TCP/IP Network Services user guide or the<strong>Tun</strong> NET user guide." <strong>Tun</strong> <strong>SQL</strong> driver conformityThe <strong>Tun</strong> <strong>SQL</strong> driver supports all the level 1 functions and some of thelevel 2 functions. The "Microsoft ODBC Cursor Library" is suppliedwith the driver. Although this library only supports static and "forwardonly" cursors, this is sufficient for many applications.1 - 16 <strong>Data</strong> <strong>Access</strong> !
2CONFIGURATION AND USE INWINDOWSVerifying the functioning of <strong>Tun</strong> <strong>SQL</strong>" Executing <strong>Tun</strong> DB ShowWhen you've installed and configured <strong>Tun</strong> <strong>SQL</strong> on both the Windowsand UNIX machines, you must check everything's running correctly.You can do this by running <strong>Tun</strong> DB Show.Run the program by clicking the <strong>Tun</strong> DB Show icon in the <strong>Data</strong><strong>Access</strong> group (menu Start, Programs, <strong>Esker</strong> <strong>Tun</strong> under Windows95/98/2000 and Windows NT).The following window appears:! Configuration and use in Windows 2 - 17
You use this utility to query a host on the network to see if one or more<strong>Tun</strong> <strong>SQL</strong> servers are present. Enter the name or IP address of theserver in the Host Name field or select the server you want from thedrop-down list (the list shows the servers declared in the hosts file, andon the NIS server).To configure <strong>Tun</strong> NIS, please refer to the manual TCP/IP NetworkServices or <strong>Tun</strong> NET.Click the Find Servers button.If one or more <strong>Tun</strong> <strong>SQL</strong> servers are correctly installed on the remotemachine, the Installed Servers list appears as follows (there's at leastone line):Each line contains the following information:• The name of the DBMS that the <strong>Tun</strong> <strong>SQL</strong> server interfaces with.• The version number of the DBMS.• The name of the executable file that functions as the server(tunodbc200.ora, for example).Note:With some DBMSs (Informix On-Line, for example), selecting theserver in the list displays the list of databases managed by the DBMS inthe appropriate column (<strong>Data</strong>bases).2 - 18 <strong>Data</strong> <strong>Access</strong> !
If there are no <strong>Tun</strong> <strong>SQL</strong> servers in the list, it means that a problemoccurred during installation. In this case, you must carry out all theoperations and checks described in the previous chapters again." ParametersUse the Options menu in <strong>Tun</strong> DB Show to:• Manage services.• Enter the proxy server settings.Managing servicesA service number from 5370 is associated with each <strong>Tun</strong> <strong>SQL</strong> serverprocess. For <strong>Tun</strong> <strong>SQL</strong> to function correctly, you must define the FirstService and set the number of services possible. This enables <strong>Tun</strong> <strong>SQL</strong>to detect the different database systems accessible to a <strong>Tun</strong> <strong>SQL</strong>server. The default First Service is 5370 and the Service Count defaultis 5. The list of available services is given below:• Oracle 5370• Informix 5371• Sybase 5372• DB2/RS6000 5373• Progress 6 5374• Progress 7 5375• C-ISAM 5376• DB2 for MVS 5377• Progress 8 5378Choose Options#Parameters... from the main menu. The followingdialog box opens:! Configuration and use in Windows 2 - 19
Using a proxy server firewallWhen you configure a proxy server in <strong>Tun</strong> DBRevamp, access to anoutside server goes through a proxy gateway machine.To set the firewall parameters (IP address, port number, etc.), chooseOptions#Firewall from the main menu.The following dialog box opens:Select the Use a Proxy server check box.Enter the name or IP address of the server. Only enter a name if you usea DNS. You can also choose one from the drop-down list (click thedown arrow to the right of the field). The list contains the names of theservers listed in the server table (hosttab) and on the NIS server (NISresources have yellow icons).Also enter the SOCKS port number (usually the default value 1080).To avoid using the firewall for local connections, select Do not use forlocal addresses.The firewall configuration can be applied to all the <strong>Tun</strong> applications:To do that, select the Use these settings for all <strong>Tun</strong> applications checkbox. To apply the general configuration to all the <strong>Tun</strong> applications inuse (after using a specific <strong>Tun</strong> DBShow configuration, for example),click Restore general settings.2 - 20 <strong>Data</strong> <strong>Access</strong> !
You must create this data source before you can use the examples (seethe manual "Getting started with <strong>Tun</strong>").To create a data source, you can use:• <strong>Tun</strong> DB Show.• ODBC <strong>Data</strong>Source Administrator (Windows utility).Creating a data source with <strong>Tun</strong> DB ShowStart <strong>Tun</strong> DB Show again and do the following:• Enter the name or IP address of the server with the database forwhich you want to create a data source.• Click Find Servers to display the <strong>Tun</strong> <strong>SQL</strong> servers installed on thehost.• Select the server for the DBMS with the database for which youwant to create a data source.• Click Add....If <strong>Tun</strong> NIS is installed on the PC and the network administrator hasconfigured the NIS tables, you can use the Add from NIS... button toaccess the data sources on the network. See the TCP/IP NetworkServices or <strong>Tun</strong> NET user guide for instructions on how to configure<strong>Tun</strong> NIS.Now please read the section "Configuring the data source".Creating a data source with ODBC AdministratorOpen the Control Panel and click the ODBC icon (32-bit ODBC inWindows 95). Click the Add button in the dialog box that opens.Select the ODBC driver <strong>Tun</strong>32 Driver.2 - 22 <strong>Data</strong> <strong>Access</strong> !
Configuring the data sourceClick the Add button in <strong>Tun</strong> DB Show or the ODBC Administratorto display the following dialog box:" General tabThe first tab contains the following fields:<strong>Data</strong> Source NameThe icon represents the field containing the name of the data sourceas used by ODBC-compliant applications. For you to be able to connectto the sample database, it's imperative that the data source is called:• <strong>Tun</strong>SqlDemoIfx• <strong>Tun</strong>SqlDemoIse• <strong>Tun</strong>SqlDemoOra• <strong>Tun</strong>SqlDemoSyb• <strong>Tun</strong>SqlDemoDB2• <strong>Tun</strong>SqlDemoProFor Informix On-LineFor Informix SEFor OracleFor SybaseFor DB2For Progress! Configuration and use in Windows 2 - 23
DescriptionEnter an optional comment to associate with the data source.Host NameEnter the IP address or the name of the host on which the database youwant to use is installed.Service NameEnter the name of the <strong>Tun</strong> <strong>SQL</strong> server process associated with theDBMS in which the required database has been created (for example,tunodbc200.ora).If you're using a different TCP/IP stack from TCP/IP Stack, youshould complete the services file in the TCP/IP software used with thefollowing values:tunodbc200.ora 5370/tcp # <strong>Tun</strong>-<strong>SQL</strong> ORACLEtunodbc200.ifx 5371/tcp # <strong>Tun</strong>-<strong>SQL</strong> INFORMIXtunodbc200.syb 5372/tcp # <strong>Tun</strong>-<strong>SQL</strong> SYBASEtunodbc200.db2 5373/tcp # <strong>Tun</strong>-<strong>SQL</strong> DB2tunodbc200.pro 5374/tcp # <strong>Tun</strong>-<strong>SQL</strong> PROGRESSThe other services are given below (not used in the example):tunodbc200.pro7 5375/tcp # <strong>Tun</strong>-<strong>SQL</strong> PROGRESS7tunodbc200.ism 5376/tcp # <strong>Tun</strong>-<strong>SQL</strong> C-ISAMtunodbc200.mvs 5377/tcp # <strong>Tun</strong>-<strong>SQL</strong> DB2/MVStunodbc200.pro8 5378/tcp # <strong>Tun</strong>-<strong>SQL</strong> PROGRESS8<strong>Data</strong>baseEnter the name of the database you want to use. To use the sampledatabase, enter tunsqldemo (the sample database supplied with <strong>Tun</strong><strong>SQL</strong>).User NameEnter the name of a user authorized to access the database.PasswordEnter the password associated with the user.2 - 24 <strong>Data</strong> <strong>Access</strong> !
" Driver tabClick the Driver tab to display the ODBC driver configuration window:Keep Alive TimeoutSince the PC is liable to software and hardware failures, the <strong>Tun</strong> <strong>SQL</strong>server has to regularly check that the PC is still under power. To dothis, it regularly sends packets to the PC. If the PC doesn't reply in atime of n seconds, the process stops. Enter the timeout value (thedefault is 1 hour).Row Cache SizeIndicates the size of the data packets extracted from a table during an<strong>SQL</strong> "select" operation. The value can be expressed in kilobytes ornumber of lines.If the value equals 1, then one TCP packet per row is retrieved. If thevalue equals 100 then the rows are grouped in packets of 100 up to thenumber of rows actually retrieved. This field lets you optimizeexchanges on the network. The optimum value is between 50 and 150.The default value is 32 Kb.! Configuration and use in Windows 2 - 25
Column Block SizeIndicates the fragmentation unit to be used when very wide columnshave to be retrieved from the database (large amounts of text orimages). If this value is too low, the number of exchanges on thenetwork are considerably increased.Supported versionCurrently, there are two versions of the ODBC API, numbered 1.00 and2.00. Some applications are only compatible with ODBC version 1.00(Microsoft <strong>Access</strong>) and don't work with drivers from a higher version.The <strong>Tun</strong> <strong>SQL</strong> ODBC driver, which is compatible with version 2.00,can emulate version 1.00 to allow these applications to run.Select the appropriate check box to indicate to the ODBC driver thelevel of compatibility required for a given application.TranslatorDue to the differences in accented character notation in the Windows(CP850) and UNIX (ISO8859) environments, it's sometimes necessaryto set up character conversion tables for the ODBC driver. The Select...button enables the user to choose the required conversion table. Youcan ignore this field in the sample database since the text it contains isin English.Note:You can use <strong>Tun</strong> DB Map to create or edit the conversion tables.2 - 26 <strong>Data</strong> <strong>Access</strong> !
Click the Row Limits tab to display the limits dialog box:Row Limit ModeSome office applications let you compose your own <strong>SQL</strong> requests. Inother cases, applications read the contents of an entire table beforedisplaying them on the screen. This doesn't pose any particularproblems when they're dealing with small tables in a local database.On the other hand, insurmountable problems can arise when it's aquestion of very large tables in a centralized, remote database. In thiscase, there's a considerable number of exchanges on the network andthere may be insufficient memory in the PC to store the received data.The PC needs to be frequently rebooted after such a "select" query.To compensate for this problem, the <strong>Tun</strong> <strong>SQL</strong> ODBC driverincorporates the notion of limits. You define the limits on the RowLimits tab.! Configuration and use in Windows 2 - 27
Five types of limits are recognized by the <strong>Tun</strong> <strong>SQL</strong> ODBC driver:No LimitAbsolute LimitFixed LimitVariable LimitExtendedLimitNo limit is imposed by the ODBC driver.The ODBC driver refuses to load more thann rows during one select request. No messagesare displayed to inform the user.The ODBC driver refuses to load more thann rows during one select request. A message willbe displayed informing the user.The ODBC driver refuses to load more thann rows during one select request. However, itdisplays a message proposing to load more,within the limit of the Maximum Value.The ODBC driver refuses to load more thann rows during one select request. However, itdisplays a message proposing to load more, withno Maximum Value. In this case, the messagedisplayed is really only a warning.TraceYou can select the Trace check box to save a record of your <strong>SQL</strong>queries in a ".log" file that you can later consult. This option lets yousee what the ODBC driver does when you pass it an <strong>SQL</strong> query.NISClick the button ... to choose the directory where you want to put thisfile.If <strong>Tun</strong> NIS is installed on the PC and the network administrator hasconfigured the NIS tables, you can click the Import NIS... button toaccess the data sources on the network. See the manual TCP/IPNetwork Services (if you don't have <strong>Tun</strong> NET) for instructions onhow to configure <strong>Tun</strong> NIS, or the chapter "The NIS Browser" in the<strong>Tun</strong> NET or TCP/IP Network Services manual2 - 28 <strong>Data</strong> <strong>Access</strong> !
Notes:In this chapter you were asked to create a data source calledtunsqldemoXXX which is used by the examples supplied with <strong>Tun</strong><strong>SQL</strong>.To use <strong>Tun</strong> <strong>SQL</strong> with other applications and databases, you mustcreate the required data source for each case. Typically, there must bean individual data source for each application and database used.You can create a data source directly using the Windows ODBCapplication from the Control Panel.Transferring the demonstration database<strong>Tun</strong> <strong>SQL</strong> is delivered with a test database for use with the examplesincluded. This database must be downloaded from the PC to the datasource tunsqldemoXXX that you were asked to create in the precedingsections.Note:The variable XXX in the name of the data source may take one of thefollowing values:• Ifx• Ise• Ora• SybFor Informix On-LineFor Informix SEFor OracleFor SybaseTo perform the downloading, run the program by clicking the <strong>Tun</strong> DBScript icon in the <strong>Data</strong> <strong>Access</strong> group (menu Start, Programs, <strong>Esker</strong><strong>Tun</strong> under Windows 95/98/2000 and Windows NT).! Configuration and use in Windows 2 - 29
When the application starts, the following window appears:" Loading the <strong>SQL</strong> batch file to create the databaseYou can load the database of your choice by choosing File➔Open orclicking the button .To download the example database, you must load the file\Demo\Db\XXXCREAT.<strong>SQL</strong> from the <strong>Tun</strong> <strong>SQL</strong> installationdirectory." Connecting with the data sourceBefore you can run the <strong>SQL</strong> batch file, you must establish a connectionwith a data source. To do this, click the button or choose<strong>Data</strong>base➔Connect.This operation displays a dialog box that asks for the name of the datasource to use. If the connection can be established, the batch file is run.To download the example database, select the data source<strong>Tun</strong>SqlDemoXXX which was defined earlier.2 - 30 <strong>Data</strong> <strong>Access</strong> !
" ExecutionTo execute the <strong>SQL</strong> batch file, choose <strong>Data</strong>base➔Execute in the mainmenu or click the button . <strong>Tun</strong> DB Script then submits the <strong>SQL</strong>commands consecutively to the database which corresponds to theselected data source. If there's an error, <strong>Tun</strong> DB Script stops runningand displays an error message." Disconnecting the data sourceAfter execution, you must disconnect the data source by clicking thebutton or by choosing <strong>Data</strong>base➔Disconnect from the main menu.A disconnection of the data source also occurs when you quit theapplication.Note:Although you can use <strong>Tun</strong> DB Script to download the <strong>Tun</strong> <strong>SQL</strong>example database, it also has other uses. In fact, <strong>Tun</strong> DB Script canexecute whole lists of <strong>SQL</strong> commands to create other databases orupdate or completely clear extremely large tables.Creating a virtual data source<strong>Tun</strong> DB Revamp can link virtual tables, adapted to the end user'senvironment, to a real database. See the section "<strong>Data</strong>baseRevamping" for more information on that application.When you create a virtual (revamped) database, you can create datasources for it, just as if it were a real database. Users can then use thevirtual ODBC driver supplied with <strong>Tun</strong> <strong>SQL</strong> to access the virtualdatabase you've created especially for them.A virtual data source can be considered as the association of a real datasource and an environment.To create a virtual data source, access the configuration of the virtualdata source in ODBC Administrator: Choose the <strong>Tun</strong>map32 driver.See "Creating a data source ".! Configuration and use in Windows 2 - 31
The following dialog box opens:<strong>Data</strong> sourceEnter the name of the revamped data source.DescriptionEnter a description of the data source for identification purposes.Real <strong>Data</strong> Source NameEnter the name of the data source for the real database the virtualdatabase is derived from.EnvironmentEnter the name of the environment for which you're creating a virtualdata source. An environment is the set of virtual tables: Each revampeddatabase can have one or more environments. Click the button tochoose the environment from the list of environments defined in thedatabase.Local .DBR fileInstead of entering a real data source name, you can select theenvironment from a local .dbr file. See the section "<strong>Data</strong>baseRevamping" for information on the use of this type of file.2 - 32 <strong>Data</strong> <strong>Access</strong> !
Run the program by clicking the <strong>Tun</strong> DB Map icon in the <strong>Data</strong> <strong>Access</strong>group (menu Start, Programs, <strong>Esker</strong> <strong>Tun</strong> under Windows 95/98/2000and Windows NT).The following screen is displayed:The table on the left shows all the characters available on the PC(ASCII and extended ASCII). The table on the right shows the samecharacters but in positions that correspond to the notation used by theDBMS on the UNIX machine. The first 128 positions in the table on theright are already filled since they are the same in both systems.To assign a character to one of the positions in the right-hand table,select a character in the left-hand table and "drag" it across to one of thesquares in the right-hand table, with the mouse button pressed.You can create as many conversion tables as you need. ChooseFile#Save from the general menu. Save the files with the extension".ttt".2 - 34 <strong>Data</strong> <strong>Access</strong> !
" Implementation of conversion tablesFor conversion tables to be taken into account, they have to beassociated with a data source using the dialog box displayed by <strong>Tun</strong>DB Show to this effect. Enter the details in the Translator section:Click Select... to display the following dialog box:Select the ODBC translator you want to use and click OK.! Configuration and use in Windows 2 - 35
3C-ISAMIntroduction to C-ISAM" The C-ISAM file systemC-ISAM (Indexed Sequential <strong>Access</strong> Method) is a library of Cfunctions developed by Informix. It allows the management of indexedsequential files (file creation, and insert, delete and read operations). C-ISAM includes other features like file locking and transaction supportwhich ensure data integrity. These features guarantee that data isaccessible, valid and correctly used.C-ISAM uses data types similar to those used in C. Since C-ISAMimplements these types independently of the UNIX system used, theway it stores the data can be different than the way the data isrepresented at run time. C-ISAM includes conversion functions toconvert run-time data formats to storage data formats.A C-ISAM file is really a combination of two files: One contains data(file.dat) and the other an index for finding the data in the data file(file.idx). The two files are always used together as one logical C-ISAMfile.file1file1.datfile1.idx! C-ISAM 3 - 37
" RDBMSs and C-ISAMAs C-ISAM files use indexed sequential access, developers mustunderstand the file structure and use the index files to access data.Building a database system using C-ISAM files frees developers fromthese constraints by incorporating an indexed file structure as tables,columns, and indexes in a catalog." <strong>Tun</strong> <strong>SQL</strong> C-ISAMC-ISAM depends on C functions to query and update sequential files.The C-ISAM driver shipped with <strong>Tun</strong> <strong>SQL</strong> lets you view sequentialfiles as a standard relational database with tables, fields and keys. Youcan then use standard <strong>SQL</strong> instructions to query or update a databasecreated with C-ISAM files. The C-ISAM driver C-ISAM translates theinstructions into C functions that perform the necessary operations onthe sequential files.To go from a sequential data view to a relational database view, the C-ISAM driver adds descriptive database files known as the catalog to thestandard C-ISAM data and index files. These are C-ISAM type files(.dat data file and .idx index file): SysTables, SysColumns, SysIndexesand SysDefaults.SysTables SysColumns SysIndexes SysDefaultsfile1.datfile1.idxCatalog filessqltools is a UNIX tool for creating and managing databases built on C-ISAM. It works on the same principle: <strong>SQL</strong> instructions are used toconstruct the database and are translated into C functions before theycan be read by the C-ISAM file system.3 - 38 <strong>Data</strong> <strong>Access</strong> !
" Installing the C-ISAM driverTo install the <strong>Tun</strong> <strong>SQL</strong> C-ISAM, refer to the "<strong>Tun</strong> InstallationGuide".Using sqltools" Using sqltoolsYou can use sqltools on-line or from a semi-graphical interface(windows, menus).Connect to the UNIX server containing the C-ISAM files. Werecommend you create a user login ID to access the C-ISAM files.Change to the sqltools installation directory and run the application byentering the following command:sqltoolsto run the application on-line,orsqtools -vto use the graphical interface" Creating the databaseThe first step is to create the database containing the data from the C-ISAM files. To do that, use one of the following methods:• Choose <strong>Data</strong>base#Create and enter the name of the database youwant to create. .• Enter the following statement in the lower pane (Input window):create database "databasename";This statement creates a directory with the name of the database and theextension .ism in the directory indicated by the variable ISAM-PATHSee "DBMS Installation Settings" in the "<strong>Tun</strong> Installation Guide"for more information on the ISAM-PATH variable. ".! C-ISAM 3 - 39
Example:Create database "demo";creates the directory demo.ism in the directory /<strong>Tun</strong>Sql/bases if ISAM-PATH=/<strong>Tun</strong>Sql/bases.This directory contains the C-ISAM .dat and .idx files that describe thedatabase: SysTables, SysColumns, SysIndexes and SysDefaults, a totalof 4 logical C-ISAM files and 8 operating system files.The lower window (Input window) takes the name of the database:Note:You can run shell commands directly from sqltools. Enter thecommand preceded by an exclamation mark and followed by a semicolonin the lower pane (Input window).Example:! ls -a ;To enter character strings in uppercase, use quotes.Example:!ls "/<strong>Tun</strong>Sql/locisam";" Connecting to an existing databaseIf you're using an existing database, you can perform operations on thetables after connection.3 - 40 <strong>Data</strong> <strong>Access</strong> !
To do that, choose <strong>Data</strong>base#Connect and enter the name of thedatabase. The lower pane (Input window) takes the name of thedatabase you connect to." Creating tablesOnce the database is created (the .ism directory contains the table'sdescriptive files), you can then create tables in it. .You can perform this step using a pair of existing C-ISAM files (the.dat data file and the .idx index file), or create new ones. The statementused in the second case is different, as are the precautions you musttake: Use the create table statement to create the pair of C-ISAM filesat the same time as the table, and the define table statement to create atable from a pair of existing C-ISAM files.Creating tables from scratchTo create the pair of C-ISAM files at the same time as the table, enterthe following statement in the lower pane (Input window), which nowhas the database name as a title:create table tablename (field1 type1, field2type2,..., primary key(field1)));This statement creates a table with the name "tablename" in thedatabase. The table contains the fields field1, field2, etc. with the typestype1, type2, etc. See the list of types.The C-ISAM data and index file pair are created in the databasedirectory (databasename.ism). The names of these files use the firstseven characters of the table name and a unique identification numberthat's attributed automatically: The extension .dat is added for the datafile and .idx for the index file. If the table name is less than sevencharacters, these file names are padded out with underline characters("_").Example:create table table1 (field1 longint, field2 char(25),filler char (30), primary key(field1));creates the files table1_100.dat and table1_100.idx. The table containsthe field field1 containing a longint type, the field field2 containing amaximum of 25 char types, and the field filler containing a maximum of30 char types. The primary key for this table is field1.! C-ISAM 3 - 41
Creating tables from an existing pair of C-ISAM filesTo create a table in a database for which the C-ISAM .dat and .idx filepair already exists, enter the following statement in the lower pane(Input window) which has the database name as its title:define table tablename file is filename (field1type1, field2 type2,..., primary key(field1)));This statement creates a table with the name "tablename" from theexisting files filename.dat and filename.idx.Important note:Before using the table (for example, before you use select statements onthe table), you must copy the files specified by the file is keywords intothe database directory.The define statement, however, can be executed even if the files haven'tyet been copied to this directory. It's even recommended not to copythe files until you execute the create index statement, if you want tocreate an index for the table." Creating an indexTo create an index for one through eight columns in a table, enter thefollowing statement in the lower pane (Input window), which has thedatabase name as a title:create unique index indexname on tablename (field1,field3);This statement creates the index "indexname" for columns field1 andfield3 in the table "tablename"." C StructuresEach statement passed to sqltools is translated into C code for the C-ISAM file system. To view the corresponding C structure for a table,choose Catalog#GetCStruct.3 - 42 <strong>Data</strong> <strong>Access</strong> !
For example, the statement that creates table1 produces the following Cstructure:struct root_table1/* file "table1_100" */{long lint_field1; /* field1 longint */charchr_field2[25]; /* field2 char(25)*/charchr_filler[30]; /* filler char(30)*/unsigned char null_flags[1];/* reserved */};In this example, there's a reserved field (an array of unsigned chars)one byte long. This field is specific to the C-ISAM managementsystem. When a table is created with the statement create table,sqltools automatically adds this reserved field to the table." Validating a table created from existing C-ISAM filesWhen you create a table from an existing pair of C-ISAM files (with thedefine statement), you must be careful that the table structure youcreate conforms to that of the C-ISAM files.For example, you create the table "table2" based on the C-ISAM filesfilename.dat and filename.idx, written in C. These files have thefollowing record structure:• A field composed of a longint variable,• A field composed of an array of 25 char variables,• A field composed of an array of 30 char variables.If you define table "table2" as follows:define table table2 file is table1_100 (field1longint, field2 char(25), filler char(25));you create a table whose records have the structure:• A longint type field,• Two char array fields of length 25,! C-ISAM 3 - 43
which doesn't correspond to the structure generated by the C-ISAMfiles the table is based on.In this case, there's a mismatch between the created table and the C-ISAM files it's based on.To verify that a table's data structure corresponds to the original C-ISAM files, choose Catalog#CheckDefine. To verify all the tables inthe database, choose Tools#Check Catalog.In our example, the Output window shows the following results:The following message is displayed:Table size different from file record size (55 60)"The message warns that table table2 was defined differently than the C-ISAM "filename" files it's based on. The define statement should be asfollows:define table table2 file is filename (field1 longint,field2 char(25), filler char(30));3 - 44 <strong>Data</strong> <strong>Access</strong> !
" Viewing a table's C structureYou can view a table's C structure, that is, the different columns created(name, data type and length), as well as the information concerning datamanagement (the primary keys, for example).To do that, choose Catalog#GetCStruct and enter the name of thetable whose C structure you want to view. To view the C structure of allthe tables in the database, choose Tools#List Structures.The example below shows the result of this command for a tablecreated with a primary key:The following statement creates the table:create table customer(cust_number longint,cust_name char(20),cust_address1 char(20),cust_address2 char(20),filler char(20),primary key (cust_number));The C structure generated is:struct doc_customer /* file "custome110" */{long lint_cust_number; /* cust_number longint */char chr_cust_name[20]; /* cust_name char(20) */char chr_cust_address1[20];/* cust_address1 char(20) */char chr_cust_address2[20];/* cust_address2 char(20) */char chr_filler[20]; /* filler char(20) */unsigned char null_flags[1]; /* reserved */};struct keydesc idx_customer_1;idx_customer_1.k_flags = ISNODUPS;idx_customer_1.k_nparts = 1;idx_customer_1.k_part[0].kp_start = 0;idx_customer_1.k_part[0].kp_leng = 4;idx_customer_1.k_part[0].kp_type = LONGTYPE;The first piece of code shows the structure of the table (the fields), thesecond shows the primary key and its various assignments.! C-ISAM 3 - 45
" Catalog informationYou can obtain information on the catalog using the Catalog menu.The menu options provide information on:• TypeInfo: Each data type is identified by a number, as defined bythe ODBC standard. Enter the number for the data type you want toverify, or enter 0 to view the data type list.• Tables: You can query the catalog for information on its tables,using the name of the user who created the table, the table nameitself, or the table type (system table, synonym, etc.). Enter the %character to include all the tables or table types in your query.• Columns: You can query the catalog for information on itscolumns, using the name of the user who created the table, the tablename itself, or the column name. Enter the % character to include allthe tables or columns in your query.• Statistics: You can obtain statistics on the data in the catalog.• PrimaryKeys: You can query the catalog for a table's primary keys,using the name of the user who created the table or the table nameitself. Enter the % character to include all the tables in your query.For more information on the Catalog menu options, refer to the catalogsystem section in the ODBC standard reference manual." Editing a tableThe length of records in a table is set when the table's created.Consequently, you can't add or delete records if the total length isaffected.If you want to change the structure of a table, you must first delete thetable respecting the precautions described in "Deleting a table"." Deleting a tableThere are two ways to delete a table from the catalog:You created the table using the statement create table: Use thestatement drop table to delete it. Note: This statement removes allreferences to the table from the catalog files and deletes the pair of C-ISAM files linked with the table.3 - 46 <strong>Data</strong> <strong>Access</strong> !
You defined the table using the statement define table: Use thestatement undefine table to cancel the define statement. This statementonly removes all references to the table from the catalog files.Note:You can use the drop table statement for a table defined by definetable. However, the drop table statement deletes the pair of C-ISAMfiles specified by the file is keywords if they're in the databasedirectory. You should, therefore, be careful using the drop tablestatement if you created the table from existing C-ISAM files.If you want to keep the pair of C-ISAM files associated with a table youdelete using the drop table statement, you must first copy these files toa different directory. That way, after deleting the table, you can usethese backup copies." Maintaining the C-ISAM filesWhen you create tables from existing C-ISAM files (using the definetable), you must copy these files into the database directory if you wantto use the tables.However, if these files are used and updated in other applications, it'suseful to be able to use the updates in your C-ISAM database. To dothat, you must create symbolic links with the existing C-ISAM filesfrom the database, rather than make copies.Example:You create the database dbtest in the directory /<strong>Tun</strong>Sql. For the tablesin this database, you use the files filename.dat and filename.idx, whichare in the directory /data and are used by other applications.You create symbolic links to these files in the directory/<strong>Tun</strong>Sql/dbtest.ism (the database directory) with the followingcommand:ln -s /data/filename.* /<strong>Tun</strong>Sql/dbtest.ism! C-ISAM 3 - 47
" Deleting a databaseTo remove (delete) a database, choose <strong>Data</strong>base#Drop and enter thename of the database to remove, or enter the following command in thelower pane (Input window):drop database databasename" Saving resultsYou can save the results displayed in the upper pane (Output window)to a text file with the extension .res.To do that, choose File#Save as... and select the location and the savefile name." Running a scriptYou can use the File#Execute option to execute an <strong>SQL</strong> script oncondition that you use the <strong>SQL</strong> statements supported by sqltools.3 - 48 <strong>Data</strong> <strong>Access</strong> !
PART 2DATABASE REVAMPING
4REVAMPINGVirtual databasesMost of today's structured data storage facilities consist of Relational<strong>Data</strong>base Management Systems (RDBMS). <strong>Data</strong>bases make it possibleto store the corporation's data resources which can then be updatedusing special applications. The mass of data assembled in this way isalso of interest to a large number of users who need to extractinformation for their work (performance indicators, statistics, expertsystems). The <strong>SQL</strong> language is used to update and query databases.However, database structure, an essential part of the informationsystem, can complicate access to database information throughout thecorporation:• There's a considerable number of tables and records in databases,too many in fact for the average end-user who is often onlyinterested in a part of the data.• <strong>Data</strong>base structure is always complex and the user needs a lot ofexperience to find his way around.• The computing environment of databases isn't very user-friendly.For example, the names of the tables and records are seldomexpressed in straightforward terms.• <strong>Data</strong> manipulation requires prior knowledge of the <strong>SQL</strong> language toquery databases and obtain the desired results.Several breakthroughs have been made which reduce these obstaclesand facilitate access to databases (for example, the inclusion ofgraphical interfaces in database query tools).The next step is to free the end-user totally from the pre-requisite oftechnical database knowledge by presenting him only the informationhe needs in the most suitable form for his work environment.! Revamping 4 - 51
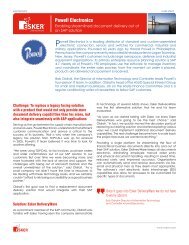
The consequences of this are:• Improved productivity: The end-user becomes autonomous in hisuse of data, and analysis and decision-making take less time becausethey're more simple.• More relevant information: Using only the data he needs, the usersharpens his capacity for analysis and synthesis, and refines theresults." RevampingRevamping consists of constructing a virtual database that's adapted tothe user's environment from the existing database. Although it doesn'texist as a real database, the new structure is seen by the user as anormal database whose tables and fields correspond exactly to hisneeds: The database only contains the information the user really needsfor his analyses, in a form which suits his requirements (understandabledata names, predefined functions).The redefined database is perfected by an administrator who adapts thetables and fields from real databases. For example:Real databaseCust_tabcust_nocounnamephonefaxsalesSales_tabsale_nocust_noprod_nodatetotalProd_tabprod_nolabellinefactoSalesProductLineFactoryCountrySalesRevamped database4 - 52 <strong>Data</strong> <strong>Access</strong> !
In the above example, the real database contains three tables:"Cust_tab" (customer table), "Sales_tab" (sales table) and "Prod_tab"(product table).The administrator defines a virtual table that presents the results of salesper product, per product line, per production site and per country.The virtual table entitled "Sales" contains the following fields:• Product (real field: "prod_tab.label»)• Line (real field: "prod_tab.line")• Factory (real field: "prod_tab.fact")• Country (real field: "cust_tab.coun")• Sales (real field: "sales_tab.total")The virtual table constructs a join between the "Prod_tab" and"Sales_tab" tables using the common field "prod_no", and a joinbetween the "Sales_tab" and "Cust_tab" tables using the common field"cust_no".Revamping in <strong>Tun</strong> <strong>SQL</strong><strong>Tun</strong> <strong>SQL</strong> uses two components to administrate and use virtualdatabases:• The database administrator <strong>Tun</strong> DB Revamp which manages therevamping.• The virtual ODBC driver which allows the user to access therevamped database." The DB Revamp administratorThe objective of the <strong>Tun</strong> <strong>SQL</strong> virtual database is to offer the end-usercontextually redefined information for a particular "environment".With the intuitive graphic interface, the administrator can define asmany "environments" for different users or types of user as he wants.The environment is based on "occupation": An accountant need onlysee the tables related to accountancy, sales staff the tables related totheir jobs.! Revamping 4 - 53
Each environment can be viewed as a special data source by the ODBCfront-end which makes the query (refer to the architecture diagram inthe section "Virtual ODBC driver").The virtual database model is as follows:• One or more environments, defined from a real data source, whichcontain a selection of tables from the real database. The selectiondepends on the end-user's needs.• The tables defined in an environment are either native tables fromthe real database or the result of joins between two or more tables(concept of view).• Each table only contains the fields required by the end-user.• The revamped fields are either existing fields from real tables orrecalculated fields that simplify the end use of the database.• The revamped tables and fields can be given names that are clearerfor the end-user (for example, "Cust_tab" can be renamed"Customer Table" and "Cust_no" "Client Number").<strong>Data</strong>sourceEnvironmentRevampedtableRevampedtableRevampedtableRevampedfieldRevampedfieldRevampedfieldRevampedfieldRevampedfieldThe tables redefined in an environment don't physically exist in thedatabase. However, the revamped database is stored in an indexed formin three supplementary tables created in the real database:• An environment table containing a list of environments in the form"environment name" and "description".• A table containing a list of redefined tables. Each of the redefinedtables is indexed by a name, a description and the name of theenvironment to which it belongs.4 - 54 <strong>Data</strong> <strong>Access</strong> !
• A table of redefined fields. Each of the redefined fields is indexedby a name, a description, an origin (existing field, processed data,data concatenation) and the name of the virtual table to which itbelongs.After a revamping operation, a database always contains these threeextra tables." Virtual ODBC DriverFor the end-user, querying a virtual database is similar to querying areal database in read-only mode. This openness is due to the inclusionof a special virtual database ODBC driver in <strong>Tun</strong> <strong>SQL</strong>.When the ODBC manager (ODBC.DLL) receives queries from anenvironment, it transmits them to the virtual ODBC driver. The virtualODBC driver then translates them into appropriate queries for the realdatabase. Next, the virtual ODBC driver passes the translated queriesback to the ODBC manager which directs them to the real database'snormal ODBC driver.DBRevamp(Revamping)Application(MS Query typeof front end)ODBC Manager(ODBC.DLL)Virtual ODBCDriverODBC Manager(ODBC.DLL)ODBC Driver(<strong>Tun</strong> <strong>SQL</strong>)ODBC Driver(<strong>Tun</strong> <strong>SQL</strong>)ODBC Driver(other)<strong>Data</strong>base <strong>Data</strong>base <strong>Data</strong>baseRevampeddatabase! Revamping 4 - 55
5TUN DB REVAMP GENERAL USEGeneral options" Choosing the working languageTo choose the interface language, choose ?➔Language" and select thelanguage you want to work in." Modifying the displayTo modify the controls displayed in the main <strong>Tun</strong> DB Revampwindow:• Select or cancel the View➔Toolbar option to display or hide thetoolbar.• Select or cancel the View➔Status Bar option to display or hide thestatus bar.• Select or cancel the View➔Property Box option to display or hidethe object properties bar." Copying an objectUse one of the following methods to copy an object:1. To use the "drag and drop" method, select the object to be copied,and drag it to the place you want to copy it to, with the mousebutton held down.2. Choose Edit➔Copy from the main menu to copy the selectedobject, and then Edit➔Paste to paste it in the desired location.3. Choose Copy and Paste from the context menu (displayed byclicking the right mouse button) to copy the selected and object andpaste it in the desired location.! <strong>Tun</strong> DB Revamp general use 5 - 57
4. Use the keyboard keys Ctrl-C (copy) and Ctrl-V (paste) to performthe operation.5. Use the toolbar buttons, (copy) and (paste)." Deleting an objectTo delete an object, select it by clicking it and then do one of thefollowing:1. Choose Edit➔Delete from the main menu.2. Choose Delete from the context menu.3. Use one of the keyboard's Del keys.4. Click the button in the toolbar." Renaming an objectTo rename an object, first select it and then use one of the followingmethods:1. Use the General tab in the property box.2. Use the F2 function-key on the keyboard and replace the old namewith the new one.3. Click the object again and proceed as for method 2." Saving changesTo save changes made to property values, press Enter with the cursorsituated in the relevant dialog box, or click Apply." Obtaining helpTo access the on-line help or obtain more information about <strong>Tun</strong> DBRevamp, choose ?➔About DBRevamp, or use the toolbar button ." Quitting <strong>Tun</strong> DB RevampTo quit the application, choose File➔Exit.5 - 58 <strong>Data</strong> <strong>Access</strong> !
Importing data source environmentsTo redefine (revamp) a real database, you have to select acorresponding data source. You do this by choosing File➔Import... orelse by clicking the button in the toolbar.The following dialog box opens:It shows a list of the data sources declared on the PC. To create a datasource, see "Creating a data source". Since virtual data sources,obtained by revamping a real database, can't be redefined, they don'tappear in this list. They do, however, appear in the list of data sourcesmade available to the end-user in any Windows application that usesthem (for example, Microsoft Query).Select the data source you want to use.A <strong>Tun</strong> DB Revamp window similar to the following appears:! <strong>Tun</strong> DB Revamp general use 5 - 59
The real database tables appear in the left pane of the window.If the database in question hasn't been revamped with <strong>Tun</strong> DBRevamp, the right pane contains an empty environment named "NewEnvironment". This is the first environment you can configure.On the other hand, if you've already revamped the database with <strong>Tun</strong>DB Revamp, (in which case, it's a question of updating the virtualdatabase), the right pane contains a list of the environments alreadycreated and their contents.Creating an environmentTo define a new environment for the selected data source, select theenvironment root (called "Environments") and choose Insert➔NewEnvironment from the main menu. You can also click the toolbarbutton ..Enter a name and, optionally, a description for this environment.Creating a virtual tableTo create a virtual table in an environment, select the environment anddo the following:• Choose Insert➔New Table from the main menu or choose NewTable from the environment's context menu. You can also click thetoolbar button .• Choose View#Property Box to display the property box of thenewly created table (if it's not already displayed).• On the General tab in the Property Box, enter a name and optionaldescription for the table. You can also use the F2 function-key torename a selected table.5 - 60 <strong>Data</strong> <strong>Access</strong> !
If you want the virtual table to contain all or part of a real table, you cancopy the real table into the environment of your choice: All the fields inthe real table are also copied. To do this:• Use one of the methods described in the introduction (drag 'n drop,Copy/Paste, keyboard shortcut or toolbar button) to select the realtable in the source database and copy it to the target environment.• Delete the fields you don't require from the virtual database orchange them as described in the section "Creating a field".• If you want to, you can change the names of the objects copied(tables and fields), and add a description to them on thecorresponding General tab.Creating a fieldIn a virtual table, you can:• Insert an existing field from a real database, without changing itsdefinition.• Create a new virtual field from the real database fields." Existing fieldsYou can copy an existing field from a table in the real database directlyinto the virtual table. To do this:• Use one of the methods described in the introduction (drag 'n drop,Copy/Paste, keyboard accelerator or toolbar button) to select thefield in the real database table and copy it to the virtual table of theredefined database.• If you want, you can change the name of the field and give it adescription on the corresponding General tab (or else use the F2function-key).! <strong>Tun</strong> DB Revamp general use 5 - 61
" New fieldTo define a new field in a virtual table, select the virtual table and dothe following:• Choose Insert➔New Field from the main menu or choose NewField from the table's context menu. You can also click the toolbarbutton .• Choose View#Property Box to display the property box of thenewly created field (if it's not already displayed).• Enter a name and, optionally, a description on the General tab.Click the Origin tab. You can then:• Add a function to the field: Select the function from theFunction list box. The available functions are: Sum, Min, Max,Number, Average, and None.• Add a value from an existing field in a real database to the newfield or the function selected above: Select the real table andfield you want from the two Field list boxes.• Add an operation to the field selected above: Choose theoperator you want from the Operation list box. The availableoperations are: +, -, *, /, and none. The operator + can be used toconcatenate characters.• Then click the button Ins to add these options to the field definition.5 - 62 <strong>Data</strong> <strong>Access</strong> !
Example 1:You have access to a real table "res_tab" which contains four fieldsres1, res2, res3 and res4 corresponding to the quarterly results in aparticular year. You want to define the "Result" field in a table in yourvirtual database that contains the sum of the four real fields.On the Origin tab, for the field "Result":• Select the "res_tab" table and the "res1" field in the Field option'slist boxes.• Select the operator + in the list box of the Operation option.• Click the Mod button to replace the default entry. The new entry is"res_tab.res1 +".• Next select the "res_tab" table and the "res2" field in the list boxesof the Field option.• Select the operator + from the Operation list box again.• Click the button Ins to add the newly created entry "res_tab.res2 +".• Do the same for the field "res3".• For the field "res4", select the None operator instead of +.• The Result field is finally defined from the following list:res_tab.res1+res_tab.res2+res_tab.res3+res_tab.res4which means that the Result field contains the sum of the four fields"res1"," res2", "res3" et "res4".Example 2:You want the Results field to show the sum of the year's sales. To dothat, find the sum of all the res1 fields, res2 fields,... and then find thesum of these four results.On the Origin tab of the Result field:• Select the Sum function from the Function field list box.• Select the res_table table and the res1 field from each of the Fieldoption's list boxes.• Select the + operator from the Operation option's list box.• Click the Mod button to replace the default entry. The new entry is"res_tab.res1 +".! <strong>Tun</strong> DB Revamp general use 5 - 63
• Do the same for the fields "res2" and "res3". For the field "res4",select the operator "none" instead of the Operation option's "+"operator.You can change an item in a field definition using the Mod button (thehighlighted element is replaced by the values selected above). Click theDelete button to delete the highlighted item.You can change an item in a field definition using the Mod button (thehighlighted element is replaced by the values selected above). Click theDelete button to delete the highlighted item.After defining the field, click Apply for the new options to take effect.As soon as you define a new virtual field, remember to define the joinsbetween the table(s) used to create the virtual table, if there are any. Seethe section "Inter-table links".To check that the calculation you assigned to the created field is whatyou want, use <strong>Tun</strong> DB Revamp's query function. See "Querying realand virtual databases".Assigning field filtersYou can complete the definition of a virtual field with a filter, that is,you can define a condition for the calculation of the field value. Thefilter corresponds to limiting conditions in the query (as in MS Query).Example:You want to obtain the sum of the fields "res1" when the "res2" field isgreater than a particular value. The condition on "res2" is a filter.<strong>Tun</strong> DB Revamp lets you attribute a filter to virtual fields that is usedwhen the end user utilizes the field. A filter can be:• Static: The filter value is fixed.• Dynamic: Users enter their own values when they make a query.5 - 64 <strong>Data</strong> <strong>Access</strong> !
To assign a filter to a virtual field, select the field and then click theFilter tab in the Property Box. Then do the following:• Enter a label for the filter in the Label field. The label is optionalfor a static filter. For a dynamic filter, the label must indicate thepurpose of the filter for which the user is asked to supply a value.• Select the table and field to apply the filter to from the Field dropdownlist boxes.• Select the comparison operator from the Comp drop-down list box.• For static filters, enter the filter value in the Value field. Fordynamic filters, enter a question mark (?).• Click Ins to insert the defined criterion.You can create a set of conditions or criteria: Define the criteria asdescribed above. Select And or Or to add the extra criteria.To check that the filter you assigned to the created field is what youwant, use <strong>Tun</strong> DB Revamp's query function. See "Querying real andvirtual databases".If the filter is dynamic, queries to the virtual field display a window likethe following:Enter the value requested to apply the filter to the virtual field. Click theValues... button to display the list of possible values for field inquestion.! <strong>Tun</strong> DB Revamp general use 5 - 65
Inter-table linksThe fields defined in a virtual table are obtained from one or moretables in a real database.For each virtual table, it's essential to define the links between the realtables from which its constituent fields are extracted. Defining theselinks makes it possible to create the joins between the real tables whenthe end-user queries the virtual database. The links can be direct orindirect (that is, links between one table and another or between severaltables via intermediary tables)." Defining linksThe simplest way is to define the links at the same time as you definethe fields in the virtual table. The real tables used to define the fieldsmust be linked directly or indirectly to the other real tables used by thevirtual table.To define links between real tables for the same virtual table, select thevirtual table and do the following:• Click the Links tab for the virtual table.• For each real table, select the real table name and the field to use asa join with the other table. To do this, use the list box Key1 for thefirst real table, and Key2 for the second real table.Note:The names of the two fields linking the tables can be different, even ifthey represent the same data.• Select a comparison operator in the Comp list box.5 - 66 <strong>Data</strong> <strong>Access</strong> !
• Click the Ins button to add the link to the list of links in the virtualtable.You can change a link with the Mod button after changing the values ofthe selected item. Click Del to delete the selected item.Click Apply to validate the list of links you've defined." Checking links<strong>Tun</strong> DB Revamp provides a function for verifying the links you definebetween the real tables to construct the virtual table.For each virtual table, you can easily check if the real tables used arelinked and if the defined links form a coherent whole.To do this, click the "magic wand" button on the Links tab.<strong>Tun</strong> DB Revamp then examines all the links you've defined anddetects direct or indirect links that isolate particular tables from the rest.When a link between two tables is missing, <strong>Tun</strong> DB Revamp tries tolink them using two fields of the same name.! <strong>Tun</strong> DB Revamp general use 5 - 67
If the two fields exist, <strong>Tun</strong> DB Revamp proposes to define a linkbetween them as follows:In most cases, the proposed link is the right one. If, however, you thinkthat the two fields proposed by <strong>Tun</strong> DB Revamp mustn't form the linkbetween the tables, define the link manually as described in the section"Defining links".If two unlinked tables don't have fields of the same name, <strong>Tun</strong> DBRevamp displays a list of the unlinked tables:In this case, define the link manually as described in the section"Defining links".Querying real and virtual databases<strong>Tun</strong> DB Revamp includes a query function for real and virtualdatabase tables and fields.You can use this function to view a real or virtual database table or fielddirectly from <strong>Tun</strong> DB Revamp without using a query tool like MSQuery.To query a table (or a field) in the real database, chooseQuery#Source (or Query#Environment) from the main menu, orclick the toolbar button .5 - 68 <strong>Data</strong> <strong>Access</strong> !
A pane opens below the real or virtual database pane depending on theoption you chose. You can choose both options at the same time.To limit the number of records and the column width displayed whenyou query a table or a field, choose View#Options... from the mainmenu and click the Query options tab:Enter the maximum number of records to display in the fiels Maximumnumber of rows in query result.Enter the maximum column width to display in the field Maximumsize of columns in query result.! <strong>Tun</strong> DB Revamp general use 5 - 69
Note:If limits were defined when the data source was created (see "Creatinga data source"), they have a higher priority than the Query options.Example:Say a variable limit of 11 through 15 lines was set when the real datasource was configured.If you query a real database containing more than 11 records, awarning message is displayed, informing you of the limit. The exactwarning message depends on the type of limit used.Validating an environment<strong>Tun</strong> DB Revamp includes a function for verifying the consistencybetween the contents of the environments you create (as administrator)and the contents of the real database used. This is especially usefulwhen changes have been made to the structure of the real database (forexample, a field has been changed or deleted), that you haven'taccounted for in the virtual database.To use this function, you must validate the environment before youexport it to avoid any possible inconsistency. Choose File➔ValidateEnvironments from the main menu or click the button in thetoolbar.Example:Take, for example, the case where the "parameters:1" table and itsfields have been copied to the environment "Marketing". Each field inthe virtual table thus created has the "parameters:1" table as its pointof origin.If this logical table is consequently deleted in the real database, thefields in the virtual table will no longer have a point of origin.Similarly, all the tables with a reference to the "parameters:1" table intheir links will become incoherent.5 - 70 <strong>Data</strong> <strong>Access</strong> !
On a request for environment validation, <strong>Tun</strong> DB Revamp:• Identifies the virtual tables with links to the deleted table and offersto delete them. In this case, it's better not to delete them: Delete thefields that are copied from fields in the deleted table.• Identifies the virtual fields copied from the deleted table andproposes to delete them.If no inconsistency is detected, the following window is displayed:Exporting data source environmentsTo make the database redefined by its environments available to users,you must export it from the PC to the server.To export data source environments from the PC to the server, chooseFile➔Export... from the main menu or click the toolbar button .! <strong>Tun</strong> DB Revamp general use 5 - 71
This operation creates or updates the three tables containing therevamped database information.Updating a virtual data sourceWhen you change the name of an environment, you can update thecorresponding virtual data source. This functionality is automatic if youselected the Auto <strong>Data</strong> Source Update check box (chooseView➔Options).This opens the following dialog box:If the option is selected, there are two possibilities:• If the Display Warnings check box is selected, <strong>Tun</strong> DB Revamprequests confirmation before performing an automatic update.• If this check box isn't selected, the update is carried outautomatically without confirmation.If the Auto <strong>Data</strong> Source Update check box isn't selected, chooseInsert➔Create/Update <strong>Data</strong> Source from the main menu or Update<strong>Data</strong> Source from the context menu for the current environment toupdate the corresponding data source.If you want to cut the link temporarily between an environment and itsdata source, choose Insert➔Remove <strong>Data</strong> Source or Remove <strong>Data</strong>Source from the context menu. You can later recreate the link bychoosing Update <strong>Data</strong> Source.5 - 72 <strong>Data</strong> <strong>Access</strong> !
Creating a virtual data sourceThe chapter "Configuration and use" describes how to create a virtualdata source with ODBC Administrator.You can also do this with <strong>Tun</strong> DB Revamp. Choose Create associateddata source... from the environment's context menu.The following dialog box opens:Enter a description of the data source in the Description field. Selectthe Trace File check box and specify the log file if you want to keep anactivity trace for the virtual data source. For more information on thisdialog box, see the section "Creating a virtual data source" in thechapter "Configuration and use".Displaying warningsYou can choose to show or hide warnings while you're using <strong>Tun</strong> DBRevamp. These warnings supply information, for example, oninconsistencies which arise during the revamping of the database andmissing elements in the new structure.! <strong>Tun</strong> DB Revamp general use 5 - 73
<strong>Tun</strong> DB Revamp displays these warnings by default. However, youcan switch off the display of message boxes by clearing the DisplayWarnings check box (View➔Options).Local revamped data source managementYou can save and open locally the description of the revampeddatabase. This can be useful if you don't want to export the revampeddatabase immediately, or if you want to keep earlier versions. Thisdescription is saved in a file with the extension ".dbr"." Saving locallyTo save the description of a revamped database produced with <strong>Tun</strong> DBRevamp locally, choose File➔Save (or File➔Save As... to save itunder a different name), or click the button in the toolbar.The path for the real data source is also saved. This means you can laterexport the data source and its environments without modifying the path." Opening a local data sourceTo open a revamped data source that's saved in a ".dbr" file on the localmachine, choose File➔Open from the main menu or click the toolbarbutton .Select the revamped data source you want (a ".dbr" file).You can open the most recently used data sources from the File menu.5 - 74 <strong>Data</strong> <strong>Access</strong> !
" Reloading the database structureWhen you open a ".dbr" saved locally, you can update the databasestructure from which the environments were created. This is usefulwhen the real database has been changed since the last time the ".dbr"file was saved. To do that, choose File#Reload database structurefrom the main menu.After this operation, it's recommended that you validate theenvironments created previously, especially if the real fields used todefine the virtual fields have been moved or deleted. See "Validating anenvironment" for more details.Field identification" Field icons<strong>Tun</strong> DB Revamp uses field icons to make it easier to read real orvirtual tables.IconsMeaningcharacter fielddate fieldnumeric fieldbinary fieldtable primary key" Real field propertiesYou can choose Properties from a real table field's context menu (leftpane) for additional information on the field.! <strong>Tun</strong> DB Revamp general use 5 - 75
The Field properties dialog box opens:Note:The type of field referred to here corresponds to the native type and sodepends on the DBMS used.5 - 76 <strong>Data</strong> <strong>Access</strong> !
PART 3APPENDICES
AREFERENCEIndexNote:xxx stands for the relative file extension for a specific database. The fileextensions are as follows:• ifx• ora• syb• db2• pro• pro7• pro8• ism• mvsInformixOracleSybaseDB2ProgressProgress7Progress8C-ISAMDB2 for MVSCONFIG.XXXFile containing the working and securityparameters of the <strong>Tun</strong> <strong>SQL</strong> UNIX serverDBMAP Windows application to create or editcharacter conversion tables.DBSCRIPTWindows application which interprets andexecutes <strong>SQL</strong> batch filesDBSHOW Windows application for testing andconfigurationPARAM.XXXTUNODBC200.XXXFile containing the setup parameters of the<strong>Tun</strong> <strong>SQL</strong> UNIX server<strong>Tun</strong> <strong>SQL</strong> UNIX server! Reference A - 79
CONFIG.XXXContains the working and security parameters of the <strong>Tun</strong> <strong>SQL</strong> server." DescriptionThe config.xxx files supply a certain number of parameters to the <strong>Tun</strong><strong>SQL</strong> server. Unlike the param.xxx files, the parameters don't concernthe overall functioning of the server but refer to a particular database.For example, a config file looks like this:#Optional declaration for databases#Example :#[base_name]#Define=ENV_VARIABLE:value#RowLimitMode=None|Absolute|Fixed|Variable|Extended|1|2|3|4|5#RowLimitValue=value#RowLimitMax=value#DbmsName=<strong>Data</strong>baseName#Version=<strong>Data</strong>baseVersion# In this section, list allowed configuration(base,user,product)# Base_Name|*,User_Name|*,Product_Name|*[Allowed]# In this section, list denied configuration(base,user,product)# Base_Name|*,User_Name|*,Product_Name|*[Denied]This file can contain as many sections as there are databases managedby the DBMS associated with the <strong>Tun</strong> <strong>SQL</strong> UNIX server. You don'thave to include all the databases if you have no special parameters toset for them.The title of each section is the name of the corresponding databaseenclosed in square brackets (for example, [tunsqldemo]). You candefine the following parameters for each section:A - 80 <strong>Data</strong> <strong>Access</strong> !
Define=END_VARIABLE:valueAssigns a value to the environment variable ENV_VARIABLE beforethe opening of the database (database installation directory, dateformat...). Include this option for each database in the config file.RowLimitMode=None|Absolute|Fixed|Variable|Extended|1|2|3|4|5RowLimitValue=valueRowLimitMax=valueSome office applications let you compose your own <strong>SQL</strong> requests. Inother cases, applications tend to read a table in its entirety beforedisplaying it on the screen. This doesn't pose any real problem if it's aquestion of small tables contained in a local database. However,insurmountable problems can arise when you're dealing with very largetables in a centralized, remote database. In this case, there's aconsiderable number of exchanges on the network and there isinsufficient memory in the PC to store the received data. The PC has tobe frequently rebooted after this type of select request. To compensatefor this problem, the <strong>Tun</strong> <strong>SQL</strong> ODBC driver incorporates limits thatyou define with the RowLimitMode parameter. If this parameter isdefined, it takes priority over the values defined in the data source onthe PC.The parameter can take five different values:NoneNo limit is imposed by the ODBC driverAbsolute The ODBC driver doesn't load more thanRowLimitValue rows in one select request. Nomessages are displayed to inform the user.Fixed The ODBC driver doesn't load more thanRowLimitValue rows in one select request. A messageis displayed informing the user.Variable The ODBC driver doesn't load more thanRowLimitValue rows in one select request. However,it displays a message proposing to load more within thelimit of the maximum value (RowLimitMax).ExtendedLimitThe ODBC driver doesn't load more thanRowLimitValue rows in one select request. However,it displays a message proposing to load more without amaximum value. In this case, the message displayed isreally only a warning.! Reference A - 81
DbmsName=<strong>Data</strong>baseNameSets or changes the name of the database to transmit to the ODBCdriver.Version=<strong>Data</strong>baseVersionSets or changes the version number of the database to transmit to theODBC driver.In addition to the sections corresponding to each database, the configfile can include [Allowed] and [Denied] sections. You can use thesesections to secure access to certain databases. These sections functionas follows:[Allowed]This section must contain a series of triple terms such as:base_name,user_name,product_namewhere:• base_name is the name of a database• user_name is the name of a user of the database• product_name is the name of a Windows application that uses theserver.Each set of triplets indicates if a user (user_name) is authorized to usethe database (base_name) with the Windows application(product_name). Each parameter can be replaced by the genericcharacter *.For example, the triplet tunsqldemp,*, excel means that all the userscan use the base tunsqldemo from the application EXCEL except forthose whose names are contained in a similar triplet in the [Denied]section.[Denied]This section contains a series of triple terms similar to those in the[Allowed] section.A - 82 <strong>Data</strong> <strong>Access</strong> !
Each set of triple terms indicates if a user (user_name) is notauthorized to use the database (base_name) with a Windowsapplication (product_name). Each term can be replaced by the genericcharacter *.For example, the triple term *,john,excel means that the user johncannot use any database from the application excel except for thosewhose names are contained in a similar, contradictory triple term in the[Allowed] section.Notes:For a <strong>Tun</strong> <strong>SQL</strong> server to take account of a config file, you must use thecommand line option -c.Two different Informix database engines may coexist (Informixversions 5 and 7). For example, one database could be accessed bydatabase engine 1 from the directory /u/informix1 and a second bydatabase engine 2 from the directory /u/informix2. In this case, the fileconfig.ifx contains:[database1]Define=INFORMIXDIR:/u/informix1Define=DBPATH:/u/database1Version=5.01[database2]Define=INFORMIXDIR:/u/informix2Define=DBPATH:/u/database2Version=7.01" See alsoparam.xxx, tunodbc200.xxx! Reference A - 83
DBMAP" SyntaxWindows application for creating or editing conversion tables.DBMAP [-ffile_name]" DescriptionYou can use <strong>Tun</strong> DB Map to create or edit character translation tables.The translation tables lets you avoid problems caused by the differencesin the codification of accented characters on the PC and the remoteDBMS. For the translation tables to take effect, you must declare themwhen you define the data source.-ffile_nameReplace "file_name" with the name of the existing translation table youwant to use.A - 84 <strong>Data</strong> <strong>Access</strong> !
DBSCRIPT" SyntaxWindows application for executing <strong>SQL</strong> batch files.DBSCRIPT [-ddata_source] [-ffile_name]" DescriptionWith <strong>Tun</strong> DB Script, you can execute a whole list of <strong>SQL</strong> requests in asingle operation. It interprets the <strong>SQL</strong> commands one by one and stopswhen it encounters an error. You can also use <strong>Tun</strong> DB Script to changeand save <strong>SQL</strong> batch files.<strong>Tun</strong> DB Script is useful for downloading the contents of a databasefrom a Windows PC to a remote DBMS. You can also use it to updateor clear large databases.-ffile_nameReplace "file_name" with the name of the file containing the <strong>SQL</strong>commands. This file is loaded when the application starts running.-ddata_sourceReplace "data_source" with the name of the data source that the <strong>SQL</strong>batch file will use. <strong>Tun</strong> DB Script doesn't automatically create theconnection with the data source. You must do this subsequently "byhand".! Reference A - 85
DBSHOW" SyntaxWindows application for testing and configuring.DBSHOW [-hhost_name]" DescriptionYou use <strong>Tun</strong> <strong>SQL</strong> to query a remote host to see if there are any <strong>Tun</strong><strong>SQL</strong> servers present.Enter the name of the host in the Host field, then click Find Servers toobtain this information. <strong>Tun</strong> DB Show returns the names of any <strong>Tun</strong><strong>SQL</strong> servers correctly installed on the remote machine and also thenames of the DBMSs they interface with.This application is particularly useful for checking the conformity ofthe installation.-hhost_nameReplace "host_name" with the name of the host you want to query.A - 86 <strong>Data</strong> <strong>Access</strong> !
PARAM.XXXFile containing the setup parameters of the <strong>Tun</strong> <strong>SQL</strong> server." DescriptionRather than running <strong>Tun</strong> <strong>SQL</strong> servers with a large number ofcommand line options, it's better to save the options, each on a separateline, in a file and transmit the name of the file to the host using the -foption.The <strong>Tun</strong> <strong>SQL</strong> installation procedure uses this mechanism and writesthe options to param.xxx files (where xxx stands for the abbreviatedname of the DBMS (param.ora, param.syb, param.ifx, etc.).Here's an example:-output=/dev/null-output2=/dev/null-DORACLE_HOME=/home3/oracle/7.1.4-DORACLE_SID=odbc-config=/usr/tunsql/config.oraThe meaning of the different options is explained in the sectiontunodbc200.xxx." ProgressSome Progress fields may contain several values: These are known as"array fields". To view these values from applications like MS Queryand MS <strong>Access</strong>, the following option must appear in the fileparam.proX (where X is the number of the Progress version used): :-arrayfields=*where * stands for one of the following characters:$, &, #, %, - ,_.The default character is _.! Reference A - 87
The columns required to view the different array field values will thenbe named:columnname*n*,where * is the character chosen in the file param.proX (by default, "_")and n is the position of the value in the table.Example:The second value in the array field appears in column col_2_.If using the character "_" causes a problem when the column isgenerated (other columns may have a similar name), you must chooseone of the other four characters." See alsoconfig.xxx, tunodbc200.xxxA - 88 <strong>Data</strong> <strong>Access</strong> !
TUNODBC200.XXX<strong>Tun</strong> <strong>SQL</strong> server.Note:The different <strong>Tun</strong> <strong>SQL</strong> servers have a number of options in common.You can obtain a list of these options by running the executabletunodbc200.xxx with the option -a[ll], where xxx stands for thedatabase extension." Syntaxtunodbc200.XXX-a[ll]-c[config]=config_file-Dname=value-db[ms]=DBMS_name-de[bug]-f[ile]=param_file-h[old]-i[nter]-l[owercase]-n[opassword]-nor[owcount]-o[utput]=file_name-o[utput]2=file_name-ow[ner]-p[rogress]=XX-s[electby]-sv[archar]-sy[scolumns]-t[imer]=xx-u=user1,user2...-v[ersion]=DBMS_version_number-x=user1,user2..." Common options-aLists all the options supported by tunodbc200.xxx.! Reference A - 89
-c=config_fileAssociates a configuration file (config.xxx) with the server (Cf.config.xxx).-db=nameAssociates a DBMS name with the <strong>Tun</strong> <strong>SQL</strong> server. This is the namethat's displayed by <strong>Tun</strong> DB Show when you click Find Servers.-deTells the server to function in trace mode. By default, the messages aredisplayed on the device /dev/console.-Dname=valueSets the environment variable "name" to the value "value" before theserver is started (database installation directory, date format, etc.). Usethis option in the command line as many times as required. It'sindispensable to define specific variables for the <strong>Tun</strong> <strong>SQL</strong> server tofunction with some DBMSs. This definition is performed by theinstallation procedure. For reference purposes, these variables areneeded for the following DBMSs:OracleORACLE_HOME: Oracle installation directory.ORACLE_SID: Default database.InformixINFORMIX_DIR: Informix installation directory.DBPATH: Directory containing the database (only SE).SybaseSYBASE: Sybase installation directory.SYBSERVNAME: Identifier of the server setup file (optional). Thisvalue is equivalent to the variable DSQUERY, defined and used bySYBASE.-f=param_fileReplace "param_file" with the name of the file containing the programoptions. Use this option to run the program without having to entermultiple options.A - 90 <strong>Data</strong> <strong>Access</strong> !
-iUses interactive test mode to check the server is working properly.-o=fileReplace "file" with the name of the file or device that the server andaccess controller (Watchdog) trace messages are written to. Works onlyin debug mode.-o2=fileReplace "file" with the name of the file or the device that only theWatchdog trace messages (and not the server's) are written to. Worksonly in debug mode.-t=xxAssigns a timeout value. If no reply is received from the PC after thistime, the <strong>Tun</strong> <strong>SQL</strong> server thinks the PC has stopped. The servertherefore also stops. This value is of lesser priority than that assigned onthe PC when the data source is defined.-uUsed with the -x parameter to define authorized users ("*" foreveryone). The default value is *. For example:-x = *-u = bill (only "bill" is authorized)-v=XXAssociates a DBMS version number with the <strong>Tun</strong> <strong>SQL</strong> server. Thisvalue is displayed by <strong>Tun</strong> DB Show.-xUsed to define users who are denied access ("*" for everyone). Forexample:-u = *-x = bill (only "bill" is denied access)! Reference A - 91
" Informix options-hBy default, Informix doesn't maintain the cursors open during theexecution of the commit and rollback commands. The -h optionensures the cursors are kept open after one of these commands if theapplications using this type of server can't do it.-nApplies only to SCO UNIX 5. If the system SCO UNIX 3.2 version 5can't check user passwords correctly, this option cancels passwordchecking.-sBy default, Informix can't execute select commands with a sort option(group by or order by) on a column which isn't included in the selectcommand. Use the -s option to compensate when applications make noprovision for this." Oracle options-lIf tables, columns, indexes or views are created in the catalog withlowercase characters, the -l option ensures that the catalog functionsreturn data enclosed in quotation marks. Applications using this type ofserver create queries with names in quotation marks." Progress options-nApplies only to SCO UNIX 5. If SCO UNIX 3.2 version 5 can't checkuser passwords correctly, this option cancels password checking.A - 92 <strong>Data</strong> <strong>Access</strong> !
-norProgress can't tell how many lines have been modified or deleted whenan update or delete command is executed. By default, the servercompensates for this lack. However, there's a time penalty each time anupdate or delete command is executed. If applications using the serverdon't need to know the number of modified lines, the -nor optioncancels server compensation, thus saving time.-owBy default, the server doesn't support the notion of object owner in thedatabase. Some applications try to add an owner prefix when ownersare returned with the objects, provoking errors during execution. Thisoption, add owners, is useful when the application needs to know theowner and the owners are correctly handled.-p=XXIf you must use options that are specific to Progress (for example, the -Q option which forces the database to respect the ANSI norm), set theparameter as -p=XX, where XX stands for the string containing therequired options in quotation marks.-svProgress uses only one type of character string. By default, all thestrings are considered to be of a fixed length (<strong>SQL</strong>_CHAR in ODBC).If this option is used, the strings are treated as though they were ofvariable length (<strong>SQL</strong>_VARCHAR in ODBC).-syProgress can define system or hidden columns that aren't returned whena search of all the columns are carried out using a wildcard character.This is why, by default, the server doesn't describe the columns in itscatalog. If, however, the hidden columns are required, this optionenforces their return." See alsoparam.xxx, config.xxx! Reference A - 93
B<strong>SQL</strong> STATEMENTS USED IN C-ISAMPrinciple instructionsCREATE DATABASE ........................................................................ 97CREATE TABLE ................................................................................ 98DEFINE TABLE.................................................................................. 99COLUMN DEFINITION OPTION.............................................. 100DEFAULT CLAUSE ................................................................... 101NOT NULL CLAUSE.................................................................. 102CONSTRAINT DEFINITION SUBSET...................................... 103CONSTRAINT DEFINITION OPTION...................................... 104FILE IS OPTION ......................................................................... 105CREATE INDEX............................................................................... 106CREATE SYNONYM ....................................................................... 107COMMENT ....................................................................................... 108DROP DATABASE........................................................................... 109CONNECT DATABASE................................................................... 110DISCONNECT DATABASE ............................................................ 111DROP INDEX.................................................................................... 112DROP TABLE ................................................................................... 113DROP SYNONYM............................................................................ 114! <strong>SQL</strong> statements used in C-ISAM B - 95
UNDEFINE TABLE .......................................................................... 115SELECT ............................................................................................. 116SELECT CLAUSE....................................................................... 117EXPRESSION.............................................................................. 118FROM CLAUSE .......................................................................... 119WHERE CLAUSE ....................................................................... 120GROUP BY CLAUSE.................................................................. 121HAVING CLAUSE...................................................................... 122ORDER BY CLAUSE.................................................................. 123DELETE............................................................................................. 124INSERT.............................................................................................. 125VALUES CLAUSE...................................................................... 126UPDATE............................................................................................ 127SET CLAUSE............................................................................... 128AGGREGATE EXPRESSION..................................................... 129<strong>SQL</strong> statement syntaxThe <strong>SQL</strong> statements are presented using the following syntax:• Reserved names are in uppercase characters (INSERT, UNIQUE,etc.). You can, however, use lowercase characters to enter them onthe command line.• Variable names are in italic (<strong>Data</strong>basename, etc.).• Square brackets indicate optional parameters or entries([optional]).• Braces and the expression xor indicate an exclusive choice ({Axor B xor C}).• The exponent n ( n ) indicates a sequence that can be repeated from0 to n times (sequence n ).Punctuation marks and parentheses are literal symbols that must beentered exactly as they appear.B - 96 <strong>Data</strong> <strong>Access</strong> !
CREATE DATABASE" Purpose" SyntaxCreates a new database.CREATE DATABASE BasenameNote:The database name must be less than 18 characters." UseThe database created becomes the current database.This statement can only be used with sqltools (<strong>Tun</strong> <strong>SQL</strong> tool).After the creation of the database, a directory named <strong>Data</strong>basename.ismis created. This directory contains the extra C-ISAM files composingthe catalog (SysTables, SysColumns, SysIndexes, SysDefaults). It is asubdirectory of the directory designated by the ISAM-PATHenvironment variable if set, or of the current directory." ExampleCREATE DATABASE TEST;Creates the directory test.ism containing the files SysTables.dat,SysTables.idx, SysColumns.dat, SysColumns.idx, SysIndexes.dat,SysIndexes.idx, SysDefaults.dat, and SysDefaults.idx.! <strong>SQL</strong> statements used in C-ISAM B - 97
CREATE TABLE" Purpose" SyntaxCreates a new table in the current database and places data integrityconstraints on its columns or a group of columns.CREATE TABLE tablename (Column definition [,Column definition] n )[,Constraint definition] nNote:The table name must be less than 18 characters." UseTable names in the same database must be unique. Each column in thesame table must have a different name.The table name can be prefixed with the name of a UNIX user whobecomes the owner of the table. If no name is specified, the currentlogin ID is used." ExampleCREATE TABLE TABLE_TEST (c1 char);This statement creates table table1 in the relational database by creatingthe associated C-ISAM files (table1_100.dat and table1_100.idx, forexample).The C-ISAM file names are created by taking the first seven charactersof the table name and adding a unique value to them. If the table namehas less than seven characters, the new file names are padded out withunderline characters ( _ ). The unique value is 100 for the first tablecreated: This value is then incremented by 1 for each new table.B - 98 <strong>Data</strong> <strong>Access</strong> !
DEFINE TABLE" Purpose" SyntaxDefines a new table in the current database, with data integrityconstraints on its columns or a sequence of its columns, and conditionaloptions for the existence of files.DEFINE TABLE tablename [File is option] (Column definition[,Column definition] n ) [,Constraint definition] nNote:The table name must be less than 18 characters." UseTable names in the same database must be unique. Column names inthe same table must all be different.The table name can be prefixed with the name of a UNIX user whobecomes the owner of the table. If no name is specified, the currentlogin ID is used." ExampleDEFINE TABLE TABLE1 file is file_1 (c1 char);In this example, the file_1 C-ISAM files (file_1.idx and file_1.dat)already exist: Only the table must be defined.! <strong>SQL</strong> statements used in C-ISAM B - 99
COLUMN DEFINITION OPTION" Purpose" SyntaxUsed in the statements CREATE TABLE and DEFINE TABLE.The "column definition" option in the DEFINE TABLE (CREATETABLE) statement lists the name, type, default value and constraint fora single column.Columnname <strong>Data</strong> type [Default clause] [Not null clause] [Constraintdefinition subset]" ExampleCREATE TABLE PETS(name char (20),sex char(1));race char (25),This table is composed of the columns name, race and sex.B - 100 <strong>Data</strong> <strong>Access</strong> !
DEFAULT CLAUSE" Syntax" UseUsed in the option COLUMN DEFINITION.DEFAULT [{Literal xor NULL xor Current xor Today xor User}]The default value is inserted into the column when an explicit value isnot specified. If a default isn't specified and the column allows nulls,the default is NULL.LITERALNULLCURRENTTODAYUSERString of characters or numeric constant characters defined by the userNull valueCurrent date and time (only usable with TIMESTAMP type)Current date (only usable with DATE type)Name of the current user (only usable with VAR or VARCHAR type)" ExampleCREATE TABLE PETS(name char (20),race char(25),sex char(1) DEFAULT 'M')In this table, the default value for sex is a string literal: 'M'.! <strong>SQL</strong> statements used in C-ISAM B - 101
NOT NULL CLAUSE" Purpose" SyntaxUsed in the option COLUMN DEFINITION.If you don't indicate a default value for a column, the default is nullunless you include the NOT NULL keywords after the data type of thecolumn. In this case, there is no default value for the column.NOT NULL" ExampleCREATE TABLE INVOICE(invoice_id longint NOT NULL,customer_name char (30))If the column is designated as NOT NULL (and no default value isspecified), you need to enter a value in this column when inserting arow or updating that column in a row. If not, the database server returnsan error.B - 102 <strong>Data</strong> <strong>Access</strong> !
CONSTRAINT DEFINITION SUBSET" Purpose" SyntaxUsed in the option COLUMN DEFINITION.The constraint definition subset lets you create constraints for a singlecolumn.{UNIQUE xor PRIMARY KEY} [CONSTRAINT Constraint name]Note:The constraint name mustn't be longer than 18 characters and must beunique in the database." UseUNIQUEPRIMARY KEYConstrains the field to be uniqueConstrains the field to be unique and to be the primary key of thetableIf the name of the constraint isn't specified, a default name is assigned." ExampleCREATE TABLE INVOICE(invoice_number longint UNIQUE CONSTRAINT un_invoice,customer_name char (30))The unicity constraint of the invoice number is called un_invoice.! <strong>SQL</strong> statements used in C-ISAM B - 103
CONSTRAINT DEFINITION OPTION" Purpose" Syntax" UseUsed in the statements CREATE TABLE and DEFINE TABLE.The constraint definition option lets you create constraints for a set ofcolumns (from 1 through 8 columns).{UNIQUE xor PRIMARY KEY} (Columnname[,Columnname] n )[CONSTRAINT Constraint name]UNIQUEPRIMARY KEYConstrains the field to be unique for the set of columnsConstrains the field to be unique and to be the primary key for theset of columnsIf the name of the constraint isn't specified, a default name is assignedto the constraint.Each column named in a constraint must be a column in the table andcan't appear in the constraint list more than once." ExampleCREATE TABLE FAMILY(name char (20),surname char (20),birth_date date,PRIMARY KEY (name, surname) CONSTRAINT pk_family)The primary key constraint pk_family affects the name and surnamefields.B - 104 <strong>Data</strong> <strong>Access</strong> !
FILE IS OPTION" Purpose" Syntax" UseUsed in the statement DEFINE TABLE.Defines the use of the table according to the existence or non-existenceof a file.FILE IS filenameIf this option is used, no C-ISAM files are created. <strong>Tun</strong> <strong>SQL</strong> must findthe files filename.dat and filename.idx in the directory of the currentdatabase before it can use the table.If the option isn't used, a default name is assigned to the files created inthe current database directory." ExamplesCREATE DATABASE TEST;DEFINE TABLE TABLE1 FILE IS FIC1 (C1 CHAR);In this example, no files are created. The files foo1.dat and foo1.idxmust be added to the directory test.ism.DEFINE TABLE TABLE1 (C1 CHAR);In this example, the files table_100.dat and table_100.idx (defaultnames) are created in the directory test.ism.! <strong>SQL</strong> statements used in C-ISAM B - 105
CREATE INDEX" Purpose" SyntaxCreates an index for one or more columns in a table (from 1 through 8columns).CREATE {UNIQUE xor DISTINCT} INDEX indexname ONtablename (Columnname [,Columnname] n )Notes:The index name mustn't be longer than 18 characters.The number of columns can vary from 1 through 8." UseUNIQUEDISTINCTConstrains the index to be uniqueSynonym for UNIQUEFor tables defined with the FILE IS option, the CREATE INDEXstatement must be executed before copying the files filename.dat andfilename.idx." ExampleCREATE DISTINCT INDEX ix_name ON Table1 (name,birth_date) ;This statement creates the index ix_name for the name and birth_datecolumns in the table Table1.B - 106 <strong>Data</strong> <strong>Access</strong> !
CREATE SYNONYM" Purpose" SyntaxAttributes a synonym to a table.CREATE SYNONYM synonymname FOR tablenameNotes:The name of the synonym must not be longer than 18 characters." UseThe name of a synonym must be preceded by the name of a UNIX userwho then becomes the owner of the synonym. If no name is given, thecurrent login ID is used by default." ExampleCREATE SYNONYM employee FOR Table1;This statement creates the synonym employee for the table Table1.! <strong>SQL</strong> statements used in C-ISAM B - 107
COMMENT" Purpose" SyntaxAttributes a comment to a table or a synonym.COMMENT ON {tablename xor synonymname} IS 'comment string'" ExampleCOMMENT on TABLE1 IS 'Employees' Table'B - 108 <strong>Data</strong> <strong>Access</strong> !
DROP DATABASE" Purpose" SyntaxRemoves (deletes) an entire database, including all catalogs, indexesand data.DROP DATABASE basenameNote:The database name must be less than 18 characters." UseA database that's being used by another user can't be dropped.The DROP DATABASE statement doesn't remove the databasedirectory if it contains any files other than those created for thedatabase's tables and indexes." ExampleDROP DATABASE DBTEST;Deletes the database DBTEST.! <strong>SQL</strong> statements used in C-ISAM B - 109
CONNECT DATABASE" Purpose" SyntaxConnects to a different database. You can't perform operations on adatabase if you're not connected to it.CONNECT DATABASE basename" ExampleCONNECT DATABASE DBTEST2;Connects to the database DBTEST2.B - 110 <strong>Data</strong> <strong>Access</strong> !
DISCONNECT DATABASE" Purpose" SyntaxDisconnects from the current database.DISCONNECT DATABASE basename" ExampleDISCONNECT DATABASE DBTEST2;Disconnects from the database DBTEST2.! <strong>SQL</strong> statements used in C-ISAM B - 111
DROP INDEX" Purpose" SyntaxDeletes an index.DROP INDEX indexname" ExampleDROP INDEX ix_name ;Deletes the index ix_name.B - 112 <strong>Data</strong> <strong>Access</strong> !
DROP TABLE" Purpose" Syntax" UseDeletes a table, along with its associated indexes and data.DROP TABLE {tablename xor synonymname}If a synonym is deleted by the statement DROP TABLE, the table isalso deleted.If the statement DROP TABLE applies to a table, the table's synonymswill only be deleted if the statement DROP SYNONYM is used." ExampleDROP TABLE TABLE1;Deletes the table TABLE1, and its indexes and data.! <strong>SQL</strong> statements used in C-ISAM B - 113
DROP SYNONYM" Purpose" Syntax" UseDeletes a previously defined synonym.DROP SYNONYM synonymnameIf a table is dropped, the synonym remains in place until you explicitlydrop it using the DROP SYNONYM statement." ExampleDROP SYNONYM employee;Deletes the synonym employee attributed to the table Table1. The tableis not deleted with this statement.B - 114 <strong>Data</strong> <strong>Access</strong> !
UNDEFINE TABLE" Purpose" SyntaxDeletes a table defined by a DEFINE statement but doesn't delete theassociated data and index files.UNDEFINE TABLE {tablename xor synonymname}" ExampleUNDEFINE TABLE TABLE1;Deletes the table TABLE1 created by the statement DEFINE TABLETABLE1.! <strong>SQL</strong> statements used in C-ISAM B - 115
SELECT" Purpose" Syntax" UseQueries a database.SELECT Select clause From clause [Where clause] [Group by clause][Having clause] [Order by clause]You can query the tables in the current or a different database." ExampleSELECT customer_nameFROM customersWHERE turn_over > 250ORDERBY country ;This query reads the customers with an annual turnover of over 250from the customers table and returns their names listed by country.B - 116 <strong>Data</strong> <strong>Access</strong> !
SELECT CLAUSE" Syntax" UseUsed by the statements SELECT and INSERT.[{ALL xor DISTINCT xor UNIQUE}] {Expression [[AS] Displaylabel] [,Expression [[AS] Display label]] nIn the SELECT clause, you specify exactly which data to select, and ifyou want to omit duplicate values.ALLDISTINCTUNIQUESpecifies that all the selected values are returned, even if they'reduplicates.Removes duplicate rows from the query results.Synonym for DISTINCT." ExampleSELECT customer_nameFROM customersWHERE turn_over > 250ORDERBY country ;This query reads the customers with an annual turnover of over 250from the customers table and returns their names listed by country.SELECT order_date, COUNT(*), paid_date - order_dateFROM ordersGROUP BY 1, 3This query returns the order date, the number of orders and thedifference between the payment and order dates, grouped by order dateand time lapse (difference between the dates).! <strong>SQL</strong> statements used in C-ISAM B - 117
EXPRESSION" SyntaxUsed by the clause SELECT.{ [{tablename xor synonymname xor tablealias}.] columnnamexor NULLxor Literal numberxor Quoted stringxor Userxor Aggregate expression}" Example'Cordwainer'The character string 'Cordwainer' is a subexpression.B - 118 <strong>Data</strong> <strong>Access</strong> !
FROM CLAUSE" Purpose" SyntaxUsed by the statements SELECT and DELETE.Lists the table or tables from which data are selected.FROM {Table name xor Synonym name} [[AS] Table alias][,{Table name xor Synonym name} [[AS] Table alias]] n" ExampleSELECT customer_name, order_numFROM customers c, orders oWHERE c.customer_num = o.customer_num ;In this statement, data is extracted from the tables customers and ordersand the tables are given aliases.! <strong>SQL</strong> statements used in C-ISAM B - 119
WHERE CLAUSE" Purpose" SyntaxUsed by the statements SELECT, DELETE and UPDATE.Specifies search and join conditions for the data that are selected.WHERE Condition [AND Condition] n" ExampleSELECT customer_nameFROM customersWHERE last_order_date < '28/07/1993'ORDERBY country ;In this example, the search condition is the last order date.B - 120 <strong>Data</strong> <strong>Access</strong> !
GROUP BY CLAUSE" Purpose" Syntax" UseUsed by the statement SELECT.Produces a single row of results for each group.GROUP BY {Table name xor Synonym name } . Column name xorSelect number}[,{Table name xor Synonym name} . Column name xor Selectnumber}] nA group is a set of rows that have the same values for each columnlisted.The "select number" variable is an integer that represents the position ofa column in the SELECT clause." ExampleSELECT order_date, COUNT(*), paid_date - order_dateFROM ordersGROUPBY order_date, 3 ;The results are grouped by order_date and paid_date - order_date.! <strong>SQL</strong> statements used in C-ISAM B - 121
HAVING CLAUSE" Purpose" SyntaxUsed by the statement SELECT.Applies one or more conditions to groups.HAVING Condition" ExampleSELECT customer_num, call_dtime, call_codeFROM cust_callsGROUP BY call_code, 2 , 1HAVING customer_num < 42 ;This query returns the call_code, call_dtime and customer_num tablesand groups them by call_code for all the calls from customers whosecustomer number is less than 42.B - 122 <strong>Data</strong> <strong>Access</strong> !
ORDER BY CLAUSE" Purpose" Syntax" UseUsed by the statement SELECT.Sorts query results by the values contained in one or more columns.ORDER BY {Table name . xor Synonym name .} Column name xorSelect number xor Display label} [,{Table name . xor Synonym name .}Column name xor Select number xor Display label}] nThe "select number" variable is an integer that represents the position ofa column in the SELECT clause." ExampleSELECT customer_nameFROM customersWHERE turn_over > 250ORDERBY country ;This query returns its results ordered by country.! <strong>SQL</strong> statements used in C-ISAM B - 123
DELETE" Purpose" SyntaxDeletes one or more rows from a table.DELETE FROM {Table name xor Synonym name}[WHERE {Condition xor CURRENT OF Cursor name}]" ExampleDELETE FROM customers WHERE last_order_date
INSERT" Purpose" SyntaxInserts one or more rows into a table.INSERT INTO {Table name xor Synonym name} [(Column name[,Column name] n )] {Values clause xor Select clause}" ExampleINSERT INTO Pets VALUES ('Socks', 'Cat', 'M') ;This statement inserts the values 'Socks', 'Cat' and 'M' into the Petstable.! <strong>SQL</strong> statements used in C-ISAM B - 125
VALUES CLAUSE" Syntax" UseUsed by the statement INSERT.VALUES ( {Variable name : Indicator variable xor NULL xor Literalnumber xor Quoted string xor Literal Timestamp xor Literal date xorLiteral time} [,{Variable name : Indicator variable xor NULL xorLiteral number xor Quoted string xor Literal Timestamp xor Literaldate xor Literal time}] n )When you use the VALUES clause, you can only insert one row at atime. Each value that follows the VALUES keyword is assigned to thecorresponding column listed in the INSERT INTO clause (or to thecolumns in order if a list of columns isn't specified)." ExampleINSERT INTO Pets VALUES ('Socks', , 'M') ;This statement inserts the value 'Socks' in the first column and 'M' inthe third column of the table Pets. The second column is untouched.B - 126 <strong>Data</strong> <strong>Access</strong> !
UPDATE" Purpose" SyntaxChanges the value of one or more columns or one or more rows in atable.UPDATE {Table name xor Synonym name} SET Set clause [WHERE{Condition xor CURRENT OF Cursor name}]" ExampleUPDATE Catalog SET item_price = 10 WHERE item_type ='L' ;This statement changes the price of all the 'L' type articles in the tableCatalog to 10.! <strong>SQL</strong> statements used in C-ISAM B - 127
SET CLAUSE" SyntaxUsed by the statement UPDATE.{Column name = {Constant xor (Select statement) xor NULL}[,Column name = {Constant xor (Select statement) xor NULL}] nxor {(Column name [,Column name] n xor *} = (Select statement)" ExampleUPDATE Catalog SET item_price = 10In this statement, the SET clause changes the price item_price to 10..B - 128 <strong>Data</strong> <strong>Access</strong> !
AGGREGATE EXPRESSION" SyntaxUsed by the statement SELECT or in an expression.{COUNT(*)xor{MIN xor MAX xor SUM xor AVG xor COUNT} ([{DISTINCT xorUNIQUE}] {Table name xor Synonym name xor Table alias} . Columnname)}" ExampleSELECT COUNT (DISTINCT item_type) FROM Catalog ;This statement returns the number of different types of article in thetable Catalog.! <strong>SQL</strong> statements used in C-ISAM B - 129
<strong>Data</strong> typesThis section describes the data types supported by the <strong>SQL</strong> languagewith their equivalent C language definitions. The descriptionscorrespond to the <strong>SQL</strong> types used by CREATE TABLE. They arenative mode equivalents. For the importation of files created outside theC-ISAM database with the command DEFINE TABLE, thedifferences are indicated.In the following table, the types in italics in the column "C languagetype" only apply to the use of CREATE TABLE.<strong>SQL</strong> type in the <strong>SQL</strong> type in C language typedatabaseODBCbit <strong>SQL</strong>_BIT unsigned char notnull_data;unsigned char data;byte <strong>SQL</strong>_TINYINT unsigned char notnull_data;unsigned char data;char(maxlength)<strong>SQL</strong>_CHAR char data[ maxlength ];1
If the bit data type is used with DEFINE TABLE, only one byte isreserved. The value 0 is no longer differentiated from the value null. InDEFINE TABLE therefore this type of field can't be null.The following table shows the values stored. The data in italic onlyapplies to CREATE TABLE.Bit type field notnull_data <strong>Data</strong> value0 1 01 1 1Null 0 0" The byte typeThis type corresponds to the <strong>SQL</strong>_TINYINT type in ODBC. It storesvalues from 0 to 255, or null.If this data type is used with CREATE TABLE a two-byte block isreserved (as with the bit type) to differentiate the value null from theother values. If this type of field is used in the definition of a key, thetwo bytes are used in the key.If the data type is used with DEFINE TABLE, only one byte isreserved. The value 0 therefore can't be differentiated from null. InDEFINE TABLE this type of field can't be null.The following table shows the values stored. The data in italic onlyapplies to CREATE TABLE.byte type field notnull_data data value0 1 01 1 1... 1 ...255 1 255null 0 0" The char typeThis type corresponds to the <strong>SQL</strong>_CHAR type in ODBC. It can stockfrom 1 to 32511 characters.! <strong>SQL</strong> statements used in C-ISAM B - 131
When this type of data is inserted in a field, all the non-significantspaces at the end of the string are deleted and the corresponding bytesin the file are set to '\0' (ASCII code 0). When data is read from thesefields, the string read is automatically completed with spaces (ASCIIcode 32) to its maximum size. If an empty string is stored in a field oftype char, a single space is written to the field to distinguish it fromnull.char(10) type fielddata value‘’ 0x32000000000000000000‘ ‘ 0x32000000000000000000‘A ‘ 0x41000000000000000000‘AaBb’0x41614262000000000000null0x00000000000000000000" The varchar typeThis type corresponds to the <strong>SQL</strong>_VARCHAR type in ODBC. It's usedin practically the same way as the char type. It also stores from 1 to32511 characters.It differs from the char type in that when data is inserted into this typeof field, none of the non-significant spaces at the end of the string aredeleted but the corresponding bytes in the file are filled with thecharacter '\0'. When data is read from these fields, ODBC retrieves theunmodified string. As for the char type, an empty string is stored as asingle space character to distinguish it from null.varchar(10) type fielddata value‘’ 0x32000000000000000000‘ ‘ 0x32000000000000000000‘A ‘ 0x41202020202000000000‘AaBb’0x41614262000000000000null0x00000000000000000000" The binary typeThis type corresponds to the <strong>SQL</strong>_BINARY type in ODBC. It can storefrom 1 to 32511 characters.B - 132 <strong>Data</strong> <strong>Access</strong> !
When this type of data is used with CREATE TABLE, an extra byte(notnull_data) is used. This byte can be set at 0 or 1 to distinguish thevalue null from an empty string. If a binary type field is used in thedefinition of a key, the notnull_data byte is included with the data bytesin the key.No extra byte is added when the binary type is used with DEFINETABLE. Only the significant bytes are stored. The value 0 can't bedistinguished then from the value null. For this reason, this type of fieldcan't be null.When data is inserted into this type of field, the corresponding bytes inthe file are completed with the '\0' character. When this type of field isread, all the bytes are retrieved by ODBC.The following table shows the stored values. The data in italics onlyapply to CREATE TABLE.binary(10) type field notnull_data data value0x 1 0x000000000000000000000x00 1 0x000000000000000000000x1234 1 0x12340000000000000000null 0 0x00000000000000000000" The varbinary typeThis type corresponds to the <strong>SQL</strong>_VARBINARY type in ODBC. It canstore from 1 to 32511 characters.This type can only be used with the CREATE TABLE command. Novarbinary type fields can be used with DEFINE TABLE. Two extrabytes are used with this data type. The bytes store the length of thebinary data plus one as a short integer. The value 0 corresponds to anull binary and the value 1 to a binary of zero length.Like the binary type, when data is inserted into this type of field, thecorresponding block in the file is completed with the character '\0'.When this type of field is read, only the bytes with the binary length areretrieved by ODBC. If a varbinary type of field is used in thedefinition of a key, the size_data bytes aren't included with the databytes in the key.! <strong>SQL</strong> statements used in C-ISAM B - 133
varbinary(10) type field size_data data value0x 0x0001 0x000000000000000000000x00 0x0002 0x000000000000000000000x1234 0x0003 0x12340000000000000000null 0x0000 0x00000000000000000000" The smallint typeThis type corresponds to the <strong>SQL</strong>_SMALLINT type in ODBC. It storesintegers in the range -32767 to 32767 in 2 bytes. The value –32768 isreserved for a null field.smallint type fielddata value-32767 -327670 030000 30000null -32768" The longint typeThis type corresponds to the <strong>SQL</strong>_INTEGER type in ODBC. It storesinteger values in the range -134217727 to 134217727 in 4 bytes. Thevalue –134217728 is reserved for a null field.longint type fielddata value-32767 -327670 0134217 134217null -134217728" The real typeThis type corresponds to the <strong>SQL</strong>_REAL and <strong>SQL</strong>_FLOAT types inODBC. It stores floating point numbers in machine format in 4 bytes.real type fielddata value-25 (float)-25.00 (float)0.03.1415 (float)3.1415nullnon-significant valueB - 134 <strong>Data</strong> <strong>Access</strong> !
" The double typeThis type corresponds to the <strong>SQL</strong>_DOUBLE type in ODBC. It storesfloating point numbers in machine format in 8 bytes.double type fielddata value-25 (double)-25.00 (double)0.03.1415 (double)3.1415nullnon-significant value" The decimal typeThis type corresponds to the <strong>SQL</strong>_DECIMAL type in ODBC. It storesfixed point numbers.The decimal type must be followed by two parameters in brackets, "c1decimal(n, m)", where n is the total number of digits and m the numberof decimals. If m isn't specified, a default value of 0 is used.The C-ISAM functions stdecimal() and lddecimal() are used toread/write fields of this type." The date typeThis type corresponds to the <strong>SQL</strong>_DATE type in ODBC. It stores adate as the number of days since the 1 st January in the year 0 as a 4-byteinteger. To insert or test a date in <strong>SQL</strong> commands, use ODBC notation({d ‘AAAA-MM-JJ’ }).date type fielddata value{ d ‘0000-01-01’ } 0{ d ‘1997-02-17’ } 729438null -134217728" The time typeThis type corresponds to the <strong>SQL</strong>_TIME type in ODBC. It stores thetime as the number of seconds in the day in a 4-byte integer. To insertor test a time in <strong>SQL</strong> commands, use ODBC notation({ t ‘hh :mm :ss’ }).! <strong>SQL</strong> statements used in C-ISAM B - 135
time type fielddata value{ t ’00 :00 :00’ } 0{ t ’13 :40 :10’ } 49210null -134217728" The timestamp typeThis type corresponds to the <strong>SQL</strong>_TIMESTAMP type in ODBC. Itstores the time as the number of seconds from the 1 st January 1970(similar to the time() function in C). The maximum value correspondsto the date 5 February 2036, 00.00 h. To insert or test a timestamp in<strong>SQL</strong> commands, use ODBC notation ({ ts ‘AAAA-MM-JJhh :mm :ss’ }).timestamp type fielddata value{ ts ’1970-01-01 00 :00 :00’ } 0{ ts ’1997-02-17 13 :40 :10’ } 856186810null -134217728B - 136 <strong>Data</strong> <strong>Access</strong> !
INDEXAllowed,82Arrayfields (Progress),87BackOffice,2binary,130, 132bit,130byte,130, 131ABCchar,130, 131C-ISAM,37Create database,39ISAM-PATH,39sqltools,38SysColumns,38SysDefaults,38SysIndexes,38SysTables,38Client/Server model,11COLUMN DEFINITION,100COMMENT,108config.xxx,80CONNECT DATABASE,110CONSTRAINT DEFINITION,103, 104Conversion tables,33Create database,39CREATE DATABASE,97CREATE INDEX,106CREATE SYNONYM,107CREATE TABLE,98, 130<strong>Data</strong> source,21<strong>Data</strong>base revamping,14date,130, 135DB Script,15DB Show,15, 17DB2,14DBMAP.EXE,84DDBSCRIPT.EXE,85DBSHOW.EXE,86Debug,91decimal,130, 135DEFAULT,101DEFINE TABLE,99, 130DELETE,124Denied,82DISCONNECT DATABASE,111double,130, 135DROP DATABASE,109DROP INDEX,112DROP SYNONYM,114DROP TABLE,113, 115EEmbedded <strong>SQL</strong>,9Environment,53, 60Exporting data source environments,71FFILE IS,105Files.dat files,37, 38, 40, 41.idx files,37, 38, 40, 41C-ISAM,37FROM,119GROUP BY,121HAVING,122GHImporting a data source,59Index (C-ISAM),42Informix,14, 90INSERT,125Inter-table links,66I! Index I - 137
ISAM-PATH,39Joins,53Limits,27longint,130, 134NOT NULL,102JLNOODBC,9, 26ODBC.DLL,10Oracle,14, 90ORDER BY,123Ordres <strong>SQL</strong>/C-ISAMCOMMENT,108CREATE SYNONYM,107PARAM.XXX,87Progress,14RDBMS,12real,130, 134Revamping,53PRSScript (running a script from sqltools),48Security,82SELECT,116SELECT CLAUSE,117Sequential files,38SET,128smallint,130, 134Special characters,33<strong>SQL</strong>,12<strong>SQL</strong>/C-ISAM clausesDEFAULT,101FROM,119GROUP BY,121HAVING,122NOT NULL,102ORDER BY,123SELECT CLAUSE,117SET,128VALUES,126WHERE,120<strong>SQL</strong>/C-ISAM optionsCOLUMN DEFINITION,100CONSTRAINT DEFINITION,104FILE IS,105<strong>SQL</strong>/C-ISAM statementsCONNECT DATABASE,110CREATE DATABASE,97CREATE INDEX,106CREATE TABLE,98DEFINE TABLE,99DISCONNECT DATABASE,111DROP DATABASE,109DROP INDEX,112DROP SYNONYM,114DROP TABLE,113, 115INSERT,125UPDATE,127<strong>SQL</strong>/C-ISAM subsetCONSTRAINT DEFINITION,103<strong>SQL</strong>_BINARY,130, 132<strong>SQL</strong>_BIT,130<strong>SQL</strong>_CHAR,130, 131<strong>SQL</strong>_DATE,130, 135<strong>SQL</strong>_DECIMAL,130, 135<strong>SQL</strong>_DOUBLE,130, 135<strong>SQL</strong>_FLOAT,130, 134<strong>SQL</strong>_INTEGER,130, 134<strong>SQL</strong>_REAL,134<strong>SQL</strong>_SMALLINT,130, 134<strong>SQL</strong>_TIME,130, 135<strong>SQL</strong>_TIMESTAMP,130, 136<strong>SQL</strong>_TINYINT,130, 131<strong>SQL</strong>_VARBINARY,130, 133<strong>SQL</strong>_VARCHAR,130, 132sqltools,38StatementsDELETE,124SELECT,116Sybase,14, 90SysColumns,38SysDefaults,38SysIndexes,38SysTables,38I - 138 <strong>Data</strong> <strong>Access</strong> !
Tables (C-ISAM),41time,130, 135timestamp,130, 136Trace,90Translator,26TUNODBC.XXX,89Typebinary,130, 132bit,130byte,130, 131char,130, 131date,130, 135decimal,130, 135double,130, 135longint,130, 134real,130, 134smallint,130, 134time,130, 135timestamp,130, 136varbinary,130, 133varchar,130, 132TUPDATE,127UVValidating environments,70VALUES,126varbinary,130, 133varchar,130, 132Virtual data source,31Virtual databases,51Virtual field,54, 61Virtual ODBC driver,13, 14, 55Virtual table,54Virtual table,60Warnings,73WHERE,120WOSA,10W! Index I - 139