COLOR VIDEO SOUNDER
COLOR VIDEO SOUNDER
COLOR VIDEO SOUNDER
- No tags were found...

You also want an ePaper? Increase the reach of your titles
YUMPU automatically turns print PDFs into web optimized ePapers that Google loves.
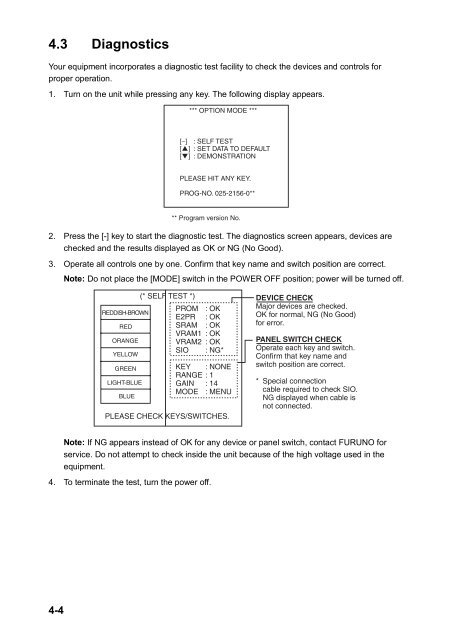
4.3 DiagnosticsYour equipment incorporates a diagnostic test facility to check the devices and controls forproper operation.1. Turn on the unit while pressing any key. The following display appears.*** OPTION MODE ***[−] : SELF TEST[ ] : SET DATA TO DEFAULT[ ] : DEMONSTRATIONPLEASE HIT ANY KEY.PROG-NO. 025-2156-0**** Program version No.2. Press the [-] key to start the diagnostic test. The diagnostics screen appears, devices arechecked and the results displayed as OK or NG (No Good).3. Operate all controls one by one. Confirm that key name and switch position are correct.Note: Do not place the [MODE] switch in the POWER OFF position; power will be turned off.REDDISH-BROWNREDORANGEYELLOWGREENLIGHT-BLUEBLUE(* SELF TEST *)PROM : OKE2PR : OKSRAM : OKVRAM1 : OKVRAM2 : OKSIO : NG*KEY : NONERANGE : 1GAIN : 14MODE : MENUPLEASE CHECK KEYS/SWITCHES.DEVICE CHECKMajor devices are checked.OK for normal, NG (No Good)for error.PANEL SWITCH CHECKOperate each key and switch.Confirm that key name andswitch position are correct.* Special connectioncable required to check SIO.NG displayed when cable isnot connected.Note: If NG appears instead of OK for any device or panel switch, contact FURUNO forservice. Do not attempt to check inside the unit because of the high voltage used in theequipment.4. To terminate the test, turn the power off.4-4