- Page 1 and 2: CVP-309/307O W N E R ’ S M A N U
- Page 3 and 4: PRECAUTIONSPLEASE READ CAREFULLY BE
- Page 5 and 6: Thank you for purchasing this Yamah
- Page 7 and 8: Table of ContentsIntroductionWelcom
- Page 9 and 10: AppendixTroubleshooting ...........
- Page 11 and 12: Perform Along with a Full Band—So
- Page 13 and 14: IntroductionDEMOORGAN FLUTESPIANORE
- Page 15 and 16: 4 Playing the keyboardPlay the keyb
- Page 17 and 18: INPUT MIC.VOLUME LINE INMIC. LINE P
- Page 19 and 20: Display SettingsAdjusting the Brigh
- Page 21 and 22: Handling the Floppy Disk Drive (FDD
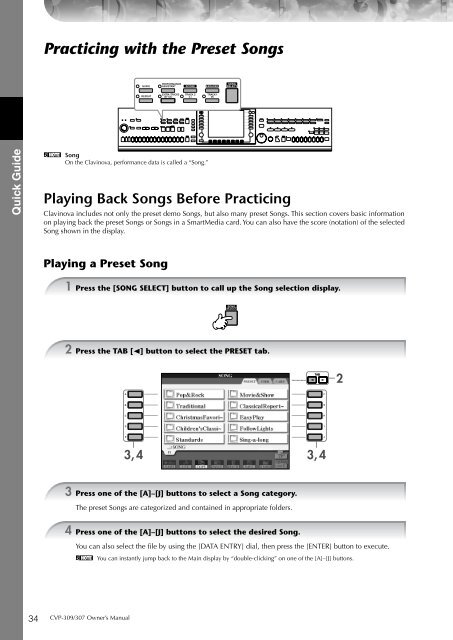
- Page 23 and 24: Quick GuidePlaying the DemosThe Dem
- Page 25 and 26: Operations in the Basic DisplaysTo
- Page 27 and 28: 2 Press the [D] button to select th
- Page 29 and 30: Setting the touch sensitivity of th
- Page 31 and 32: 2 Set the parameters by pressing th
- Page 33: Selecting sound effectsYou can play
- Page 37 and 38: Displaying Music Notation (Score)Yo
- Page 39 and 40: 3 Press the [TRACK 1 (R)] button to
- Page 41 and 42: Other Methods for Specifying the A-
- Page 43 and 44: 2 Press the [PERFORMANCE ASSISTANT]
- Page 45 and 46: 1 Press the [STYLE SELECT] button t
- Page 47 and 48: During Style PlaybackSTYLESELECT●
- Page 49 and 50: Checking How to Play Chords with th
- Page 51 and 52: 211 2 3 4 5 6 7 82 Press the TAB [
- Page 53 and 54: Singing with the Lyrics DisplayTry
- Page 55 and 56: 4 Press the [H] button to call up t
- Page 57 and 58: Basic OperationTrying Out the Basic
- Page 59 and 60: Basic Displays (Main Display and Fi
- Page 61 and 62: Basic Displays (Main Display and Fi
- Page 63 and 64: Basic Displays (Main Display and Fi
- Page 65 and 66: Basic Displays (Main Display and Fi
- Page 67 and 68: Basic Displays (Main Display and Fi
- Page 69 and 70: Restoring the Factory-programmed Se
- Page 71 and 72: Data BackupData BackupFor maximum d
- Page 73 and 74: Playing Different Voices Simultaneo
- Page 75 and 76: Playing Different Voices Simultaneo
- Page 77 and 78: Enhancing the Acoustic Realism of t
- Page 79 and 80: Changing Pitch4 Change the followin
- Page 81 and 82: Adding Effects to Voices Played on
- Page 83 and 84: Editing the Volume and Tonal Balanc
- Page 85 and 86:
Editing the Volume and Tonal Balanc
- Page 87 and 88:
Editing the Volume and Tonal Balanc
- Page 89 and 90:
Editing the Volume and Tonal Balanc
- Page 91 and 92:
Editing the Volume and Tonal Balanc
- Page 93 and 94:
Voice Creating (Sound Creator)Voice
- Page 95 and 96:
Voice Creating (Sound Creator)2. LE
- Page 97 and 98:
Voice Creating (Sound Creator)2. DS
- Page 99 and 100:
Voice Creating (Sound Creator)Edita
- Page 101 and 102:
Using, Creating and Editing the Aut
- Page 103 and 104:
Playing Only the Rhythm Channels of
- Page 105 and 106:
Style Playback-related Settings•
- Page 107 and 108:
Convenient Music Finder feature•
- Page 109 and 110:
Convenient Music Finder feature•
- Page 111 and 112:
Style CreatorStyle CreatorYou can c
- Page 113 and 114:
Style Creator6 Use the [3π†]/[4
- Page 115 and 116:
Style CreatorStep Recording (EDIT)T
- Page 117 and 118:
Style CreatorPlaying the Style Duri
- Page 119 and 120:
Style Creator■ GROOVEThis lets yo
- Page 121 and 122:
Style CreatorMaking Style File Form
- Page 123 and 124:
Style Creator■ NTT (Note Transpos
- Page 125 and 126:
Registering and Recalling Custom Pa
- Page 127 and 128:
Recalling the Registered Panel Setu
- Page 129 and 130:
Recalling the Registered Panel Setu
- Page 131 and 132:
Operations for Song PlaybackOperati
- Page 133 and 134:
Operations for Song Playback■ Que
- Page 135 and 136:
Using the Practice Function (Guide)
- Page 137 and 138:
Recording Your PerformanceTurning p
- Page 139 and 140:
Recording Your Performance4 Start r
- Page 141 and 142:
Recording Your Performance8 Press t
- Page 143 and 144:
Recording Your PerformanceRecording
- Page 145 and 146:
Recording Your PerformanceAbout ite
- Page 147 and 148:
Recording Your Performance8 Play th
- Page 149 and 150:
Recording Your Performance5 While h
- Page 151 and 152:
Recording Your Performance5 Press t
- Page 153 and 154:
Recording Your PerformanceRe-Record
- Page 155 and 156:
Recording Your Performance4 Press t
- Page 157 and 158:
Recording Your Performance4 Press t
- Page 159 and 160:
Recording Your PerformanceDisplayin
- Page 161 and 162:
Using a MicrophoneReference to Quic
- Page 163 and 164:
Editing Vocal Harmony ParametersEdi
- Page 165 and 166:
Adjusting the Microphone and Harmon
- Page 167 and 168:
Adjusting the Microphone and Harmon
- Page 169 and 170:
Talk SettingAdjustable Items (Param
- Page 171 and 172:
Accessing the Special Clavinova Web
- Page 173 and 174:
Operations in the Special Clavinova
- Page 175 and 176:
Operations in the Special Clavinova
- Page 177 and 178:
Operations in the Special Clavinova
- Page 179 and 180:
Operations in the Special Clavinova
- Page 181 and 182:
Operations in the Special Clavinova
- Page 183 and 184:
Glossary of Internet TermsGlossary
- Page 185 and 186:
Connecting Audio & Video Devices[AU
- Page 187 and 188:
Using the Footswitch or Foot Contro
- Page 189 and 190:
Connecting external MIDI devices ([
- Page 191 and 192:
Connecting a Computer or USB Device
- Page 193 and 194:
What is MIDI?Recording and play bac
- Page 195 and 196:
What You Can Do With MIDIWhat You C
- Page 197 and 198:
MIDI SettingsTemplate nameAll Parts
- Page 199 and 200:
MIDI Settings● Tx MONITORThe dots
- Page 201 and 202:
TroubleshootingOverallThe Clavinova
- Page 203 and 204:
StyleStyle playback does not start.
- Page 205 and 206:
ScoreWhen displaying the music scor
- Page 207 and 208:
2 Attach two front legs and a rear
- Page 209 and 210:
CVP-309/307: Keyboard Stand Assembl
- Page 211 and 212:
9 Set the adjuster.Rotate the adjus
- Page 213 and 214:
SpecificationsSound SourceKeyboardD
- Page 215 and 216:
IndexNumerics1-16 .................
- Page 217 and 218:
QQUANTIZE .........................
- Page 219 and 220:
In The MoodBy Joe GarlandCopyright
- Page 221 and 222:
IMPORTANT SAFETY INSTRUCTIONSINFORM
- Page 223 and 224:
For details of products, please con


![Premere il pulsante [SONG] - Yamaha](https://img.yumpu.com/50419553/1/184x260/premere-il-pulsante-song-yamaha.jpg?quality=85)

