TB7220 Ultrastat Programmable Thermostat - The Energy Conscious
TB7220 Ultrastat Programmable Thermostat - The Energy Conscious
TB7220 Ultrastat Programmable Thermostat - The Energy Conscious

You also want an ePaper? Increase the reach of your titles
YUMPU automatically turns print PDFs into web optimized ePapers that Google loves.
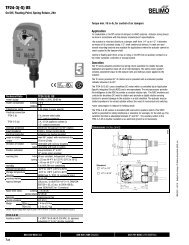
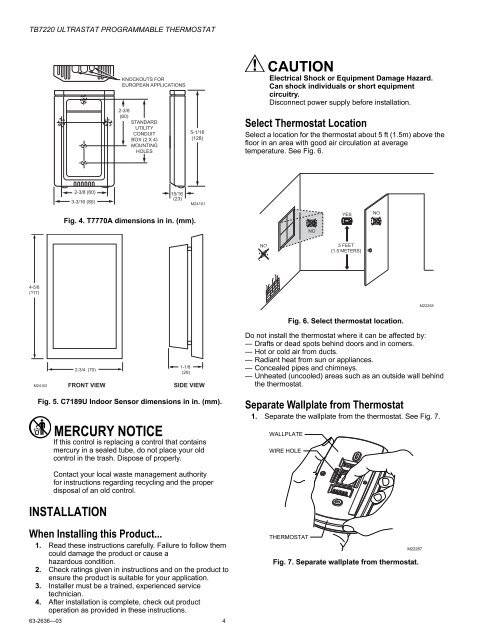
<strong>TB7220</strong> ULTRASTAT PROGRAMMABLE THERMOSTATKNOCKOUTS FOREUROPEAN APPLICATIONS2-3/8(60)STANDARDUTILITYCONDUITBOX (2 X 4)MOUNTINGHOLES5-1/16(128)CAUTIONElectrical Shock or Equipment Damage Hazard.Can shock individuals or short equipmentcircuitry.Disconnect power supply before installation.Select <strong><strong>The</strong>rmostat</strong> LocationSelect a location for the thermostat about 5 ft (1.5m) above thefloor in an area with good air circulation at averagetemperature. See Fig. 6.2-3/8 (60)3-3/16 (80)15/16(23)M24101Fig. 4. T7770A dimensions in in. (mm).YESNONONO5 FEET[1.5 METERS]4-5/8(117)M22258Fig. 6. Select thermostat location.M241022-3/4 (70)FRONT VIEW1-1/8(29)SIDE VIEWDo not install the thermostat where it can be affected by:— Drafts or dead spots behind doors and in corners.— Hot or cold air from ducts.— Radiant heat from sun or appliances.— Concealed pipes and chimneys.— Unheated (uncooled) areas such as an outside wall behindthe thermostat.Fig. 5. C7189U Indoor Sensor dimensions in in. (mm).MERCURY NOTICEIf this control is replacing a control that containsmercury in a sealed tube, do not place your oldcontrol in the trash. Dispose of properly.Separate Wallplate from <strong><strong>The</strong>rmostat</strong>1. Separate the wallplate from the thermostat. See Fig. 7.WALLPLATEWIRE HOLEContact your local waste management authorityfor instructions regarding recycling and the properdisposal of an old control.INSTALLATIONWhen Installing this Product...1. Read these instructions carefully. Failure to follow themcould damage the product or cause ahazardous condition.2. Check ratings given in instructions and on the product toensure the product is suitable for your application.3. Installer must be a trained, experienced servicetechnician.4. After installation is complete, check out productoperation as provided in these instructions.63-2636—03 4THERMOSTATM22267Fig. 7. Separate wallplate from thermostat.