TB7220 Ultrastat Programmable Thermostat - The Energy Conscious
TB7220 Ultrastat Programmable Thermostat - The Energy Conscious
TB7220 Ultrastat Programmable Thermostat - The Energy Conscious

You also want an ePaper? Increase the reach of your titles
YUMPU automatically turns print PDFs into web optimized ePapers that Google loves.
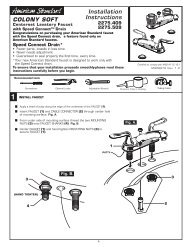
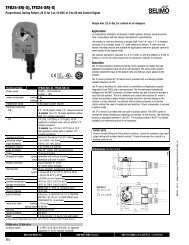
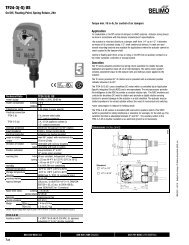
<strong>TB7220</strong> ULTRASTAT PROGRAMMABLE THERMOSTATInstall Wallplate (See Fig. 8)Mount the thermostat horizontally on the wall:1. Pull the wires through the wire hole on the wallplate.2. Position the wallplate on the wall with the arrow pointingup. Level the wallplate for appearance only.3. Use a pencil to mark the mounting holes.4. Remove the wallplate from the wall and drill two 3/16 in.holes in the wall (if drywall) as marked. For firmermaterial such as plaster, drill two 7/32 in. holes. Tap thewall anchors (provided) into the drilled holes until flushwith the wall.5. Pull the wires through the wire hole on the wallplate andposition the wallplate over the wall anchors.6. Insert the mounting screws into the wall anchors andtighten.WALLWIRES THROUGH WALLAND WIRE SLOTWALLANCHORS (2)NOTES:— Refer to Table 5 for terminal designationdescriptions.— See Fig. 12 through 21 for wiring diagrams forspecific equipment applications.1. Select set of terminal identifications that correspond toyour system type (conventional or heat pump). See Fig. 9.CGYO/BRCR1HEAT PUMPCONVENTIONALCGYWRCR1W2Y2S1S2SCREWTERMINALSFACTORY INSTALLED JUMPER.W1Y2S1S2M24015Fig. 9. Terminal identifications for system type.MOUNTINGHOLES2. Loosen screw terminals used for the application.3. Insert the wires into the terminal block and tighten eachscrew terminal. See Fig. 10.MOUNTINGSCREWS (2)M13665Fig. 8. Install wallplate.WIRINGCAUTIONElectrical Shock Hazard.Can cause electrical shock or equipment damage.Disconnect power supply before connecting wiring.IMPORTANT— All wiring must agree with applicable codes,ordinances and regulations.— Use 18 gauge thermostat wire. Shielded cable is notrequired.WIRE HOLEM13666Fig. 10. Insert wires into terminal block.4. Push excess wire back into the wall opening and restrictwires to the shaded area. See Fig. 11.5. Plug the wall opening with nonflammable insulation toprevent drafts from affecting the thermostat.5 63-2636—03