Ascension Modular Radial Head - PerPrima
Ascension Modular Radial Head - PerPrima
Ascension Modular Radial Head - PerPrima

You also want an ePaper? Increase the reach of your titles
YUMPU automatically turns print PDFs into web optimized ePapers that Google loves.
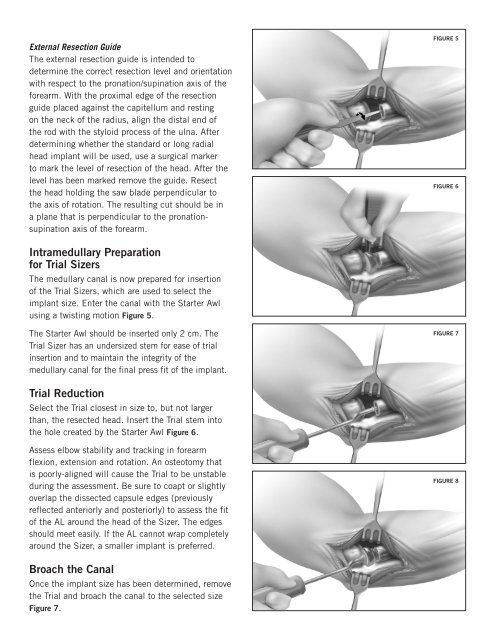
External Resection GuideThe external resection guide is intended todetermine the correct resection level and orientationwith respect to the pronation/supination axis of theforearm. With the proximal edge of the resectionguide placed against the capitellum and restingon the neck of the radius, align the distal end ofthe rod with the styloid process of the ulna. Afterdetermining whether the standard or long radialhead implant will be used, use a surgical markerto mark the level of resection of the head. After thelevel has been marked remove the guide. Resectthe head holding the saw blade perpendicular tothe axis of rotation. The resulting cut should be ina plane that is perpendicular to the pronationsupinationaxis of the forearm.FIGURE 5FIGURE 6Intramedullary Preparationfor Trial SizersThe medullary canal is now prepared for insertionof the Trial Sizers, which are used to select theimplant size. Enter the canal with the Starter Awlusing a twisting motion Figure 5.The Starter Awl should be inserted only 2 cm. TheTrial Sizer has an undersized stem for ease of trialinsertion and to maintain the integrity of themedullary canal for the final press fit of the implant.FIGURE 7Trial ReductionSelect the Trial closest in size to, but not largerthan, the resected head. Insert the Trial stem intothe hole created by the Starter Awl Figure 6.Assess elbow stability and tracking in forearmflexion, extension and rotation. An osteotomy thatis poorly-aligned will cause the Trial to be unstableduring the assessment. Be sure to coapt or slightlyoverlap the dissected capsule edges (previouslyreflected anteriorly and posteriorly) to assess the fitof the AL around the head of the Sizer. The edgesshould meet easily. If the AL cannot wrap completelyaround the Sizer, a smaller implant is preferred.FIGURE 8Broach the CanalOnce the implant size has been determined, removethe Trial and broach the canal to the selected sizeFigure 7.