Acumed Radial Head Replacement
Acumed Radial Head Replacement
Acumed Radial Head Replacement
- No tags were found...

You also want an ePaper? Increase the reach of your titles
YUMPU automatically turns print PDFs into web optimized ePapers that Google loves.
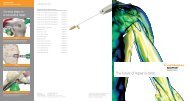
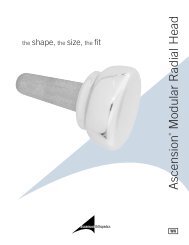
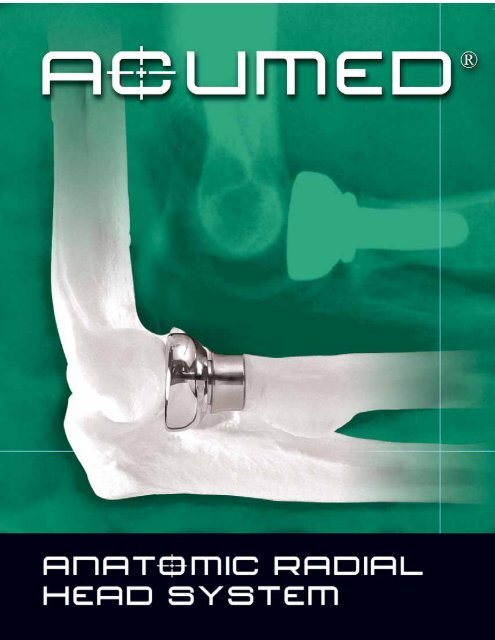
Anatomic <strong>Radial</strong> <strong>Head</strong>s and Stems replicate the patient’s naturalradial head geometry. The offset anatomic dish on the proximalend of the radial head implant provides improved articulationwith the capitellum. The neck angle is 4 degrees, preventingimplant loosening and maintaining the proper angled relationshipbetween the radial neck and the plane of the head.Straightforward Instrumentation includes a unique collar heightgauge for an improved method of determining overall length ofthe radius. Color-coded broaches, trial heads and stems providequick distinction between system components and sizes. Collarreamers are included in the system to create a perpendicular necksurface for the stem collar.200 <strong>Head</strong> and Stem Combinations provide the surgeon with animplant that matches the patient’s natural anatomic radial headshape. 20 stem options in five diameters, each with four collarheight options provide proper restoration of the overall length ofthe radius. The anatomical heads are provided in five sizes, leftand right, to accommodate various patient sizes.Medial Defined Ulna Articular Zoneis angled and smooth to improve contactwith the radial notch.10mmHighly PolishedCobalt Chrome <strong>Head</strong>to maximize articulation.Multiple Collar Heights torestore radial length.Contoured Lateral Surfaceimproves interface with theannular ligament.Fluted Stemfor rotational stability.25mm25mm Stem Lengthis long enough to provide stability againstbending movements but short enough notto reach the bend in the proximal canal.Tapered Titanium Stemto aid insertion.Grit Blasted Stem Surfacepromotes bony ongrowth.3
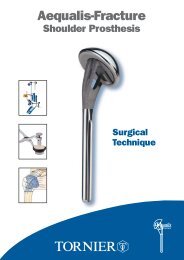
SURGICAL TECHNIQUEBy Shawn O’Driscoll, Ph.D., M.D.The following is <strong>Acumed</strong>’s suggested method for implanting the Anatomic <strong>Radial</strong> <strong>Head</strong> Prosthesis. For specific questions not addressed here,please contact your local <strong>Acumed</strong> representative or <strong>Acumed</strong> by phone at 888 627-9957 or on the web at www.acumed.net.Step 1: Incision and DissectionWhile there are many acceptable exposure methods,the Kaplan interval in a line from the lateral epicondyletoward Lister's tubercle, with the forearm in neutralrotation, permits the collateral ligament to be left intact.In fracture dislocations, the exposure is through thetraumatic opening in the ligament complex. Proximally,the ECRL origin is released with the anterior capsule topermit direct access to the front of the radial head.Step 2: <strong>Radial</strong> <strong>Head</strong> ResectionTemplate the radial head prior to surgery to determinethe appropriate level of resection. Resect theradial head with a microsagittal saw as close to thesurgical neck as possible. A maximum length of 17mmof the radius can be replaced. This 17mm includesthe radius length reamed with the CollarReamer in Step 4.4Step 3: Determine Stem DiameterUse the 5mm awl (TR-0206) to initially enter thecanal. Starting with the smallest broach (6mm,TR-BRA06), prepare the canal for the stem. Use sequentiallylarger broaches until a tight fit is achieved withthe broach. Tap on the back end of the broach with amallet. There is a groove on the broach just above thecutting flutes that indicates when to stop. Note thatthe broaches are 0.5mm undersized from the implantstem to ensure a tight press fit.Step 4: Ream with Collar ReamerSelect the collar reamer (TR-CRAxx) that matchesthe stem diameter determined by the broach in theprevious step. Under power or by hand, ream tocreate a surface where at least 60% of the radial shaftis in contact with the reamer. To ream by hand, attachthe collar reamer to the T-Handle (MS-T1212). Donot over-ream the radial shaft; removing too muchbone will cause the radial head not to articulateproperly with the capitellum.
Step 5: Determine <strong>Head</strong> DiameterDetermine head diameter by placing the resectedhead into the sizing pockets on the impactor base(TR-MS03). If between sizes, select the smallerdiameter.Step 6:Assemble <strong>Head</strong> and Stem GaugeAssemble the head gauge (TR-TG02) and stemgauge (TR-TGA06).The head gauge needs to becompletely compressed.Step 7: Determine Collar HeightInsert stem gauge assembly (TR-TGA06) into thebone canal. Starting with the +0 end of the trialgauge (TR-TG01), sequentially increase the height byinserting the end of the gauge under the head of theassembly, until the head reaches the capitellum. It iscritical that the coronoid contacts the trochlea duringthis process. The coronoid separated from thetrochlea is an indicator that the collar is too large.The number on the trial gauge (+0, 2, 4, 8mm) willcorrespond to the collar height on the stem.Step 8: Select Trial Implants & AssembleAfter selecting the trial head and stem, align lasermarks on the head and stem and assemble usinghand pressure. The stem laser mark is indicated forLeft and Right for proper orientation. If the trialhead and stem are difficult to connect, apply salinesolution prior to connecting.5