instruction manual for wire welding machine - Cebotechusa.com
instruction manual for wire welding machine - Cebotechusa.com
instruction manual for wire welding machine - Cebotechusa.com

You also want an ePaper? Increase the reach of your titles
YUMPU automatically turns print PDFs into web optimized ePapers that Google loves.
ent, and when it ends LED A lights. All knobs are disabled.<br />
To see the setting of the service function related to the<br />
saved program, press the key R and hold it down; after 2<br />
sec. the display G shows the first message dSP. Pressing<br />
the torch trigger will display the abbreviations of the various<br />
functions in sequence, and display Q shows the setting.<br />
To return to <strong>welding</strong> with a saved program, release the<br />
key R.<br />
To exit saved programs, press the key R and, while holding<br />
it down, briefly press and release the key O.<br />
7 MAINTENANCE<br />
• Safety gas nozzle<br />
This nozzle must be periodically cleaned to remove splattered<br />
metal. Replace if distorted or squashed.<br />
• Contact tip.<br />
Only a good contact between this contact tip and the <strong>wire</strong><br />
can ensure a stable arc and optimum current output; you<br />
must there<strong>for</strong>e observe the following precautions:<br />
A) The contact tip hole must be kept free of grime and<br />
oxidation.<br />
B) Splattered metal sticks more easily after long <strong>welding</strong><br />
sessions, blocking the <strong>wire</strong> flow.<br />
The tip must there<strong>for</strong>e be cleaned more often, and<br />
replaced if necessary.<br />
C) The contact tip must always be firmly screwed onto<br />
the torch body. The thermal cycles to which the torch is<br />
subjected can cause it to loosen, thus heating the torch<br />
body and tip and causing the <strong>wire</strong> to advance unevenly.<br />
• Wire liner.<br />
This is an important part that must be checked often,<br />
because the <strong>wire</strong> may deposit copper dust or tiny shavings.<br />
Clean it periodically along with the gas lines, using<br />
dry <strong>com</strong>pressed air.<br />
The liners are subjected to constant wear and tear, and<br />
there<strong>for</strong>e must be replaced after a certain amount of time.<br />
• Gearmotor group.<br />
Periodically clean the set of feeder rollers, to remove any<br />
rust or metal residue left by the coils. You must periodically<br />
check the entire <strong>wire</strong> feeder group: hasp, <strong>wire</strong><br />
guide rollers, liner and contact tip.<br />
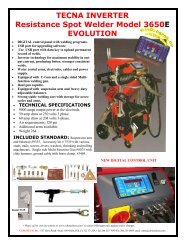
8 ACCESSORIES<br />
Art. 1434 Wire feeder.<br />
Art. 1242 Torch 3.5mt<br />
Art. 129 Kit <strong>for</strong> coil diameter 300 Kg 15<br />
Art. 2003 Pull 2003 torch with UP/DOWN <strong>com</strong>mand<br />
on grip.<br />
15