INSTALLATION INSTRUCTIONS Evaporator Coils - Alpine Home Air ...
INSTALLATION INSTRUCTIONS Evaporator Coils - Alpine Home Air ...
INSTALLATION INSTRUCTIONS Evaporator Coils - Alpine Home Air ...
- No tags were found...

You also want an ePaper? Increase the reach of your titles
YUMPU automatically turns print PDFs into web optimized ePapers that Google loves.
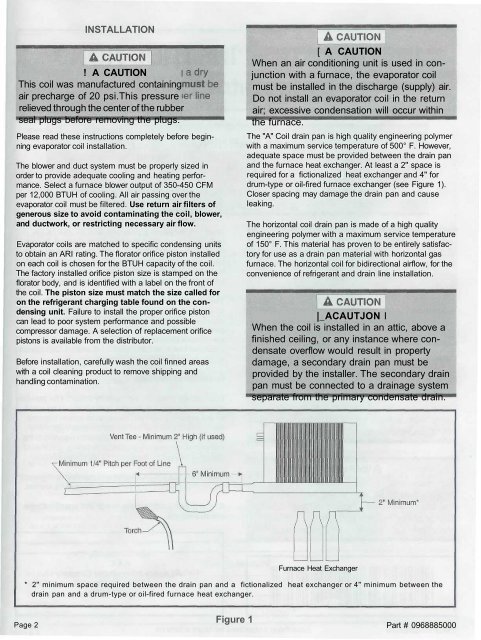
<strong>INSTALLATION</strong>! A CAUTIONThis coil was manufactured containingair precharge of 20 psi.This pressurerelieved through the center of the rubberseal plugs before removing the plugs.Please read these instructions completely before beginningevaporator coil installation.The blower and duct system must be properly sized inorder to provide adequate cooling and heating performance.Select a furnace blower output of 350-450 CFMper 12,000 BTUH of cooling. All air passing over theevaporator coil must be filtered. Use return air filters ofgenerous size to avoid contaminating the coil, blower,and ductwork, or restricting necessary air flow.<strong>Evaporator</strong> coils are matched to specific condensing unitsto obtain an ARI rating. The florator orifice piston installedon each coil is chosen for the BTUH capacity of the coil.The factory installed orifice piston size is stamped on theflorator body, and is identified with a label on the front ofthe coil. The piston size must match the size called foron the refrigerant charging table found on the condensingunit. Failure to install the proper orifice pistoncan lead to poor system performance and possiblecompressor damage. A selection of replacement orificepistons is available from the distributor.Before installation, carefully wash the coil finned areaswith a coil cleaning product to remove shipping andhandling contamination.[ A CAUTIONWhen an air conditioning unit is used in conjunctionwith a furnace, the evaporator coilmust be installed in the discharge (supply) air.Do not install an evaporator coil in the returnair; excessive condensation will occur withinthe furnace.The "A" Coil drain pan is high quality engineering polymerwith a maximum service temperature of 500° F. However,adequate space must be provided between the drain panand the furnace heat exchanger. At least a 2" space isrequired for a fictionalized heat exchanger and 4" fordrum-type or oil-fired furnace exchanger (see Figure 1).Closer spacing may damage the drain pan and causeleaking.The horizontal coil drain pan is made of a high qualityengineering polymer with a maximum service temperatureof 150° F. This material has proven to be entirely satisfactoryfor use as a drain pan material with horizontal gasfurnace. The horizontal coil for bidirectional airflow, for theconvenience of refrigerant and drain line installation.|_ACAUTJON IWhen the coil is installed in an attic, above afinished ceiling, or any instance where condensateoverflow would result in propertydamage, a secondary drain pan must beprovided by the installer. The secondary drainpan must be connected to a drainage systemseparate from the primary condensate drain.Furnace Heat Exchanger* 2" minimum space required between the drain pan and a fictionalized heat exchanger or 4" minimum between thedrain pan and a drum-type or oil-fired furnace heat exchanger.Page 2Figure 1Part # 0968885000

![Owner's Manual (General) [pdf] - Appliance Factory Parts](https://img.yumpu.com/50830858/1/184x260/owners-manual-general-pdf-appliance-factory-parts.jpg?quality=85)