Instructables.com - How to Enter the Ghetto Matrix (DIY Bullet Time)
Instructables.com - How to Enter the Ghetto Matrix (DIY Bullet Time)
Instructables.com - How to Enter the Ghetto Matrix (DIY Bullet Time)

Create successful ePaper yourself
Turn your PDF publications into a flip-book with our unique Google optimized e-Paper software.
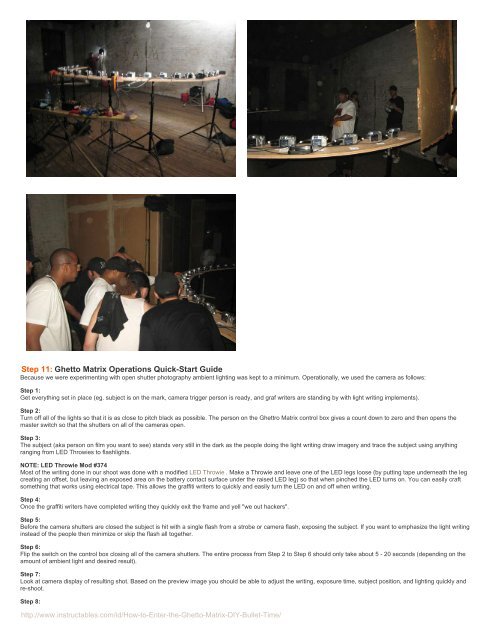
Step 11: Ghet<strong>to</strong> <strong>Matrix</strong> Operations Quick-Start Guide<br />
Because we were experimenting with open shutter pho<strong>to</strong>graphy ambient lighting was kept <strong>to</strong> a minimum. Operationally, we used <strong>the</strong> camera as follows:<br />
Step 1:<br />
Get everything set in place (eg. subject is on <strong>the</strong> mark, camera trigger person is ready, and graf writers are standing by with light writing implements).<br />
Step 2:<br />
Turn off all of <strong>the</strong> lights so that it is as close <strong>to</strong> pitch black as possible. The person on <strong>the</strong> Ghettro <strong>Matrix</strong> control box gives a count down <strong>to</strong> zero and <strong>the</strong>n opens <strong>the</strong><br />
master switch so that <strong>the</strong> shutters on all of <strong>the</strong> cameras open.<br />
Step 3:<br />
The subject (aka person on film you want <strong>to</strong> see) stands very still in <strong>the</strong> dark as <strong>the</strong> people doing <strong>the</strong> light writing draw imagery and trace <strong>the</strong> subject using anything<br />
ranging from LED Throwies <strong>to</strong> flashlights.<br />
NOTE: LED Throwie Mod #374<br />
Most of <strong>the</strong> writing done in our shoot was done with a modified LED Throwie . Make a Throwie and leave one of <strong>the</strong> LED legs loose (by putting tape underneath <strong>the</strong> leg<br />
creating an offset, but leaving an exposed area on <strong>the</strong> battery contact surface under <strong>the</strong> raised LED leg) so that when pinched <strong>the</strong> LED turns on. You can easily craft<br />
something that works using electrical tape. This allows <strong>the</strong> graffiti writers <strong>to</strong> quickly and easily turn <strong>the</strong> LED on and off when writing.<br />
Step 4:<br />
Once <strong>the</strong> graffiti writers have <strong>com</strong>pleted writing <strong>the</strong>y quickly exit <strong>the</strong> frame and yell "we out hackers".<br />
Step 5:<br />
Before <strong>the</strong> camera shutters are closed <strong>the</strong> subject is hit with a single flash from a strobe or camera flash, exposing <strong>the</strong> subject. If you want <strong>to</strong> emphasize <strong>the</strong> light writing<br />
instead of <strong>the</strong> people <strong>the</strong>n minimize or skip <strong>the</strong> flash all <strong>to</strong>ge<strong>the</strong>r.<br />
Step 6:<br />
Flip <strong>the</strong> switch on <strong>the</strong> control box closing all of <strong>the</strong> camera shutters. The entire process from Step 2 <strong>to</strong> Step 6 should only take about 5 - 20 seconds (depending on <strong>the</strong><br />
amount of ambient light and desired result).<br />
Step 7:<br />
Look at camera display of resulting shot. Based on <strong>the</strong> preview image you should be able <strong>to</strong> adjust <strong>the</strong> writing, exposure time, subject position, and lighting quickly and<br />
re-shoot.<br />
Step 8:<br />
http://www.instructables.<strong>com</strong>/id/<strong>How</strong>-<strong>to</strong>-<strong>Enter</strong>-<strong>the</strong>-Ghet<strong>to</strong>-<strong>Matrix</strong>-<strong>DIY</strong>-<strong>Bullet</strong>-<strong>Time</strong>/