Instructables.com - How to Enter the Ghetto Matrix (DIY Bullet Time)
Instructables.com - How to Enter the Ghetto Matrix (DIY Bullet Time)
Instructables.com - How to Enter the Ghetto Matrix (DIY Bullet Time)

Create successful ePaper yourself
Turn your PDF publications into a flip-book with our unique Google optimized e-Paper software.
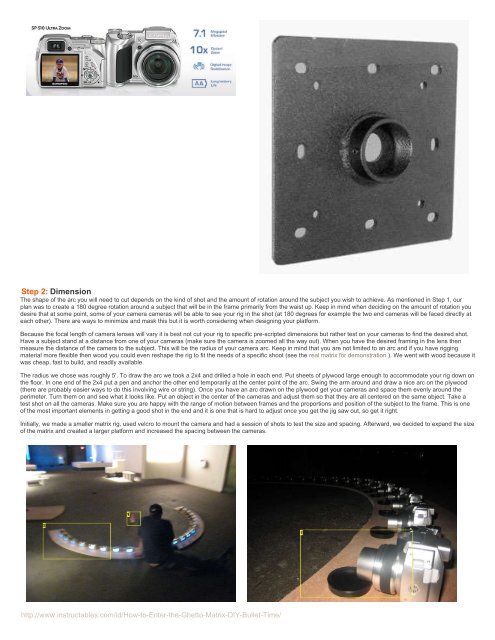
Step 2: Dimension<br />
The shape of <strong>the</strong> arc you will need <strong>to</strong> cut depends on <strong>the</strong> kind of shot and <strong>the</strong> amount of rotation around <strong>the</strong> subject you wish <strong>to</strong> achieve. As mentioned in Step 1, our<br />
plan was <strong>to</strong> create a 180 degree rotation around a subject that will be in <strong>the</strong> frame primarily from <strong>the</strong> waist up. Keep in mind when deciding on <strong>the</strong> amount of rotation you<br />
desire that at some point, some of your camera cameras will be able <strong>to</strong> see your rig in <strong>the</strong> shot (at 180 degrees for example <strong>the</strong> two end cameras will be faced directly at<br />
each o<strong>the</strong>r). There are ways <strong>to</strong> minimize and mask this but it is worth considering when designing your platform.<br />
Because <strong>the</strong> focal length of camera lenses will vary it is best not cut your rig <strong>to</strong> specific pre-scripted dimensions but ra<strong>the</strong>r test on your cameras <strong>to</strong> find <strong>the</strong> desired shot.<br />
Have a subject stand at a distance from one of your cameras (make sure <strong>the</strong> camera is zoomed all <strong>the</strong> way out). When you have <strong>the</strong> desired framing in <strong>the</strong> lens <strong>the</strong>n<br />
measure <strong>the</strong> distance of <strong>the</strong> camera <strong>to</strong> <strong>the</strong> subject. This will be <strong>the</strong> radius of your camera arc. Keep in mind that you are not limited <strong>to</strong> an arc and if you have rigging<br />
material more flexible <strong>the</strong>n wood you could even reshape <strong>the</strong> rig <strong>to</strong> fit <strong>the</strong> needs of a specific shoot (see <strong>the</strong> real matrix for demonstration ). We went with wood because it<br />
was cheap, fast <strong>to</strong> build, and readily available.<br />
The radius we chose was roughly 5'. To draw <strong>the</strong> arc we <strong>to</strong>ok a 2x4 and drilled a hole in each end. Put sheets of plywood large enough <strong>to</strong> ac<strong>com</strong>modate your rig down on<br />
<strong>the</strong> floor. In one end of <strong>the</strong> 2x4 put a pen and anchor <strong>the</strong> o<strong>the</strong>r end temporarily at <strong>the</strong> center point of <strong>the</strong> arc. Swing <strong>the</strong> arm around and draw a nice arc on <strong>the</strong> plywood<br />
(<strong>the</strong>re are probably easier ways <strong>to</strong> do this involving wire or string). Once you have an arc drawn on <strong>the</strong> plywood get your cameras and space <strong>the</strong>m evenly around <strong>the</strong><br />
perimeter. Turn <strong>the</strong>m on and see what it looks like. Put an object in <strong>the</strong> center of <strong>the</strong> cameras and adjust <strong>the</strong>m so that <strong>the</strong>y are all centered on <strong>the</strong> same object. Take a<br />
test shot on all <strong>the</strong> cameras. Make sure you are happy with <strong>the</strong> range of motion between frames and <strong>the</strong> proportions and position of <strong>the</strong> subject <strong>to</strong> <strong>the</strong> frame. This is one<br />
of <strong>the</strong> most important elements in getting a good shot in <strong>the</strong> end and it is one that is hard <strong>to</strong> adjust once you get <strong>the</strong> jig saw out, so get it right.<br />
Initially, we made a smaller matrix rig, used velcro <strong>to</strong> mount <strong>the</strong> camera and had a session of shots <strong>to</strong> test <strong>the</strong> size and spacing. Afterward, we decided <strong>to</strong> expand <strong>the</strong> size<br />
of <strong>the</strong> matrix and created a larger platform and increased <strong>the</strong> spacing between <strong>the</strong> cameras.<br />
http://www.instructables.<strong>com</strong>/id/<strong>How</strong>-<strong>to</strong>-<strong>Enter</strong>-<strong>the</strong>-Ghet<strong>to</strong>-<strong>Matrix</strong>-<strong>DIY</strong>-<strong>Bullet</strong>-<strong>Time</strong>/