map <strong>for</strong> the base BSDF’s Reflectance 0 channel; basically, this could be though of as a dynamically-generated ‘dirt’ map whichcombines the basic Reflectance 0 color of the BSDF with the procedural diffusion map. As with a procedural Color map, theappearance of this map will be influenced by the Mix Mode and Mix Strength parameters.Luminance:When activated, the plugin will create a <strong>Maxwell</strong> Emitter material. In this case, any other C<strong>4D</strong> channels will be ignored. If anHDR (i.e. mxi, hdr, exr) texture is specified, then this will be used to create the <strong>Maxwell</strong> material as an image-based emitter;otherwise, the output color will be determined using the C<strong>4D</strong> Color parameter, while the output power will be determinedusing the C<strong>4D</strong> Brightness parameter. Output power <strong>for</strong> auto-generated emitters is always specified in lux (lumens per m 2 ) toensure that output power scales reasonably with different scene sizes.Note: if the luminance color is effectively pure black, and there is also no file-based or procedural texture in the channel, thischannel will be treated as if it were disabled.Specular:Transparency:The plugin will create a plasticine or metallic Material, depending on the Mode parameter. When set to metallic, a single BSDFwill be created and its Reflectance 90 channel will be set to a weaker version of the C<strong>4D</strong> material’s basic color. Otherwise, a 2-layer plasticine material will be created. In either case, the C<strong>4D</strong> Width parameter will be used to control the material’sroughness, in order to give a reflective response similar to that of the C<strong>4D</strong> material.When activated, the plugin will create a dielectric <strong>Maxwell</strong> material. In this case, the Color and Specular channels in the C<strong>4D</strong>material will be ignored, if they are activated, and instead the Color and Brightness parameters in the Transparency channel willbe used to determine the base BSDF’s Transmittance color. If a texture is specified, then it will be placed in the BSDF’sTransmittance map. It is important to use a realistic Refraction value, as this will be directly translated by the plugin, and will beplaced in the BSDF’s Nd field. The attenuation of the BSDF will be set using the <strong>Cinema</strong> Absorption distance, factoring <strong>for</strong> thecurrent scene scale. The Blurriness parameter will be used to increase the material’s attenuation, and also to add someroughness, again in an attempt to approximate what would be seen in the C<strong>4D</strong> material being converted.Note: if the transparency color is effectively pure black, and there is also no file-based or procedural texture in the channel, thischannel will be treated as if it were disabled. Also, if there a map is specified, and that map contains only greyscale values, theTransparency channel will be used as an alpha channel instead.Bump:Normal:Alpha:Displacement:the texture specified here will be placed in the <strong>Maxwell</strong> Material’s Global Bump channel, with the Strength parameter beingtranslated into the Global Bump valueThis works similarly to the Bump channel, except that the map will have normal mapping enabled, and the values specified <strong>for</strong>Flip X and Flip Y will be transferred into their corresponding places in the <strong>Maxwell</strong> bump channel.A texture found here will be placed in the Mask map of each layer in the material, producing a clip-mapped <strong>Maxwell</strong> Material. Ifthe texture specified resides in a C<strong>4D</strong> library, and uses alpha-channel to accomplish clipping, then this map will be translated bythe plugin and saved to disk as a black-and-white <strong>Maxwell</strong>-style clip map.The texture specified here will be placed in the <strong>Maxwell</strong> Material’s Displacement layer, with the Strength and Heightparameters being used to set the <strong>Maxwell</strong> displacement Height.58
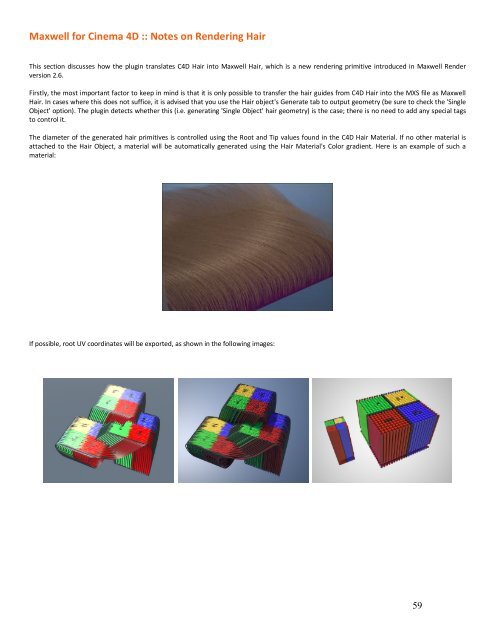
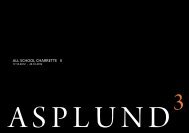
<strong>Maxwell</strong> <strong>for</strong> <strong>Cinema</strong> <strong>4D</strong> :: Notes on Rendering HairThis section discusses how the plugin translates C<strong>4D</strong> Hair into <strong>Maxwell</strong> Hair, which is a new rendering primitive introduced in <strong>Maxwell</strong> Renderversion 2.6.Firstly, the most important factor to keep in mind is that it is only possible to transfer the hair guides from C<strong>4D</strong> Hair into the MXS file as <strong>Maxwell</strong>Hair. In cases where this does not suffice, it is advised that you use the Hair object's Generate tab to output geometry (be sure to check the 'SingleObject' option). The plugin detects whether this (i.e. generating 'Single Object' hair geometry) is the case; there is no need to add any special tagsto control it.The diameter of the generated hair primitives is controlled using the Root and Tip values found in the C<strong>4D</strong> Hair Material. If no other material isattached to the Hair Object, a material will be automatically generated using the Hair Material's Color gradient. Here is an example of such amaterial:If possible, root UV coordinates will be exported, as shown in the following images:59