Maxwell for Cinema 4D - Architektur
Maxwell for Cinema 4D - Architektur
Maxwell for Cinema 4D - Architektur
- No tags were found...

You also want an ePaper? Increase the reach of your titles
YUMPU automatically turns print PDFs into web optimized ePapers that Google loves.
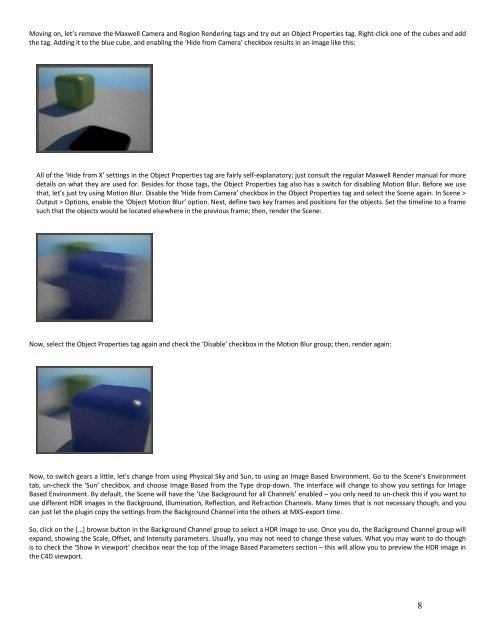
Moving on, let’s remove the <strong>Maxwell</strong> Camera and Region Rendering tags and try out an Object Properties tag. Right-click one of the cubes and addthe tag. Adding it to the blue cube, and enabling the ‘Hide from Camera’ checkbox results in an image like this:All of the ‘Hide from X’ settings in the Object Properties tag are fairly self-explanatory; just consult the regular <strong>Maxwell</strong> Render manual <strong>for</strong> moredetails on what they are used <strong>for</strong>. Besides <strong>for</strong> those tags, the Object Properties tag also has a switch <strong>for</strong> disabling Motion Blur. Be<strong>for</strong>e we usethat, let’s just try using Motion Blur. Disable the ‘Hide from Camera’ checkbox in the Object Properties tag and select the Scene again. In Scene >Output > Options, enable the ‘Object Motion Blur’ option. Next, define two key frames and positions <strong>for</strong> the objects. Set the timeline to a framesuch that the objects would be located elsewhere in the previous frame; then, render the Scene:Now, select the Object Properties tag again and check the ‘Disable’ checkbox in the Motion Blur group; then, render again:Now, to switch gears a little, let’s change from using Physical Sky and Sun, to using an Image Based Environment. Go to the Scene’s Environmenttab, un-check the ‘Sun’ checkbox, and choose Image Based from the Type drop-down. The interface will change to show you settings <strong>for</strong> ImageBased Environment. By default, the Scene will have the ‘Use Background <strong>for</strong> all Channels’ enabled – you only need to un-check this if you want touse different HDR images in the Background, Illumination, Reflection, and Refraction Channels. Many times that is not necessary though, and youcan just let the plugin copy the settings from the Background Channel into the others at MXS-export time.So, click on the […] browse button in the Background Channel group to select a HDR image to use. Once you do, the Background Channel group willexpand, showing the Scale, Offset, and Intensity parameters. Usually, you may not need to change these values. What you may want to do thoughis to check the ‘Show in viewport’ checkbox near the top of the Image Based Parameters section – this will allow you to preview the HDR image inthe C<strong>4D</strong> viewport.8