AUTOMATIKLADER - Philippi
AUTOMATIKLADER - Philippi
AUTOMATIKLADER - Philippi
- No tags were found...

Create successful ePaper yourself
Turn your PDF publications into a flip-book with our unique Google optimized e-Paper software.
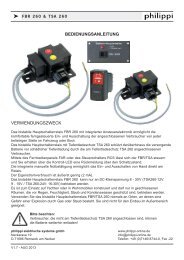
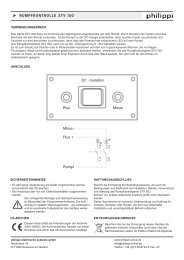
Operating Instructions ALbolt turner 4,5mm and/or screwdrivers of size 2 (Pozidrive). If only one batterie (group) will be connected,then this is to be attached to exit +1. Further groups of batteries are attached at the exits +2It is to be made certain absolutely that the polarity of the battery is considered. Keep the wiring between batterycharger and the batteries as short as possible. Shift if possible no lines of recieving equipement parallelto the loading and main lines to avoid HF disturbances. Use as possible colored lines for battery cabling. Ifnot possible, mark the cables with colored insulating tape. The indicated minimum cross sections of a lineare to be kept absolutely.Charging current recom. fuse size Cable length 2m10 A 15 A 1,5 mm² 2,5 mm²15 A 20 A 2,5 mm² 4 mm²The plus load lines must be secured in the proximity of the batteries by suitable fuses or breakers. The fusesize should be appropriate for something over the nominal charging current of the battery charger. Examinethe wiring annually. To thin cables and/or loose connections can have dangerous overheatings at cables andinstallation to the consequence. Pay attention to firm connections, in order to avoid high transition resistances.4.3 Connection of the optional temperature sensorThe temperature sensor measures the temperature of the battery. It should beattached therefore at the exterior of the battery. It is sufficiently if this by meansof tape at the exterior of the battery is fixed. The housing of the temperaturesensor is electrically isolated. The electrical connection of the temperature sensorstakes place at the lower row of terminals on the front side of the charger.The cable length of the temperature sensor amounts to 2.8 m, if this should notbe sufficient it can be extended or shortened without limits. If no temperaturesensor is attached, then the charger works with the standard voltage levels,which correspond to a temperature of 20 °C.4.4 Connection of charging control (Optional: FB-P)External charging control (option) is left justified put in at the upper row of terminals on the front side of thecharger.terminal No. 1: white line (+ LED ye)terminal No. 2: brown line (+ LED gr)terminal No. 3: green line (- Minus)