GSM&PSTN; FWT 8848 User's Mannual - Linksz.net
GSM&PSTN; FWT 8848 User's Mannual - Linksz.net
GSM&PSTN; FWT 8848 User's Mannual - Linksz.net
- No tags were found...

Create successful ePaper yourself
Turn your PDF publications into a flip-book with our unique Google optimized e-Paper software.
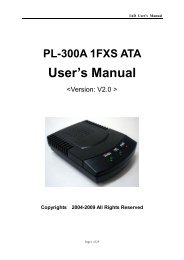
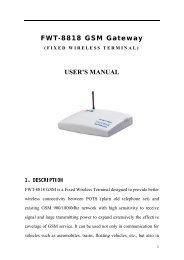
GSM&<strong>PSTN</strong> <strong>FWT</strong>-<strong>8848</strong> <strong>User's</strong> Manual Version 1.1GSM&<strong>PSTN</strong> <strong>FWT</strong>-<strong>8848</strong> (Gateway)<strong>User's</strong> ManualGSM&<strong>PSTN</strong> <strong>FWT</strong>-<strong>8848</strong> Version 1.1 -20101
GSM&<strong>PSTN</strong> <strong>FWT</strong>-<strong>8848</strong> <strong>User's</strong> Manual Version 1.11, General DescriptionGSM+<strong>PSTN</strong> fwt with LCR has the function to choose route automatically.When you dial from GSM+<strong>PSTN</strong> fwt, it will check the prefix no. you preset into device. Then itwill call out through GSM or <strong>PSTN</strong> according to your presetting rules. And GSM /<strong>PSTN</strong> bothsupport call in .When you are in the phone call through GSM, and at the same time, another phone call to pstn line,the caller will hear busy tone. And vice versa.It will dial out through GSM if you don't connect to <strong>PSTN</strong> or <strong>PSTN</strong> line is disconnected, and it willdial out through <strong>PSTN</strong> if you don't insert SIM card or GSM <strong>net</strong>work has no signal.Available:• GSM 900/1800Mhz dual band, employing Wavecom Q2403A,SIM500W module to make;• GSM 900/1800/1900Mhz Tri-band, employing Sim300z module to make;• GSM850/900/1800/1900Mhz Quadband, employing M10, SIM540W module to make.Appearance and StructureItem GSM&<strong>PSTN</strong> <strong>FWT</strong>-<strong>8848</strong> RemarkAppearanceWhite/blackMaterialABS (Acrylonitrile Butadiene Styrene)Dimension 170mm×118mm×30mm Excluding antennaWeight 250g Weight of Main unitPower SwitchPower SocketRocker switch12V DC inputPhone interface RJ11 2 RJ-11 portsAntenna interfaceLED displaySMA-femaleNo.1: Power, No.2.in use, No.3, in talk, No.4,Battery, if have, No. 5-7, Signal strengthFrom left to right(frontside view)2
GSM&<strong>PSTN</strong> <strong>FWT</strong>-<strong>8848</strong> <strong>User's</strong> Manual Version 1.1Front sideLEDs display for Signal strength, Power, WorkingStatus,Talking and Battery indicator;Rear side1pcs SMA antenna connectors, 2 RJ-11 output,Power port and switch;Bottom side1pcs Sim card holder slots, you can insert Simcard into the slot .2, Features:1) Auto-select economic route (Low cost routing-LCR function)2) GSM isn't ready, call will be forced to dial out from <strong>PSTN</strong>.3) When not connecting to <strong>PSTN</strong> line, GSM will provide the forced dial-out function4) Simple to install and easy to maintain5) Steady module and reliable design ensures good performance6) Provides optimized circuit directly connecting the exchange device for extensions7) Compatible to most telephones, PBX device.8) Strong signals with high gain antenna9) Attractive plastic casing10) SIM card supported (1.8V, 3V)11) Caller ID display12) Provides reversal polarity signal for metering13) No noise and clear voice14) Suitable for wide voltage range and low power consumption15) Suitable for all kinds of weather and environment16) RJ-11 ports (1 fxo for pstn line and 1 fxs port)17) Locking PIN / <strong>net</strong>work (optional)3,Technical SpecificationsAir interface standard: GSM850/1900Mhz,900/1,800Mhz phase 2+ full bandFrequency ranges:A) GSM 850 GSM 1900:I) Transmission: 869.2 ~ 893.8MHz I) Transmission: 1, 930 ~ 1, 990MHzIi) Reception: 824.2 ~ 848.2MHz Ii) Reception: 1, 850 ~ 1, 910MHzB) GSM 900: GSM 1800:I) Transmission: 890 ~ 915MHz I) Transmission: 1, 710 ~ 1, 785MHzIi) Reception: 935 ~ 960MHz Ii) Reception: 1, 805 ~ 1, 880MHzPhone interface: supply RJ-11 Phone InterfaceHanging voltage: 45VPicking off voltage: 30mA / 41mA3
GSM&<strong>PSTN</strong> <strong>FWT</strong>-<strong>8848</strong> <strong>User's</strong> Manual Version 1.1Dialing tone Frequency: 450HzAntenna interface: Antenna amplifying>2.5dbSensitivity:
GSM&<strong>PSTN</strong> <strong>FWT</strong>-<strong>8848</strong> <strong>User's</strong> Manual Version 1.12. Install antenna. In order to ensure the quality of voice, antenna must be put beyond 1.5 fromthe telephone and terminal.3. On end of the telephone line connects to the “Phone” port of the terminal, the other endconnects to telephone.4. “Power” port connects to power adapter that is connected to 110-220V AC power supply.The Installation for Connecting to <strong>PSTN</strong> &Ordinary TelephoneThe Sketch for connecting to <strong>PSTN</strong> And Ordinary Telephone set.Draw your attention: Because there are many types of ordinary telephone and their electricparameters are different. In order to avoid mutual disturbance between telephone and terminaland affect voice quality. The distance between telephone and terminal is 1.5m at least.7, Function SettingBefore you do the following function settings, Lift handset or press hands free key of telephoneset, then you can press the buttons according to the following instructions to finish setting, youwill hear 2 beeps when you finish, this testify setting successfully.I) GSM/<strong>PSTN</strong> routing settingSetting guide*#21#01*00#### set the prefix of phone number to dial thru <strong>PSTN</strong>, 21---Command, 01-serial no.,5
GSM&<strong>PSTN</strong> <strong>FWT</strong>-<strong>8848</strong> <strong>User's</strong> Manual Version 1.100--prefix no. Maxium 5 digit, if not enough, use "#" to substitute.E.g.*#21#01*00#### set all number with prefix 00 call out through <strong>PSTN</strong>.*#21#01*0755## set all number with prefix 0755 call out through <strong>PSTN</strong>.Default setting:*#21#01*1#####*#21#02*2#####*#21#03*3#####*#21#04*4#####*#21#05*5#####*#21#06*6#####*#21#07*7#####*#21#08*8#####*#21#09*9#####*#21#10*00####Default setting: Prefix 1 to 9 and 00 numbers call out through <strong>PSTN</strong>. Other numbers call outthrough GSM.II) Other Optional Function Setting1) Restore to factory default setting*#99#99# restore to factory default setting.2) Adjust dial interval*#01#30# , 01--command,30--time,Max 9.9 seconds,Min 0.5 seconds, default setting is 3seconds.*If you use GSM&<strong>PSTN</strong> <strong>FWT</strong>-<strong>8848</strong> for connecting to VoIP gateway, you can set dial interval as0.5 second, it can make PDD
GSM&<strong>PSTN</strong> <strong>FWT</strong>-<strong>8848</strong> <strong>User's</strong> Manual Version 1.1*#04#*0755# 10--command,*0755—area code,Max 5 numbers, use "*" instead if area codeis less than 5 digits.6) Setting IP numbers*#05#17911# 05--command,17911—IP numbers,Max 5 numbers, use "*" instead if IP numberis less than 5 digit.7)Hide Caller ID (been sent out)Setting*#13#01# 13--command,01--value,Max-02,Min-00 Default setting is 0000-- presentation indicator is used according to the subscription of the CLIR service01 – CLIR allowed02 – CLIR prohibitedNotice: This Setting needs GSM carrier support.8) Bar incoming call setting*#14#00# 14--command,00--value,00--no barring, 01--set barring default setting --009) FSK setting (optional)*#17#00# setting caller ID17-order, 00-value, 00-DTMF, 01-FSK, default setting is 00This setting need terminal has FSK Chip set support10) Billing Mode setting*#15#00#15--command, 00-value, 01-reversal polarity, 02-12 KHz, 03-16 KHz, default setting-- 0111)IMEI change Setting ( for SIM500W / M10 Module only)1. Write IMEI to RAM*#18#IMEI no.#, 18--command, IMEI No. --15-digit IMEI no.2. Check IMEI, if it is right, and then write it to module.*#19#IMEI no.#, 19--command, IMEI No. --15-digits IMEI No.Notice: Step 1 and Step 2, IMEI no. must be same.12) Pin Lock &Network Lock Setting (optional)(Should confirm before order)2) PIN Lock1, Set to open PIN code check and automatic PIN lock function*#07#*1234# 07-command, 1234- the current SIM card PIN codeIf set successfully, the device will open PIN code check, and automatically change the currentSIM Card into "PIN on" from "PIN off"2, Set to close PIN code check and automatic PIN lock function*#08#*1234# 08-command, 1234- the current SIM card PIN codeIf set successfully, the device will close PIN code check and automatic PIN lock function.7
GSM&<strong>PSTN</strong> <strong>FWT</strong>-<strong>8848</strong> <strong>User's</strong> Manual Version 1.13, Set to change PIN code, open automatic PIN lock function*#09#1234*56785678# 09-command, 1234- the current sim card PIN code, 5678-new PIN code.(5678 can be any other 4 digits number, suppose you can use 2009).If set successfully, the device will change the current sim card PIN code as you want.5678, orthe any other 4 digit PIN codes, and open automatic PIN lock function.2) Network Lock1, Set to open Network lock function*#10#01234# 10-command, 01234-password2, Set to close Network lock function*#11#01234# 11-command, 01234-password3, Set the Network codes*#12#1*46003*46003# 12-command, 1--No. Of IMSI, 46003--the IMSI code for China Telecom*#12#2*46000*46000# 12-command, 2--No. Of IMSI, 46000--the IMSI code for China Mobile8, Making Calls and Answer Incoming CallsMaking Calls1. Lift the handset or press “hand-free” key, you will hear dialing tone, then you can dial thetelephone numbers you want to call.2. Dialing: dialing the telephone numbers you want to call3. On completion of dialed digits, you can press “#” to transmit the called telephonenumbers. If you don’t dial any key for continual 3 seconds during the dialing, terminaltransmits called telephone numbers automatically.4. During calls, if the telephone numbers is not free ones, the terminal sends outanti-polarity signal.5. If the calling party or called party hangs up, the terminal stops sending out anti-polaritysignal.Answering Incoming CallsWhen some calls are coming in, if the connected telephone has the function of displayingincoming calls, the telephone rings and displays the incoming telephone numbers. Nowusers can lift the handset or press “hand-free” to answer it.8
GSM&<strong>PSTN</strong> <strong>FWT</strong>-<strong>8848</strong> <strong>User's</strong> Manual Version 1.1Warranty CardPlease fill in the blanks carefully, and keep it properly as the voucher for warranty.Type of EquipmentGSM <strong>FWT</strong>-<strong>8848</strong>User’s nameContact with:Contact Tel.no.AddressDate of Ex-worksDate of Maintenance Damage Management MaintainerSales AgentPurchasing Date(Stamp)9