SRI986 Electro-Pneumatic Positioner - webadmin1.net
SRI986 Electro-Pneumatic Positioner - webadmin1.net
SRI986 Electro-Pneumatic Positioner - webadmin1.net
- No tags were found...

You also want an ePaper? Increase the reach of your titles
YUMPU automatically turns print PDFs into web optimized ePapers that Google loves.
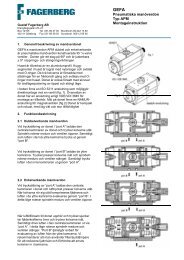
28 <strong>SRI986</strong> MI EVE0102 A-(en)9.6 Subsequent installationor exchangeFor subsequent installation there are kits available, seePSS EVE0102A. Safety measures indicated in page29 are to be absolutely observed!Kit components:1 Driver plate for transmitting the rotary motion5 Support Ø 7 mm for converter plate9 Converter plate with 2 fillister head screws 10and one lock washer 2011 Support for cover12 Cable screw connection13 Screw plug14 Frame with rubber sealg) Secure cable screw connection 12 and screw plug13 to frame 14 using the nuts supplied. Positionthe frame so that the rubber seal faces towards theposition controller and so that the cable screwconnection 12 is next to the terminals.h) Screw on cover 15 so that the ventilation slot is atthe bottom when the unit is attached. ' # "! "# #Installation:a) Unscrew lower screw 2 of stroke factor adjustmentfacility 3.b) Position driver plate 1, turning screw 2 again andtighten gently.c) Hold the stroke factor adjustment unit togethermanually and remove upper screw 4 . Swivel indriver plate and return screw. Tighten screws 2and 4 .d) Screw in the 2 supports 5 Ø 7 mm as follows:Longer support left, shorter support right.e) Secure converter plate 9 with screws 10 and alockwasher 20 (left screw) to the two supports sothat the pin on the driver plate 1 engages into theslot on the tooth segment.f) Screw two supports 11 into the female thread forsecuring the cover. In installation position, theseare the female threads in the top left corner and inthe bottom right corner. !