MDX-40A Setup Guide - Support
MDX-40A Setup Guide - Support
MDX-40A Setup Guide - Support

Create successful ePaper yourself
Turn your PDF publications into a flip-book with our unique Google optimized e-Paper software.
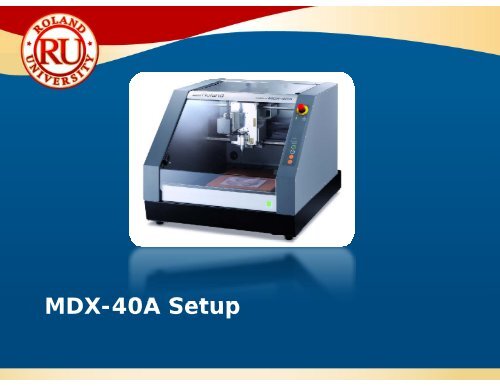
<strong>MDX</strong>-<strong>40A</strong> <strong>Setup</strong>
What’s IncludedAll items included with <strong>MDX</strong>-<strong>40A</strong>NOTES:•Please be familiar with thenames of all the accessorieslisted here.
<strong>MDX</strong>-<strong>40A</strong> Power OnTurning <strong>MDX</strong>-<strong>40A</strong> onNOTES:• Close front cover. •Keep cover closed duringoperation.•Opening cover duringoperation will cause anemergency stop condition.• Turn on main power on right side of machine.• The Power light will turn on.• Turn on Sub-Power to start machine.• Scanning and Modeling lights will flash• After initializing, the Modeling lightwill be on.
<strong>MDX</strong>-<strong>40A</strong> SafetyPress Emergency Stop button to immediately stopcutting and abort cutting job.NOTES: To remove machine from E-Stop condition, twist button. •Machine will need to berestarted after the emergencystop condition has beenremoved.
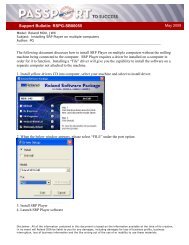
<strong>MDX</strong>-<strong>40A</strong> Driver InstallDriver Install for Windows XP• Turn on machine• Turn on computer• Install USB cable• Place <strong>MDX</strong>-<strong>40A</strong> drivers CD into computer• Labeled RSP065, <strong>MDX</strong>-<strong>40A</strong> Roland SoftwarePackage• Follow windows based instructions ti for completinginstall.NOTES:Vpanel Install:• Select VPanel for <strong>MDX</strong>-<strong>40A</strong>• Click on Install• Click Start button and look for the<strong>MDX</strong>-<strong>40A</strong> Vpanel to start software
<strong>Setup</strong> Basics – Installing Tool Follow the below steps for installing the collet,tooling, and using the two wrenches.• Install the collet loosely. Use the 17mm wrench to hold theyspindle in place as you install the collet until it is finger tight.NOTES:
<strong>Setup</strong> Basics – Installing Tool• Insert tool into collet.NOTES:•Please note a tool does notcome from the factory in thebox. It must be orderedseparately.• Twist collet to temporarily hold the tool or manually supporttool.
<strong>Setup</strong> Basics – Installing Tool• To tighten the collet, use both spanners to tighten the collet.• TIP: Use the 17mm wrench in the left hand and 10mmwrench in the right hand. Pull the wrenches away totighten the collet. Tighten to about 3.2 N-m of force.NOTES:• TIP: To loosen the collet, again with the 17mm wrench inthe left hand and 10mm in the right hand, pull the wrenchestowards each other. <strong>Support</strong> toolto prevent the tool from dropping.
<strong>MDX</strong>-<strong>40A</strong> Adding MaterialAffix material to <strong>MDX</strong>-<strong>40A</strong> table using either AS-10sheets or double sided carpet tape (heavy traffic type)NOTES:•Double sided carpet tape(Heavy traffic variety) can bepurchased at local hardwarestore such as Home Depot andAce Hardware.•Best tape is fabric based tapenot foam or fiberglass typetape as it is easily removedfrom the table.
<strong>MDX</strong>-<strong>40A</strong> Setting Origin Points Place Z0 sensor above material and connect sensor cable to thesensor and Z0 connector on the back left side of machine. Move tool so that it is right above the sensor about .250”.NOTES:Click on “Set Z origin i using sensor” then click on Detect t tobegin tool detection.
<strong>MDX</strong>-<strong>40A</strong>The <strong>MDX</strong>-<strong>40A</strong> is now ready to receive commands fromsoftware program.NOTES:
ZCL-<strong>40A</strong> Rotary AxisThe ZCL-<strong>40A</strong> allows you to cut objects and rotate themautomatically.• 4.7” Diameter by 10.6” Length maximum material size.NOTES:
What’s IncludedAll items included with optional ZCL-<strong>40A</strong>.NOTES:•Please be familiar with thenames of all the accessorieslisted here.
ZCL-<strong>40A</strong> <strong>Setup</strong>Remove 8 screws andremove table completely.NOTES:Install ZCL-<strong>40A</strong> unit and attach using 4 screws thatcame with the ZCL-<strong>40A</strong>.
ZCL-<strong>40A</strong> <strong>Setup</strong>Make sure that the screw is not at an angle and thatthere isn’t dust or debris in the holes.NOTES:Use included dust caps to keep area clean.
ZCL-<strong>40A</strong> <strong>Setup</strong>Make sure power to machine is turned off. Install cablesto expansion port and secure cables as shown below.NOTES:
ZCL-<strong>40A</strong> <strong>Setup</strong>When you turn the ZCL-<strong>40A</strong>, the rotary axis may not belevel.NOTES:•Install material into clamp andinstall tool.•Use tool and material to checkfor correct angle.•Just move tool in the Y axisbackwards and forwards andadjust angle accordingly untilflat.Set A-Angle on ZCL-<strong>40A</strong> unit.• Move clamp so that it is level.• Set A Origin at this point.A‐Axis
ZCL-<strong>40A</strong> <strong>Setup</strong>• Install Live centerNOTES:• Install detection pin into 6mm collet.
ZCL-<strong>40A</strong> <strong>Setup</strong>Setting Y Origin• Install Y-origin sensor.NOTES:• Move in live center support andtighten lever.
ZCL-<strong>40A</strong> <strong>Setup</strong>• Tighten knob to secure.NOTES:
ZCL-<strong>40A</strong> <strong>Setup</strong>• Click on Detect Jig on the <strong>MDX</strong>-<strong>40A</strong> Vpanel.NOTES:• The following screen will appear. Click on Start Sensing tobegin detection process.
ZCL-<strong>40A</strong> <strong>Setup</strong>• You will be reminded to make sure there is no dust or debrisaround the tool sensor. Please clean now if dusty.NOTES:• The machine will touch the sensor bar in various positionseven turning the spindle by half a turn automatically toaccurately setup the ZCL-<strong>40A</strong>.• Once finished, i click OK button and Close to close the JigSetting screen.
ZCL-<strong>40A</strong> <strong>Setup</strong>• Remove Y-Origin sensor and calibration pin.NOTES:
ZCL-<strong>40A</strong> Material <strong>Setup</strong>• Install material in clamp.NOTES:• Install center drill on tailstock and move center drill againstgsurface of material.
ZCL-<strong>40A</strong> Material <strong>Setup</strong>• Click on Drill Workpiece on the <strong>MDX</strong>-<strong>40A</strong> VPanel.NOTES:• Click on Rotate to start turning the rotary axis.
ZCL-<strong>40A</strong> Material <strong>Setup</strong>• Turn tailstock spindle adjusting dial slowly until the centercuts in about 3mm (1/8”) from the tip.NOTES:• Click Stop to stop the rotation and Close to close the screen.
ZCL-<strong>40A</strong> Material <strong>Setup</strong>• Remove center drill from material and remove center drill.NOTES:• Install Live center and move tail stock until the Live center isin the hole created by the center drill.
ZCL-<strong>40A</strong> Material <strong>Setup</strong>• Turn tailstock spindle adjusting dial until the material is notmoving freely. Tighten knob to ensure the Live center doesnot move during cutting.NOTES:•Do not turn the tailstockspindle excessively or thematerial may deform which willaffect accuracy.•Do not turn too little or thematerial may move duringcutting.•You want to turn until someresistance is felt.• Tighten clamp firmly.
ZCL-<strong>40A</strong> Material <strong>Setup</strong>• Install tooling for cutting.• In the VPanel, select “Set Z Origin at center of rotation” andclick Apply.NOTES:•Every time a tool is replaced,this procedure needs to beperformed.•If you change a tool, themachine won’t know that thetool length has changed unlessthis step is performed.• You will be reminded to make sure there is no dust or debrisaround the tool sensor. Please clean now if dusty.• Click Continue to begin detection.
ZCL-<strong>40A</strong> Material <strong>Setup</strong>• Once finished, the following screen will appear. Click OK.NOTES:• The Z and Y Origin have now been set.
ZCL-<strong>40A</strong> Material <strong>Setup</strong>• You CAM software, such as SRP Player, will indicate whereyour X Origin needs to be set. Move your tool in the X Axis(left and right) so it matches the X Origin indicated by thesoftware.• Once it is in the location desired, click on “Set X Origin here”and then Apply.NOTES:
ZCL-<strong>40A</strong> Origin Setting• The <strong>MDX</strong>-<strong>40A</strong> and ZCL-<strong>40A</strong> are now ready to receivecommands from your computer.NOTES: