Users instructions FM+DEX - Widex for professionals
Users instructions FM+DEX - Widex for professionals
Users instructions FM+DEX - Widex for professionals

Create successful ePaper yourself
Turn your PDF publications into a flip-book with our unique Google optimized e-Paper software.
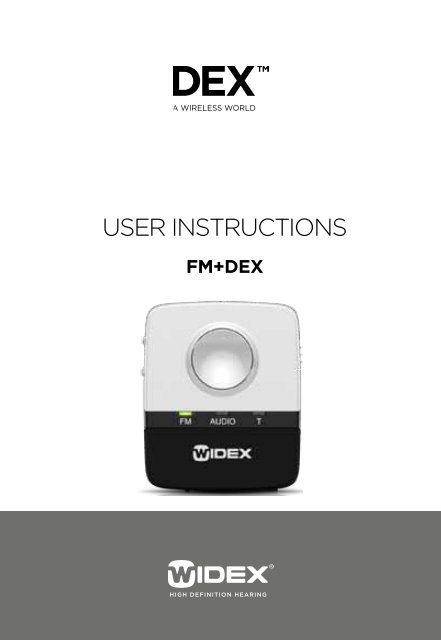
User <strong>instructions</strong><strong>FM+DEX</strong>
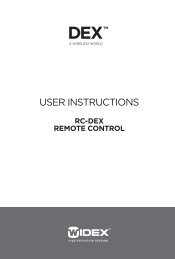
Package Contents<strong>FM+DEX</strong>ChargerJack-to-jack cableNeck loop antenna(two lengths)ClipClick-on moduleUser <strong>instructions</strong>2
Contentssymbols .......................................4Your new <strong>FM+DEX</strong> ..............................5Intended use. ................................... 6Description of device ............................ 6<strong>FM+DEX</strong> OVERVIEW ..............................7LEDs ...........................................8OPERATING RANGES .............................9GETTING STARTED ..............................10Charging the battery ........................... 10Preparing <strong>for</strong> Telecoil, FM or Audio ............... 12Antenna. ...................................... 17TURNING ON THE device ........................23Acoustic indicators ..........................24Selecting input source .......................25Volume adjustment ..........................26Room off .....................................27TURNING OFF THE device .......................28Tamper switch ................................29In case of malfunction.... ....................30CARING FOR YOUR <strong>FM+DEX</strong> ......................33Warnings. ....................................34Safety Warning ..............................35Regulatory in<strong>for</strong>mation .....................363
symbolsThe following symbols will be used throughout themanual:WARNINGMessages with this heading indicate adverse reactions, potentialsafety hazards or inadequate device per<strong>for</strong>mance.CAUTIONMessages with this heading indicate/include in<strong>for</strong>mation regardingany special care to be exercised.Not <strong>for</strong> general waste.4
Your new <strong>FM+DEX</strong>Your <strong>FM+DEX</strong> is part of the DEX family of assistivelistening devices. These user <strong>instructions</strong> explain howthe <strong>FM+DEX</strong> should be operated.WARNINGThis booklet contains important in<strong>for</strong>mation and <strong>instructions</strong>.Please read this booklet care fully be<strong>for</strong>e you start using thedevice.5
Intended useThe <strong>FM+DEX</strong> is a battery-powered device intended totransmit (or stream) signals to <strong>Widex</strong> hearing aids usingthe wireless <strong>Widex</strong>Link technology; i.e. signals arereceived, altered and transmitted to the hearing aid.Description of deviceThe <strong>FM+DEX</strong> is offered in order to support <strong>Widex</strong> hearingaids without DAI (direct audio input) or a telecoil.When the FM module is attached, the user is able toreceive FM signals.In the same way, the device can substitute <strong>for</strong> a telecoilin hearing aids not fitted with a telecoil. The third inputpossibility is the line in, which can be used to streammusic, etc., by connecting a computer or portable unitto the device.The <strong>FM+DEX</strong> is worn on a neck loop antenna or attacheddirectly to clothing using the included clip.6
<strong>FM+DEX</strong> OVERVIEW1. On/Off2. Input toggle key/Room off3. Volume up/down4. FM input LED5. Audio input LED6. T (telecoil) LED7. Battery level indicator8. Tamper switch9. FM switch10. FM connector (Europlug)11. FM connector (SCOLA FLEX receiver)12. Charge (mini USB socket)13. Audio (line-in)14. Cover7.5.4.3.10.11.9.1.2.6.8. 12.13.14.7
LEDsInput indicatorsGreen light in any of the three input LEDs indicates thatthis input source has been chosen.Battery indicatorBattery indicatorBattery lowBattery chargingBattery fully charged, charging unit stillconnectedredorangegreen8
OPERATING RANGESFrom <strong>FM+DEX</strong> to hearing aidsFrom FM transmitter to <strong>FM+DEX</strong>Up to 40 cmUp to 30 metres9
GETTING STARTEDCharging the batteryThe device uses a rechargeable battery that is chargedthrough the mini USB connector. When fully charged,the battery has a capacity of approx. 10 hours of continuoususe. The charger is available in four countryversions. The version you have may there<strong>for</strong>e not lookexactly as illustrated in this booklet.10
1. Connect the charger to the mini USB connector atthe bottom of the <strong>FM+DEX</strong>.2. Plug the charger into a wall socket.It takes approximately 4 hours to charge the batterythe first time. Recharging takes approx. 2 hours. Thedevice cannot stream while recharging.WARNINGDo not attempt to change the battery yourself. Contact yourhearing care professional if the battery needs replacement.11
Preparing <strong>for</strong> Telecoil, FM or AudioThe toggle key allows you to choose between threeinput sources, depending on whether you wish toreceive Telecoil, FM or Audio signals. If you wish to usethe Telecoil function, you just need to press the togglekey until the T LED is green. However, to prepare <strong>for</strong> FMor Audio reception, you need to do the following:Toggle key12
FMIf you wish to listen to an FM source, you will first needto connect the appropriate FM receiver module.1. Remove the cover at the bottom of the device bypressing the sides of the cover.2a. If you have a <strong>Widex</strong> SCOLA FLEX receiver, slide itinto place as shown. Set the receiver’s mode switchin position 2 “FM+M”.13
2b. Other compatible modules are connected to thedevice via a Europlug. Please be sure to turn andposition the Europlug correctly, i.e. according tothe thickness of the pins.3. Turn the receiver module on.4. Slide the FM switch to the right if you are using aSCOLA FLEX interface or to the left if you are usinga Europlug.4.14
5. Attach the cover again.Pressing the “button” indicated by the arrow allows youto activate the scan button of the receiver module.15
AudioIf you wish to listen to an audio source, plug the jackto-jackcable provided into the Audio (line-in) socket.Connect the other end to the audio source.16
AntennaThe <strong>FM+DEX</strong> can be used with or without an externalneck loop antenna.Attaching the neck loop antennaAssemble the two neck loop wires (if not alreadyassembled) by connecting the male jack on the shortwire to the female jack on the long wire. Then connectthe jack connectors at the end of the neck loop wires tothe holes in the click-on module.17
Then attach the assembled module to the device asillustrated.18
An alternative way of using the device is by attachingit to your clothes using the detachable clip. These firsttwo illustrations show how to attach the clip to thedevice.19
Pushing the clip upwards with two fingers allows you toturn the clip as required. Push it backwards to fix it inthe desired position.20
To open the clip, click the lock open, place it on yourclothes and click it closed.21
caution: For pacemaker users(Risks) The use of wireless <strong>Widex</strong> hearing aids/DEX should notinterfere with other devices such as a pacemaker. However, tobe extra cautious, <strong>Widex</strong> follows the guidelines recommendedby the manufacturers of implantable defibrillators and pacemakers<strong>for</strong> their patients when using mobile phones. Specifically,hearing aid wearers who also use a pacemaker should• Keep the hearing aids (and/or any of the DEX accessories) ata distance of at least 15 cm/½ foot away from the pacemakerand• Do not carry the hearing aids (and/or any of the DEX accessories)in a shirt pocket or close to the chest.• If any interference is observed, do not use the hearing aids(and/or DEX) and contact your pacemaker manufacturer andhearing care professional immediately.22
TURNING ON THE devicePush the slide button on the right side upwards.23
Acoustic indicatorsWhen using any button/switch, a corresponding acousticindicator will be presented in the hearing aids.Turning the device onChange of input sourceRoom on (start-up setting: On)Volume adjustmentToneToneToneTones24
Selecting input sourceThe device starts up in the FM input setting. Using thetoggle key you can change between the three inputoptions: FM, AUDIO or T (telecoil). The current inputsource is indicated by a green light in the correspondingLED. Make sure that the desired source has beenchosen.25
Volume adjustmentThe device starts up at the default volume level.Use the volume control on the left side to adjust thevolume up or down.volume upvolume down26
Room offIf you wish to listen to the input signal only, push theinput toggle key and hold it in <strong>for</strong> more than one second.This will disable the hearing aid microphones. Todeactivate this function again, push the input togglekey and hold it in again <strong>for</strong> more than one second.27
TURNING OFF THE deviceTo turn the device off, push the slide button on the rightside of the device downward.When you turn the device off, it stops streaming andthe hearing aids return to program 1 (usually the Masterprogram).28
Tamper switchThe input toggle/room off key and volume control canbe locked using the tamper switch. Slide the switch tothe left to lock the functions, and to the right to unlockthem. When the device is turned off and on again, it willstart up in FM. The input toggle key will still be locked.AUDIOCHARGE29
In case of malfunction....Problem Possible cause SolutionYour <strong>FM+DEX</strong> doesnot workNo sound when listeningto audioTemporary suspensionof communicationbetween hearingaids. Message:“Partner check”Streaming is interruptedThe device is notturned onThe device is out ofrange<strong>FM+DEX</strong> is notwithin range of thehearing aids<strong>FM+DEX</strong> is notwithin range of thehearing aidsInterference withanother deviceThe <strong>FM+DEX</strong> is outof rangeTurn it onMove the devicewithin range. Seepage 9.Move the devicewithin rangeMove the devicewithin rangeMove one of thedevices out of rangeof the other (2 m)Move the devicewithin range. Seepage 9.30
Problem Possible cause SolutionThe input togglekey does not workThe charger is connectedbut does notcharge (LEDs arenot green)No streamed audiosound even thoughthe audio input LEDis green.The <strong>FM+DEX</strong> is notturned onThe battery is lowThe battery does notworkThe charger is connectedto the<strong>FM+DEX</strong>Functions have beenlocked with tamperswitchThe power supply tothe <strong>FM+DEX</strong> hasbeen interruptedThe cable betweenthe sound sourceand the <strong>FM+DEX</strong> hasbeen disconnected.Turn the <strong>FM+DEX</strong> onCharge the batteryusing the includedchargerContact your hearingcare professional tohave the batteryreplacedDisconnect thecharger when the<strong>FM+DEX</strong> has beenchargedUnlockCheck that thecharger is properlyconnected to the<strong>FM+DEX</strong> mini USBsocket and a wallsocket, and that thewall socket isswitched onConnect the soundsource to the<strong>FM+DEX</strong>31
Problem Possible cause SolutionNo streamed signalseven thoughthe telecoil (T) LEDis green.No teleloop signalPlace the <strong>FM+DEX</strong> inan area with teleloopsignalsNo streamed FMsignals even thoughthe FM input LED isgreenBattery level indicatoris redNo FM module isattachedThe FM module orthe FM transmitter isswitched offThe battery is lowCheck that an FMmodule is attachedCheck that the FMmodule and the FMtransmitter areswitched on and areset to the samechannelCharge the battery32
CARING FOR YOUR <strong>FM+DEX</strong>The device is a valuable object and should be treatedwith care. Here are some things you can do to prolongthe life of your device:CAUTION• Do not expose the device to extreme temperatures or highhumidity.• Do not immerse in water or other liquids.• Clean the device with a dry, soft cloth. Never wash it withwater, cleaning solutions or other liquids.• Avoid dropping the device.• When the device is not in use, keep it in its case in a cool, drylocation out of reach of children and pets.33
WarningsWARNING• Keep the <strong>FM+DEX</strong> and its parts and accessories out of reachof children and anyone else who might swallow parts of thedevice, or otherwise cause injury to themselves with theseitems. In case of ingestion, contact a physician immediately.• Do not carry your <strong>FM+DEX</strong> with you during X-rays, MRIs, CTor other medical treatments and scans. The emissions fromthese procedures as well as from other types of radiation,such as that in a microwave oven, can damage the device.Radiation from, <strong>for</strong> example, room surveillance equipment,burglar alarms and mobile phones is weaker and will not damagethe device, but may create audible interference.• Do not use the device on aircraft or in hospitals withoutpermission.• Do not use the device in mines or other areas with explosivegases.CAUTION• Never try to open or repair the device yourself. (This shouldonly be done by authorized personnel.)• Although the device has been designed to comply with themost stringent international electromagnetic compatibilitystandards, the possibility cannot be excluded that it maycause interference with other equipment, such as medicaldevices.34
Safety WarningThis device is charged by an external power charger.• Only connect a charger that is compatible with the<strong>FM+DEX</strong>.• The charger must have an output rating of 5VDC,500mA, and a mini USB connector.• The charger input rating voltage and wall plug mustbe compatible with the AC wall outlet in your region.• The charger must have the certification marks showingcertification by a safety agency acceptable inyour region.<strong>Widex</strong> strongly recommends that you always use acharger unit that is supplied by your <strong>Widex</strong> Distributorto ensure safe and efficient use of your <strong>FM+DEX</strong>.When the <strong>FM+DEX</strong> is connected to external mainsoperatedequipment like a PC, audio source or similar,this equipment must comply with IEC 60065, IEC60950, IEC 60601-1 or equivalent safety standards.35
Regulatory in<strong>for</strong>mationFCC ID: TTY-FMDIC: 5676B-FMDFederal Communications Commission StatementThis device complies with part 15 of the FCC Rules.Operation is subject to the following two conditions:(1) This device may not cause harmful interference, and(2) this device must accept any interference received,including interference that may cause undesired operation.NOTE:This equipment has been tested and found to complywith the limits <strong>for</strong> a Class B digital device, pursuantto part 15 of the FCC Rules. These limits are designedto provide reasonable protection against harmfulinterference in a residential installation. This equipmentgenerates, uses and can radiate radio frequency energyand, if not installed and used in accordance with the<strong>instructions</strong>, may cause harmful interference to radiocommunications. However, there is no guarantee thatinterference will not occur in a particular installation. Ifthis equipment does cause harmful interference to radioor television reception, which can be determined byturning the equipment off and on, the user is encouragedto try to correct the interference by one or more of thefollowing measures:36
— Reorient or relocate the receiving antenna.— Increase the separation between the equipment andreceiver.— Connect the equipment into an outlet on a circuitdifferent from that to which the receiver is connected.— Consult the dealer or an experienced radio/TVtechnician <strong>for</strong> help.NOTE:This equipment complies with FCC radiation exposurelimits set <strong>for</strong>th <strong>for</strong> an uncontrolled environment. Thistransmitter must not be co-located or operating inconjunction with any other antenna or transmitter.Changes or modifications to the equipment not expresslyapproved by <strong>Widex</strong> could void the user’s authority tooperate the equipment.Industry Canada Statement /Déclaration d’industrie CanadaUnder Industry Canada regulations, this radio transmittermay only operate using an antenna of a type andmaximum (or lesser) gain approved <strong>for</strong> the transmitter byIndustry Canada.To reduce potential radio interference to other users, theantenna type and its gain should be so chosen that theequivalent isotropically radiated power (e.i.r.p.) is notmore than that necessary <strong>for</strong> successful communication.This device complies with Industry Canada licenceexemptRSS standard(s). Operation is subject to thefollowing two conditions:37
(1) this device may not cause interference, and(2) this device must accept any interference, includinginterference that may cause undesired operation of thedevice.Con<strong>for</strong>mément à la réglementation d’Industrie Canada,le présent émetteur radio peut fonctionner avec uneantenne d’un type et d’un gain maximal (ou inférieur)approuvé pour l’émetteur par Industrie Canada.Dans le but de réduire les risques de brouillageradioélectrique à l’intention des autres utilisateurs, ilfaut choisir le type d’antenne et son gain de sorte quela puissance isotrope rayonnée équivalente (p.i.r.e.) nedépasse pas l’intensité nécessaire à l’établissement d’unecommunication satisfaisante.Le présent appareil est con<strong>for</strong>me aux CNR d’IndustrieCanada applicables aux appareils radio exempts delicence. L’exploitation est autorisée aux deux conditionssuivantes:(1) l’appareil ne doit pas produire de brouillage, et(2) l’utilisateur de l’appareil doit accepter tout brouillageradioélectrique subi, même si le brouillage est susceptibled’en compromettre le fonctionnement.38
Hereby, <strong>Widex</strong> A/S declares that this <strong>FM+DEX</strong> is incompliance with the essential requirements and otherrelevant provisions of Directive 1999/5/EC.A copy of the Declaration of Con<strong>for</strong>mity can be foundat: http://www.widex.com39
Hearing aids, accessories and batteriesshould not be disposed of with normalhousehold waste. Please consult yournational <strong>Widex</strong> distributor <strong>for</strong> advice onhow to dispose of these items.40
ManufacturerPrinted by HTO / 2012-04¡9 514 0129 041]¤ ¡#01v¤9 514 0198 001 #01