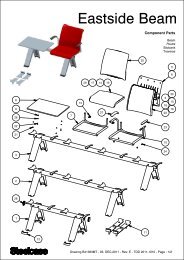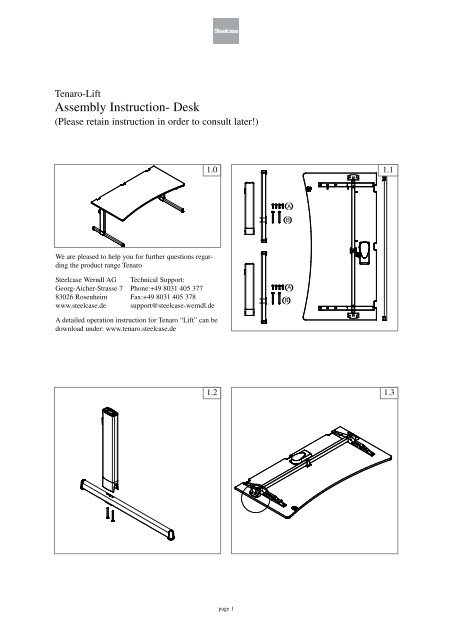
Assembly Instruction- Desk - Steelcase Village
Assembly Instruction- Desk - Steelcase Village
Assembly Instruction- Desk - Steelcase Village

You also want an ePaper? Increase the reach of your titles
YUMPU automatically turns print PDFs into web optimized ePapers that Google loves.
EU Declaration of ConformityProduct:<strong>Desk</strong>Type:TENAROYear of Construction: 2004Design of the equipmentconforms to the followingrelevant regulations:EC Machine Directive 98/37/EU, App. IIAEC Low-Voltage Directive 73/23/EECEC EMV Directive 89/336/EECApplied EN 292-1: 1991harmonised specifications: EN 292-2: 1995EN 349: 1993EN 527-1: 2000IEC 60950 + A4: 1997EN 55014Applied national DIN 4554: 1986standards and technicalspecifications:Manufacturer:<strong>Steelcase</strong> Werndl AGGeorg-Aicher-Straße 7D-83026 RosenheimTelephone: +49 (0) 80 31 405- 0Telefax: +49 (0) 80 31 405-100Rosenheim 01.08.2004 Theo Albrecht, Confidential ClerkPlace Date Name and Title SignatureTenaro © 10/2004
Tenaro © 10/2004
Table of Contents1 General1.1 TENARO Product Range . . . . . . . . . . . . . . . . . . . . . . . . . . . . . . . . . . 11.2 <strong>Instruction</strong> Manual. . . . . . . . . . . . . . . . . . . . . . . . . . . . . . . . . . . . . . . 21.3 Explanations : Symbols and General . . . . . . . . . . . . . . . . . . . . . . . . . 31.4 Exemption from Liability . . . . . . . . . . . . . . . . . . . . . . . . . . . . . . . . . . 32 Basic Safety Notes2.1 Application for designated purpose . . . . . . . . . . . . . . . . . . . . . . . . . . 52.2 Application Contrary to Designated Purpose . . . . . . . . . . . . . . . . . . 52.3 Safety Regulations . . . . . . . . . . . . . . . . . . . . . . . . . . . . . . . . . . . . . . . 52.4 Safety Features . . . . . . . . . . . . . . . . . . . . . . . . . . . . . . . . . . . . . . . . . 83 Transport and Storage3.1 Safety Rules . . . . . . . . . . . . . . . . . . . . . . . . . . . . . . . . . . . . . . . . . . . . 93.2 Interim Storage . . . . . . . . . . . . . . . . . . . . . . . . . . . . . . . . . . . . . . . . . 94 Set-up, <strong>Assembly</strong>, Dismantling4.1 Safety Rules . . . . . . . . . . . . . . . . . . . . . . . . . . . . . . . . . . . . . . . . . . . 114.2 Power Points . . . . . . . . . . . . . . . . . . . . . . . . . . . . . . . . . . . . . . . . . . 124.3 Set-up, <strong>Assembly</strong> and Setting Up. . . . . . . . . . . . . . . . . . . . . . . . . . . 124.4 Disposal of Packaging Material . . . . . . . . . . . . . . . . . . . . . . . . . . . . 134.5 Dismantling and Disposal of the <strong>Desk</strong> . . . . . . . . . . . . . . . . . . . . . . . 14Tenaro © 10/2004
5 Technical Description5.1 Safety Rules. . . . . . . . . . . . . . . . . . . . . . . . . . . . . . . . . . . . . . . . . . . 155.2 Technical Specifications . . . . . . . . . . . . . . . . . . . . . . . . . . . . . . . . . 175.2.1 Table: Technical Specifications . . . . . . . . . . . . . . . . . . . . . 175.2.2 Factory Settings at Delivery . . . . . . . . . . . . . . . . . . . . . . . . 185.3 Components. . . . . . . . . . . . . . . . . . . . . . . . . . . . . . . . . . . . . . . . . . . 185.4 Overview of <strong>Desk</strong> . . . . . . . . . . . . . . . . . . . . . . . . . . . . . . . . . . . . . . . 195.5 Control Panel up/down . . . . . . . . . . . . . . . . . . . . . . . . . . . . . . . . . . 205.6 Operating Panel with 3-PositionMemory (optional) . . . . . . . . . . . . 215.7 Electrical Height Adjustment . . . . . . . . . . . . . . . . . . . . . . . . . . . . . 226 Operation Electrical Height Adjustment6.1 Safety Regulations. . . . . . . . . . . . . . . . . . . . . . . . . . . . . . . . . . . . . . 236.2 Switching On . . . . . . . . . . . . . . . . . . . . . . . . . . . . . . . . . . . . . . . . . . 246.3 Commissioning . . . . . . . . . . . . . . . . . . . . . . . . . . . . . . . . . . . . . . . . 256.4 Control Panel up / down . . . . . . . . . . . . . . . . . . . . . . . . . . . . . . . . . 256.4.1 Reference Drive „up“/„down“ with control panel. . . . . . . 266.4.2 Adjusting <strong>Desk</strong> Height . . . . . . . . . . . . . . . . . . . . . . . . . . . . 276.5 Operating Panel with 3-Position Memory (optional) . . . . . . . . . . . 296.5.1 Reference Drive with Operating Panel 3-Position Memory 296.5.2 Adjusting <strong>Desk</strong> Height . . . . . . . . . . . . . . . . . . . . . . . . . . . . 316.5.3 Changing Display Mode to Centimeter or Inch . . . . . . . . . 326.5.4 Setting Position in Memory . . . . . . . . . . . . . . . . . . . . . . . . 336.5.5 Call up of Saved Position . . . . . . . . . . . . . . . . . . . . . . . . . . 347 Defects and Faults7.1 Safety Rules. . . . . . . . . . . . . . . . . . . . . . . . . . . . . . . . . . . . . . . . . . . 357.2 Fault Indications on the Display . . . . . . . . . . . . . . . . . . . . . . . . . . . 357.3 Other Faults . . . . . . . . . . . . . . . . . . . . . . . . . . . . . . . . . . . . . . . . . . . 37Tenaro © 10/2004
Tenaro © 10/2004
General1 General1.1 TENARO Product RangeProduction and marketing of this range are subject to constant qualitycontrol which guarantees faultless functionality:• <strong>Desk</strong> with electrical height adjustment (lift with electricmotor)• <strong>Desk</strong> with manual height adjustment• Organisational furniture e.g. counters, equipment interfacesetc.• Accessories and optional componentsProduction and marketing of this range are subject to constant qualitycontrol which guarantees faultless functionality.The products are designed and manufactured according to state-of-thearttechnology (in Germany at the time of manufacture) and recognisedtechnical safety regulations; nevertheless hazards can occur. Observethe relevant safety rules! Hazards which may impair the safety factormust be eliminated immediately. We reserve the right to make technicalmodifications to the products.<strong>Steelcase</strong> Werndl AG uses a quality management system that complieswith the DIN EN ISO 9001 standards.<strong>Steelcase</strong> Werndl AG reserves the right to apply the GS-mark to theTENARO product rangeIn addition, <strong>Steelcase</strong> Werndl AG carries the Eco-Audit-Mark of the“EU System for Environmental Management”.The nameplate of the electrical height adjustment is mounted on theside of the control housing.Product-InformationTenaro © 10/2004 1
General1.3 Explanations : Symbols and GeneralThe under-mentioned symbols used in this instruction manual have thefollowing meaning:DANGERImminent danger! Possibility of injury!Non-observance of the rules can be detrimental to your health or canbe fatal.ATTENTIONNon-observance can lead to slight physical injury, material damage ormalfunction.NOTETips and important information.1.4 Exemption from LiabilityThe Company <strong>Steelcase</strong> Werndl AG may be exempt from liability in oneor more of the following instances:• if the product is used contrary to its designated purpose;• if the product is used for purposes other than the reasonableapplication of office furniture;• if the product is operated with defect or malfunctioningsafety devices;• if the product is improperly assembled by unauthorisedpersonnel;• if components and adaptations, which do not originatefrom <strong>Steelcase</strong> Werndl AG, are used. The design andconstruction of pirate parts with regard to stress andsafety requirements is not guaranteed;Exemptionfrom LiabilityTenaro © 10/2004 3
GeneralExemptionfrom Liability(continued)• if third suppliers propose applications which demonstrablyresult in incorrect use of the product;• if unauthorised alterations are made to the product withregard to its construction and performance;• if the product is subjected to stress in excess of themanufacturer’s specifications;;• if maintenance and servicing by third parties and unqualifiedpersons is improper;• if supervision of the product components (functionalcontrols) is poor;• if disposal and recycling of the product or the pakkagingis improper;• if the product is re-sold to third parties without theinstruction manual;• in the event of foreign object damage or damage causedby an Act of God.Inspect all components regularly and, in the event of damage, contactauthorised specialists or our Service-Hotline (refer 9.2 Repairs andSpare Parts).It is vital to call in qualified specialists with regard to extensive assembly,maintenance and service work.For more information and notes please refer to the relevant topics in thesubsequent chapters of this instruction manual.4 Tenaro © 10/2004
Basic Safety Notes2 Basic Safety Notes2.1 Application for designated purposeThe TENARO desk has been designed exclusively as office furniture.Any other application of the desk is regarded as contrary to its designatedpurpose. If the desk is not used in accordance with its designatedpurpose <strong>Steelcase</strong> Werndl AG is not liable for damage which may occurand does not guarantee flawless and functional operation of the components.Using the desk in accordance with its designated purpose furtherimplies the observance of all notes in the instruction manual.Application forDesignatedPurpose2.2 Application Contrary to Designated PurposeUsing the product contrary to its designated purpose can result in dangerto life and limb as well as material damage. For this reason applicationof the product contrary to its designated purpose is prohibited. Ifthe desk is not used in accordance with its designated purpose <strong>Steelcase</strong>Werndl AG is not liable for damages which may occur and does notguarantee flawless and functional operation of the components. Possibleapplications contrary to the designated purpose are:• Lifting of loads• Using the desk as a climbing support• Frequently placing objects that have a gross weight ofmore than approx. 70 kg on the deskProhibited Application2.3 Safety RegulationsThe user of the TENARO desk must observe the safety regulations andwarnings in this instruction manual.The general and local regulations with regard to accident preventionand environmental protection, supplementary to the instruction manual,must be observed.ObservingSafety RegulationsTenaro © 10/2004 5
Basic Safety NotesDANGER OF PHYSICAL INJURY AND DAMAGE TO THE DESKThe TENARO desk may only be used and operated in technicallyflawless condition and in accordance with the instructionmanual.The desk must be positioned in such a way that adequatespace is provided for the lifting motion as well as formaintenance.To transport or move the desk it must be picked up by thebase only. It may not be lifted by the desk-top. This maycause the fastening screws to be stripped.Before adjusting the height of the desk, ensure• that there are no persons or objects(e.g. open doors and windows) in the lifting area,• that there are no persons or objects,• that the maximum permissible load capacity of thedesk is not exceeded (refer 5.2 Technical Specifications),• that the display of the control panel does not indicatea fault report (refer 7.2 Fault Indications onthe Display),• that the desk-top is level (use the adjusting screwsat the base of the legs if the floor is uneven).CRUSH AND SHEAR HAZARDThere must be adequate space (minimum 2,5 cm) in relationto all surrounding objects, walls etc. in the entire liftingarea.6 Tenaro © 10/2004
Basic Safety NotesELECTRICAL HAZARDSElectrical appliances may not be earthed to the desk frame.Metallic parts of the desk may be live if there are damagedcurrent carrying cables and connections.The power must be switched off before plugs are inserted orremoved.Protect the cable from excessive heat or sharp edges.The electrical components of the desk must be inspected regularly.Loose connections and damaged cables must be removedimmediately.Do not attempt to open the housing of• the electric motor• the control panelPower connections may only be installed by qualified personnel.POSSIBLE DAMAGE TO THE DESKThe plug of the desk must be easily accessible at all times.Do not use the desk in wet or moist surroundings! Refer toinformation in Point 4.3 Set-up, <strong>Assembly</strong> and Setting Up.Do not use the electric cable to remove the plug from thesocket!Make sure that the connecting cables of all equipment on thedesk are long enough.Tenaro © 10/2004 7
Basic Safety NotesDANGER OF COLLAPSEDo not use the electrical height adjustment if there are personson the desk.Do not use the desk as a climbing support.2.4 Safety FeaturesThe desk is equipped with the following safety features:• The lifting motion stops automatically if the maximumpermissible load (approx. 70 kg) is exceeded.8 Tenaro © 10/2004
Transport and Storage3 Transport and Storage3.1 Safety RulesDANGR OF PHYSICAL INJURY AND DAMAGE TO THE DESKWhen transporting or moving the desk it must be picked upby the base only. It may not be lifted by the desk-top. Thismay cause the fastening screws to be stripped.3.2 Interim StorageShould the desk go into interim storage prior to set-up, the followingrequirements must be met:• Undamaged transport packaging• The floor must have adequate load-bearing capacity• The floor must be dry• The area where the desk will be positioned must be level• Temperature range +10 °C to +40 °C• Max. rel. humidity 80 %POSSIBLE DAMAGE TO THE DESKShould the desk be dismantled for transportation, for example,it is important to ensure that both side frames areagain assembled with the matching desk-top frame of thesame desk.Otherwise the lifting mechanism may be damaged due to theprogrammed control settings possibly not corresponding tothe settings of another desk.In this regard observe the separate assembly instructions.Tenaro © 10/2004 9
Transport and Storage10 Tenaro © 10/2004
Set-up, <strong>Assembly</strong>, Dismantling4 Set-up, <strong>Assembly</strong>, Dismantling4.1 Safety RulesCRUSH AND SHEAR HAZARDAdequate space (at least 2,5cm) in relation to surroundingobjects, walls etc. must be allowed in the entire lifting area.DANGER OF PHYSICAL INJURY AND DAMAGE TO THE DESKThe desk must be positioned in such a way that it providesadequate space for the lifting motion as well as for maintenance.POSSIBLE DAMAGE TO THE DESKWhen transporting or moving the desk it must be picked upby the base only. It may not be lifted by the desk-top. Thismay cause the fastening screws to be stripped.Tenaro © 10/2004 11
Set-up, <strong>Assembly</strong>, Dismantling4.2 Power PointsDANGER OF PHYSICAL INJURY AND DAMAGE TO THE DESKPower points may only be installed by qualified personnel.The electrical components of the desk must be inspected.Loose connections and damaged cables must be removedimmediately.Plugs may only be removed or inserted when the power isswitched off.The plug of the desk must always be easily accessible.4.3 Set-up, <strong>Assembly</strong> and Setting UpSet-up and use of the product requires in-depth planning. For this purpose<strong>Steelcase</strong> Werndl AG has its own Planning Department.Checking theDeliverySet-upThe partially assembled components of the TENARO office furniturerange are generally supplied by specialised shops or directly by themanufacturer.After unpacking the product it must be inspected immediately for transportdamage and completeness and, if necessary, any damage must bereported to the manufacturer without delay.The set-up area must meet the following requirements:• The floor must have adequate load-bearing capacity• The area where the desk will be positioned must belevel• Temperature range +10 °C to +40 °C• Max. rel. humidity 80 %12 Tenaro © 10/2004
Set-up, <strong>Assembly</strong>, Dismantling<strong>Steelcase</strong> Werndl AG recommends that installation is done by a specialisedshop or respectively by an assembling company.InstallationAn experienced craftsman can also assemble the desk according to theassembly instructions available.POSSIBLE DAMAGE TO THE DESKShould the desk be dismantled for transportation, it is importantto ensure that both side frames are again assembledwith the matching desk-top frame of the same desk. Otherwisethe lifting mechanism may be damaged due to the programmedcontrol settings possibly not corresponding to thesettings of another desk.4.4 Disposal of Packaging MaterialThe packaging consists of the following materials:• Polyethylene shrink foil (PE)• Polyethylene bubble foil (PE)• Cardboard side protection• EPP corner protection• Cardboard paddingThese materials can be recycled. Packaging is disposed of by the manufacturerif <strong>Steelcase</strong> Werndl AG or an assembling company authorisedby <strong>Steelcase</strong> Werndl AG assembles the product. Should you assemblethe product yourself, please ensure selective sorting for recycling purposes.Disposal ofPackagingMaterialTenaro © 10/2004 13
Set-up, <strong>Assembly</strong>, DismantlingDisposal ofdesk4.5 Dismantling and Disposal of the <strong>Desk</strong>Should the TENARO desk finally be dismantled and disposed of,• disconnect the desk from the power points;• reduce the desk into its component parts;• sort the various parts according to:• re-usable components• disposable materials (wood, metal, synthetics, electricalcomponents)and have them recycled. The national regulations must beobserved.14 Tenaro © 10/2004
Technical Description5 Technical Description5.1 Safety RulesThe TENARO desk may only be used and operated in accordancewith the instruction manual and when in technicallyflawless conditionCRUSH AND SHEAR HAZARDAdequate space (at least 2,5cm) in relation to surroundingobjects, walls etc. must be allowed in the entire lifting area.The desk must be positioned in such a way that adequatespace is provided for the lifting motion as well as formaintenanceDANGER OF INJURY THROUGH ELECTRIC POWERDo not use the desk in wet or damp surroundings! Refer todetails in Point 4.3 Set-up, <strong>Assembly</strong> and Setting Up.The electrical components of the desk must be inspected regularly.Loose connections and damaged cables must be removedimmediately.Do not attempt to open the control housing.Do not attempt to open the electric motor housing.Tenaro © 10/2004 15
Technical DescriptionDANGER OF DAMAGE TO THE ELECTRICAL EQUIPMENTDo not use the electric cable to remove the plug from thesocket!Protect the cable from excessive heat and sharp edges.Power connections may only be installed by specialists.The plug of the desk must be easily accessible at all times.Ensure that the connecting cables of all equipment on the deskare long enough.16 Tenaro © 10/2004
Technical Description5.2 Technical Specifications5.2.1 Table: Technical SpecificationsModell CBD4P000200-009 / CBD4P000300-309Dimensions:Weight:Temperature range: +5 °C to +40 °CMax. rel. humidity: 80 %Supply voltage: 230 V ∼ ± 10 %Rated frequency:50 HzMaximum ON cycle:max. 2min. / 18 minMaximumload:Protection: IP 40Maximumpower consumption:CBD4P000200-009:CBD4P000300-309:approx. 700 N= approx. 70 kg400 W600 WRate of movement:approx. 43 mm / secmax.Maximum adjustment range: 670 mmControl panel up/downControl panel with 3-position memoryThe nameplate is mounted on the side of the control housing.Remarks(refer Delivery Note)(refer Delivery Note)Lifting motion switchesoff at load> approx. 70 kgwired upTenaro © 10/2004 17
Technical Description5.2.2 Factory Settings at DeliveryStanding height of of setup desk is 68 cm.The dongle for activating the stopping device is inserted, therefore thestopping device is enabled.You can alter these settings according to your needs. Refer relevant instructionsin Chapter 65.3 ComponentsThe TENARO desk consists mainly of the following components:• <strong>Desk</strong>-top connected to desk-top frame• <strong>Desk</strong>-top frame made of welded steelpipe• 2 side frames complete with motor and telescopiccolumn with lifting stroke of 670 mm• Sheet metal cableway (optional)• Legs fitted with adjustable screws (1,5 cm) for heightadjustment if the floor is uneven• Central bridge• Small parts• Electrical height adjustment:• Electric motor (68...135 H)• Controls for lift height adjustment including stoppingdevice• Dongle for activating stopping device• (standard) Control panel up/down• (optional) Control panel with display to indicateheight; programming function for two desk heights18 Tenaro © 10/2004
Technical Description5.4 Overview of <strong>Desk</strong>Figure 5–1 Overview13241 Controls 2 Telescopic column3 Control panel 4 Central bridgeTenaro © 10/2004 19
Technical Description5.5 Control Panel up/downThe control panel with „up“ and „down“ function is normally situated onthe righthand side on the under-side of the desk-top. It is hinged and itcan be continuously adjusted downwards to a 90°-position.Figure 5–2 Control Panel up/down1 231 Button „up“ 2 Button „down“3 Operating panel in 90°-position20 Tenaro © 10/2004
Technical Description5.6 Operating Panel with 3-PositionMemory(optional)Three different positions can be programmed with this 3-position operatingpanel.Operation of the electrical height adjustment is described in Chapter 6.Figure 5–3 Operating Panel with 3-Position Memory123451 Button „up“ 2 Button „down“3 Display 4 Button „MEMORY 1 / 2 / 3“5 Button „STORE“The operating panel cable is connected to the control, which is locatedunder the desk.Tenaro © 10/2004 21
Technical Description5.7 Electrical Height AdjustmentThe electrical height adjustment enables the setting and permanentprogramming of three optimal desk heights (seat and standing height).It basically consists of the following components:stoppingdevice• Electric motor 68...135H• Control panel• Control for height setting including stopping device anddongle for activating the stopper deviceThe stopping device is activated when the dongle is inserted in therespective receptacle at the rear side of the control housing.The stopper device is an additional module of the desk hight adjustment.It is triggered immediately when an object, e.g. an open windowinterferes with the desk movement. In this case the desk movement isstopped, its moving direction reversed and it is re-positioned approximately2 cm away from the point of interference.Relatively soft interfering objects cannot trigger the stopping device.optimal deskheightThe adjustment of the optimal desk height (seat height) is crucial forcorrect seating at the work place. Determine the desk height to be setat the work place according to the work place analysis (e.g. in accordancewith the Occupational Health and Safety Act, VDU Work Regulations,Regulations for the Prevention of Accidents).Operation of the electrical height adjustment is described in Chapter 6.The lifting motion takes place via electronic controls. The controls arelocated in a plastic housing under the desk-top.22 Tenaro © 10/2004
Operation Electrical Height Adjustment6 Operation Electrical Height Adjustment6.1 Safety RegulationsDANGER OF PHYSICAL INJURY AND DAMAGE TO THE DESKBefore adjusting the height of the desk, ensure• that the desk-top is level (if the floor is uneven,level by means of the threaded pins on the legs);• that there are no persons or objects (e.g. opendoors and windows) in the lifting area;• that there are no persons or objects (e.g. opendoors and windows) in the lifting area;• that the maximum permissible load capacity of thedesk is not exceeded ( refer to 5.2 Technical Specifications).DANGER OF INJURY THROUGH ELECTRICAL POWERMetallic parts of the desk may be live if there are damagedcurrent carrying cables and connections.Therefore: Electrical appliances may not be earthed to thedesk frame.The electrical components of the desk must be inspected regularly.Loose connections and damaged cables must be removedimmediately.Do not try to open the housing of the control.Tenaro © 10/2004 23
Operation Electrical Height AdjustmentCRUSH AND SHEAR HAZARDAdequate space (at least 2,5 cm) in relation to surroundingobjects, walls etc. must be allowed in the entire lifting area.The desk must be positioned in such a way that adequatespace is provided for the lifting motion as well as formaintenance.Ensure that the connecting cables of all equipment on the deskare long enough!6.2 Switching OnEnsure• that the desk has been assembled correctly,• that the cable connecting the control and the motor is inplace,• that the cable connecting the control panel and the controlis in place,• the dongle for activating the stopping device is inserted,• that all safety rules are observed.You can now connect the power:• plug the mains plug into a 220/230V socket24 Tenaro © 10/2004
Operation Electrical Height Adjustment6.3 CommissioningBefore the TENARO desk is used for the first time a reference drive hasto be conducted.Reference drive instructions can be found in the appendix of the correspondingcontrol panel description.6.4 Control Panel up / downThe control panel is usually located on the left or righthand side on theunder-side of the desk-top. The operating panel is hinged and can becontinuously adjusted to a 90° vertical position.Figure 6–11 21 Key „up“ 2 Key „down“POSSIBLE DAMAGE TO THE OPERATING PANELDo not forcefully push adjust the control panel further thenits 90° vertical position!Do not place any objects on the control panel.Do not spill any liquids onto the control panel.Tenaro © 10/2004 25
Operation Electrical Height Adjustment6.4.1 Reference Drive „up“/„down“ with control panelPress and hold Key „down“ until final positionis reached.Release Key „down“.Press and hold Key „down“ for approx. 5 sec.The systems moves to the bottom finalposition, moves 5 mm up and then to thebottom final position again.Release Key „down“ again.Press Key „up“ until final top position isreached.If key is released before reference drive is completed, procedure will beinterrupted and must be restarted.Incorrectreference driveIf reference drive has not been completed successfully, you have to proceedas follows:Press Keys „up“ and „down“ and hold for atleast 5 sec.Restart reference drive as described above.26 Tenaro © 10/2004
Operation Electrical Height Adjustment6.4.2 Adjusting <strong>Desk</strong> HeightBEFORE ADJUSTING THE HEIGHT OF THE DESK, ENSURE• that there are no persons or objects (e.g. opendoors and windows) in the lifting area;• that there are no persons on the desk;• that the maximum permissable load capacity is notexceedid (refer Technical Specifications);• that the desk-top is level (use the adjusting screwsat the base of the legs if the floor is uneven);• that there are no excessive loads on the desk-top.These impede the height adjustment.Ensure that the connecting cables of all equipment on the deskare long enough.Press Keys „up“ or „down“.Lifting motion takes place only• as long as the relevant keys are pressed• as long as the maximum load (app. 70 kg) is not exceeded(refer 5.2 Technical Specifications).The desk starts to move at a speed of approximately 4 cm/sec.Tenaro © 10/2004 27
Operation Electrical Height AdjustmentPOSSIBLE DAMAGE TO THE DESKIn the event of the desk-top moving one-sidedly or irregularly:• release the key immediately to stop the motion!• ascertain the cause be referring to the Fault FindingTable (refer 7.2 Fault Indications on the Displayand 7.3 Other Faults)• if necessary call a service technician28 Tenaro © 10/2004
Operation Electrical Height Adjustment6.5 Operating Panel with 3-Position Memory(optional)Before the TENARO desk is used for the first time a reference drive hasto be conducted.Figure 6–2 Operating Panel 3-Position Memory123451 Key „up“ 2 Key „down“3 Display 4 Key „MEMORY 1 / 2 / 3“5 Key „STORE“6.5.1 Reference Drive with Operating Panel 3-PositionMemoryPress and hold Key „down“ until bottom finalposition is reached.If desk is already in final bottom position,press Key only briefly.Release Key „down“ and wait for approx. 2seconds.Tenaro © 10/2004 29
Operation Electrical Height AdjustmentPress and hold Key „down“ for approx. 5seconds.System moves in bottom final position, 5 mmup, and again in bottom final position .„E 1“ is blinking on display during drive .„68“ appears on display.Release Key „down“ again.Press Key „up“ until top final position isreached.If key is released before reference drive is completed, procedure will beinterrupted and must be restarted.Incorrectreference driveIf reference drive has not completed successfully, you have to proceedas follows:Press Keys „up“ and „down“ and hold for atleast 5 sec.Restart reference drive as described above.30 Tenaro © 10/2004
Operation Electrical Height Adjustment6.5.2 Adjusting <strong>Desk</strong> HeightBEFORE ADJUSTING THE HEIGHT OF THE DESK, ENSURE• that there are no persons or objects (e.g. opendoors and windows) in the lifting area;• that there are no persons on the desk;• that the maximum permissable load capacity is notexceeded (refer Technical Specifications);• that the desk-top is level (use the adjusting screwsat the base of the legs if the floor is uneven);• that there are no excessive loads on the desk-top.These impede the height adjustment.Ensure that the connecting cables of all equipment on the deskare long enough.Press Key „up“ or „down“Lifting motion takes place only• as long as the relevant keys are pressed• as long as the maximum load (approx. 70 kg) is notexceeded (refer 5.2 Technical Specifications).The desk starts to move at a speed of approximately 4 cm/sec.Tenaro © 10/2004 31
Operation Electrical Height AdjustmentPOSSIBLE DAMAGE TO THE DESKIn the event of the desk-top moving one-sidedly or irregularly:• release the key immediately to stop the motion!• ascertain the cause by referring to the Fault FindingTable (refer 7.2 Fault Indications on the Display and7.3 Other Faults)• if necessary call a service technician6.5.3 Changing Display Mode to Centimeter or InchYou can choose desk height to be indicated in inch or centimeter.To change display mode proceed according to the table below:ActionFor example:Display indicates „27“ for desk height of27 inch.You wish to change to cm-display mode.Indication onDisplayExample:1. Change betweeen cm and inch:Press and hold .„S“ blinks on display.2 Selected height appears in inch afterapprox. 5 sec. For example „68“ indicatesdisk height of 68 cm.Example:32 Tenaro © 10/2004
Operation Electrical Height Adjustment6.5.4 Setting Position in MemoryThree positions can be set in the memory.Short form instructions on how to set positions and call up programmedpositions can be found at the back of the control panel.ActionIndication onDisplay1. Select height:Example:Press or ,until required height is indicated.2. Save position:PressDisplay starts to blink for approx. 3 sec.3.Press for position 1,while „S“ is blinking;orPress for position 2,while „S“ is blinking;orPress for position 3,while „S“ is blinking.The position is now saved in control memory. This is indicated on thedisplay.Tenaro © 10/2004 33
Operation Electrical Height Adjustment6.5.5 Call up of Saved PositionShort form instructions on how to set positions and call up savedpositions can be found at the back of the control panel.ActionIndication onDisplay1. Press , to call up saved heightposition 1 ;Pressposition 2;Pressposition 3;, to call up saved height, to call up saved height2. „go1“ blinks on displayor„go2“ blinks on displayor„go3“ blinks on display3.Press or , while display isblinking, until desk has reachedprogrammed height and this is indicatedon the display.Beispiel:The programmed height is only approached as long as go1, go2 or go3is blinking. Otherwise hight adjustment is only carried out as long asKey „up“ or „down“ is being pressed !Lift or lower until the required or programmed height is reachedand the desk stops. This ensures straight (horizontal) alignmentof the desk should it be burdened one-sidedly.34 Tenaro © 10/2004
Defects and Faults7 Defects and Faults7.1 Safety RulesThe following is basically applicable to repair a fault:INJURY THROUGH ELECTRICAL POWERRemove or insert a plug only when the power is switchedoff.Do not attempt to open the housing of• the controls• the electric motor• the control panelPOSSIBLE DAMAGE TO THE ELECTRICAL EQUIPMENTDo not use the electric cable to remove the plug from thesocket!7.2 Fault Indications on the DisplayShould faults occur when operating the TENARO desk, please checkwhether operation was carried out in accordance with the instructionmanual. In this way the fault can usually be traced and eliminated.Certain faults which may occur are indicated on the display of the controlpanel. The „Error“-Segment blinks.The table below will assist you in finding the cause and repairing thefault.The following section will provide assistance with regard to other faultswhich are not indicated on the display (refer 7.3 Other Faults).Tenaro © 10/2004 35
Defects and FaultsDisplayProblemDescriptionPossible CausePossible CauseProgrammedposition lostFault in controlConduct referencedrive (refer 6.4.1Reference Drive„up“/„down“ withcontrol panel or6.5.1 Reference Drivewith Operating Panel3-Position Memory)Overlaod duringlifting motionExcessive load ondeskMotor stops; reduceweight (remove load)Incorret keyoperationInvalid key or keycombination usedRelease all keys andkey combinationsand press valid key /key combinationControl is notprogrammedProgramming not setControl has to be resetwith aprogramming device.ContactService-Hotline(refer 9.2 Repairsand Spare Parts)36 Tenaro © 10/2004
Defects and Faults7.3 Other FaultsShould faults occur when operating the TENARO desk, please checkwhether operating instructions were followed in accordance with theinstruction manual. In this way the fault can usually be traced and eliminated.The table below will assist you in finding the cause and repairing thefault.The previous section (refer 7.2 Fault Indications on the Display) willprovide assistance with regard to faults which are indicated on the display.Defects / Faults Possible Cause MeasuresLifting / loweringprocess does notstartObstruction caused by foreignobjects or dirt in the telescopiccolumn areaPower supply interruptedFault in the driveMaximum permissible loadexceeded (approx. 70 kg)Fault in the controlRemove foreign objects / dirtCheck cable connections(mains plug; connection betweenPC and controls);Check power supply (fuses indistribution board of building)Contact Service Hotline (refer9.2 Repairs and Spare Parts)Reduce / remove loadContact Service Hotline (refer9.2 Repairs and Spare Parts)Tenaro © 10/2004 37
Defects and FaultsDefects / Faults Possible Cause Measures<strong>Desk</strong> can only beloweredControl has lost data • Disconnect power cable• Reconnect power cable• Conduct reference drive(refer 6.4.1 ReferenceDrive „up“/„down“ withcontrol panel or 6.5.1Reference Drive withOperating Panel 3-PositionMemory)Lifting / loweringprocess is jerky<strong>Desk</strong> constructionis unstable<strong>Desk</strong> construction is twisted,caused by incorrect assemblingCenter Bridge is not insertedproperly(hammer must be used forassembling)• Loosen screws• Move to top position• Move to bottom position• Tighten screws• Loosen screws• Move to top position• Move to bottom position• Tighten screwsScrews are loose • Loosen screws• Move to top position• Move to bottom position• Tighten screwsLifting / loweringprocess is onesidedor unevenFault in controlHeavy one-sided loadStop lifting / lowering processimmediately;Call Customer Service (refer9.2 Repairs and Spare Parts)Remove or centre load, thenlift or lower desk until it stopsautomatically.38 Tenaro © 10/2004
Defects and FaultsDefects / Faults Possible Cause MeasuresNoisedevelopmentStopping devicedoes not respondTelescopic column dirty orblocked by foreign objectsObstruction / obstructingobject is too softDongle for stopping device isnot or incorrectly insertedStop lifting / lowering processimmediately;Remove foreign objects / dirtCall Customer ServiceRequires no counter measureInsert dongleTenaro © 10/2004 39
Defects and Faults40 Tenaro © 10/2004
Maintenance8 Maintenance8.1 Safety RulesINJURY THROUGH ELECTRICAL ENERGYMaintenance and repairs on electrical equipment and suppliesmay only be carried out by authorised specialists.CRUSH AND SHEAR HAZARDUnintentional lifting and lowering is possible!The electrical connection of the height adjustment must bedisconnected from the power supply for maintenance andrepair work on all non-electrical components of the desk.DANGER OF PHYSICAL INJURY AND DAMAGE TO DESKOnly suitably qualified personnel may carry out maintenanceand repair work.Only suitable tools may be used for these tasks.Do not attempt to open the housing of• the controls• the control panelBefore adjusting the height of the desk, ensure that thedesk-top is level (use the adjusting screws at the base of thelegs if the floor is uneven).Tenaro © 10/2004 41
MaintenancePOSSIBLE DAMAGE TO THE DESKEnsure that there are no objects in the area of travel of the lifting column!Only components supplied by <strong>Steelcase</strong> Werndl AG may be fitted as spareparts. The use of other parts is subject to agreement by <strong>Steelcase</strong> WerndlAG.The stipulated maintenance and inspection intervals must be adhered to.Materials (e.g. lubricants) for servicing and maintenance must be collectedin suitable containers and disposed of in accordance with the regulations (inaccordance with EU-Regulation 75/439/EEC).8.2 Functional ControlsThe components of the TENARO desk should be inspected for good working order at regularintervals. Particular attention should be paid to the electric connections:INJURY THROUGH ELECTRICAL ENERGYMetallic parts of the desk may be live if there are damaged current carryingcables and connections.Therefore: Electrical appliances may not be earthed to the desk frame.42 Tenaro © 10/2004
MaintenanceDANGER OF PHYSICAL INJURY AND DAMAGE TO DESKDo not use the desk in wet or damp surroundings!Refer to information in 4.3 Set-up, <strong>Assembly</strong> and SettingUp.DAMAGE TO THE ELECTRICAL EQUIPMENT IS POSSIBLEDo not use the electric cable to remove the plug from thesocket!Plugs may only be inserted or removed when the power isswitched off.Protect the cable from excessive heat and from sharp edges.Inspect the electrical components of the desk regularly.Loose connections and damaged cables must be removedimmediately.Tenaro © 10/2004 43
8.3 Table : Functional ControlsInterval Control point FunctionalControlPermissibleValueMeasures ifrequiredDuringsetupFrame PartsPosition centerbridgeInsert centerbridge completelyintoguidesInsert centerbridge inguide withhammerBeforeeach heightadjustmentImmediate areaaround deskCheck safetydistancesNo objects inthe liftingareaRemoveobjects<strong>Desk</strong>-top Check whether level Level Set withthreadedpins on thelegsAt regularintervalsConnection ofthe electricalsupplies(cables)Check for damage tothe isolationNo damageRenew connectionsIsolation of theelectrical supplies(cables)Check for damage tothe isolationNo damageRenew cableArea aroundthe electricalsupplies(cables)Check distance tohot objects (e.g.heaters)AdequatedistanceEstablishdistanceAt the back ofcontrolCheck if dongle forstopping device isinsertedDongle iscorrectlyinsertedInsertdongleTenaro © 10/2004 44
Maintenance8.4 Maintenance WorkOnly authorised specialists may carry out maintenance work. In thisregard please contact our Service Department (refer 9.2 Repairs andSpare Parts).<strong>Steelcase</strong> Werndl AG is exempt from liability and does not offer anyguarantee in respect of the following (see 1.4 Exemption from Liability):• if supervision of the product components (functionalcontrols) is poor• improper maintenance• maintenance by third parties• maintenance by unqualified and unauthorised personnel• using components and adaptations that do not originatefrom <strong>Steelcase</strong> Werndl AG• unauthorised alterations to the construction and performanceof the product• deliberate incorrect operation• utilisation contrary to the rules.Exemptionfrom Liability8.5 Cleaning and ServicingDAMAGE TO THE DESK POSSIBLEProtect control panel from damp and moisture.Protect controls from damp and moisture.Commercially available cleaning agents can be used for cleaning thesurfaces of the desk.Only appropriate maintenance and cleaning agents should be used forthe relevant materials (wood, synthetics, metal).Tenaro © 10/2004 45
Maintenance46 Tenaro © 10/2004
Customer Service9 Customer Service9.1 Delivery, Set-up, <strong>Instruction</strong>The TENARO desk is normally delivered, assembled and set up by themanufacturer or a specialised shop.The users are shown by the manufacturer, respectively the specialisedshop, how to operate the desk.9.2 Repairs and Spare PartsOriginal spare parts and accessories are obtained from the manufacturer.Please contact the Service Department should faults, which cannot berepaired, occur:<strong>Steelcase</strong> Werndl AG Hotline:Georg-Aicher-Straße 7 Telephone:+49 (0) 80 31 405 - 377D-83026 Rosenheim Telefax: +49 (0) 80 31 405 - 378e-mail: support@steelcase-werndl.deServiceHotlinetechnical supportFrance +33 (0) 3 88 13 37 96UK +44 (0) 17 53 68 02 00Spain +34 914 759 000 241Italy +39 (051) 65 00 708HollandBelgiumLuxemburgScandinavia+31 30 634 62 41Baltic countriesPolandCzech RepublicSlovaothers +33 (0) 3 88 13 37 96Tenaro © 10/2004 47
Customer Service9.3 Product MonitoringWe would also like to offer you safe, technologically up-to-date productsin the future.Should you have any suggestions that could possibly improve the safetyand/or operation of this product, please send us your feedback by completingthe attached sheet (next page).48 Tenaro © 10/2004
Customer ServiceFeedback for Product Monitoring<strong>Steelcase</strong> Werndl AG Telefax: +49 0 80 31 405 - 378Georg-Aicher-Straße 7D-83026 RosenheimSuggestions regarding the product :Suggestions regarding the instruction manual :Sender :Tenaro © 10/2004 49
Customer Service50 Tenaro © 10/2004