1964-65 chevrolet chevelle/ el camino - Classic Auto Air
1964-65 chevrolet chevelle/ el camino - Classic Auto Air
1964-65 chevrolet chevelle/ el camino - Classic Auto Air
Create successful ePaper yourself
Turn your PDF publications into a flip-book with our unique Google optimized e-Paper software.
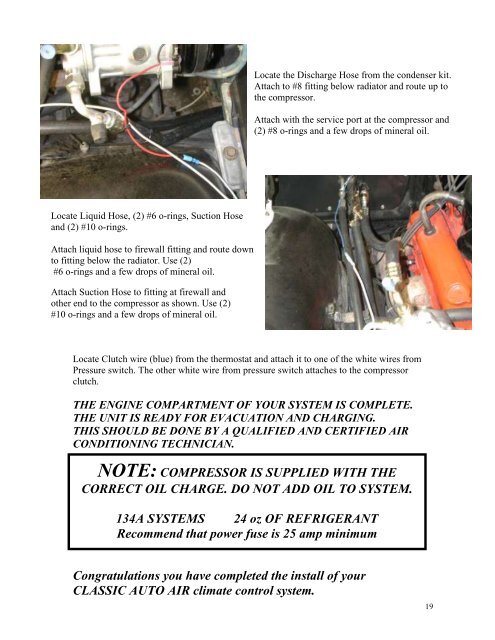
Locate Liquid Hose, (2) #6 o-rings, Suction Hose<br />
and (2) #10 o-rings.<br />
Attach liquid hose to firewall fitting and route down<br />
to fitting b<strong>el</strong>ow the radiator. Use (2)<br />
#6 o-rings and a few drops of mineral oil.<br />
Attach Suction Hose to fitting at firewall and<br />
other end to the compressor as shown. Use (2)<br />
#10 o-rings and a few drops of mineral oil.<br />
Locate the Discharge Hose from the condenser kit.<br />
Attach to #8 fitting b<strong>el</strong>ow radiator and route up to<br />
the compressor.<br />
Attach with the service port at the compressor and<br />
(2) #8 o-rings and a few drops of mineral oil.<br />
Locate Clutch wire (blue) from the thermostat and attach it to one of the white wires from<br />
Pressure switch. The other white wire from pressure switch attaches to the compressor<br />
clutch.<br />
THE ENGINE COMPARTMENT OF YOUR SYSTEM IS COMPLETE.<br />
THE UNIT IS READY FOR EVACUATION AND CHARGING.<br />
THIS SHOULD BE DONE BY A QUALIFIED AND CERTIFIED AIR<br />
CONDITIONING TECHNICIAN.<br />
NOTE: COMPRESSOR IS SUPPLIED WITH THE<br />
CORRECT OIL CHARGE. DO NOT ADD OIL TO SYSTEM.<br />
134A SYSTEMS 24 oz OF REFRIGERANT<br />
Recommend that power fuse is 25 amp minimum<br />
Congratulations you have completed the install of your<br />
CLASSIC AUTO AIR climate control system.<br />
19


