Building instructions Fournier RF-4D - Aero-naut
Building instructions Fournier RF-4D - Aero-naut
Building instructions Fournier RF-4D - Aero-naut
Create successful ePaper yourself
Turn your PDF publications into a flip-book with our unique Google optimized e-Paper software.
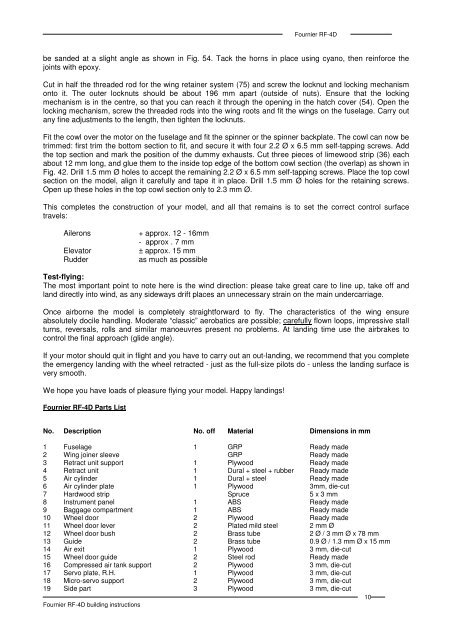
<strong>Fournier</strong> <strong>RF</strong>-<strong>4D</strong>be sanded at a slight angle as shown in Fig. 54. Tack the horns in place using cyano, then reinforce thejoints with epoxy.Cut in half the threaded rod for the wing retainer system (75) and screw the locknut and locking mechanismonto it. The outer locknuts should be about 196 mm apart (outside of nuts). Ensure that the lockingmechanism is in the centre, so that you can reach it through the opening in the hatch cover (54). Open thelocking mechanism, screw the threaded rods into the wing roots and fit the wings on the fuselage. Carry outany fine adjustments to the length, then tighten the locknuts.Fit the cowl over the motor on the fuselage and fit the spinner or the spinner backplate. The cowl can now betrimmed: first trim the bottom section to fit, and secure it with four 2.2 Ø x 6.5 mm self-tapping screws. Addthe top section and mark the position of the dummy exhausts. Cut three pieces of limewood strip (36) eachabout 12 mm long, and glue them to the inside top edge of the bottom cowl section (the overlap) as shown inFig. 42. Drill 1.5 mm Ø holes to accept the remaining 2.2 Ø x 6.5 mm self-tapping screws. Place the top cowlsection on the model, align it carefully and tape it in place. Drill 1.5 mm Ø holes for the retaining screws.Open up these holes in the top cowl section only to 2.3 mm Ø.This completes the construction of your model, and all that remains is to set the correct control surfacetravels:AileronsElevatorRudder+ approx. 12 - 16mm- approx . 7 mm± approx. 15 mmas much as possibleTest-flying:The most important point to note here is the wind direction: please take great care to line up, take off andland directly into wind, as any sideways drift places an unnecessary strain on the main undercarriage.Once airborne the model is completely straightforward to fly. The characteristics of the wing ensureabsolutely docile handling. Moderate “classic” aerobatics are possible; carefully flown loops, impressive stallturns, reversals, rolls and similar manoeuvres present no problems. At landing time use the airbrakes tocontrol the final approach (glide angle).If your motor should quit in flight and you have to carry out an out-landing, we recommend that you completethe emergency landing with the wheel retracted - just as the full-size pilots do - unless the landing surface isvery smooth.We hope you have loads of pleasure flying your model. Happy landings!<strong>Fournier</strong> <strong>RF</strong>-<strong>4D</strong> Parts ListNo. Description No. off Material Dimensions in mm1 Fuselage 1 GRP Ready made2 Wing joiner sleeve GRP Ready made3 Retract unit support 1 Plywood Ready made4 Retract unit 1 Dural + steel + rubber Ready made5 Air cylinder 1 Dural + steel Ready made6 Air cylinder plate 1 Plywood 3mm, die-cut7 Hardwood strip Spruce 5 x 3 mm8 Instrument panel 1 ABS Ready made9 Baggage compartment 1 ABS Ready made10 Wheel door 2 Plywood Ready made11 Wheel door lever 2 Plated mild steel 2 mm Ø12 Wheel door bush 2 Brass tube 2 Ø / 3 mm Ø x 78 mm13 Guide 2 Brass tube 0.9 Ø / 1.3 mm Ø x 15 mm14 Air exit 1 Plywood 3 mm, die-cut15 Wheel door guide 2 Steel rod Ready made16 Compressed air tank support 2 Plywood 3 mm, die-cut17 Servo plate, R.H. 1 Plywood 3 mm, die-cut18 Micro-servo support 2 Plywood 3 mm, die-cut19 Side part 3 Plywood 3 mm, die-cut<strong>Fournier</strong> <strong>RF</strong>-<strong>4D</strong> building <strong>instructions</strong>10


