TMS Pack for FireMonkey Developers Guide - TMS Software
TMS Pack for FireMonkey Developers Guide - TMS Software
TMS Pack for FireMonkey Developers Guide - TMS Software
- No tags were found...

Create successful ePaper yourself
Turn your PDF publications into a flip-book with our unique Google optimized e-Paper software.
<strong>TMS</strong> SOFTWARE<strong>TMS</strong> <strong>Pack</strong> <strong>for</strong> <strong>FireMonkey</strong>DEVELOPERS GUIDE<strong>TMS</strong> <strong>Pack</strong> <strong>for</strong> <strong>FireMonkey</strong>DEVELOPERS GUIDEJune 2014Copyright © 2014 by tmssoftware.com bvbaWeb: http://www.tmssoftware.comEmail: info@tmssoftware.com1
<strong>TMS</strong> SOFTWARE<strong>TMS</strong> <strong>Pack</strong> <strong>for</strong> <strong>FireMonkey</strong>DEVELOPERS GUIDEIndexAvailability ............................................................................................................................................... 5Description .............................................................................................................................................. 5List of available controls .......................................................................................................................... 6Shapes ............................................................................................................................................. 6Components .................................................................................................................................... 6<strong>TMS</strong>FMXNavBar ..................................................................................................................................... 17T<strong>TMS</strong>FMXEdit / T<strong>TMS</strong>FMXEditBtn ........................................................................................................ 18T<strong>TMS</strong>FMXPageSlider ............................................................................................................................. 20Properties / Events ............................................................................................................................ 21T<strong>TMS</strong>FMXTableView .............................................................................................................................. 22Architecture ................................................................................................................................... 22Styling ............................................................................................................................................ 24Properties / Methods / Events ...................................................................................................... 25Item storage and buffering ............................................................................................................ 30Adding and removing items .......................................................................................................... 31Sorting ........................................................................................................................................... 32Categories ...................................................................................................................................... 33Lookup ........................................................................................................................................... 36Filtering / Searching....................................................................................................................... 37Editing / Deleting ........................................................................................................................... 38DetailView ..................................................................................................................................... 39Layout ............................................................................................................................................ 41User interface interaction with the TableView ............................................................................. 44MultiSelect..................................................................................................................................... 44Additional Item Elements .............................................................................................................. 45Per<strong>for</strong>mance .................................................................................................................................. 46Binding Controls ............................................................................................................................ 46LiveBindings ................................................................................................................................... 48HTML support ................................................................................................................................ 51T<strong>TMS</strong>FMXPopup .................................................................................................................................... 53T<strong>TMS</strong>FMXCircularGauge ........................................................................................................................ 55T<strong>TMS</strong>FMXLinearGauge .......................................................................................................................... 59T<strong>TMS</strong>FMXJogMeter ............................................................................................................................... 602
<strong>TMS</strong> SOFTWARE<strong>TMS</strong> <strong>Pack</strong> <strong>for</strong> <strong>FireMonkey</strong>DEVELOPERS GUIDET<strong>TMS</strong>FMX7SegLED ................................................................................................................................. 61T<strong>TMS</strong>FMXCompass ................................................................................................................................ 62T<strong>TMS</strong>FMXClock ...................................................................................................................................... 62T<strong>TMS</strong>FMXRotarySwitch / T<strong>TMS</strong>FMXKnobSwitch .................................................................................. 63T<strong>TMS</strong>FMXMatrixLabel ........................................................................................................................... 64T<strong>TMS</strong>FMXScope ..................................................................................................................................... 66T<strong>TMS</strong>FMXSpinner .................................................................................................................................. 68T<strong>TMS</strong>FMXLEDMeter / T<strong>TMS</strong>FMXLEDScope ........................................................................................... 70T<strong>TMS</strong>FMXLED / T<strong>TMS</strong>FMXLEDBar ......................................................................................................... 71T<strong>TMS</strong>FMXSlider ..................................................................................................................................... 71T<strong>TMS</strong>FMXTileList ................................................................................................................................... 72Architecture ................................................................................................................................... 72Styling ............................................................................................................................................ 73Properties / Methods / Events ...................................................................................................... 74Adding and removing tiles ............................................................................................................. 77Badges ........................................................................................................................................... 78Tile Styles ....................................................................................................................................... 79Columns and Rows ........................................................................................................................ 82Paging / Scrolling ........................................................................................................................... 83PageSize ......................................................................................................................................... 84ColumnWidth / RowHeight ........................................................................................................... 85Filtering / Searching / Lookup ....................................................................................................... 86Keyboard navigation ...................................................................................................................... 86Reordering tiles ............................................................................................................................. 86Per<strong>for</strong>mance .................................................................................................................................. 86MultiSelect..................................................................................................................................... 87LiveBindings ................................................................................................................................... 88T<strong>TMS</strong>FMXHotSpotImage ....................................................................................................................... 88Adding a new hotspot ................................................................................................................... 89Magic Wand Tool ........................................................................................................................... 91Saving and loading hotspots .......................................................................................................... 92Compatibility ................................................................................................................................. 92T<strong>TMS</strong>FMXHotSpotEditorDialog ..................................................................................................... 92T<strong>TMS</strong>FMXSpeedButton ......................................................................................................................... 933
<strong>TMS</strong> SOFTWARE<strong>TMS</strong> <strong>Pack</strong> <strong>for</strong> <strong>FireMonkey</strong>DEVELOPERS GUIDET<strong>TMS</strong>FMXCalendar / T<strong>TMS</strong>FMXCalendarPicker .................................................................................... 93T<strong>TMS</strong>FMXTrackBar ................................................................................................................................ 97T<strong>TMS</strong>FMXButton ................................................................................................................................... 97T<strong>TMS</strong>FMXColorSelector / T<strong>TMS</strong>FMXColorPicker .................................................................................. 98T<strong>TMS</strong>FMXBitmapSelector / T<strong>TMS</strong>FMXBitmapPicker ............................................................................ 98T<strong>TMS</strong>FMXWebBrowser / T<strong>TMS</strong>FMXWebBrowserPopup .................................................................... 100T<strong>TMS</strong>FMXSignatureCapture ................................................................................................................ 102T<strong>TMS</strong>FMXListEditor ............................................................................................................................. 102Architecture ................................................................................................................................. 102Appearance ................................................................................................................................. 103Items ............................................................................................................................................ 103Events .......................................................................................................................................... 104<strong>TMS</strong> Mini HTML rendering engine ...................................................................................................... 105Samples ............................................................................................................................................... 108<strong>TMS</strong> TableView Overview Demo ................................................................................................. 108<strong>TMS</strong> TableView LiveBindings Demo 1 & 2 ................................................................................... 109<strong>TMS</strong> Instrumentation WorkShop Demo ...................................................................................... 115<strong>TMS</strong> PageSlider Demo ................................................................................................................. 116<strong>TMS</strong> TileList Demo ....................................................................................................................... 117<strong>TMS</strong> TileList LiveBindings Demo .................................................................................................. 118<strong>TMS</strong> HotSpotImage Demo ........................................................................................................... 119General <strong>FireMonkey</strong> component usage guidlines ............................................................................... 120Visual part .................................................................................................................................... 120Non-visual part ............................................................................................................................ 120Naming convention ..................................................................................................................... 120Styling .......................................................................................................................................... 120Components ................................................................................................................................ 124Cross-plat<strong>for</strong>m deployment of applications with <strong>TMS</strong> <strong>Pack</strong> <strong>for</strong> <strong>FireMonkey</strong> components ........ 1254
<strong>TMS</strong> SOFTWARE<strong>TMS</strong> <strong>Pack</strong> <strong>for</strong> <strong>FireMonkey</strong>DEVELOPERS GUIDEAvailability<strong>TMS</strong> <strong>Pack</strong> <strong>for</strong> <strong>FireMonkey</strong> is a component set that is suitable <strong>for</strong> cross plat<strong>for</strong>m development withthe Embarcadero <strong>FireMonkey</strong> framework and is designed <strong>for</strong> use with Win32, Win64, Mac OS-X, iOSand Android operating systems. With the registered version of <strong>TMS</strong> <strong>Pack</strong> <strong>for</strong> <strong>FireMonkey</strong>, <strong>FireMonkey</strong>HD applications <strong>for</strong> Windows and Mac OS-X can be created as well as <strong>FireMonkey</strong> iOS and Androidmobile applications that can be deployed to iPhone, iPad, iPod, or Android devices.Versions:<strong>TMS</strong> <strong>Pack</strong> <strong>for</strong> <strong>FireMonkey</strong> requires Delphi XE4 & C++Builder XE4 Update 1 or newer releases.Description<strong>TMS</strong> <strong>Pack</strong> <strong>for</strong> <strong>FireMonkey</strong> contains components <strong>for</strong> use in user interfaces designed with theEmbarcadero <strong>FireMonkey</strong> framework. The components have been designed from the ground upbased on the core concepts of the <strong>FireMonkey</strong> framework: made up of styles, fully cross-plat<strong>for</strong>m,scalable and compatible with <strong>FireMonkey</strong>’s effects, rotation, and livebindings.IMPORTANT NOTICE:If the <strong>FireMonkey</strong> framework is new to you, please see the chapter “General <strong>FireMonkey</strong> componentusage guidelines” that offers an introduction that is recommended to read be<strong>for</strong>e you start workingwith the <strong>TMS</strong> <strong>Pack</strong> <strong>for</strong> <strong>FireMonkey</strong>. Another interesting source of in<strong>for</strong>mation ishttp://docwiki.embarcadero.com/RADStudio/en/<strong>FireMonkey</strong>_Application_Plat<strong>for</strong>m5
<strong>TMS</strong> SOFTWARE<strong>TMS</strong> <strong>Pack</strong> <strong>for</strong> <strong>FireMonkey</strong>DEVELOPERS GUIDEList of available controlsShapesT<strong>TMS</strong>FMX7SegLEDShape7-segment LED shape usedin the 7-segment LEDcomponentT<strong>TMS</strong>FMXNeedleShapeA needle shape used invarious gauge and metercomponents.T<strong>TMS</strong>FMXSectionShapeA section shape used inthe gauge component.T<strong>TMS</strong>FMXSetPointShapeA setpoint shape used inthe gauge component.T<strong>TMS</strong>FMXPieShapeA pie shape used in thecircular gauge andvariants. This is used tocreate a 180 ° version <strong>for</strong>example.ComponentsT<strong>TMS</strong>FMX7SegLEDT<strong>TMS</strong>FMXJogMeter6
<strong>TMS</strong> SOFTWARE<strong>TMS</strong> <strong>Pack</strong> <strong>for</strong> <strong>FireMonkey</strong>DEVELOPERS GUIDET<strong>TMS</strong>FMXLinearGaugeT<strong>TMS</strong>FMXCircularGaugeT<strong>TMS</strong>FMXCompassT<strong>TMS</strong>FMXClock7
<strong>TMS</strong> SOFTWARE<strong>TMS</strong> <strong>Pack</strong> <strong>for</strong> <strong>FireMonkey</strong>DEVELOPERS GUIDET<strong>TMS</strong>FMXRotarySwitchT<strong>TMS</strong>FMXKnobSwitchT<strong>TMS</strong>FMXMatrixLabelT<strong>TMS</strong>FMXScopeT<strong>TMS</strong>FMXSpinner8
<strong>TMS</strong> SOFTWARE<strong>TMS</strong> <strong>Pack</strong> <strong>for</strong> <strong>FireMonkey</strong>DEVELOPERS GUIDET<strong>TMS</strong>FMXLEDMeterT<strong>TMS</strong>FMXLEDScopeT<strong>TMS</strong>FMXLED, T<strong>TMS</strong>FMXLEDBarT<strong>TMS</strong>FMXSliderT<strong>TMS</strong>FMXPageSliderSmoothly animated pager.9
<strong>TMS</strong> SOFTWARE<strong>TMS</strong> <strong>Pack</strong> <strong>for</strong> <strong>FireMonkey</strong>DEVELOPERS GUIDET<strong>TMS</strong>FMXRatingT<strong>TMS</strong>FMXTileListT<strong>TMS</strong>FMXBadge10
<strong>TMS</strong> SOFTWARE<strong>TMS</strong> <strong>Pack</strong> <strong>for</strong> <strong>FireMonkey</strong>DEVELOPERS GUIDET<strong>TMS</strong>FMXTableViewSmoothly animated scrolling list.T<strong>TMS</strong>FMXHTMLTextText shape that supports HTML (see MiniHTMLchapter)T<strong>TMS</strong>FMXBitmapBitmap shape which can load and display animage directly or through a BitmapContainer.11
<strong>TMS</strong> SOFTWARE<strong>TMS</strong> <strong>Pack</strong> <strong>for</strong> <strong>FireMonkey</strong>DEVELOPERS GUIDET<strong>TMS</strong>FMXBitmapContainerContainer that holds multiple bitmapsT<strong>TMS</strong>FMXSearchEditInherits from TEdit and adds an optional clearand search button, and has a roundedappearance.T<strong>TMS</strong>FMXBarButtonInherits from TButton and adds a Layout andKind property <strong>for</strong> different appearances used inthe TableView.T<strong>TMS</strong>FMXPopupComponent that allows displaying any type ofcontrol inside a customizable popup dialog.T<strong>TMS</strong>FMXSpeedButtonInherits from TSpeedButton and adds a Groupingpossibility and an image.T<strong>TMS</strong>FMXHotSpotImageComponent that is able to display an (optionallystretched) image with predefined clickable andcustomizable hotspots.Hotspots are added with a complete separatedesigner.12
<strong>TMS</strong> SOFTWARE<strong>TMS</strong> <strong>Pack</strong> <strong>for</strong> <strong>FireMonkey</strong>DEVELOPERS GUIDET<strong>TMS</strong>FMXGridFeature packed and highly stylable gridcomponent created from scratch. Explained in aseparate documentation “<strong>TMS</strong> Grid <strong>for</strong><strong>FireMonkey</strong>”T<strong>TMS</strong>FMXEdit / T<strong>TMS</strong>FMXEditBtnAutocomplete and lookup enabled control thatextends TEdit. Has the capability of display andediting various editing types such as float,money, lowercase, uppercase, …T<strong>TMS</strong>FMXPanelExpandable / Collapsable container <strong>for</strong> othercontrols.T<strong>TMS</strong>FMXProgressBarExtends TProgressBar and adds a display textwith <strong>for</strong>mat capabilities.13
<strong>TMS</strong> SOFTWARE<strong>TMS</strong> <strong>Pack</strong> <strong>for</strong> <strong>FireMonkey</strong>DEVELOPERS GUIDET<strong>TMS</strong>FMXNavBarNavigation bar with several panels that canhold controls and can be divided in sections.T<strong>TMS</strong>FMXCalendar /T<strong>TMS</strong>FMXCalendarPickerCalendar with multiselect, disjunctselection,as well as the capability of displayingweeknumbers and weekdays.T<strong>TMS</strong>FMXMemoFeature packed and highly stylable memocomponent. Explained in a separatedocumentation “<strong>TMS</strong> Memo <strong>for</strong> <strong>FireMonkey</strong>”T<strong>TMS</strong>FMXTrackBar14
<strong>TMS</strong> SOFTWARE<strong>TMS</strong> <strong>Pack</strong> <strong>for</strong> <strong>FireMonkey</strong>DEVELOPERS GUIDEHighly styleable and configurable trackbarwith optional snapping, tickmarks and<strong>for</strong>matted values text.T<strong>TMS</strong>FMXColorPicker /T<strong>TMS</strong>FMXColorSelectorA color selector and picker with manycustomization / custom drawing options andevents.T<strong>TMS</strong>FMXBitmapPicker /T<strong>TMS</strong>FMXBitmapSelectorA bitmap selector and picker with manycustomization / custom drawing options andevents.T<strong>TMS</strong>FMXButtonA standard TButton extended with anoptional image and html enabled text.T<strong>TMS</strong>FMXWebBrowser /T<strong>TMS</strong>FMXWebBrowserPopup15
<strong>TMS</strong> SOFTWARE<strong>TMS</strong> <strong>Pack</strong> <strong>for</strong> <strong>FireMonkey</strong>DEVELOPERS GUIDET<strong>TMS</strong>FMXSignatureCaptureT<strong>TMS</strong>FMXListEditor16
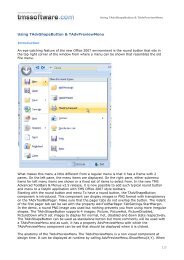
<strong>TMS</strong> SOFTWARE<strong>TMS</strong> <strong>Pack</strong> <strong>for</strong> <strong>FireMonkey</strong>DEVELOPERS GUIDE<strong>TMS</strong>FMXNavBarT<strong>TMS</strong>FMXNavBar is a container <strong>for</strong> T<strong>TMS</strong>FMXNavBarPanel that is able to display several sections perpanel. Each panel is displayed in a list that can be collapsed with a slider.Adding a panel can be done by right-clicking the component and clicking “new panel”.Next panel and previous panel is used to navigate through the panels that you have created.To create a panel programmatically, first create and then add the panel as a child to the navbar:varaPanel: T<strong>TMS</strong>FMXNavBarPanel;beginaPanel := T<strong>TMS</strong>FMXNavBarPanel.Create(<strong>TMS</strong>FMXNavBar1);aPanel.Caption := 'Hello World!';<strong>TMS</strong>FMXNavBar1.AddPanel(aPanel);The amount of visible panel items can be controlled with <strong>TMS</strong>FMXNavBar1.SplitterPositionwhich is limited to the panelcount.17
<strong>TMS</strong> SOFTWARE<strong>TMS</strong> <strong>Pack</strong> <strong>for</strong> <strong>FireMonkey</strong>DEVELOPERS GUIDET<strong>TMS</strong>FMXEdit / T<strong>TMS</strong>FMXEditBtnT<strong>TMS</strong>FMXEdit and T<strong>TMS</strong>FMXEditBtn extends TEdit and adds several capabilities such asautocompletion, Lookup and supports edit types such as alphanumeric, numeric, float, uppercase,lowercase, money, ….The lookuplist can be enabled by setting the enabled property to true:<strong>TMS</strong>FMXEdit1.Lookup.Enabled := True;To display the list while typing, items can be added to the displaylist. The amount of displayeditems when typing can be controlled with <strong>TMS</strong>FMXEdit1.Lookup.DisplayCount.<strong>TMS</strong>FMXEdit1.Lookup.DisplayList.Add('abs');<strong>TMS</strong>FMXEdit1.Lookup.DisplayList.Add('Item 1');<strong>TMS</strong>FMXEdit1.Lookup.DisplayList.Add('Hello World !');When typing, the list shows after 2 characters, with the property<strong>TMS</strong>FMXEdit1.Lookup.NumChars this can be modified. When typing text, the text that is typedcan also be automatically added to the list by setting <strong>TMS</strong>FMXEdit1.Lookup.History to true.Autocompletion can be actived with <strong>TMS</strong>FMXEdit1.AutoComplete := True; The editautomatically displays the item that matches the characters typed in the edit.<strong>TMS</strong>FMXEdit1.AutoComplete := True;<strong>TMS</strong>FMXEdit1.Lookup.DisplayList.Add('Hello World !');The text in the edit can be displayed as password characters by setting <strong>TMS</strong>FMXEdit1.Password:= True;The T<strong>TMS</strong>FMXEditBtn extends the T<strong>TMS</strong>FMXEdit, inheriting all features and adds a button to the editthat can display a popupcontrol.The popupcontrol can be added with<strong>TMS</strong>FMXEditBtn1.PopupControl := TreeView1;18
19<strong>TMS</strong> SOFTWARE<strong>TMS</strong> <strong>Pack</strong> <strong>for</strong> <strong>FireMonkey</strong>DEVELOPERS GUIDE
<strong>TMS</strong> SOFTWARE<strong>TMS</strong> <strong>Pack</strong> <strong>for</strong> <strong>FireMonkey</strong>DEVELOPERS GUIDET<strong>TMS</strong>FMXPageSliderT<strong>TMS</strong>FMXPageSlider is a drill down page control that holds and animates multiple pages sliding fromleft to right and vice versa as drill down is happening.1) Header: The top-aligned rectangle that can hold other controls and contains by default theHTML enabled T<strong>TMS</strong>FMXHTMLText.2) HeaderText: HTML enabled text.20
<strong>TMS</strong> SOFTWARE<strong>TMS</strong> <strong>Pack</strong> <strong>for</strong> <strong>FireMonkey</strong>DEVELOPERS GUIDE3) Footer: The bottom-aligned rectangle that can hold other controls and contains by defaultthe HTML enabled T<strong>TMS</strong>FMXHTMLText.4) FooterText: HTML enabled text.5) Content: The client-aligned rectangle that can hold other controls.6) Contenteffect: A shadow effect on the default styleAdding a new page at design time can be done by right-clicking the component and choosing “Newpage” from the context menu.To create a new page at runtime the following code can be used:varsp: T<strong>TMS</strong>FMXPage;beginsp:= T<strong>TMS</strong>FMXPage.Create(<strong>TMS</strong>FMXPageslider1);sp.PageSlider := <strong>TMS</strong>FMXPageslider1;sp.Header := 'Runtime created page';end;To remove a page at runtime, simply destroy the page:<strong>TMS</strong>FMXPage.Free;Pages slide in from the right and are animated. To change a page simply set the ActivePageIndex tothe correct page. You will notice that pages with a PageIndex that occur be<strong>for</strong>e theActivePageIndex will automatically slide along the Active Page.Navigation through pages can also be done with the keyboard and the mouse. Click on a page andslide it from right to left to increase the ActivePageIndex or vice versa to decrease. This all happenswith animation that can optionally be set faster or slower or be turned off with the AnimationFactorproperty.When a page is active, you will notice that the page leaves a minimum amount of width to the left,this is necessary to interact with and show the previous page. This is set with the MinimumWidthproperty.Properties / Events- ActivePage: The page that is currently active.- ActivePageIndex: The index of the page that is currently active. This property is used toswitch between pages at designtime and runtime.- AnimationFactor: The speed of the animation, the higher the factor the slower theanimation.- Fill: The fill of the background of the page.- Footer / Header: The caption of the footer / header which support HTML.- MinimumWidth: The width that is left visible of the page when the page is inactive.- PageIndex: The page index of the page.- BitmapContainer: container of bitmaps used in the Header and Footer to display imageswith HTML.- OnPageChange: Event called when a page has changed- OnPageChanging: Event called when a page is about to change. With this event pagechanging can be blocked with the AllowChange parameter.- OnPageMoved: Event called when a page is moved to another PageIndex21
<strong>TMS</strong> SOFTWARE<strong>TMS</strong> <strong>Pack</strong> <strong>for</strong> <strong>FireMonkey</strong>DEVELOPERS GUIDET<strong>TMS</strong>FMXTableViewArchitecture1) Header: a rectangle shape with a caption and that can hold optionally a backbutton and aneditbutton. The backbutton is used to return from the detail view and the edit button isused to put the tableview in edit mode.2) Footer: a rectangle shape with a caption. When the TableView is in edit mode, the 3buttons (Archive, Move and Mark) are displayed in this footer rectangle.3) BackGround: the background is a placeholder <strong>for</strong> the items that also enables scrolling ofitems and keyboard handling.4) DefaultItem: the basic default layout of the item. When adding items, the layout is copied(cloned) <strong>for</strong> each item.5) Edit Rectangle: the rectangle that is displayed when the TableView is in edit mode.6) Left Rectangle: a placeholder rectangle that can contain other elements, such as, but notlimited to, a checkbox, radiobutton or image.7) Center Rectangle: the rectangle that contains the Caption and Description of the item.8) Right Rectangle: the right rectangle has the same purpose as the left rectangle, but is rightaligned.22
<strong>TMS</strong> SOFTWARE<strong>TMS</strong> <strong>Pack</strong> <strong>for</strong> <strong>FireMonkey</strong>DEVELOPERS GUIDE9) Bulb Rectangle: a custom designed shape that can display text in a rounded shapedappearance.10) Detail Rectangle: a rectangle that contains a predefined detail image and is enabled whenan item has a DetailView assigned.11) Delete Rectangle: a rectangle that contains a delete button and is enabled when swiping onthe item.12) PlaceHolder Rectangle: element internally used to position the elements with extra spacingwhen the lookupbar / scrollbar are enabled.13) Default Category: the basic layout of a category. When adding items, the category isautomatically added according to the kind of item.14) Header Search: a search edit box displayed when filtering or search is enabled.15) Inplace Edit: search edit box that is trans<strong>for</strong>med to work as an inplaced editor and isdisplayed when clicking on the caption or description when the appropriate properties areset to enable editing.23
<strong>TMS</strong> SOFTWARE<strong>TMS</strong> <strong>Pack</strong> <strong>for</strong> <strong>FireMonkey</strong>DEVELOPERS GUIDEStylingWith the <strong>FireMonkey</strong> design philosophy in mind, we have made the TableView completely styleable.When editing the custom or default style when right-clicking on the component (See: GeneralFiremonkey component usage guidelines) the basic TableView layout is defined with severalstyleable elements. Elements can be removed, added and modified and updates are reflected in thecomponent when applying the edited style.Programmatically, almost every element is accessible with a function. When you want to style anelement programmatically, you can use the appropriate function. Below is an overview of eachelement that is styleable at designtime and at runtime:1) T<strong>TMS</strong>FMXTableView.GetHeaderRectangle2) T<strong>TMS</strong>FMXTableView.GetFooterRectangle3) T<strong>TMS</strong>FMXTableView.GetListBackGround &T<strong>TMS</strong>FMXTableView.GetListContainer4) T<strong>TMS</strong>FMXTableView.GetDefaultItem & T<strong>TMS</strong>FMXTableViewItem.Shape5) T<strong>TMS</strong>FMXTableViewItem.ShapeEditRectangle6) T<strong>TMS</strong>FMXTableViewItem.ShapeLeftRectangle7) T<strong>TMS</strong>FMXTableViewItem.ShapeCaption &T<strong>TMS</strong>FMXTableViewItem.ShapeDescription &T<strong>TMS</strong>FMXTableViewItem.ShapeCenterRectangle8) T<strong>TMS</strong>FMXTableViewItem.ShapeRightRectangle9) T<strong>TMS</strong>FMXTableViewItem.ShapeBulbRectangle10) T<strong>TMS</strong>FMXTableViewItem.ShapeDetailRectangle11) T<strong>TMS</strong>FMXTableViewItem.ShapeDeleteRectangle12) T<strong>TMS</strong>FMXTableViewItem.ShapePlaceHolder24
<strong>TMS</strong> SOFTWARE<strong>TMS</strong> <strong>Pack</strong> <strong>for</strong> <strong>FireMonkey</strong>DEVELOPERS GUIDE13) T<strong>TMS</strong>FMXTableView.GetDefaultCategory & T<strong>TMS</strong>FMXTableViewCategory.Shape14) T<strong>TMS</strong>FMXTableView.GetSearchEdit15) T<strong>TMS</strong>FMXTableView.GetInplaceEditThese are the most important functions that return the element that is available in the default styleor the style of the item when it is cloned. There are more functions available specific <strong>for</strong> the itemand the tableview such as the deletebuttonshape, bulbshape, checked and uncheckedimage anddefault animations on the backbutton. A complete list can be found when typing the name of thecomponent and search through all the “Get*” functions and <strong>for</strong> the Tableview Item the functionsthat have “Shape” in the name.Below is a sample that shows the power of styling.Properties / Methods / EventsBelow is a list of properties, methods and events in alphabetic order that expose the corefunctionality of the component and that need a short introduction be<strong>for</strong>e delving into the details ofthe component.T<strong>TMS</strong>FMXTableView published properties- ArchiveText: The text of the left button that is displayed in the footer when in edit mode.- AutoDeleteItem: deletes the item automatically.- AutoFilter: When filtering or searching is enabled, the filtering is applied automatically.- AutoLoadBuffer: When buffering is used (BufferSize > 0) the list automatically loads thenext buffer when scrolling in the list.- AutoLookup: When using the lookupbar, the list automatically displays the correctcategory.- AutoToggleDetail: When a DetailView is assigned and the item is clicked. The DetailView isautomatically displayed with animation.- BackButton: Displays a back button in the left corner of the header when the DetailView isdisplayed.25
<strong>TMS</strong> SOFTWARE<strong>TMS</strong> <strong>Pack</strong> <strong>for</strong> <strong>FireMonkey</strong>DEVELOPERS GUIDE- BitmapContainer: Support <strong>for</strong> BitmapContainer, which is able to contain a collection ofreusable TBitmap items.- BufferSize: Used to load an initial buffer of the total collection of items. When scrolling thebuffer is repositioned to load the next BufferSize of items.- Categories: Collection of custom categories, used when the CategoryType is set toctCustom.- CategoryType: The type of categories that are used. A choice can be made betweenalphabetic, alphanumeric or custom.- DefaultDetailView: The Default detail view that is used by all items if the DetailViewproperty of the item is nil.- EditButton: Displays an edit button in the right corner of the header. This button can beused to set the TableView in edit mode. This button is also used in combination withfiltering / searching. In this mode the button is switched to a Cancel button.- Filtering: the type of filtering the list applies. In combination with the search edit box, thevfFilterStart and vfFilterRandom option creates a subset of items and vfSearch highlightsthe item that matches the search string.- FooterText: The text in the footer.- HeaderText: The text in the header.- ItemOptions: Enables or disables cloning of certain elements that are present in the defaultitem. The per<strong>for</strong>mance of the list can be increase when using in combination with theBufferSize property.- Items: a collection of TableView items.- LayoutMode: defines the layout of the item list. The lmNormal option displays the list as anormal TableView and the lmGroup displays the items in grouped mode. The grouped modeused the GroupIndex per item to create groups.- LookupBar: Enables or disables the lookupbar.- MarkText: The text of the right button that is displayed in the footer when in edit mode.- MoveText: The text of the center button that is displayed in the footer when in edit mode.- MultiSelect: Enables or disables multiselect on items.- ScrollIndicator: Shows or hides the scrollindicator that visualizes the amount of items in thecollection with an optional fading animation.- SelectedItemIndex: The index of the item that has been selected.- ShowFilter: Show the search edit box on top of the list which can be used to apply filteringor highlight an item in the list.- ShowFilterOnSwipe: Enables or disables the ability of showing the search edit boxCategory item published properties in Categories collection- Caption: The Caption displayed in the category.- ID: To link items to the specific category.- LookupText: The text displayed in the lookupbar.Item published properties in Items collection- Bitmap: The bitmap displayed in the left rectangle image when enabled in the ItemOptions.- BitmapName: The name of the bitmap displayed in the left rectangle image when enabledin the ItemOptions and when a BitmapContainer is assigned and contains an image with thecorrect name.- BulbText: The text of the bulb rectangle, that is displayed when enabled in theItemOptions.- CanDelete: When CanDelete is false, the deletebutton will not be displayed and the itemcannot be deleted.- CanEditCaption: Displays an inplace editor when clicking on the caption.- CanEditDescription: Displays an inplace editor when clicking on the description.- CanSelect: Enables selection of an item.- Caption: The caption of the item.26
<strong>TMS</strong> SOFTWARE<strong>TMS</strong> <strong>Pack</strong> <strong>for</strong> <strong>FireMonkey</strong>DEVELOPERS GUIDE- CategoryID: The id of the category linked to the item when displaying custom categories.- DataBoolean: Boolean property that is linked to a control placed in the right rectangle. Thisproperty also triggers the OnItemData event.- DataGroupIndex: The index that is used in combination with a radiobutton, to create aRadioButtonGroup.- DataObject: Has the same functionality as the DataBoolean property but of type TObject.- DataString: Has the same functionality as the DataBoolean property but of type String.- DataValue: Has the same functionality as the DataBoolean property but of type Single.- DeleteButton: Displays the deletebutton.- Description: The description of the item.- DetailView: The view that is displayed when clicking on an item, to navigate to the detail.- GroupIndex: The index that is used to group items in the lmGroup layoutmode.- LeftMargin: The margin / indenting of an item from the left side.- RightMargin: The margin / indenting of an item from the right side.- Selected: Sets the item selected.- Tag: Tag property that can be used to hold additional in<strong>for</strong>mation.- Visible: Shows or hides the item.Public procedures, functions, properties- property TopItem: Integer;Sets the first visible item in the list.- function SelectedItem: T<strong>TMS</strong>FMXTableViewItem;Returns the selected item.- function CountSelected: Integer;Returns the count of selected items.- function ItemFromDifferentCategory(item1, item2:T<strong>TMS</strong>FMXTableViewItem): Boolean;Returns whether the first item is from a different category of the second item.- function ItemAtXY(X, Y: Single): T<strong>TMS</strong>FMXTableViewItem;Returns the Item at a specific position in the TableView.- function GetCharacterForItem(AItem: T<strong>TMS</strong>FMXTableViewItem): String;Returns the Character of the item that is used when categories are applied.- function FindItemWithFilter(AFilter: String): T<strong>TMS</strong>FMXTableViewItem;Returns the item with a specific filter applied.- function IsItemInItemList(AItem: T<strong>TMS</strong>FMXTableViewItem): Boolean;Returns if the item is loaded in the list (depending on the BufferSize and scrollposition)- function IsItemVisibleInList(AItem: T<strong>TMS</strong>FMXTableViewItem): Boolean;Returns if the item is visible in the list.- function isEditMode: Boolean;Returns if the edit mode is active or inactive.- function isDetailMode: Boolean;Returns if a detail view is visible or not visible.- function GetCurrentListView: TControl;27
<strong>TMS</strong> SOFTWARE<strong>TMS</strong> <strong>Pack</strong> <strong>for</strong> <strong>FireMonkey</strong>DEVELOPERS GUIDEReturns the current view in edit mode, the main list control or the detail list control.- function FindFirstItemWithCategory(ACategory: String):T<strong>TMS</strong>FMXTableViewItem;Returns the first item with a specific Category when using AlphaBetic / AlphaNumericcategories.- function FindFirstItemWithCategoryID(ACategoryID: Integer):T<strong>TMS</strong>FMXTableViewItem;Returns the first item with a specific CategoryID when using custom categories.- procedure ToggleEditMode;Toggles between edit mode and normal mode.- procedure ApplyFilter(AFilter: String);Applies and automatically updates the list with a specific filter.- procedure UpdateTableView;Forces a complete update of the list of items in the TableView.- procedure BeginUpdate;Blocks an update of the TableView. This is necessary when adding a large amount of items.Used in combination with EndUpdate;- procedure EndUpdate;Blocks an update of the TableView. This is necessary when adding a large amount of items.Used in combination with BeginUpdate;- procedure LoadNextBuffer(ABufferSize: Integer = -1);Loads the next list with specific BufferSize. (ABufferSize = -1 loads the default BufferSize).- procedure LoadPreviousBuffer(ABufferSize: Integer = -1);Loads the previous list with specific BufferSize. (ABufferSize = -1 loads the defaultBufferSize).- procedure EditMode;Sets the list in edit mode.- procedure CancelEditMode;Cancels the edit mode. Sets the list back to normal mode.- procedure ShowDetailView;Shows the detail view of the item.- procedure HideDetailView;Hides the detail view of the item.- procedure LoadBufferBetween(BufferStart, BufferStop: Integer);Loads the list between a start and stop buffer.- procedure LookupCustomCategory(ACategoryID: Integer);Automatically positions the category on top in the list with a specific CategoryID.This can be used in combination with custom categories.- procedure LookupCategory(ACategory: String);28
<strong>TMS</strong> SOFTWARE<strong>TMS</strong> <strong>Pack</strong> <strong>for</strong> <strong>FireMonkey</strong>DEVELOPERS GUIDEAutomatically positions the category on top in the list with a specific Category. This can beused in combination with AlphaBetic / AlphaNumeric categories.- procedure LookupItem(AItemIndex: Integer; SelectItem: Boolean =False);Automatically positions the item on top in the list with a specific index, and the possibilityto select that item.- procedure DeSelectAllItems;Deselects all items.- procedure SelectAllItems;Selects all items that are loaded in the list.- procedure SelectItemsBetween(AStartIndex, AStopIndex: Integer;AddToSelection: Boolean = False);Selects a subset of items between a StartIndex and StopIndex. AddToSelection parameteradds the subset to an internal list, when AddToSelection is false, the list is clear be<strong>for</strong>eadding the new subset.- procedure SelectItems(Selection: Array of Integer; AddToSelection:Boolean = False);Selects a subset of items <strong>for</strong> which the item indexes are passed as an array of integers. Thisprocedure works in the same way as the subset between a StartIndex and StopIndex.Published events- OnAfterFilter: Event called after Filtering is applied.- OnAfterSearch: Event called after Seaching is applied.- OnAnimationCustomize: The transition between the list and the detailview is animated.These 2 list animations can be customized through this event.- OnApplyStyleLookup: When editing the default or custom Style through the StyleBook, thisevent is called after applying the style. When starting the application, modifications can bemade in this event to the style that is either the default style or the edited style from theStyleBook.- OnArchiveClick: Event called when clicking on the ArchiveButton, which is displayed whenthe TableView is set in EditMode.- OnBackButtonClick: When the TableView is in edit mode, the BackButton is enabled. TheOnBackButtonClick event is triggered when clicking on this button.- OnBe<strong>for</strong>eFilter: Event called be<strong>for</strong>e Filtering is applied.- OnBe<strong>for</strong>eSearch: Event called be<strong>for</strong>e searching is applied.- OnCategoryAnchorClick: Event called when clicking on an anchor when using HTML in theCategory.- OnCategoryClick: When using categories and the lookupbar is enabled, the OnCategoryClickevent is called when clicking on a custom category or an alphanumeric character.- OnCategoryCustomize: When using categories, this event is called after creating a clone ofthe default category that is available in the default TableView style. Modifications onappearance and functionality can be made through this event.- OnHeaderAnchorClick: Event called when clicking on an anchor when using HTML in theHeader.- OnFooterAnchorClick: Event called when clicking on an anchor when using HTML in theFooter.- OnItemAfterDetail: Event called when the animation is completed that animates thedetailview after clicking on the item.29
<strong>TMS</strong> SOFTWARE<strong>TMS</strong> <strong>Pack</strong> <strong>for</strong> <strong>FireMonkey</strong>DEVELOPERS GUIDE- OnItemAfterDraw: Event called after the item is drawed. This event can be used <strong>for</strong> customdrawing on top of the item.- OnItemAfterReturnDetail: Event called when the animation is completed that animates themain list view back to the original state after clicking on the backbutton.- OnItemBe<strong>for</strong>eDetail: Event called be<strong>for</strong>e the animation is started when clicking on an itemto animate the DetailView.- OnItemBe<strong>for</strong>eDraw: Event called be<strong>for</strong>e the item is drawn. This event can be used to hidethe background and per<strong>for</strong>m custom drawing.- OnItemBe<strong>for</strong>eReturnDetail: Event called be<strong>for</strong>e the animation is started when animatingthe main list back to the original state after clicking on the backbutton.- OnItemCaptionAnchorClick: Event called when clicking on an anchor when using HTML inthe Item Caption.- OnItemClick: Event called when clicking on an item.- OnItemCompare: Event called when sorting the items. Custom sorting can be applied to theitems collection.- OnItemCustomize: This event is called after creating a clone of the default item that isavailable in the default TableView style. Modifications on item appearance, interaction andfunctionality can be made through this event.- OnItemData: Event called when modyfing one of the Data* properties of an item.- OnItemDescriptionAnchorClick: Event called when clicking on an anchor when using HTMLin the Item Description.- OnItemDelete: Event called when deleting an item.- OnItemSelected: Event called when selecting an item.- OnManualLoadNextBuffer: When AutoLoadBuffer is false, this event is called when the listtries to load the next buffer.- OnManualLoadPreviousBuffer: When AutoLoadBuffer is false, this event is called when thelist tries to load the previous buffer.- OnManualLookup: When AutoLookup is false, this is event is called when the lookupbar isused to lookup a category.- OnMarkClick: Event called when clicking on the mark button which is displayed when theTableView is set in EditMode.- OnMoveClick: Event called when clicking on the move button which is displayed when theTableView is set in EditMode.- OnScroll: Event called when scrolling in the list.- OnScrollFinished: Event called when the scrolling is finished.Item storage and bufferingThe TableView implements a specific way of loading / displaying items. The design choices aredriven by making the TableView per<strong>for</strong>mant and resource friendly. Items are stored in aTCollection. When the component is first made visible on a <strong>for</strong>m, from this collection a displaylist ofitem shapes that are cloned from the default item shape are automatically created. Only a smallnumber of items are created initially. The other remaining items remain in the collection waiting tobe shown in the control by means of the generation of display items (shapes). This loading process isnecessary to make sure the TableView offers a good per<strong>for</strong>mance on various operating systems. Inother words, there is no speed impact when adding 10 items or 10000 items to the Items collection.Displayed items are only on demand and incrementally created. This loading / displaying process iscontrolled by a single property: BufferSize.The BufferSize property is set, by default, to 50. This means that only <strong>for</strong> the first 50 items displayitems are created. While scrolling in the list, the list automatically creates display items <strong>for</strong> thenext 50 items. This buffering method increases per<strong>for</strong>mance if balanced correctly. Setting theBufferSize to 0 will create display items at once <strong>for</strong> all items. Loading 10000 items with BufferSizeset to 0 will have an initial large per<strong>for</strong>mance hit as the creation of display items is a resourceintensive process (<strong>FireMonkey</strong> framework limitation) Setting BufferSize to 50 is good balance.30
<strong>TMS</strong> SOFTWARE<strong>TMS</strong> <strong>Pack</strong> <strong>for</strong> <strong>FireMonkey</strong>DEVELOPERS GUIDEIf the BufferSize is set, the AutoLoadBuffer property will create the display items automaticallywhen scrolling beyond the end of the list. When AutoLoadBuffer is set to False, the TableView willnot create the display items automatically but instead the appropriate events will be triggered.Creating display items can then be done manually.OnManualLoadNextBuffer: Event triggered if AutoLoadBuffer is false, BufferSize > 0 and the list isscrolled to the end.OnManualLoadPreviousBuffer: Event triggered if AutoLoadBuffer is false, BufferSize > 0 and the listis scrolled to the beginning.When implementing these events, loading the buffer can be done with:<strong>TMS</strong>FMXTableView1.LoadNextBuffer();<strong>TMS</strong>FMXTableView1.LoadPreviousBuffer();These two methods have a parameter with which you can decide how many display items areloaded. If no parameter is passed the loading will use the BufferSize property.It’s a matter of experimenting with the starting BufferSize, the buffersize that is loaded next andthe quantity of the items in the collection to have the best per<strong>for</strong>mance.Adding and removing itemsAfter dropping a TableView component (T<strong>TMS</strong>FMXTableView) on the <strong>for</strong>m you will notice that, bydefault, the TableView has some items already added. Adding items can be done at designtime andat runtime. Click on the component to view the Items property. This is a default collection editorand can be used to add or remove items.Items can also be added programatically:varit: T<strong>TMS</strong>FMXTableViewItem;i: Integer;begin31
<strong>TMS</strong> SOFTWARE<strong>TMS</strong> <strong>Pack</strong> <strong>for</strong> <strong>FireMonkey</strong>DEVELOPERS GUIDE<strong>TMS</strong>FMXTableView1.BeginUpdate;<strong>for</strong> I := 0 to 100 dobeginit := <strong>TMS</strong>FMXTableView1.Items.Add;it.Caption := 'Item ' + inttostr(I);it.Description := 'Hello World !';end;<strong>TMS</strong>FMXTableView1.EndUpdate;Note that all calls to the <strong>TMS</strong>FMXTableView must include a BeginUpdate and EndUpdate statement.Whenever an item is added, the display list is rebuilt. With a BeginUpdate and EndUpdate statementthe update process is blocked and then executed once.To remove an item programmatically, just call the item’s destructor.SortingAfter adding items, sorting can be applied to the collection. This will be done alphabetically bydefault, but can be customized with the OnItemCompare event.If no sorting is applied, the items are displayed in the order that they are added in the collection.varit: T<strong>TMS</strong>FMXTableViewItem;i: Integer;begin<strong>TMS</strong>FMXTableView1.BeginUpdate;it := <strong>TMS</strong>FMXTableView1.Items.Add;it.Caption := 'Pear';it.Description := 'This is a Pear';it := <strong>TMS</strong>FMXTableView1.Items.Add;it.Caption := 'Banana';it.Description := 'This is a Banana';it := <strong>TMS</strong>FMXTableView1.Items.Add;it.Caption := 'Apple';it.Description := 'This is an Apple';it := <strong>TMS</strong>FMXTableView1.Items.Add;it.Caption := 'Lemon';it.Description := 'This is a Lemon';<strong>TMS</strong>FMXTableView1.EndUpdate;end;32
<strong>TMS</strong> SOFTWARE<strong>TMS</strong> <strong>Pack</strong> <strong>for</strong> <strong>FireMonkey</strong>DEVELOPERS GUIDEWhen calling <strong>TMS</strong>FMXTableView1.Items.Sort; the Items are sorted alphabetically. Twooptional parameters can be passed to sort case sensitive (default) or incase sensitive and ascending(default) or descending:TableView.Sorting is important <strong>for</strong> the next paragraph in this manual: Categories.CategoriesIn the TableView there are 4 types of categories:- AlphaBetic- AlphaNumericFirst (Numbers are added to the lookupbar and are displayed first)- AlphaNumericLast (Numbers are added to the lookupbar and are displayed last)- CustomThese types can be set with the CategoryType property. With the AlphaBetic / AlphaNumericcategories, the TableView automatically searches and adds categories with the first letter of theitem caption. The range that is used to display categories in AlphaBetic mode is A…Z andAlphaNumeric adds 0…9. In the sample below the items are sorted and the CategoryType property isset to ctAlphaBetic.varit: T<strong>TMS</strong>FMXTableViewItem;i: Integer;begin<strong>TMS</strong>FMXTableView1.BeginUpdate;<strong>TMS</strong>FMXTableView1.CategoryType := ctAlphaBetic;it := <strong>TMS</strong>FMXTableView1.Items.Add;33
<strong>TMS</strong> SOFTWARE<strong>TMS</strong> <strong>Pack</strong> <strong>for</strong> <strong>FireMonkey</strong>DEVELOPERS GUIDEit.Caption := 'Pear';it.Description := 'This is a Pear';it := <strong>TMS</strong>FMXTableView1.Items.Add;it.Caption := 'Banana';it.Description := 'This is a Banana';it := <strong>TMS</strong>FMXTableView1.Items.Add;it.Caption := 'Apple';it.Description := 'This is an Apple';it := <strong>TMS</strong>FMXTableView1.Items.Add;it.Caption := 'Lemon';it.Description := 'This is a Lemon';it := <strong>TMS</strong>FMXTableView1.Items.Add;it.Caption := 'Apple 2';it.Description := 'This is an Apple 2';<strong>TMS</strong>FMXTableView1.Items.Sort;<strong>TMS</strong>FMXTableView1.EndUpdate;end;When using categories, the LookupBar on the right side of the control is enabled and displayed bydefault. The LookupBar can be used to navigate directly through the categories. This is explained inthe lookup paragraph.If the CategoryType is set to ctAlphaBetic / ctAlphaNumericFirst or ctAlphaNumericLast thecategories are predefined. You can use custom categories by setting the CategoryType to ctCustomand adding your own categories. Custom categories works with linking the CategoryID property ofthe item to the ID of the category.34
<strong>TMS</strong> SOFTWARE<strong>TMS</strong> <strong>Pack</strong> <strong>for</strong> <strong>FireMonkey</strong>DEVELOPERS GUIDEvarit: T<strong>TMS</strong>FMXTableViewItem;cat: T<strong>TMS</strong>FMXTableViewCategory;i: Integer;begin<strong>TMS</strong>FMXTableView1.BeginUpdate;<strong>TMS</strong>FMXTableView1.CategoryType := ctCustom;cat := <strong>TMS</strong>FMXTableView1.Categories.Add;cat.Id := 0; // all items with CategoryID 0 belong to this categorycat.Caption := 'Category 1';cat.LookupText := 'Cat 1';cat := <strong>TMS</strong>FMXTableView1.Categories.Add;cat.Id := 1; // all items with CategoryID 0 belong to this categorycat.Caption := 'Category 2';cat.LookupText := 'Cat 2';it := <strong>TMS</strong>FMXTableView1.Items.Add;it.Caption := 'Pear';it.Description := 'This is a Pear';it.CategoryID := 0;it := <strong>TMS</strong>FMXTableView1.Items.Add;it.Caption := 'Banana';it.Description := 'This is a Banana';it.CategoryID := 0;it := <strong>TMS</strong>FMXTableView1.Items.Add;it.Caption := 'Apple';it.Description := 'This is an Apple';it.CategoryID := 1;it := <strong>TMS</strong>FMXTableView1.Items.Add;it.Caption := 'Lemon';it.Description := 'This is a Lemon';it.CategoryID := 1;it := <strong>TMS</strong>FMXTableView1.Items.Add;it.Caption := 'Apple 2';it.Description := 'This is an Apple 2';it.CategoryID := 1;<strong>TMS</strong>FMXTableView1.Items.Sort;<strong>TMS</strong>FMXTableView1.EndUpdate;end;35
<strong>TMS</strong> SOFTWARE<strong>TMS</strong> <strong>Pack</strong> <strong>for</strong> <strong>FireMonkey</strong>DEVELOPERS GUIDEAs result you can see the 2 categories in the list and the corresponding lookuptext <strong>for</strong> each categoryin the lookupbar. Sorting can also be applied on categories in the same way as sorting is applied toitems. The categories are then sorted alphabetically and ascending based on the caption.LookupAfter activating categories, the (optional) lookupbar is automatically displayed. Clicking anddragging along the lookupbar will automatically per<strong>for</strong>m a lookup. This can be disabled with theAutoLookup property. If the AutoLookup property is false, the OnManualLookup event is triggeredwhen a category is clicked. From there you can per<strong>for</strong>m a lookup with one of the two methodsbelow depending on the type of categories you have chosen:<strong>TMS</strong>FMXTableView1.LookupCategory(ACharacter);//Per<strong>for</strong>ms a lookup of an AlphaBetic / AlphaNumeric category with aspecific character.<strong>TMS</strong>FMXTableView1.LookupCustomCategory(ACharacterID);//Per<strong>for</strong>ms a lookup of a Custom category with a specific characterID.When navigating through the categories the lookupbar will, when necessary, load the buffer that isneeded to display the selected category. Depending on the BufferSize and the active buffered itemsthe lookup will be either instant or could have a small loading time. Adapt the BufferSize to anoptimal value depending on the device on which the application will run.36
<strong>TMS</strong> SOFTWARE<strong>TMS</strong> <strong>Pack</strong> <strong>for</strong> <strong>FireMonkey</strong>DEVELOPERS GUIDEFiltering / SearchingThe TableView supports Filtering or Searching. Filtering only shows the items that match the searchtext while searching highlights the first item found. Similar to the operation of the lookupbar, thisway of navigating through items automatically takes care of loading the correct buffer that isneeded to display the matched items.Filtering / Searching can be enabled in two ways: either programmatically with theShowFilter:Boolean property or by swiping the list down. The last method is optional and can beconfigured with the ShowFilterOnSwipe property. To programmatically show the filter entry editcontrol use:<strong>TMS</strong>FMXTableView1.ShowFilter := True;After setting ShowFilter to true or swiping the list down, the search edit box appears.The search edit box can be hidden by clicking the cancel button in the TableView header.By default, when filtering is per<strong>for</strong>med, the TableView only shows the items that match the stringin the edit box.The filter method can be changed by setting the Filtering property and can be set to vfFilterStart,vfFilterRandom, vfSearch or vfNone.- vfFilterStart: Shows the items that match the string from the beginning of the text in theedit box.37
<strong>TMS</strong> SOFTWARE<strong>TMS</strong> <strong>Pack</strong> <strong>for</strong> <strong>FireMonkey</strong>DEVELOPERS GUIDE- vfFilterRandom: Shows the items that contains the filter in the text, not necessarily fromthe beginning of the text.- vfSearch: Highlights the first item that matches the string in the edit box.- vfNone: No filtering or searching is applied.The filtering or searching is automatically per<strong>for</strong>med everytime the text in the search edit box ischanged. With the AutoFilter property set to false, this is not longer the case. When AutoFilter isfalse, the filtering is applied by pressing the Enter key.Following events are triggered when per<strong>for</strong>ming filtering / searching:OnBe<strong>for</strong>eFilter, OnBe<strong>for</strong>eSearch, OnAfterFilter and OnAfterSearchVia these events, custom filtering or custom searching can be done. To per<strong>for</strong>m a manual filteringyou can use the ApplyFilter method:<strong>TMS</strong>FMXTableView1.ApplyFilter('Filter');Editing / DeletingEditing can be enabled with the EditButton: Boolean property. When clicking the edit button, theTableView is set in edit mode. This automatically animates checkboxes from the left and addsbuttons in the footer of the TableView. Clicking on the items automatically checks the checkboxand updates the buttons. The text <strong>for</strong> these editing related buttons can be set with the MarkText,ArchiveText and MoveText properties.38
<strong>TMS</strong> SOFTWARE<strong>TMS</strong> <strong>Pack</strong> <strong>for</strong> <strong>FireMonkey</strong>DEVELOPERS GUIDEClicking on the Archive Button will delete the selected items from the list. Each button has aseparate event that can be used to per<strong>for</strong>m different operations. Deleting an item can also be donefrom a delete button associated with the item. The delete button is made visible by swiping fromright to left on the item or programmatically:Clicking on the delete button will delete the item. The automatic delete functionality in thedeletebutton and the archive button can be disabled with the AutoDeleteItem property.Note: Editing and searching are mutually exclusive functions. When searching is enabled the editfunctionality is disabled and vice versa.DetailViewThe TableView has support <strong>for</strong> showing a Detailview. The detail view can be any type of componentthat descends from TControl. Each item in the TableView can have its own DetailView or all itemscan share the same DetailView (DetailView property on item level versus DefaultDetailView onTableView level). If the DetailView is assigned, the item is marked with a default detail arrowimage. If the DetailView property is nil, the item automatically looks <strong>for</strong> the DefaultDetailViewcontrol that can be assigned on the TableView level.39
<strong>TMS</strong> SOFTWARE<strong>TMS</strong> <strong>Pack</strong> <strong>for</strong> <strong>FireMonkey</strong>DEVELOPERS GUIDEClicking on the item that has a DetailView assigned automatically slides the main items list out ofview and slides in the DetailView. An extra back button, controlled by the TableView BackButtonproperty can be optionally shown and when clicked, it will slide out the DetailView and slide in theregular main items list.In this sample, we have placed three panels on the <strong>for</strong>m and assigned each panel to a differentitem:<strong>TMS</strong>FMXTableView1.Items[0].DetailView := Panel1;<strong>TMS</strong>FMXTableView1.Items[1].DetailView := Panel2;<strong>TMS</strong>FMXTableView1.Items[2].DetailView := Panel3;Clicking on the first item shows Panel1, the second item Panel2 and the third item Panel3.The automatic toggle between the main list and the detail list can be disabled by settingAutoToggleDetail: Boolean to false. From the OnItemClick or OnItemSelected event handler you canuse the ToggleDetailView() method to show the assigned DetailView of the item. With theOnBackButtonClick event you can programmatically return back to the main list.TForm1.<strong>TMS</strong>FMXTableView1BackButtonClick(Sender: TObject;AItem: T<strong>TMS</strong>FMXTableViewItem);40
<strong>TMS</strong> SOFTWARE<strong>TMS</strong> <strong>Pack</strong> <strong>for</strong> <strong>FireMonkey</strong>DEVELOPERS GUIDEbeginAItem.ToggleDetailView;end;TForm1.<strong>TMS</strong>FMXTableView1ItemClick(Sender: TObject;AItem: T<strong>TMS</strong>FMXTableViewItem);beginAItem.ToggleDetailView;end;LayoutThe TableView has 2 ways of displaying the list. The list can either be displayed in a normal view(default) or in a grouped view. This can be selected with the T<strong>TMS</strong>FMXTableView.LayoutModeproperty.Normal view:41
<strong>TMS</strong> SOFTWARE<strong>TMS</strong> <strong>Pack</strong> <strong>for</strong> <strong>FireMonkey</strong>DEVELOPERS GUIDEGrouped view:Items are assigned to a group (Category) via the Item’s CategoryID property. When using categories,multiple items can be assigned to a group (Category).This sample code snippet initializes two groups with each two items in the TableView:varitm: T<strong>TMS</strong>FMXTableViewItem;begin<strong>TMS</strong>FMXTableView1.BeginUpdate;<strong>TMS</strong>FMXTableView1.Items.Clear;<strong>TMS</strong>FMXTableView1.Categories.Clear;// group 0<strong>TMS</strong>FMXTableView1.Categories.Add.Caption := 'Internet settings';// group 1<strong>TMS</strong>FMXTableView1.Categories.Add.Caption := 'Email settings';<strong>TMS</strong>FMXTableView1.CategoryType := ctCustom;itm := <strong>TMS</strong>FMXTableView1.Items.Add;itm.CategoryID := 0;itm.GroupIndex := 0;itm.Caption := 'Proxy';itm.Description := 'Proxy server name';itm := <strong>TMS</strong>FMXTableView1.Items.Add;itm.CategoryID := 0;itm.GroupIndex := 1;itm.Caption := 'IP address';itm.Description := '192.168.0.1';42
<strong>TMS</strong> SOFTWARE<strong>TMS</strong> <strong>Pack</strong> <strong>for</strong> <strong>FireMonkey</strong>DEVELOPERS GUIDEitm := <strong>TMS</strong>FMXTableView1.Items.Add;itm.CategoryID := 1;itm.Caption := 'POP server';itm.Description := 'pop.myserver.com';itm := <strong>TMS</strong>FMXTableView1.Items.Add;itm.CategoryID := 1;itm.Caption := 'SMTP server';itm.Description := 'smtp.myserver.com';<strong>TMS</strong>FMXTableView1.LayoutMode := lmGroup;<strong>TMS</strong>FMXTableView1.EndUpdate;end;As you can see with in the above result, the items from the first category are added separately. Thiscan be controlled with the GroupIndex property. Items can be added to different categories withthe CategoryID and within the category, multiple groups can be created with the GroupIndexproperty.43
<strong>TMS</strong> SOFTWARE<strong>TMS</strong> <strong>Pack</strong> <strong>for</strong> <strong>FireMonkey</strong>DEVELOPERS GUIDEUser interface interaction with the TableViewThe list supports scrolling, navigation and selection. Interaction with the list can be done with thekeyboard and the mouse.With the keyboard you can navigate through the items, each time you press the up, down, left orright keys the list selects the previous or next item. The home key selects the first item while theend key selects the last item. When pressing the pagedown or pageup key the list jumps in steps ofthe BufferSize, if the BufferSize = 0 the step is set to 10.When navigating through the list with the keyboard, the list automatically loads the next buffer.To navigate in the list with the mouse, you can click and hold your left mouse button on the listthen drag up or down depending in the direction you want the list to scroll. When making a flickgesture the list will scroll a certain amount of items with an inertia animation. The faster you flickwith the mouse the faster and the further the list will scroll.MultiSelectThe TableView supports multiple item selection. Multiple item selection can be enabled by settingthe MultiSelect property to true. Clicking on an item selects that item and when you click onanother item, the previous item is deselected. To select multiple items, you need to hold the CTRLor SHIFT key on the keyboard. With the CTRL key you are able to select items of choice and withthe SHIFT key the list selects all items between the first and the last item you have clicked.MultiSelect can be done by keyboard alone, pressing the direction keys and holding the CTRL orSHIFT key at the same time. Below is a sample of multiple items selected in the list by holding theCTRL key and clicking several items.Programmatically, in multiselect mode, the selected of an item can be get or set with the item’sSelected: Boolean property. In addition, two helper methods exist: SelectAllItems, DeSelectAllItemsto programmatically select or unselect all items at once.This sample code snippet programmatically selects items 1,3,5:<strong>TMS</strong>FMXTableView1.MultiSelect := true;44
<strong>TMS</strong> SOFTWARE<strong>TMS</strong> <strong>Pack</strong> <strong>for</strong> <strong>FireMonkey</strong>DEVELOPERS GUIDE<strong>TMS</strong>FMXTableView1.DeSelectAllItems;<strong>TMS</strong>FMXTableView1.Items[1].Selected := true;<strong>TMS</strong>FMXTableView1.Items[3].Selected := true;<strong>TMS</strong>FMXTableView1.Items[5].Selected := true;Additional Item ElementsOther than the delete button, the detail arrow image and the checked / unchecked image, the itemhas three additional elements that are optionally (See notes in Per<strong>for</strong>mance chapter) available:- LeftRectangle- RightRectangle- BulbRectangleThe BulbRectangle contains a T<strong>TMS</strong>FMXHTMLText shape that contains optional HTML <strong>for</strong>matted Textand can be set with the BulbText property.<strong>TMS</strong>FMXTableView1.Items[0].BulbText :='Bulb Text';The Left Rectangle contains a T<strong>TMS</strong>FMXBitmap component that can be linked to a BitmapContainer.By default the Left Rectangle is disabled. You can enable it by checking the correct option in theItemOptions property.Note that an extra area is offered where a bitmap can be shown. You can either show aBitmapContainer item and link it via the BitmapName, or directly load the bitmap in the item.varbmp: T<strong>TMS</strong>FMXBitmapItem;beginbmp := <strong>TMS</strong>FMXTableView1.Items.Add;bmp.Name := 'item_bitmap';bmp.Bitmap.LoadFromFile('mybitmap.png');<strong>TMS</strong>FMXTableView1.BitmapContainer := <strong>TMS</strong>FMXBitmapContainer1;<strong>TMS</strong>FMXTableView1.Items[0].BitmapName := 'item_bitmap';//or<strong>TMS</strong>FMXTableView1.Items[0].Bitmap.LoadFromFile('mybitmap.png');end;The right rectangle is an empty rectangle by default and can contain any visual element that isavailable in <strong>FireMonkey</strong>. The TableView supports a small set of controls, that are ready to use anddo not need further binding with properties and events. This is explained in the next chapter.45
<strong>TMS</strong> SOFTWARE<strong>TMS</strong> <strong>Pack</strong> <strong>for</strong> <strong>FireMonkey</strong>DEVELOPERS GUIDEPer<strong>for</strong>manceA default TableView has some per<strong>for</strong>mance related options already preset to optimal values <strong>for</strong> themost typical use of the TableView. The BufferSize is set to 50, which will only load and display thefirst 50 items in the UI. Second per<strong>for</strong>mance related setting is the ItemOptions property. Thiscontains a set of options that can be used to decrease the time the TableView needs to build up thedisplay items list.As explained in the Architecture chapter, the default item contains various elements that arecloned when adding items. These setting under ItemOptions affect what parts of an item are clonedor not. When an element is not checked in the ItemOptions, the element is not cloned when thedisplay item list is built and that increases the per<strong>for</strong>mance.By default the ItemOptions have unchecked LeftRectangle, RightRectangle and BulbRectangle. Thismeans that these elements will not be cloned and will not be available in the item. You can furtherimprove per<strong>for</strong>mance by unchecking elements that are not necessary <strong>for</strong> your application.Binding ControlsWhen the right rectangle is activated in the ItemOptions, an extra space will be available that canbe filled with the control added in the StyleBook. You can add any type of control, but the listalready implements a small set that does not need extra binding.- CheckBox- RadioButton- TrackBar- ArcDialOpen the StyleBook editor by clicking on the Edit Custom Style option in the popupmenu after rightclickingon the component. Select the default item -> right rectangle element and place a newTCheckBox component inside the rectangle.Select the TCheckBox component and set the StyleName to ‘item_checkbox’. When adding aRadioButton, TrackBar or ArcDial, the component base classname – ‘T’ must be prepended with‘item_’. The StyleName must be lowercase.- CheckBox: ‘item_checkbox’- RadioButton: ‘item_radiobutton’- TrackBar: ‘item_trackbar’- ArcDial: ‘item_arcdial’Applying the style in the IDE style editor results in the Checkbox being visible at designtime in eachitem in the list. In the TableView, the CheckBox OnChange event has been assigned and theIsChecked property is linked to the Item from the Items collection.To persist the value of the checkbox, the Item has a few Data* properties to store the value:- DataBoolean- DataGroupIndex- DataString- DataValue- DataObject46
<strong>TMS</strong> SOFTWARE<strong>TMS</strong> <strong>Pack</strong> <strong>for</strong> <strong>FireMonkey</strong>DEVELOPERS GUIDEFor the CheckBox and RadioButton the DataBoolean property is used, <strong>for</strong> the TrackBar and ArcDialthe DataValue property is used. When changing the DataBoolean property to true, the checkbox willbe checked. When checking the checkbox, the DataBoolean property will be set.This binding happens in the same way <strong>for</strong> the other controls. For the RadioButton the Item has anextra DataGroupIndex property that can be used to create a RadioGroup, i.e. all items with aRadioButton with the same DataGroupIndex value <strong>for</strong>m a group.Manual binding is also available through events <strong>for</strong> non-supported controls. Below is a samplebinding a TEdit to the DataString property of the item.First, add a TEdit control to the right rectangle element in the StyleBook. Set the TEdit controlstylename to ‘item_edit’. This will be important to access the edit with the correct name.Second, there are 3 important events that are needed <strong>for</strong> binding with TEdit.- OnItemCustomize- OnItemData- OnChangeThe OnItemCustomize event is used to connect the edit with the DataString property. TheOnItemData is called when the Data properties are modified. The OnChange event is implementedand sets the DataString property with the value of the edit. The combination results in the codebelow:TForm1.ItemEditChanged(Sender: TObject);vari: Integer;it: T<strong>TMS</strong>FMXTableViewItem;begini := (Sender as TEdit).Tag;if (i >= 0) and (i
<strong>TMS</strong> SOFTWARE<strong>TMS</strong> <strong>Pack</strong> <strong>for</strong> <strong>FireMonkey</strong>DEVELOPERS GUIDETForm1.<strong>TMS</strong>FMXTableView1ItemData(Sender: TObject;AItem: T<strong>TMS</strong>FMXTableViewItem; AItemShape: T<strong>TMS</strong>FMXTableViewItemShape;AItemControlShape: TControl);varshpr: TRectangle;edt: TEdit;beginshpr := AItem.ShapeRightRectangle;if Assigned(shpr) thenbeginedt := (shpr.FindStyleResource('item_edit') as TEdit);if Assigned(edt) thenedt.Text := AItem.DataString;end;end;LiveBindingsLiveBindings is new way of data-binding controls, <strong>for</strong> more in<strong>for</strong>mation and samples on LiveBindings,please read the documentation onhttp://docwiki.embarcadero.com/RADStudio/en/LiveBindings_in_RAD_Studio first.The TableView has a basic implementation that populates the list and takes care of binding theSelectedItemIndex. When dropping a TableView on the <strong>for</strong>m you will notice a LiveBindings property.To create a new LiveBinding, you can either click on the arrow and select “New LiveBinding…” orclick directly on “New LiveBinding…” at the bottom of the object inspector.This action will automatically drop a BindingsList component on the <strong>for</strong>m and will show theBindingsList editor window.48
<strong>TMS</strong> SOFTWARE<strong>TMS</strong> <strong>Pack</strong> <strong>for</strong> <strong>FireMonkey</strong>DEVELOPERS GUIDEWhen reading the documentation in the “LiveBindings in RAD Studio” you will notice thatLiveBindings is not limited to DataBase support. There is also support <strong>for</strong> binding various propertiesof the TableView to other controls. Below is a sample that binds the TrackBar position to theTableView rotationAngle.Drop a new TableView and a TrackBar component on the <strong>for</strong>m. Select the TrackBar component andadd a new TBindExprItems expression. In the BindingsList component you see the TBindExprItemscomponent listed.Point the SourceComponent to the TrackBar and the ControlComponent to the <strong>TMS</strong>FMXTableView1.Start the FormatExpressions editor by double-clicking on the “(TExpressionsDir)” label. Click on theadd button to add a new <strong>for</strong>mat expression and fill in the Binding properties. The ControlComponent49
<strong>TMS</strong> SOFTWARE<strong>TMS</strong> <strong>Pack</strong> <strong>for</strong> <strong>FireMonkey</strong>DEVELOPERS GUIDEis set to <strong>TMS</strong>FMXTableView1 and we want the RotationAngle to be modified. Fill in RotationAngle inthe Control Expression field. For the Source Expression which is linked with the SourceComponentwe fill in “Value”.Now there is one step left to implement be<strong>for</strong>e the application is ready. When dragging the slider ofthe TrackBar, the RotationAngle of the <strong>TMS</strong>FMXTableView component will be unaffected. This isbecause the <strong>TMS</strong>FMXTableView did not receive a notice from the BindingsList component, there<strong>for</strong>ewe need to notify the bind component that the value of the TrackBar has changed.This is done by implementing the OnChange event and notifying the BindingsList component:varFNotifying: Integer;procedure TForm557.TrackBar1Change(Sender: TObject);begin// Some controls send notifications when setting properties,// like TTrackBarif FNotifying = 0 thenbeginInc(FNotifying);// Send notification to cause expression re-evaluation of dependentexpressionstryBindingsList1.Notify(Sender, '');finallyDec(FNotifying);end;end;end;Now when dragging the slider of the TrackBar, the BindingsList is notified and the <strong>TMS</strong>FMXTableViewrotates according to the Value of the TrackBar. Multiple bindings can be made and are triggeredsimultaneously due to the Notify procedure of the BindingsList.In the BindingsList editor window you will notice that a new category is added <strong>for</strong> the TableView:“DB TableView Links”. The link “T<strong>TMS</strong>FMXBindDBTableViewLink” can be used to connect to aDataSource through a BindScope. This link is designed to work specifically with DataBaseconnections.The TableView DB link automatically generates Expressions to link the SelectedItemIndex to thecorrect record in the Database. Internally the DataSet is automatically loaded and <strong>for</strong> each recordin the DataSet an item is added.50
<strong>TMS</strong> SOFTWARE<strong>TMS</strong> <strong>Pack</strong> <strong>for</strong> <strong>FireMonkey</strong>DEVELOPERS GUIDEIn the object inspector, after expanding the LiveBindings property, you will notice aColumnExpressions property. This is because the implementation inherits from the standardTBindGridLink and is necessary to link Database fields to multiple elements in the TableView.More on the T<strong>TMS</strong>FMXBindDBTableViewLink is explained in the Samples chapter at the <strong>TMS</strong>TableView LiveBindings Demo 1 & 2.HTML supportThe TableView supports HTML in various elements such as the headertext, footertext, bulbtext, thecaption and the description. The HTML engine in <strong>FireMonkey</strong> is a port of the VCL HTML engine, thussupporting most functionality that was available in the VCL HTML Engine.As ImageLists do no exist in the <strong>FireMonkey</strong> framework, the HTML engine supports displaying imagesfrom a BitmapContainer and this is demonstrated in the sample below.Drop a TableView and a BitmapContainer on the <strong>for</strong>m. In the BitmapContainer we have loaded animage and named it htmlimage:The name is necessary because the HTML Engine will search <strong>for</strong> an image with a name that is set inthe tag.Now assign the BitmapContainer to the TableView component:In this sample we will display an image in HTML in the caption of an item.This can be done by using the tag.51
<strong>TMS</strong> SOFTWARE<strong>TMS</strong> <strong>Pack</strong> <strong>for</strong> <strong>FireMonkey</strong>DEVELOPERS GUIDE<strong>TMS</strong>FMXTableView1.Items[0].Caption := ' This is animage';The item will display the caption with an image that comes from the BitmapContainer. In this way,one item can be used multiple times.For more in<strong>for</strong>mation about the HTML engine and supported tags please read the chapter HTMLrendering engine.52
<strong>TMS</strong> SOFTWARE<strong>TMS</strong> <strong>Pack</strong> <strong>for</strong> <strong>FireMonkey</strong>DEVELOPERS GUIDET<strong>TMS</strong>FMXPopupThe T<strong>TMS</strong>FMXPopup is a component that has the capability to display a <strong>FireMonkey</strong> control inside afully customizable transparent popup window. It is specifically designed match the layout of anative iOS popup window. This component can be easily configured to display itself positioned at aspecific control on the <strong>for</strong>m or a given absolute position. The popup control can have optionally afooter and a header and in the footer and header buttons can be added as well as HTML <strong>for</strong>mattedtext.Header and footer are configurable via following properties:- FooterButtons: collection of T<strong>TMS</strong>FMXPopupButton instances displayed from left in thefooter- FooterHeight: sets the height in pixels of the footer- FooterText: string holding HTML <strong>for</strong>matted text <strong>for</strong> the footer- HeaderButtons: collection of T<strong>TMS</strong>FMXPopupButton instances displayed from left in theheader- HeaderHeight: sets the height in pixels of the header- HeaderText: string holding HTML <strong>for</strong>matted text <strong>for</strong> the headerFollowing properties exist <strong>for</strong> the T<strong>TMS</strong>FMXPopupButton:- BitmapName: name of image in the connected BitmapContainer to use <strong>for</strong> the button- Kind: sets the type of the button, following button types are predefined: bkArchive,bkBack, bkCancel, bkDelete, bkDone, bkEdit, bkMark, bkMove, bkNormal- Layout: property to set layout of the button to normal or pointer- ShowText: when true, text is shown next to the image in the button- Text: button caption text- Width: width of the buttonProperties on T<strong>TMS</strong>FMXPopup that control appearance and position of the popup:- ArrowHeight: The height of the arrow.- ArrowPosition: The position of the arrow.- ArrowWidth: The width of the arrow.- DetailControl: The control that will be displayed and automatically positioned inside thepopup.- HeaderText: The text of the header that supports HTML.- Placement: Property to determine the position of the popup relative or absolute to a givenplacement control.53
<strong>TMS</strong> SOFTWARE<strong>TMS</strong> <strong>Pack</strong> <strong>for</strong> <strong>FireMonkey</strong>DEVELOPERS GUIDE- PlacementTarget: The control used as a reference to position the popup after it isdisplayed.- PlacementRectangle: A custom rectangle used to display the popup, in combination withthe PlacementTarget and Placement properties.After setting properties where the popup must be shown you can use the following methods topopup or close the dialog:<strong>TMS</strong>FMXPopup1.Popup;<strong>TMS</strong>FMXPopup1.Close;Example:This code snippet assigns a T<strong>TMS</strong>FMXTableView control to be displayed on the popup and configuresthe T<strong>TMS</strong>FMXPopup to open at the bottom of a button on the <strong>for</strong>m with a button in the header toclose the popup again:procedure TForm1.FormCreate(Sender: TObject);begin// hide the popup footer<strong>TMS</strong>FMXPopup1.ShowFooter := false;// tableview should be displayed in the popup only<strong>TMS</strong>FMXTableView1.Visible := false;// assign the tableview as detail control <strong>for</strong> the popup<strong>TMS</strong>FMXPopup1.DetailControl := <strong>TMS</strong>FMXTableView1;// set the control as reference <strong>for</strong> position of the popup<strong>TMS</strong>FMXPopup1.PlacementTarget := Button1;// show the popup at the bottom of the button centered<strong>TMS</strong>FMXPopup1.Placement := TPlacement.plBottomCenter;// add a header button that closes the popup<strong>TMS</strong>FMXPopup1.HeaderButtons.Clear;with <strong>TMS</strong>FMXPopup1.HeaderButtons.Add dobeginKind := T<strong>TMS</strong>FMXBarButtonKind.bkBack;Width := 50;end;end;procedure TForm1.<strong>TMS</strong>FMXPopup1HeaderButtonClick(Sender: TObject;AButton: T<strong>TMS</strong>FMXPopupButton; AButtonShape: T<strong>TMS</strong>FMXBarButton);beginif AButton.Index = 0 then<strong>TMS</strong>FMXPopup1.Close;end;54
<strong>TMS</strong> SOFTWARE<strong>TMS</strong> <strong>Pack</strong> <strong>for</strong> <strong>FireMonkey</strong>DEVELOPERS GUIDET<strong>TMS</strong>FMXCircularGaugeT<strong>TMS</strong>FMXCircularGauge is a highly customizable circular gauge with optionally multiple needles,setpoints and sections. Divisions, subdivisions can be configured as well as aperture of the values oraperture of the entire control, enabling to use it as a full circle gauge, half circle gauge, ¾ circlegauge etc…Customizing the appearance of a <strong>FireMonkey</strong> component is done via editing its style.Design of the T<strong>TMS</strong>FMXCircularGaugeFollowing style elements make up the appearance of the <strong>TMS</strong>FMXCircularGauge:1) The outer background element of the gauge.2) The inner element of the gauge. This element holds the sections, needles, setpoints,divisions and subdivisions.3) The displaytext of the gauge, this can be set on component level.4) 5) The Division and SubDivision text appearance.6) 7) The Division and SubDivision line appearance.8) The outer center element.9) The needle.10) The inner center element which holds the needle.When starting the IDE style editor <strong>for</strong> the gauge, there are two TText elements and two TLineelements (item 4 till 7). These elements are used to define the appearance of the Divisions and theSubDivisions in the gauge. The style of these elements will be reflected in the control when applyingthe style. A single style element <strong>for</strong> the Division and SubDivision will control the appearance of eachdivider line/text and subdivider line text in the gauge.55
<strong>TMS</strong> SOFTWARE<strong>TMS</strong> <strong>Pack</strong> <strong>for</strong> <strong>FireMonkey</strong>DEVELOPERS GUIDEBy default the Divisions and SubDivisions are visible. The properties ShowDivisions,ShowSubDivisions control this visibility. In the Object Inspector, the component has properties thatcan be used to specify the number of Divisions / SubDivisions, change the minimum, maximum andthe value. The values are distributed in the circular gauge between a start and stop angle that canbe set with DivisionsStartAngle, DivisionsStopAngle. For the gauge itself, the LayoutStartAngle,LayoutStopAngle define the start angle and end angle of the shape and these are default set to 0°and 360° to have a full circular gauge. Set these values to 0°, 180° <strong>for</strong> example to have a halfcircular gauge.Division angles:Layout angles:Changing the Value property of the gauge will update the needle position accordingly.The gauge has three different collections of shapes that will be dynamically added to the StyleBookwhen used and can each be modified afterwards. Adding a setpoint, section or extra needle willautomatically add an element in the StyleBook.Remember that the position of the extra needle and the setpoint, or the start value and end valueof the section, are properties that are accessible in the IDE Object Inspector. The visualconfiguration of these setpoints, sections or extra needles can be changed with the IDE style editorand will determine the way these elements look.56
<strong>TMS</strong> SOFTWARE<strong>TMS</strong> <strong>Pack</strong> <strong>for</strong> <strong>FireMonkey</strong>DEVELOPERS GUIDEYou can style each element separately, add or remove elements and create a custom version of thedefault gauge. Below is a sample of the gauge after adding new section elements, and modifyingthe background, inner- and outerelement appearances.Other than via the designer, a section <strong>for</strong> example can also be added in code:Example:This code snippet adds a yellow section <strong>for</strong> the range of values from 20 to 40:with <strong>TMS</strong>FMXCircularGauge1.Sections.Add dobeginStartValue := 20;EndValue := 40;Shape.Fill.Color := claYellow;end;Programmatically changing style elementsIn code, the different style elements can also be changed. The component exposes these styleelements via functions. For example, T<strong>TMS</strong>FMXCircularGauge provides the function GetDivision,GetDivisionText etc…In code, the color of the divider lines could be changed with:<strong>TMS</strong>FMXCircularGauge1.GetDivision.Fill.Color := claYellow;<strong>TMS</strong>FMXCircularGauge1.GetDivision.Stroke.Color := claYellow;<strong>TMS</strong>FMXCircularGauge1.Update; //needed to update the style!57
<strong>TMS</strong> SOFTWARE<strong>TMS</strong> <strong>Pack</strong> <strong>for</strong> <strong>FireMonkey</strong>DEVELOPERS GUIDEEvents- OnValueClick: Event triggered when the inner element of the gauge is clicked and passesthe value at the mouse coordinate.- OnSectionClick, OnSetPointClick, OnExtraNeedleClick: Events triggered when clicking onsection, setpoint or needle elements. When implementing the OnSectionClick eventhandler, clicking a section will not trigger the OnValueClick since the section lays on top ofthe values.Properties- DivisionFormat: The <strong>for</strong>mat of the main divisions in the gauge, <strong>for</strong>matting is done internallywith the FormatFloat() function. See FormatFloat in the Delphi help <strong>for</strong> in<strong>for</strong>mation on theavailable <strong>for</strong>matting specifiers.- Divisions: The amount of divisions between MinimumValue and MaximumValue.- DivisionsStartAngle / DivisionsStopAngle: The start and end angles between which thedividers are distributed in the gauge inner circle.- ExtraNeedles: Extra needles can be added in this collection, the needles can be styled inthe style editor and the position can be set with the Value property of each needle.- LayoutStartAngle / LayoutStopAngle: The start and stop angle used to display the gauge.By default this is 0°and 360° to display the gauge as a full circle.- MinimumValue / MaximumValue: Defines the minimum and maximum <strong>for</strong> the valuesdisplayed in the gauge. The number of values displayed is determined by the minimum,maximum and the number of divisions and subdivisions.- Sections: A collection of elements used inside the gauge to mark special areas or ranges ofvalues. Sections start from the center but the size can be set with the inner- andoutermargin properties.- SetPoints: SetPoints are used to mark a special value, and are placed at the outer border ofthe gauge. SetPoints can have different shapes and can be styled, in the same way as theextra needles and the sections.- ShowDivisions / ShowSubDivisions / ShowDivisionText / ShowSubDivisionText: Propertiesused to hide / show values and divider lines on the gauge.- SubDivisionFormat: Sets the <strong>for</strong>mat of the subdivisions. Subdivisions are <strong>for</strong>matted in thesame way as the Divisions.- SubDivisions: Defines the amount of divisions between 2 main divisions.58
<strong>TMS</strong> SOFTWARE<strong>TMS</strong> <strong>Pack</strong> <strong>for</strong> <strong>FireMonkey</strong>DEVELOPERS GUIDET<strong>TMS</strong>FMXLinearGaugeT<strong>TMS</strong>FMXLinearGauge is very similar to the T<strong>TMS</strong>FMXCircularGauge. It also offers a needle, divisionsand subdivisions, optional sections, setpoints or extra needles.Design of the T<strong>TMS</strong>FMXLinearGauge1) The outer background element of the gauge.2) The inner element of the gauge. This element holds the sections, needles, setpoints,divisions and subdivisions.3) The needle of the gauge.4) 5) The Division and SubDivision text appearance.6) 7) The Division and SubDivision line appearance.The linear gauge is internally based on the circular gauge, but implements a different style todisplay it in a rectangular way. The SetPoint, Section and ExtraNeedle collections are also availablein the T<strong>TMS</strong>FMXLinearGauge. The SetPoints are clickable in the circular gauge and thus also in thelinear gauge. When clicking on a setpoint, the OnSetPointClick event is triggered.When adding setpoints, sections or extra needles, the shapes are visible in the IDE style editor inthe same way as with the circular gauge.With the ValueDirection property you can control whether the divider lines and values are displayedon top of or below the gauge.Modifying the style of the T<strong>TMS</strong>FMXLinearGauge to display verticalSet T<strong>TMS</strong>FMXLinearGauge.RotationAngle to 90 and via the IDE style editor, change the divisiontextstyle resource’s OrientationAngle to -90. That is all that is needed to create a vertical variant of theT<strong>TMS</strong>FMXLinearGauge. By default the values are displayed now on the left of the gauge, but this canbe easily changed by setting T<strong>TMS</strong>FMXLinearGauge.ValuePosition = vpUp.59
<strong>TMS</strong> SOFTWARE<strong>TMS</strong> <strong>Pack</strong> <strong>for</strong> <strong>FireMonkey</strong>DEVELOPERS GUIDET<strong>TMS</strong>FMXJogMeterThe jogmeter is a similar component as the T<strong>TMS</strong>FMXLinearGauge but has no minimum andmaximum values. The range is defined via a combination of Divisions, Aperture and Step. Theneedle always remains in the center of the control and the displayed range changes if the value isset.This component descends from the T<strong>TMS</strong>FMXLinearGauge component and provides a jogmeterspecific implementation.This code sample shows how the T<strong>TMS</strong>FMXJogMeter can be setup <strong>for</strong> a specific range of values:<strong>TMS</strong>FMXJogMeter1.Step := 0.1;<strong>TMS</strong>FMXJogMeter1.DivisionFormat := '0.00 mg';<strong>TMS</strong>FMXJogMeter1.Divisions := 25;<strong>TMS</strong>FMXJogMeter1.ShowSubDivisionText := True;<strong>TMS</strong>FMXJogMeter1.SubDivisions := 5;The innerelement and the subdivision line was also made slightly smaller to ensure all values fit.This can be done in the IDE style editor. After applying this code and changing the innerelement thegauge should look like the sample below:Note that the same techniques used to create a vertical variant of the T<strong>TMS</strong>FMXLinearGauge can beapplied to create a vertically oriented T<strong>TMS</strong>FMXJogMeter.60
<strong>TMS</strong> SOFTWARE<strong>TMS</strong> <strong>Pack</strong> <strong>for</strong> <strong>FireMonkey</strong>DEVELOPERS GUIDET<strong>TMS</strong>FMX7SegLEDT<strong>TMS</strong>FMX7SegLED is a control to display a value via 7 segment LEDs.Style:The 7-segment LED uses one LED shape that can be used to change the appearance, the fill of theactive and non-active LED segments. The Fill and FillActive brushes can be accessed via the IDEstyle editor after clicking on the LED shape.The 7-segment LED control has a Decimals and Digits property, which are used to increase ordecrease the amount of 7-segment LEDs that are visible. Digits sets the number of 7-segment LEDsbe<strong>for</strong>e the decimal point and Decimals sets the number of 7-segment LEDs after the decimal point.The Value property is used to set the number that must be displayed. Note that the control will notautomatically adapt its width when the number of digits or decimals is changed. It will try to fit all7-segment LEDs within the available space. Modify the width of the control when needed.varval: double;begin<strong>TMS</strong>FMX7SegLED1.Digits := 4;<strong>TMS</strong>FMX7SegLED1.Decimals := 2;val := 1234.56;<strong>TMS</strong>FMX7SegLED1.Value := val;end;Programmatically, the style of the LED can be changed via accessing the shape:<strong>TMS</strong>FMX7SegLED1.Shape.FillActive.Color := claGreen;<strong>TMS</strong>FMX7SegLED1.Update;61
<strong>TMS</strong> SOFTWARE<strong>TMS</strong> <strong>Pack</strong> <strong>for</strong> <strong>FireMonkey</strong>DEVELOPERS GUIDET<strong>TMS</strong>FMXCompassThe compass control descends from the gauge base class. It can be considered as a gauge with theneedle pointing to the north and 8 extra needles <strong>for</strong> each wind direction. These needles areaccessible in the style editor as:needle: needle pointing to the northNorth_Needle: background needle in north directionSouth_Needle: background needle in south directionWest_Needle: background needle in west directionEast_Needle: background needle in east directionNorthWest_Needle: background needle in northwest directionSouthWest_Needle: background needle in southwest directionNorthEast_Needle: background needle in northeast directionSouthEast_Needle: background needle in southeast directionThe DivisionText style is used here to define the style of the wind direction texts in the compass.The orientation of the compass can then be easily modified with theT<strong>TMS</strong>FMXCompass.RotationAngle property.T<strong>TMS</strong>FMXClockThe clock can display the current machine time or can display the time set by the ClockTimeproperty. When the Active property is true, it displays the machine time. Otherwise, the timeshown on the clock can be set via code:<strong>TMS</strong>FMXClock1.ClockTime := EncodeTime(3,15,20,0);62
<strong>TMS</strong> SOFTWARE<strong>TMS</strong> <strong>Pack</strong> <strong>for</strong> <strong>FireMonkey</strong>DEVELOPERS GUIDET<strong>TMS</strong>FMXRotarySwitch / T<strong>TMS</strong>FMXKnobSwitchTwo switch controls with a discrete but configurable number of positions are offered. TheT<strong>TMS</strong>FMXRotarySwitch is a basic switch, the T<strong>TMS</strong>FMXKnobSwitch offers LEDs in the outer circle thatindicate in what position the switch is.The values between with the switch control can select are set via the Positions collection. Eachposition has a Text property and a Tag property. For each position there is a value added on theswitch. The position of the switch can be easily get or set via T<strong>TMS</strong>FMXRotarySwitch.Value. The firstposition value is 0, the second position 1, etc…In the T<strong>TMS</strong>FMXKnobSwitch the division lines are replaced by ellipse shapes that have a default gloweffect. The needle is replaced by a rectangle that represents the “knob”. The rectangle on the“knob” has a default glow effect that has the same color as the ellipse shapes. When changing thevalue, that actually is an integer between 0 and the count of the positions, the ellipse shapes lightup from zero till the value of the position of the switch.63
<strong>TMS</strong> SOFTWARE<strong>TMS</strong> <strong>Pack</strong> <strong>for</strong> <strong>FireMonkey</strong>DEVELOPERS GUIDET<strong>TMS</strong>FMXMatrixLabelThe matrix label has only one stylable element, the LEDText shape itself. This has properties tochange the amount of LEDs, the size of the LEDs and the direction. The Text that is displayed insidethe matrixlabel is set with the Text property in the Object Inspector.The matrixlabel has the capability to autoscroll the text from right to left or vice versa. This is setwith the ScrollDirection property. The text can be <strong>for</strong>matted as is, lowercase, uppercase orpropercase. Propercase means that each word in the text starts with a capital letter.Parts of the text can have different colors. This can be done by using a ‘%’ character followed by ahex number from 0-F. This will change the color to a predefined set of colors. The color remainsapplied until a new color code is set in the text.Example:<strong>TMS</strong>FMXMatrixLabel1.Text := ‘tms%Asoft%Cware%0.com’Indexes of colors are:%0: default color (green)%1: black%2: dark red%3: dark green%4: dark yellow%5: dark blue%6: dark fuchsia%7: dark aqua%8: gray%9: silver%A: red%B: green%C: yellow%D: blue64
<strong>TMS</strong> SOFTWARE<strong>TMS</strong> <strong>Pack</strong> <strong>for</strong> <strong>FireMonkey</strong>DEVELOPERS GUIDE%E: fuchsia%F: aquaProperties- AutoScroll: Automatically scrolls the text from in the scrolldirection if true.- ScrollDirection: The direction in which the text scrolls if the AutoScroll property is true.- Text: The text of the label.- TimeInterval: Sets the scroll speed.Style element properties- LEDs: The number of visible matrix LEDs.- LEDStyle: The size of the matrix LEDs : ls14x20, ls19x27, ls9x13.- LEDsVisible: Shows / hides the inactive LEDs in the matrix.- Margin: the amount of spacing between the top / bottom of the label and the LEDs.- Orientation: LEDs can be displayed horizontal / vertical.- Spacing: The amount of spacing between the LEDs- Text: The text of the label. The text set in the StyleBook is overriden by the property atcomponent level.- TextColor: The default color of the text.- TextStyle: The automatic casing that will be applied: uppercase, lowercase, propercase oras is.65
<strong>TMS</strong> SOFTWARE<strong>TMS</strong> <strong>Pack</strong> <strong>for</strong> <strong>FireMonkey</strong>DEVELOPERS GUIDET<strong>TMS</strong>FMXScopeThe T<strong>TMS</strong>FMXScope has the capability of displaying values of multiple channels with a certaininterval and frequency. The scope cannot be styled as the scope has no default style implemented.The scope has a channels collection property that can be used to add channels. Each channel has aColor, Font, ShowValue, Style, ValueFormat, Visible and Width property. The Style property is usedto switch between line and bar styles.Bar styleLine styleThe scope is started with the Active property. With the AutoUpdate property set to true, the scopeautomatically scrolls from left to right or vice versa. The direction can be set with a separateproperty T<strong>TMS</strong>FMXScope.Direction. When the scope is scrolling, the OnNeedData event is called <strong>for</strong>each channel at each scroll step. The OnNeedData event has channel index parameter and a varValue parameter via which the value of the channel in the scope should be set.The grid can be customized with the GridColor and GridLineWidth properties and the displayedvalues of the grid are customized via the Y-Axis class property. The Y-Axis has properties to <strong>for</strong>matthe divisions, subdivisions and set the position of the Y-Axis. The MinValue and MaxValue are set onthe scope itself.The scope can also display the last added value <strong>for</strong> each channel, styled with a font and the color ofthe channel. With the property ShowValue, the value is shown in a rounded rectangle, <strong>for</strong>mattedwith the ValueFormat property.The value is displayed per channel, and is automatically positioned right or left in the grid,depending on the Direction property.- AnimateGrid / AutoUpdate: Properties used to automatically scroll and animate the grid.- BaseColor: The color used <strong>for</strong> the base center line.- Channels: A collection which contains channels that are displayed inside the scope. EachChannel has a color, style, visible and width property. The Style defines the differencebetween line and bar.- Direction: The scroll direction of the grid when autoupdating.- Frequency: The frequency in pixels on which the data is drawn and updated.- GridColor / GridLineWidth: The color and width of the grid lines.66
<strong>TMS</strong> SOFTWARE<strong>TMS</strong> <strong>Pack</strong> <strong>for</strong> <strong>FireMonkey</strong>DEVELOPERS GUIDE- MaxValue / MinValue: The values that define the Y-Axis range and the area in which thechannels are drawn.- YAxiso DivisionColor / DivisionTextColor / DivisionSize / DivisionFont: The color of themain divisions between MinValue and MaxValue.o SubDivisionColor / SubDivisionTextColor / SubDivisionSize / SubDivisionFont: Thecolor of the sub divisions between 2 division values.o Divisions / SubDivisions: The amount of values between MinValue and MaxValue.o Format / FormatType: The <strong>for</strong>matting of the values drawn in the Y-Axis.o Position: The position of the Y-Axis.o Size: The size of the Y-Axis.When AutoUpdate is set the false, the scope can still be programmatically updated. This is done viathe method T<strong>TMS</strong>FMXScope.UpdateData(ChannelIndex, Value) and when the values <strong>for</strong> all channelshave been set, T<strong>TMS</strong>FMXScope.AddData internally adds all channel data, updates the display andscrolls one step.procedure TForm1.FormCreate(Sender: TObject);begin// initialization<strong>TMS</strong>FMXScope1.Channels.Clear;<strong>TMS</strong>FMXScope1.Channels.Add.Color := claRed;<strong>TMS</strong>FMXScope1.Channels.Add.Color := claYellow;<strong>TMS</strong>FMXScope1.Channels.Add.Color := claAqua;<strong>TMS</strong>FMXScope1.MinValue := 0;<strong>TMS</strong>FMXScope1.MaxValue := 30;end;procedure TForm1.Button1Click(Sender: TObject);begin// set values <strong>for</strong> each channel and step the scope<strong>TMS</strong>FMXScope1.UpdateData(0, Random(10));<strong>TMS</strong>FMXScope1.UpdateData(1, 10+ Random(10));<strong>TMS</strong>FMXScope1.UpdateData(2, 20 + Random(10));<strong>TMS</strong>FMXScope1.AddData;end;67
<strong>TMS</strong> SOFTWARE<strong>TMS</strong> <strong>Pack</strong> <strong>for</strong> <strong>FireMonkey</strong>DEVELOPERS GUIDET<strong>TMS</strong>FMXSpinnerT<strong>TMS</strong>FMXSpinner is a scrolling selector control as can be found in iPhone, iPad, iPod. It can be usedto select a date or time but is versatile enough to select other types of data.T<strong>TMS</strong>FMXSpinner styleThe T<strong>TMS</strong>FMXSpinner style contains a minimum set of rectangles that define the layout. Thetopshadow and bottomshadow rectangles, the background and the selection rectangle. And theinner element rectangle which holds the columns.T<strong>TMS</strong>FMXSpinner columnsThe spinner has a Columns collection property, and when adding columns, they become available inthe IDE style editor. Each column can be styled separately.Each wheel of the spinner can be configured to scroll through a specific range of numbers, datetimevalues or custom values. The type of the range is set with RangeType property. For numbers, therange is set with RangeFrom and RangeTo properties.For a datetime range, the range is set with DateRangeFrom and DateRangeTo properties. The<strong>for</strong>matting of numbers and/or date time values displayed is controlled by DateTimeValueFormat orValueFormat. For DateTimeValueFormat all <strong>for</strong>matting capabilities of the Delphi methodFormatDateTime() are available. For the ValueFormat, all <strong>for</strong>matting capabilities of the Delphimethod Format() are available. Each wheel has the option to make the wheel range cyclic. This ischosen by setting Cyclic = true. When this is true, the first range value is shown again immediatelyafter the last range value and vice versa.In the sample code snippet below, the spinner is configured to allow selecting a day and hourbetween now and 10 years.<strong>TMS</strong>FMXSpinner1.Columns[0].RangeType := srtDateTime;<strong>TMS</strong>FMXSpinner1.Columns[0].StepType := sstDay;<strong>TMS</strong>FMXSpinner1.Columns[0].RangeFrom := Now;<strong>TMS</strong>FMXSpinner1.Columns[0].RangeTo := Now + 365 * 10;<strong>TMS</strong>FMXSpinner1.Columns[0].DateTimeValueFormat := 'DDD dd MMM';<strong>TMS</strong>FMXSpinner1.Columns[1].RangeType := srtNumber;<strong>TMS</strong>FMXSpinner1.Columns[1].StepType := sstNumber;<strong>TMS</strong>FMXSpinner1.Columns[1].RangeFrom := 0;<strong>TMS</strong>FMXSpinner1.Columns[1].RangeTo := 23;<strong>TMS</strong>FMXSpinner1.Columns[1].ValueFormat := '%d';<strong>TMS</strong>FMXSpinner1.Columns[1].Cyclic := true;68
<strong>TMS</strong> SOFTWARE<strong>TMS</strong> <strong>Pack</strong> <strong>for</strong> <strong>FireMonkey</strong>DEVELOPERS GUIDE<strong>TMS</strong>FMXSpinner1.Columns[2].RangeType := srtNumber;<strong>TMS</strong>FMXSpinner1.Columns[2].StepType := sstNumber;<strong>TMS</strong>FMXSpinner1.Columns[2].Step := 5;<strong>TMS</strong>FMXSpinner1.Columns[2].RangeFrom := 0;<strong>TMS</strong>FMXSpinner1.Columns[2].RangeTo := 55;<strong>TMS</strong>FMXSpinner1.Columns[2].ValueFormat := '%.2d';<strong>TMS</strong>FMXSpinner1.Columns[2].Cyclic := true;- ColumnAppearanceo AutoSize: When true, size of the spinner columns is calculated automatically.o Spacing: Sets the spacing between the columns.o TextSpacing: Sets the spacing between the text drawn in the columns.- Columns: A collection of spinner columns that can be configured in various ways.o Cyclic: When true, values are displayed as endless loop. The values are cyclicrepeated when scrolling up or down.o DateRangeFrom / DateRangeTo: The range used when the rangetype is configuredto used dates (srtDateTime). The step defines the amount of divisions betweenthese 2 range properties.o Font / FontAppearance: The color and font of the text in a column.o OnlyDate: If the RangeType is set to use datetime values, the SelectedValuecontains only the Date part.o RangeFrom / RangeTo: Defines the range of values used when setting theRangeType to srtNumber.o SelectedValue: Gets or sets the selected value. This property is used <strong>for</strong> bothdatetime range and the number range.o Step: The amount of steps between the start and end range in either number ordatetime mode.o StepType: When not using srtNumber range type, the StepType can be set toincrease per second, minute, hour, day, month or year.o TextAlign: Sets the alignment of the text within a column.o ValueFormat: Sets the <strong>for</strong>matting of the value when RangeType is srtNumber.o Width: Sets the width of the column if the Autosizing is false.- SmoothScrolling: When dragging and holding the left mouse button the value changes. Ifsmoothscrolling is false, the value is snapped inside the selected value area. Ifsmoothscrolling is true, the value is only snapped when releasing the left mouse button.69
<strong>TMS</strong> SOFTWARE<strong>TMS</strong> <strong>Pack</strong> <strong>for</strong> <strong>FireMonkey</strong>DEVELOPERS GUIDET<strong>TMS</strong>FMXLEDMeter / T<strong>TMS</strong>FMXLEDScopeThe T<strong>TMS</strong>FMXLEDScope is a collection of T<strong>TMS</strong>FMXLEDMeter components (channels). The scopedisplays a range of LED meters that have LED segments that be displayed in an active or inactivestate. The LED meters are added through the Channels collection property and can be configuredseparately. Each LED channel has a Start-, Stop-, ActiveStart- and ActiveStopColor. The transitionbetween these colors is automatically calculated <strong>for</strong> each LED segment in the meter.The maximum value is set with the Steps property. This sets the number of small LED segmentsdisplayed. With the Value property, the number of LEDs highlighted with the Active color is set.Each channel has a peak value that is displayed as a white segment by default. The peak value isautomatically raised to the maximum value of the channel. If the channel value lowers, the peakvalue remains on the highest value. The peak value is an optional indicator enabled with theShowPeak property. The peak value can also be programmatically set via PeakValue.A T<strong>TMS</strong>FMXLEDMeter can be treated as a single channel.- Channels: a collection of channels that contain a LED meter shape.o ActiveStartColor / ActiveStopColor / StartColor / StopColor: Sets the color range<strong>for</strong> active and inactive states.o PeakColor / PeakValue / ShowPeak: Sets the color of the peak value, the peakvalue displayed and whether the peak value is visible.o Steps: The amount of segments between the StartColor and StopColor. The colortransition is automatically calculated.70
<strong>TMS</strong> SOFTWARE<strong>TMS</strong> <strong>Pack</strong> <strong>for</strong> <strong>FireMonkey</strong>DEVELOPERS GUIDET<strong>TMS</strong>FMXLED / T<strong>TMS</strong>FMXLEDBarSimilar to the T<strong>TMS</strong>FMXLEDScope, the T<strong>TMS</strong>FMXLEDBar is a collection of T<strong>TMS</strong>FMXLEDs that can beused separately. LEDs are added or removed via the LEDs collection or set with the Count property.Just like with the scope, the bar is not stylable through the IDE style editor. The color of the LEDscan be changed per LED. Each LED has a base color which is used to automatically calculate the offand on color of the LED. With the state property the LED can be set to the on (true) or off (false)stat. In the active state, the LED uses the OnColor otherwise the OffColor. Note that setting theBaseColor at design time will automatically cause the LED to calculate a bright color <strong>for</strong> the onstate and a darker color <strong>for</strong> the off state. If the automatic calculated OnColor or OffColor is notwanted, these properties can also be set directly.The LEDBar has a Value property which automatically sets the state property of the LEDs to on <strong>for</strong>all LEDs that fall in range between 0 and the Value property.- Count: The amount of LEDs displaying in the bar.- Leds: A collection of LEDs used inside the bar. This way, each LED on the bar can be given adifferent color.o BaseColor: The color used to set the On- and OffColor.o OnColor: The color used when the LED is in the on state.o OffColor: The color used when the LED is in the off state.o State: The property that determines if the LED is on or off.- Spacing: The spacing between the LEDs.T<strong>TMS</strong>FMXSliderThe slider consists of 4 elements that define the default layout: the elementcontainer whichrepresents the background, the slider button element and the on and off element. When editing theslider via the IDE style editor, the on and off element are separated from the control to be visuallystyleable. After applying the style, the on and off elements are aligned inside theelementcontainer.The slider has a State property that is used to switch between on and off. You can use the mouse tointeract with the slider, clicking in the left or right part, or dragging the button, switches the stateof the slider.71
<strong>TMS</strong> SOFTWARE<strong>TMS</strong> <strong>Pack</strong> <strong>for</strong> <strong>FireMonkey</strong>DEVELOPERS GUIDET<strong>TMS</strong>FMXTileListArchitecture1) Header: The header of the tilelist that contains elements <strong>for</strong> navigation.2) Header Arrows: The arrows <strong>for</strong> page navigation (left and right arrows)3) Header Bullets: Bullets that indicate the number of pages and the current page index. Canbe uses to navigate through pages.4) Footer: The footer of the tilelist that contains elements <strong>for</strong> navigation.5) Footer Arrows: The arrows <strong>for</strong> page navigation (left and right arrows)6) Footer Bullets: Bullets that indicate the number of pages and the current page index.Bullets can be clicked to navigate through pages.7) Content: The area where the tiles are displayed and where either page based or horizontalscrolling occurs.8) ContentScroll: The scrolling area where the tiles are displayed and where the scrollingoccurs. Depending on the scroll mode, either the tiles scroll by page or simply horizontally.9) DefaultTile: Holds the default tile appearance and container <strong>for</strong> optional elements in tiles.10) DefaultTileBitmap: The default tile bitmap that can be linked in various ways to an image.This also supports BitmapContainer.11) DefaultTileCaption / DefaultTileDescription: Default elements in the tile used to displaythe caption and description of the tile.12) DefaultDetailTile: The default tile appearance of the detail view (that appears whenhovering over the main tile).72
<strong>TMS</strong> SOFTWARE<strong>TMS</strong> <strong>Pack</strong> <strong>for</strong> <strong>FireMonkey</strong>DEVELOPERS GUIDEStyling13) DefaultDetailTileBitmap: Similar to the DefaultTileBitmap but used <strong>for</strong> the <strong>for</strong> the detailview of the tile.14) DefaultDetailTileCaption / DefaultDetailTileDescription: Similar to DefaultTileCaption,DefaultTileDescription but used <strong>for</strong> the detail view of the tile.15) DefaultDetailTileAnim: The animation that is used to popup the detail tile over the mainview of the tile.16) DefaultTileAnim*: Default animations to animate the tiles when reordering / dragging.17) DefaulTileBadge: The default appearance of the tile badge that can be shown on top of thetile as an indicator.With the <strong>FireMonkey</strong> design philosophy in mind, we have made the TileList completely styleable.When editing the custom or default style when right-clicking on the component (See: GeneralFiremonkey component usage guidelines) the basic TileList layout is defined with several styleableelements. Elements can be removed, added and modified and updates are reflected in thecomponent when applying the edited style.Programmatically, almost every element is accessible with a function. When you want to style anelement programmatically, you can use the appropriate function. Below is an overview of eachelement that is styleable at designtime and at runtime:function GetHeader: TControl;function GetFooter: TControl;function GetContent: TControl;function GetScrollContent: TControl;function GetHeaderBullet: TControl;function GetHeaderBulletList: TControl;function GetFooterBulletList: TControl;function GetFooterBullet: TControl;function GetHeaderArrowLeft: TControl;function GetHeaderArrowRight: TControl;function GetFooterArrowLeft: TControl;function GetFooterArrowRight: TControl;function GetContentList: TControl;function GetContentListAnim: TAnimation;function GetContentListScroll: TControl;function GetDefaultDetailTile(Source: TFMXObject): TControl;function GetDefaultDetailTileCaption(Source: TFMXObject): TControl;function GetDefaultDetailTileNotes(Source: TFMXObject): TControl;function GetDefaultDetailTileBitmap(Source: TFMXObject): TControl;function GetDefaultDetailTileContent(Source: TFMXObject): TControl;function GetDefaultTileByName(AStyleName: String): TControl;function GetDefaultTile: TControl;function GetDefaultTileCaption(Source: TFMXObject): TControl;function GetDefaultTileNotes(Source: TFMXObject): TControl;function GetDefaultTileBitmap(Source: TFMXObject): TControl;function GetDefaultTileBadge: TControl;function GetDefaultTileContent(Source: TFMXObject): TControl;Some functions require a parameter: Source: TFMXObject. The tilelist supports multiple customdefault styles <strong>for</strong> the tile appearance. This is explained in a different chapter. When the parameteris nil, the default tile style is returned, else the custom default tile style can be found with theGetDefaultTileByName function that can be used as a parameter <strong>for</strong> the other functions.73
<strong>TMS</strong> SOFTWARE<strong>TMS</strong> <strong>Pack</strong> <strong>for</strong> <strong>FireMonkey</strong>DEVELOPERS GUIDEThese are the most important functions that return the element that is available in the default styleor the style of the item when it is cloned. A complete list can be found when typing the name of thecomponent and search through all the “Get*” functions and <strong>for</strong> the Tableview Item the functionsthat have “Shape” in the name. When an item is created, you will notice that each item has a Shapefunction. This shape function returns the cloned default tile from the default style. From eachshape there are equivalents <strong>for</strong> the caption, bitmap, notes…. Below is an overview of the Shape*functions that can be uses to get access to the tile shape that has been created.function ShapeDetail: TControl;function ShapeDetailBitmap: TControl;function ShapeDetailCaption: TControl;function ShapeDetailNotes: TControl;function ShapeDetailContent: TControl;function ShapeBitmap: TControl;function ShapeCaption: TControl;function ShapeBadge: TControl;function ShapeNotes: TControl;function ShapeContent: TControl;function ShapeContentWrapper: TControl;function ShapeDetailAnimation: TAnimation;function ShapeAnimationX: TAnimation;function ShapeAnimationY: TAnimation;function ShapeAnimationW: TAnimation;function ShapeAnimationH: TAnimation;Properties / Methods / EventsBelow is a list of properties, methods and events in alphabetic order that expose the corefunctionality of the component and that need a short introduction be<strong>for</strong>e delving into the details ofthe component.T<strong>TMS</strong>FMXTileList published properties- BitmapContainer: The bitmapcontainer used in combination with the tiles collection toshow a bitmap inside a tile.- Columns: Defines the number of columns displayed on one page.- ColumnWidth: Sets a specific columnwidth <strong>for</strong> a tile, instead of automatically calculatingthe width. When this property is different from 0 the Columns property is ignored.- Filtering: Sets the type of filtering the tile list uses. The lfStart and lfRandom optioncreates a subset of tiles that matches the search string.- FilterMode: Sets the filtering mode. This selects between filtering and searching in the tilelist, showing / marking the tiles that that match the string.- HorizontalSpacing: Horizontal spacing between tiles.- KeyBoardFilter: Allows typing on the keyboard to filter / search in the list.- KeyBoardMode: Switches the keyboard mode between page navigation and tile navigation.- LookupTime: The time the lookup remains active in seconds. When the lookuptime haspassed the lookup filter is reset to an empty string.- MultiSelect: When true, selection of multiple tiles is enabled.- NavigationMode: Selects between page mode and scroll mode.- PageHeight: Sets the height of the page which can be used in combination with scrollnavigation mode.- PageIndex: The current selected page.- PageWidth: The width of the page which can be used in combination with scroll navigationmode.- Reorder: Enables reordering of tiles.74
<strong>TMS</strong> SOFTWARE<strong>TMS</strong> <strong>Pack</strong> <strong>for</strong> <strong>FireMonkey</strong>DEVELOPERS GUIDE- RowHeight: Sets a specific rowheight <strong>for</strong> a tile, instead of automatically calculating theheight. When this property is larger than 0 the rows property is ignored.- Rows: Defines the number of rows available on one page.- SelectedTileIndex: The last selected tile index.- Styles: Collection of custom tile styles, cloned from the default tile style.- TileOptions: Defines which elements are visible in a tile. This can improve overallper<strong>for</strong>mance since the unchecked elements are not cloned and thus not available in thetile.- Tiles: The collection of tiles.- VerticalSpacing: Vertical spacing between tiles.Tile published properties in Tiles collection- Badge: The text that is shown in the badge in the left top corner of the tile.- BitmapName: The name of the bitmap that is used to show the bitmap inside the tile. Thebitmap is only shown when loBitmap is set in TileOptions.- CanSelect: Sets whether a tile can be selected.- Caption: The caption of tile.- ColumnSpan: Stretches the tile over the specified number of columns.- DataObject: Reference to an object that contains additional in<strong>for</strong>mation.- DataString: An extra additional string object.- DetailBitmapName: The name of the bitmap that is used to show the bitmap inside thedetail tile.- DetailCaption: The caption of the detail view of the tile.- DetailNotes: The notes of the detail view of the tile.- DetailSizePercentage: The percentage of the detail tile that is shown on top of the maintile. 100% means that the detail view of the tile covers the normal view entirely.- Empty: Sets a tile as empty and counts it as a tile <strong>for</strong> calculating the position of the othertiles. An empty tile appears as a hole within other tiles on the page.- EnableDetail: Enables showing the detail view of the tile on hovering.- Notes: The notes of the tile.- ReadOnly: Enables / Disables interaction with the tile.- RowSpan: Stretches the tile over the specified number of rows.- Selected: Set the tile in selected state when the CanSelect property is true.- Tag: The tag property to identify the tile.- Transparent: Hides the background of the tile.Public procedures, functions, properties on T<strong>TMS</strong>FMXTileList level- function GetLookupKey: String;Return the current lookupkey of the tile list when using keyboard mode.- procedure ApplyFilter(AFilter: String);Applies a filter on the tile list, showing only the tiles with a caption that matches the filter- function GetIndexAtPosition(ATile: T<strong>TMS</strong>FMXTile; X, Y: Single):Integer;Returns the index of the tile on X and Y position. This function is used to drag/drop tiles anduses the ATile parameter to exclude the index of the tile that is dragged.- procedure ClearFilter;Clears the filtering.- procedure ClearAllTiles(AShape: T<strong>TMS</strong>FMXTileShape);Clears all selected tile shapes except the shape that is passed through as a parameter.75
<strong>TMS</strong> SOFTWARE<strong>TMS</strong> <strong>Pack</strong> <strong>for</strong> <strong>FireMonkey</strong>DEVELOPERS GUIDE- procedure SelectAllTilesBetween(AStartTileIndex, AStopTileIndex:Integer);Selects tiles between a given start and stop index. Not that it is required that multiselection is enabled.- procedure DeSelectAllTiles(ATile: T<strong>TMS</strong>FMXTile = nil);Deselects all tiles except the tile that is passed as a parameter.- procedure SelectTiles(ArrTiles: array of integer);Deselects all tiles that are passed as an array of tile indexes.- procedure BeginUpdate; override;Method to use in combination with EndUpdate to limit the component recalculation andinternal update calls to one single action.- procedure EndUpdate; override;Method to use in combination with BeginUpdate to limit the component recalculation andinternal update calls to one single action.- function FindTileIndexBy(ARow, AColumn: Integer): Integer;Returns the tile index by a given Row and Column.- function FindNextTileIndexBy(ARow, AColumn, APageIndex: Integer):Integer;Returns the next tile by a Row and Column on a specific page.- function FindPreviousTileIndexBy(ARow, AColumn, APageIndex: Integer):Integer;Returns the previous tile by a Row and Column on a specific page.- function PageCount: Integer;Returns the number of pages.- procedure NextPage;Navigates to the next page.- procedure PreviousPage;Navigates to the previous page.- procedure GoToPage(APageIndex: Integer);Navigates to page number APageIndex. First page starts at index 0.Public procedures, functions, properties on T<strong>TMS</strong>FMXTile level- function TileList: T<strong>TMS</strong>FMXTileList;Returns the tilelist parent control of the tile.- function AllowDisplay: Boolean;Function that returns whether a tile can be displayed or not (in combination with filtering)- function Shape: T<strong>TMS</strong>FMXTileShape;Returns the shape that is created <strong>for</strong> the tile.76
<strong>TMS</strong> SOFTWARE<strong>TMS</strong> <strong>Pack</strong> <strong>for</strong> <strong>FireMonkey</strong>DEVELOPERS GUIDE- procedure UpdateTile;Updates the tile display elements to match the settings in the tile collection item.- property TilePosition: TTilePosItem;Returns the tile position inside the page, which contains in<strong>for</strong>mation about the row andcolumn and page index.- procedure ShowDetail;Shows the detail view of the tile.- procedure HideDetail;Hides the detail view of the tile.- property State: T<strong>TMS</strong>FMXTileState;The State of the tile: normal, selected, down, hover.- function GetBitmapContainer: T<strong>TMS</strong>FMXBitmapContainer;Returns the BitmapContainer associated with the TileList when available.Events published on T<strong>TMS</strong>FMXTileList level- OnBulletClick: Event called when a page bullet in the header or footer is clicked.- OnLoadTile: Event called when loading a tile <strong>for</strong> the first time. Additional settings <strong>for</strong> thetile can be dynamically applied from this event.- OnUnLoadTile: Event called when unloading a tile when it is not necessary to display itanymore. (Browsing through the pages).- OnCustomizeTile: Event called when a tile is created and customized. In this event,additional settings can be applied to the tile that are critical <strong>for</strong> a visual update whenresizing, scrolling, etc…- OnCustomizeTileBadge: Event called when a tile badge is created and customized.- OnCustomizeBullet: Event called when a page bullet is created and customized.- OnNextPageClick: Event called when clicking on the right arrow on the header or footer.- OnPreviousPageClick: Event called when clicking on the left arrow on the header or footer.- OnTileClick: Event called when clicking on a tile.- OnTileMouseDown: Event called when the mouse button is down on a tile.- OnTileMouseUp: Event called when the mouse button is released on a tile.- OnTileMouseMove: Event called when the mouse is hovering over a tile.- OnTileMouseEnter: Event called when the mouse is entering a tile.- OnTileMouseLeave: Event called when the mouse is leaving a tile.- OnTileShowDetail: Event called when the detail tile is shown.- OnTileHideDetail: Event called when the detail tile is hiding.- OnFilter: Event called when filtering the list (keyboard or programmatically).- OnFilterFinished: Event called when filtering the list has finished (the lookuptime isexceeded).- OnTileStateChanged: Event called when the state of a tile has changed (normal, hover,down, selected states).Adding and removing tilesAdding items can be done at designtime and at runtime. Click on the component to view the Tilesproperty. This is a default collection editor and can be used to add or remove items.77
<strong>TMS</strong> SOFTWARE<strong>TMS</strong> <strong>Pack</strong> <strong>for</strong> <strong>FireMonkey</strong>DEVELOPERS GUIDEItems can also be added programatically:varit: T<strong>TMS</strong>FMXTile;i: Integer;begin<strong>TMS</strong>FMXTileList1.BeginUpdate;<strong>for</strong> I := 0 to 100 dobeginit := <strong>TMS</strong>FMXTileList1.Tiles.Add;it.Caption := 'Item ' + inttostr(I);it.Notes := 'Hello World !';end;<strong>TMS</strong>FMXTileList1.EndUpdate;Whenever an item is added, the display list is normally rebuilt. Note that all calls to the<strong>TMS</strong>FMXTileList are embedded with BeginUpdate and EndUpdate calls here. With a BeginUpdate andEndUpdate call this update process to rebuild the display list is blocked and then executed once,i.e. when EndUpdate is called.To remove an item programmatically, just call the item’s destructor.BadgesEach tile has a Badge property that is able to show additional in<strong>for</strong>mation on top. The style <strong>for</strong> thisbadge can be modified in the default style of the tile list in the stylebook. To show a badge on a tileset the Badge property to the string of choice.<strong>TMS</strong>FMXTileList1.Margins.Left := 50;<strong>TMS</strong>FMXTileList1.Margins.Top := 50;<strong>TMS</strong>FMXTileList1.Margins.Right := 50;<strong>TMS</strong>FMXTileList1.Margins.Bottom := 50;with <strong>TMS</strong>FMXTileList1.Tiles.Add dobeginBadge := '123';end;78
<strong>TMS</strong> SOFTWARE<strong>TMS</strong> <strong>Pack</strong> <strong>for</strong> <strong>FireMonkey</strong>DEVELOPERS GUIDETile StylesWhen opening the stylebook editor, you will notice the default tile style. This style is applied to alltiles that are added to the tilelist. Changing this style will be reflected in all the tiles. When youwant to change the style of one or multiple tiles that must differ from the default style there are 2options that can be used to customize the tile style.1) Through the OnCustomizeTile event.Below is a code sample that changes the default background color and caption color of all odd tiles(by tile index).procedure TForm1.<strong>TMS</strong>FMXTileList1CustomizeTile(Sender: TObject;ATile: T<strong>TMS</strong>FMXTile; ATileShape: TControl);varshp: T<strong>TMS</strong>FMXTileShape;beginshp := ATile.Shape;if Assigned(shp) and Odd(ATile.Index) thenbeginshp.Fill.Color := claRed;(shp.ShapeCaption as TText).Fill.Color := claWhite;end;end;79
<strong>TMS</strong> SOFTWARE<strong>TMS</strong> <strong>Pack</strong> <strong>for</strong> <strong>FireMonkey</strong>DEVELOPERS GUIDE2) Through custom styles.The tile list supports multiple custom styles that are cloned from the default style. With thistechnique the designing can be done through the stylebook editor instead of programatically. Tocreate a new custom style, add a style item to the Styles collection of the tilelist.The StyleName property of this style will automatically be named ‘[custom]defaulttile1’. You canchange this be<strong>for</strong>e starting the stylebook editor. When making changes afterwards, the updatedname will not be reflected in the stylebook! A good practice is to first add the number of customstyles needed in the list and then edit the style of the tilelist.When right-clicking on the component and selecting “edit custom style…”, a new custom tile stylewill be added next to the default tile style. You will notice that the new style is added to thetreeview list on the right. When changing the appearance, the update will not be reflectedimmediately. To use this style inside the tilelist <strong>for</strong> specific tiles, you can select this style in thetiles collection editor. Clicking on the dropdown control <strong>for</strong> the property StyleLookup lists allavailable custom style to choose from.80
<strong>TMS</strong> SOFTWARE<strong>TMS</strong> <strong>Pack</strong> <strong>for</strong> <strong>FireMonkey</strong>DEVELOPERS GUIDEIn this sample we have changed the background color of the custom tile style to blue and thecaption and notes font color to white. Selecting this custom style or setting it programmaticallyafter adding a tile in the tiles collection editor will use this style to create the tile shape.varit: T<strong>TMS</strong>FMXTile;i: Integer;begin<strong>TMS</strong>FMXTileList1.BeginUpdate;<strong>for</strong> I := 0 to 100 dobeginit := <strong>TMS</strong>FMXTileList1.Tiles.Add;it.Caption := 'Item ' + inttostr(I);it.Notes := 'Hello World !';if Odd(I) thenit.StyleLookup := '[custom]defaulttile1';end;<strong>TMS</strong>FMXTileList1.EndUpdate;81
<strong>TMS</strong> SOFTWARE<strong>TMS</strong> <strong>Pack</strong> <strong>for</strong> <strong>FireMonkey</strong>DEVELOPERS GUIDEColumns and RowsThe tile list can contain multiple pages each consisting of multiple tiles organized in a grid that isdefined with a columns and rows property. By default the tiles are organized in a 3 x 3 grid.Changing the grid layout to a 3 x 2 grid <strong>for</strong> example will give you the result below.82
<strong>TMS</strong> SOFTWARE<strong>TMS</strong> <strong>Pack</strong> <strong>for</strong> <strong>FireMonkey</strong>DEVELOPERS GUIDEThe tiles take an area of 1 cell by default. With the ColumnSpan and RowSpan properties onT<strong>TMS</strong>FMXTile level the tiles can be “stretched” over multiple cells. Below is a sample of some tilesthat are reorganized by changing these properties.varit: T<strong>TMS</strong>FMXTile;i: Integer;begin<strong>TMS</strong>FMXTileList1.BeginUpdate;<strong>for</strong> I := 0 to 8 dobeginit := <strong>TMS</strong>FMXTileList1.Tiles.Add;it.Caption := 'Item ' + inttostr(I);it.Notes := 'Hello World !';it.ColumnSpan := Random(4);it.RowSpan := Random(4);end;<strong>TMS</strong>FMXTileList1.EndUpdate;The Row, Column, ColumnSpan and RowSpan properties are automatically calculated to make sureno tiles overlap already “occupied” cells. If a tile does not have enough room on the page itsupposed to be placed on, the tile is automatically placed on the next page.Paging / ScrollingThe tilelist supports two ways of displaying tiles. The tiles can either by organized in a page mode,displaying and loading only 3 pages (previous, current and next page), or in a scroll mode where allavailable tiles are loaded and displayed and a scrollbar is shown to scroll through the pages. Tochange between these 2 navigation techniques the property NavigationMode can be used. Thisproperty can be set to either nmPaging (Default) or nmScrolling.Below is a sample that shows the difference between these 2 navigation modes:83
<strong>TMS</strong> SOFTWARE<strong>TMS</strong> <strong>Pack</strong> <strong>for</strong> <strong>FireMonkey</strong>DEVELOPERS GUIDENavigating through the list with nmPaging modeNavigating through the list with nmScrolling modePageSizeThe page dimensions are limited to the width and height of the content inside the tilelist bydefault. With the PageWidth and PageHeight properties, these dimensions can be modified. Whenthe tile dimensions exceed the content list dimensions the vertical / horizontal scrollbars in thescrollbox will automatically appear when in nmScrolling navigation mode. Below is a sample with apageheight that is higher than the side of the tile content list.84
<strong>TMS</strong> SOFTWARE<strong>TMS</strong> <strong>Pack</strong> <strong>for</strong> <strong>FireMonkey</strong>DEVELOPERS GUIDEColumnWidth / RowHeightThe tiles can also be distributed along a customized columnwidth / rowheight. These properties areavailable on tilelist level and are 0 by default. When 0, the width and height are automaticallycalculated based on the PageWidth / PageHeight /Columns and Rows property. Below is a samplewhen ColumnWidth is set to 50.85
<strong>TMS</strong> SOFTWARE<strong>TMS</strong> <strong>Pack</strong> <strong>for</strong> <strong>FireMonkey</strong>DEVELOPERS GUIDEFiltering / Searching / LookupThe tile list supports filtering, searching and looking up tiles programmatically as well as with thekeyboard. Clicking on the list to set the focus and typing on the keyboard automatically filters thelist based on the typed text. The text that is typed can be retrieved by using the GetLookupKeyfunction. With the lookuptime property the time is set when the LookupKey is reset.Depending on the Filtering, FilterMode properties the list either displays a subset of tiles or selectsthe tile that matches the lookup string.Keyboard navigationThe tile list also supports navigation with the keyboard. By default the left, right, up and downarrow keys navigate through pages as if you are clicking on the page bullets. With theKeyBoardMode property this navigation can be changed to navigate within a page through the tiles.The arrow keys then select the next tile. If the tile is placed on the next page, the list willautomatically navigate to the next page.Reordering tilesBy default reordering tiles is enabled. When a tile is selected, the tile can be dragged on to a newlocation. To do this, first select the tile, then click and drag the selected tile to move it to a newposition in the page. The reordering is done automatically when dragging the tile, proposing theclosest new location at mouse coordinates <strong>for</strong> the tile to be dropped. Below is a screenshot ofreordering in action:When the tile is released, it will automatically animate to the new position.Per<strong>for</strong>manceA default TileList has some per<strong>for</strong>mance related options already preset to optimal values <strong>for</strong> themost typical use of the TileList. The amount of loaded pages is internally hardcoded to 3 (innmPaging mode), which will only load and display the items that match the requirements to bedisplayed in one of the three pages. When navigating, the next page is loaded while the previous86
<strong>TMS</strong> SOFTWARE<strong>TMS</strong> <strong>Pack</strong> <strong>for</strong> <strong>FireMonkey</strong>DEVELOPERS GUIDEpage is removed, freeing memory and removing unnessary tiles. More per<strong>for</strong>mance related settingscan be found in the TileOptions property. This contains a set of options that can be used todecrease the time the TileList needs to build up the display tiles list.As explained in the Architecture chapter, the default tile contains various elements that are clonedwhen adding tiles. These setting under TileOptions affect what parts of a tile are cloned or not.When an element is not checked in the TileOptions, the element is not cloned when the display tilelist is built and that increases the per<strong>for</strong>mance.By default the TileOptions have unchecked loBitmap, loDetail and loDetailBitmap. This means thatthese elements will not be cloned and will not be available in the tile. You can further improveper<strong>for</strong>mance by unchecking elements that are not necessary <strong>for</strong> your application.MultiSelectThe TileList supports multiple tile selection. Multiple tile selection can be enabled by setting theMultiSelect property to true. Clicking on a tile selects that tile and when you click on another tile,the previous tile is deselected. To select multiple tiles, you need to hold the CTRL or SHIFT key onthe keyboard. With the CTRL key you are able to select tiles of choice and with the SHIFT key thelist selects all tiles between the first and the last tile you have clicked.MultiSelect can be done by keyboard alone, pressing the direction keys and holding the CTRL orSHIFT key at the same time. Below is a sample of multiple tiles selected in the list by holding theCTRL key and clicking several tiles.Programmatically, in multiselect mode, the selected of an tile can be get or set with the tileSelected: Boolean property. In addition, three helper methods exist: SelectAllTilesBetween,SelectTiles, DeSelectAllTiles to programmatically select or unselect all Tiles at once.This sample code snippet programmatically selects items 1,3,5:<strong>TMS</strong>FMXTileList1.MultiSelect := true;<strong>TMS</strong>FMXTileList1.DeSelectAllTiles;<strong>TMS</strong>FMXTileList1.SelectTiles([1, 3, 5]);87
<strong>TMS</strong> SOFTWARE<strong>TMS</strong> <strong>Pack</strong> <strong>for</strong> <strong>FireMonkey</strong>DEVELOPERS GUIDELiveBindingsThe T<strong>TMS</strong>FMXTileList supports LiveBindings In the same way as the T<strong>TMS</strong>FMXTableView. Morein<strong>for</strong>mation can be found on the LiveBindings chapter at the T<strong>TMS</strong>FMXTableView component anddemos, or at the <strong>TMS</strong> TileList LiveBindings Demo.T<strong>TMS</strong>FMXHotSpotImageThe T<strong>TMS</strong>FMXHotSpotImage is a component that displays an image and that can have multiple areason the images that are sensitive to mouse hover or mouse clicks. The areas on the images can berectangular, circular or just irregular polygon shapes and <strong>for</strong> each area it can be choosen what coloror what bitmap texture is displayed in the area on mouse hover or mouse click. With the hotspoteditor it is easy to select or mark area’s of the image you want to create a hotspot <strong>for</strong>. The hotspoteditor is used at design-time but is also available <strong>for</strong> runtime use.When dropping a T<strong>TMS</strong>FMXHotSpotImage on the <strong>for</strong>m in the IDE, double-clicking the image starts thedesign-time hotspot editor. With the shape tools in the toolbar you can either create a rectangle,ellipse or polygon shape. The editor also has the capability of selecting an area with a magic wandtool. This selection is then converted to a polygon.Selecting a hotspot enables the detail pane that shows the different states of the hotspot (Click,Hover, Selected or Blink). Each hotspot state supports a Fill, Stroke or Bitmap appearance. Thebitmap can be loaded directly or through a bitmapcontainer that is assigned to theT<strong>TMS</strong>FMXHotSpotImage be<strong>for</strong>e starting the editor.88
<strong>TMS</strong> SOFTWARE<strong>TMS</strong> <strong>Pack</strong> <strong>for</strong> <strong>FireMonkey</strong>DEVELOPERS GUIDEAdding a new hotspotAdding a hotspot can be done programatically or at designtime.To add a hotspot programmatically, use the following code:varhotspot: T<strong>TMS</strong>FMXHotSpot;beginhotspot := <strong>TMS</strong>FMXHotSpotImage1.HotSpots.Add;hotspot.ShapeType := stRectangle;hotspot.X1 := 50;hotspot.Y1 := 50;hotspot.X2 := 100;hotspot.Y2 := 200;89
<strong>TMS</strong> SOFTWARE<strong>TMS</strong> <strong>Pack</strong> <strong>for</strong> <strong>FireMonkey</strong>DEVELOPERS GUIDEThe same can be done at designtime. When double-clicking the component the editor starts. Thiswill show the loaded image. To add a hotspot, select the tool of choice and click-drag and hold tocreate a new hotspot with the selected size and position:When releasing the mouse, the hotspot will automatically be created and selected.90
<strong>TMS</strong> SOFTWARE<strong>TMS</strong> <strong>Pack</strong> <strong>for</strong> <strong>FireMonkey</strong>DEVELOPERS GUIDEProperties can be changed in the right pane of the editor. Each hotspot can be further manipulatedafter creation, by dragging the handles to the position you want.For each state the hotspot can be in, there is a stroke and fill. Only the color can be modified in theeditor, the other brush related properties are accessible in the object inspector after closing theeditor. Each state also supports displaying an image loaded directly or through aT<strong>TMS</strong>FMXBitmapContainer by defining just the image name <strong>for</strong> the hotspot.Magic Wand ToolIn the editor, the magic wand tool automatically detects edges to convert to a hotspot of polygontype. Depending on the accuracy and tolerance the area will expand or contract. After selection ofthe magic wand tool the 2 sliders will become available to set these 2 additional parameters.The magic wand tool is also exposed as method in the T<strong>TMS</strong>FMXBitmap component and can be usedto automatically scan an area inside the loaded image. The function returns a polygon that containsa set of points that define the selected area. Below is a sample how to implement a Magic Wandtool at runtime, on a T<strong>TMS</strong>FMXBitmap.varPoly: TPolyGon;procedure TForm1.<strong>TMS</strong>FMXBitmap1MouseUp(Sender: TObject; Button:TMouseButton;Shift: TShiftState; X, Y: Single);beginpoly := <strong>TMS</strong>FMXBitmap1.MagicWand(X, Y);// <strong>for</strong>ce the bitmap to repaint with the new created polyon<strong>TMS</strong>FMXBitmap1.Repaint;end;procedure TForm1.<strong>TMS</strong>FMXBitmap1Paint(Sender: TObject; Canvas: TCanvas;const ARect: TRectF);beginCanvas.Stroke.Color := claWhite;Canvas.DrawPolygon(poly, 1);end;91
<strong>TMS</strong> SOFTWARE<strong>TMS</strong> <strong>Pack</strong> <strong>for</strong> <strong>FireMonkey</strong>DEVELOPERS GUIDEThis code will select a part of the clicked image, turn it into a polygon, and paint it in a whitestroked shape (see bottom part of the <strong>FireMonkey</strong> flame logo).Saving and loading hotspotsThe T<strong>TMS</strong>FMXHotSpotImage supports saving and loading files that define the layout of a collection ofhotspots. This can be achieved with the LoadFromFile and SaveToFile procedures. Images usedinside the hotspots will also be loaded and hotspots will automatically be created when loading afile.CompatibilityThe T<strong>TMS</strong>FMXHotSpotImage component is designed with backwards compatibility in mind. Layoutswhich are saved with the VCL hotspotimage component are 100% compatible with the <strong>FireMonkey</strong>hotspotimage. With the <strong>FireMonkey</strong> hotspotimage, the colors of the different states are replaced bya fill. An additional stroke feature is added, which will load the default values when necessary.T<strong>TMS</strong>FMXHotSpotEditorDialogOn the component palette you will also find a non-visual component T<strong>TMS</strong>FMXHotSpotEditorDialognext to the T<strong>TMS</strong>FMXHotSpotImage. This is a component that is able to show the hotspot editor atruntime. Simply drop the component on the <strong>for</strong>m and select the T<strong>TMS</strong>FMXHotSpotImage in thedropdown of the HotSpotImage property in the Object Inspector.Showing the dialog at runtime is a simple as calling the Execute function:<strong>TMS</strong>FMXHotSpotImageEditorDialog1.Execute;All changes at runtime will be reflected in the hotspotimage. The methodT<strong>TMS</strong>FMXHotSpotImage.HotSpots.SaveToFile() could be used to save the runtime edited hotspots tofile <strong>for</strong> example. Note that at runtime, the T<strong>TMS</strong>FMXHotSpotImageEditorDialog will work in Win32,Win64, Mac OS-X applications but is not supported <strong>for</strong> iOS, Android deployment.92
<strong>TMS</strong> SOFTWARE<strong>TMS</strong> <strong>Pack</strong> <strong>for</strong> <strong>FireMonkey</strong>DEVELOPERS GUIDET<strong>TMS</strong>FMXSpeedButtonThe T<strong>TMS</strong>FMXSpeedButton descends from TSpeedButton and adds the capability to display an image.The speed button can be styled when right-clicking on the component and selecting either “editcustom style…” or “edit default style…”.The speed button supports Staypressed functionality in combination with grouping. In other words,the speed button can act like a radiobutton / checkbox. To use this functionality, select thespeedbuttons you wish to group and set the GroupName to the same string of choice <strong>for</strong> all selectedcomponents. Set the StaysPressed boolean property to true on all speedbuttons of the same group.HTML is also supported as T<strong>TMS</strong>FMXHTMLText is used inside this button. More in<strong>for</strong>mation can befound on the <strong>TMS</strong> Mini HTML Rendering Engine chapter.T<strong>TMS</strong>FMXCalendar / T<strong>TMS</strong>FMXCalendarPickerThe T<strong>TMS</strong>FMXCalendar is a calendar which is able to display dates from a specific month in a variouspredefined date styles, such as weekend, current, normal and selected date styles. The importantdifference between the standard <strong>FireMonkey</strong> calendar and the T<strong>TMS</strong>FMXCalendar is the capability toper<strong>for</strong>m multi and/or disjunct selection of dates and to indicate multiple events on specific dates.MultiselectThe calendar can be used to select multiple dates, either a date range or a distinct selection ofdates. To enable multiselect set Calendar.MultiSelect := true. In the calendar, a single click selectsa day and dragging over the calendar, holding the left mouse button, selects a range of dates. Withthe keyboard, the shift and arrow keys can be used to select multiple dates. A combination betweenmouse and keyboard is also supported.If multiselect is enabled, disjunct selection can be enabled with Calendar.DisjunctSelect := True. Inthis mode, the ctrl key is used to change the focused date. The date can be selected with the spacekey. All functionality with the shift date range selection remains active.To get the selected dates, the calendar provides a collection of selected dates withCalendar.SelectedDays. A simple loop accessing the items of the collection returns the Date of thatitem giving you a set of selected days. In single selection mode, the Selected Date is returned withCalendar.SelectedDay.93
<strong>TMS</strong> SOFTWARE<strong>TMS</strong> <strong>Pack</strong> <strong>for</strong> <strong>FireMonkey</strong>DEVELOPERS GUIDEProgrammatic SelectionIn single day selection mode a specific date can be set with<strong>TMS</strong>FMXCalendar1.BeginUpdate;<strong>TMS</strong>FMXCalendar1.SelectedDay := Now;<strong>TMS</strong>FMXCalendar1.EndUpdate;To clear selection in single day mode set<strong>TMS</strong>FMXCalendar1.BeginUpdate;<strong>TMS</strong>FMXCalendar1.SelectedDay := -1;<strong>TMS</strong>FMXCalendar1.EndUpdate;In multi / distinct selection mode, dates can be added to the SelectedDays array<strong>TMS</strong>FMXCalendar1.BeginUpdate;<strong>TMS</strong>FMXCalendar1.MultiSelect := true;<strong>TMS</strong>FMXCalendar1.SelectedDays.Add.Date := Now;<strong>TMS</strong>FMXCalendar1.SelectedDays.Add.Date := Now + 1;<strong>TMS</strong>FMXCalendar1.SelectedDays.Add.Date := Now + 2;<strong>TMS</strong>FMXCalendar1.EndUpdate;To clear selection in multi day mode, clear the SelectedDays array.<strong>TMS</strong>FMXCalendar1.BeginUpdate;<strong>TMS</strong>FMXCalendar1.SelectedDays.Clear;<strong>TMS</strong>FMXCalendar1.EndUpdate;EventsThe calendar exposes events <strong>for</strong> customization / interaction.OnCurrentDayLabelClick: Event called when clicking on the current day in the footer.OnCustomizeDay: Event called when adding the date shapes to the calendar, allows you tochange the appearance, text and other important properties of a date shape. The object passedas a parameter is of type T<strong>TMS</strong>FMXCalendarDateShape.OnCustomizeEvent: Event called when adding an event indicator shape to the calendar, allowsyou to change the appearance, text and other important properties of an event indicator shapes.The object passed as a parameter is of type T<strong>TMS</strong>FMXCalendarDateEventShape.OnCustomizeWeekDay: Same event purpose as OnCustomizeDay but <strong>for</strong> the week days.OnCustomizeWeekNumber: Same event purpose as OnCustomizeDay but <strong>for</strong> the week number.OnDaySelect: Event called when selecting a day in the calendar.OnDisjunctDaySelect: Event called when disjunct selection is per<strong>for</strong>med.OnEventClick: Event called when clicking on a calendar event.OnEventShow: Event called when showing a calendar event.OnEventHide: Event called when hiding a calendar event.OnHasEvent: Event called per day to specify if that day has an event or not. If specified true, adefault event is created <strong>for</strong> that day, which can be customized in the OnCustomizeEvent event.OnMultiDaySelect: Event called when per<strong>for</strong>ming multi select.LayoutEach date displayed in the calendar is styleable (chapter “<strong>FireMonkey</strong> Styles”), through thestylebook designer or the calendar events that are published. Each date shape applies the style thatis defined in the default style of the calendar.94
<strong>TMS</strong> SOFTWARE<strong>TMS</strong> <strong>Pack</strong> <strong>for</strong> <strong>FireMonkey</strong>DEVELOPERS GUIDEEventsThe calendar has the capability of displaying multiple events per day which show a popup onhovering. The calendar events are displayed with a customizeable indicator that can be set to asquare, triangle, diamond or ellipse shape. To add an event to the calendar usevarevnt: T<strong>TMS</strong>FMXCalendarEvent;beginevnt := <strong>TMS</strong>FMXCalendar1.Events.Add;evnt.Date := Now;evnt.Text := 'This is a new event!';evnt.Kind := ekDiamond;Calendar Picker95
<strong>TMS</strong> SOFTWARE<strong>TMS</strong> <strong>Pack</strong> <strong>for</strong> <strong>FireMonkey</strong>DEVELOPERS GUIDEThe calendar picker inherits from the T<strong>TMS</strong>FMXEdit component and displays a calendar in adropdown control. The picker has the capability of displaying multiple selected dates as text withconfigurable delimiters.The picker exposes a Calendar property that has all the properties and capabilities of a defaultcalendar. To disable editing in the edit box of the picker the property CalendarPicker.ReadOnly :=True can be used.96
<strong>TMS</strong> SOFTWARE<strong>TMS</strong> <strong>Pack</strong> <strong>for</strong> <strong>FireMonkey</strong>DEVELOPERS GUIDET<strong>TMS</strong>FMXTrackBarThe T<strong>TMS</strong>FMXTrackBar is a vertically or horizontally oriented trackbar with semi transparent thumb.The trackbar displays the range from minimum to position with a different fill than the range fromposition to maximum.The T<strong>TMS</strong>FMXTrackBar allows to set a value between Minimum and Maximum. Tickmarks and valuecan be displayed at positions defined by T<strong>TMS</strong>FMXTrackBar.Step. The T<strong>TMS</strong>FMXTrackBar can beconfigured if and how the thumb should snap to the tickmarks. The <strong>for</strong>matting of the value iscontrolled with T<strong>TMS</strong>FMXTrackBar.ValueFormat and <strong>for</strong>matting that can be applied here is the sameas available with the Delphi Format() function.Snapping marginsThe property SnapMargin is used to snap the thumb to the values defined by the step property.Sample: When the SnapMargin is 10 and the step is 20, the thumb will immediately snap from 0 to20, from 20 to 40. When the SnapMargin is 1 the thumb can be freely moved between 0 and 20 untilthe thumb reaches 19, then the thumb will automatically snap to the value 20.When the SnapMargin is 0 there will be no snapping and the Thumb can be freely moved betweenminimum and maximum.T<strong>TMS</strong>FMXButtonThe T<strong>TMS</strong>FMXButton extends the TButton component and adds the ability to show an image andhtml <strong>for</strong>matted text. More in<strong>for</strong>mation on the html <strong>for</strong>matted text can be found on the <strong>TMS</strong> MiniHTML Rendering Engine chapter.97
<strong>TMS</strong> SOFTWARE<strong>TMS</strong> <strong>Pack</strong> <strong>for</strong> <strong>FireMonkey</strong>DEVELOPERS GUIDET<strong>TMS</strong>FMXColorSelector / T<strong>TMS</strong>FMXColorPickerThe T<strong>TMS</strong>FMXColorSelector and T<strong>TMS</strong>FMXColorPicker are components that are pre-configured,adding a standard set of colors to select from. Selecting a color is as easy as implementing theOnColorSelected event and/or programmatically retrieve the selected color with the<strong>TMS</strong>FMXColorSelector.SelectedColor or <strong>TMS</strong>FMXColorPicker.SelectedColor property. The pickervariant displays the selector in a popup.The T<strong>TMS</strong>FMXColorSelector and T<strong>TMS</strong>FMXColorPicker inherit from a base that allows a high level ofcustomization. Each base supports an item collection that can be displayed in a column and rowstructure. Each item can be optionally hidden and/or disabled, stretched over a column and / orrow span and can also be optionally configured as a seperator. The T<strong>TMS</strong>FMXColorSelectorcomponent overrides and adds a Color property to the base collection item class.The base selector and picker classes support custom drawing on three levels: the background, thecontent and the text. A sample can be found at the T<strong>TMS</strong>FMXBitmapSelector /T<strong>TMS</strong>FMXBitmapPicker chapter.T<strong>TMS</strong>FMXBitmapSelector / T<strong>TMS</strong>FMXBitmapPickerThe T<strong>TMS</strong>FMXBitmapSelector and T<strong>TMS</strong>FMXBitmapPicker are component that support displaying acollection of images to select from either directly in a selector or through a popup in a pickervariant. Selecting a bitmap is as easy as implementing the OnBitmapSelect event and/orprogrammatically retrieve the selected Bitmap with the <strong>TMS</strong>FMXColorSelector.SelectedBitmap /<strong>TMS</strong>FMXColorSelector.SelectedItemIndex or <strong>TMS</strong>FMXColorPicker.SelectedBitmap property. Thepicker variant displays the selector in a popup.The T<strong>TMS</strong>FMXBitmapSelector and T<strong>TMS</strong>FMXBitmapPicker inherit from a base that allows a high levelof customization. Each base supports an item collection that can be displayed in a column and rowstructure. Each item can be optionally hidden and/or disabled, stretched over a column and / orrow span and can also be optionally configured as a seperator. The T<strong>TMS</strong>FMXBitmapSelectorcomponent overrides and adds a Bitmap property to the base collection item class.The base selector and picker classes support custom drawing on three levels: the background, thecontent and the text. Below is a sample that demonstrates this.98
<strong>TMS</strong> SOFTWARE<strong>TMS</strong> <strong>Pack</strong> <strong>for</strong> <strong>FireMonkey</strong>DEVELOPERS GUIDEprocedure TForm1.FormCreate(Sender: TObject);varI: Integer;begin<strong>TMS</strong>FMXBitmapSelector1.BeginUpdate;<strong>TMS</strong>FMXBitmapSelector1.Items.Clear;<strong>TMS</strong>FMXBitmapSelector1.Columns := 3;<strong>TMS</strong>FMXBitmapSelector1.Rows := 1;<strong>for</strong> I := 0 to 2 do<strong>TMS</strong>FMXBitmapSelector1.Items.Add;<strong>TMS</strong>FMXBitmapSelector1.EndUpdate;end;procedure TForm1.<strong>TMS</strong>FMXBitmapSelector1ItemAfterDrawContent(Sender: TObject;ACanvas: TCanvas; ARect: TRectF; AItemIndex: Integer);varpt: TPathData;begincase <strong>TMS</strong>FMXBitmapSelector1.Items[AItemIndex].State ofisHover: InflateRect(ARect,-4, -4);isDown,isSelected:beginInflateRect(ARect,-4, -4);ACanvas.Stroke.Thickness := 2;ACanvas.Stroke.Color := claBlack;end;isNormal: InflateRect(ARect,-8, -8);end;ARect := RectF(Int(ARect.Left)+ 0.5, Int(ARect.Top) + 0.5,Int(ARect.Right) +0.5, Int(ARect.Bottom) + 0.5);case AItemIndex of0:beginACanvas.Fill.Color := claBlue;ACanvas.FillEllipse(ARect,1);ACanvas.DrawEllipse(ARect,1);end;1:beginACanvas.Fill.Color := claGreen;ACanvas.FillRect(ARect,0,0,AllCorners,1);ACanvas.DrawRect(ARect,0,0,AllCorners,1);end;2:beginpt := TPathData.Create;pt.MoveTo(PointF(ARect.Left + ARect.Width / 2, ARect.Top));pt.LineTo(PointF(ARect.Left + ARect.Width , ARect.Bottom));pt.LineTo(PointF(ARect.Left , ARect.Bottom));pt.ClosePath;ACanvas.Fill.Color := claRed;ACanvas.FillPath(pt,1);ACanvas.DrawPath(pt,1);99
<strong>TMS</strong> SOFTWARE<strong>TMS</strong> <strong>Pack</strong> <strong>for</strong> <strong>FireMonkey</strong>DEVELOPERS GUIDEpt.Free;end;end;end;T<strong>TMS</strong>FMXWebBrowser / T<strong>TMS</strong>FMXWebBrowserPopupThe T<strong>TMS</strong>FMXWebBrowser component is a wrapper around the native webbrowser component onWindows, iOS, Mac OS-X and Android. The T<strong>TMS</strong>FMXWebBrowser supports navigating to an URL,navigating <strong>for</strong>ward, back in history, executing javascript, loading a file and displaying a HTMLstring. The T<strong>TMS</strong>FMXWebBrowserPopup can be used to display the T<strong>TMS</strong>FMXWebBrowser componentmodally inside a separate <strong>for</strong>m or dialog depending on the target plat<strong>for</strong>m.Loading a basic HTML string<strong>TMS</strong>FMXWebBrowser1.LoadHTML('This is a HTMLstring');Loading a fileIn this sample we load a file directly inside the T<strong>TMS</strong>FMXWebBrowser component The file that weload is a html page with the following content:100
<strong>TMS</strong> SOFTWARE<strong>TMS</strong> <strong>Pack</strong> <strong>for</strong> <strong>FireMonkey</strong>DEVELOPERS GUIDEMy First HeadingMy first paragraph.The code to load the file is<strong>TMS</strong>FMXWebBrowser1.LoadFile(ExtractFilePath(ParamStr(0)) + 'test.html');Executing JavascriptIn this sample we load a html file directly inside the T<strong>TMS</strong>FMXWebBrowser, similar to the previoussample. The difference is that this file contains javascript to display the current date inside a label.The javascript function is called “DisplayDate()” and is called through a button click outside theT<strong>TMS</strong>FMXWebBrowser component. The html that is used in this sample is displayed below.My First JavaScriptClick Date to display current day, date, and time.function myFunction() {document.getElementById("demo").innerHTML = Date();}The code used to display the date from a button click:<strong>TMS</strong>FMXWebBrowser1.ExecuteJavascript('displayDate();');101
<strong>TMS</strong> SOFTWARE<strong>TMS</strong> <strong>Pack</strong> <strong>for</strong> <strong>FireMonkey</strong>DEVELOPERS GUIDET<strong>TMS</strong>FMXSignatureCaptureSignature drawing component with import/export capabilities. Draw signature on desktop or mobiledevices and export them to a stream, signature file or image. Compatible with VCL exportedsignature files. Optional clear button and text.T<strong>TMS</strong>FMXListEditorArchitectureT<strong>TMS</strong>FMXListEditor is an edit control to edit a list of values in a flexible way similar to the MicrosoftOutlook or iOS email address input. It consists of a collection of items that can be edited, added,deleted via the control. Items are displayed in the control as clickable rectangular areas with anappearance that is controlled by the property T<strong>TMS</strong>FMXListEditor.ItemAppearance. In addition totext, each item can optionally also display an image be<strong>for</strong>e and/or after the text. The images canbe clicked to per<strong>for</strong>m further actions on.102
<strong>TMS</strong> SOFTWARE<strong>TMS</strong> <strong>Pack</strong> <strong>for</strong> <strong>FireMonkey</strong>DEVELOPERS GUIDEAppearanceThe appearance of the T<strong>TMS</strong>FMXListEditor is controlled by T<strong>TMS</strong>FMXListEditor.ItemAppearance. Thisproperty holds settings <strong>for</strong> normal state of items and <strong>for</strong> selected state. The settings include:FillNormal: sets the background color of items in normal stateFontFillNormal: sets the text color of items in normal stateStrokeNormal : sets the color of the item border in normal stateRoundingNormal: sets the rectangle rounding of the item in normal stateFillSelected: sets the background color of items in selected stateFontFillSelected: sets the text color of items in selected stateStrokeSelected : sets the color of the item border in selected stateRoundingSelected: sets the rectangle rounding of the item in Selected stateFurther, there is:HorizontalSpacing : horizontal spacing in pixels between items in the listVerticalSpacing : vertical spacing in pixels between items in the listNote that the size of an item is determined by the text width & height (as well as optionally thewidth & height of a left and/or right image in the item). This means that to increase the height ofan item <strong>for</strong> example, the font size shall be increased.DefaultLeftImage, DefaultLeftImageName:Sets the image or image name <strong>for</strong> the (optional) image on the left side of items. WhenDefaultLeftImage, DefaultLeftImageName is set, all new items get the image specified byDefaultLeftImage or DefaultLeftImageName.DefaultRightImage, DefaultRightImageName:Sets the image or image name <strong>for</strong> the (optional) image on the right side of items. WhenDefaultRightImage, DefaultRightImageName is set, all new items get the image specified byDefaultRightImage or DefaultRightImageName.Note that the image on left side or right side can also be set per item via the item's LeftImage,LeftImageName and RightImage, RightImageName properties.Note that in order to use DefaultLeftImageName or DefaultRightImageName, aT<strong>TMS</strong>FMXBitmapContainer must be connected to T<strong>TMS</strong>FMXListEditor.BitmapContainer. This is acontainer control that holds multiple images and these images can be accessed via a unique nameidentifier.ItemsT<strong>TMS</strong>FMXListEditor.Items is the collection that holds the items <strong>for</strong> the list. When the user adds orremoves items, this is automatically reflected in the items collection. An item has followingproperties:LeftImage, LeftImageName : sets the image to appear on the left side of the itemRightImage, RightImageName : sets the image to appear on the right side of the itemTag : general purpose integer propertyText: holds the text of the itemValue: additional text property per item, available <strong>for</strong> storing extra in<strong>for</strong>mation such as a hyperlinketc...Adding items can be easily done via T<strong>TMS</strong>FMXListEditor.Items.Add.Text := 'New item' and deletingan item programmatically via T<strong>TMS</strong>FMXListEditor.Items.Delete(Index);103
<strong>TMS</strong> SOFTWARE<strong>TMS</strong> <strong>Pack</strong> <strong>for</strong> <strong>FireMonkey</strong>DEVELOPERS GUIDEEventsIn addition to the standard <strong>FireMonkey</strong> control events, T<strong>TMS</strong>FMXListEditor exposes some additionalevents relating to the process of editing items in the editor:OnEditorApplyStyle: event triggered when the inplace editor control is about to be created andretrieved its styleOnEditorCreate: event triggered when the inplace editor is about to be created and allows tocustomize the editor class. The default editor class is TEditOnEditorGetSize : event triggered just be<strong>for</strong>e the inplace editor will be displayed in the control andallows to customize the size of the editor in the controlOnEditorGetText: allows to retrieve a text value <strong>for</strong> the value of the editor. When the inplaceeditor derives from TCustomEdit, the .Text property is automatically used but this event allows touse inplace editors that expose the value via another property than .Text <strong>for</strong> example.OnEditorHide : event triggered when the inplace editor will be hiddenOnEditorShow : event triggered when the inplace editor will be displayedOnEditorUpdate : event triggered when the value of the inplace editor has changedOnItemCanDelete : event triggered when the user presses the DEL key <strong>for</strong> a selected item andallows to query <strong>for</strong> confirmation be<strong>for</strong>e the item is actually deletedOnItemClick : event triggered when an item is clickedOnItemDelete : event triggered when an item is deletedOnItemInsert : event triggered when a new item is inserted via inplace editingOnItemLeftImageClick : event triggered when the left image <strong>for</strong> an item is clickedOnItemRightImageClick :event triggered when the right image <strong>for</strong> an item is clickedOnItemUpdate : event triggered when the inplace editing stops and the value needs to be retrievedto update the item with.104
<strong>TMS</strong> SOFTWARE<strong>TMS</strong> <strong>Pack</strong> <strong>for</strong> <strong>FireMonkey</strong>DEVELOPERS GUIDE<strong>TMS</strong> Mini HTML rendering engineAnother core technology used among many components is a small fast & lightweight HTML renderingengine. This engine implements a subset of the HTML standard to display <strong>for</strong>matted text. It supportsfollowing tags :B : Bold tag : start bold text : end bold textExample : This is a testU : Underline tag : start underlined text : end underlined textExample : This is a testI : Italic tag : start italic text : end italic textExample : This is a testS : Strikeout tag : start strike-through text : end strike-through textExample : This is a testA : anchor tag : text after tag is an anchor. The 'value' after the href identifier is the anchor. Thiscan be an URL (with ftp,http,mailto,file identifier) or any text.If the value is an URL, the shellexecute function is called, otherwise, the anchor value can be foundin the OnAnchorClick event : end of anchorExamples : This is a testThis is a testThis is a testFONT : font specifier tag : specifies font oftext after tag.withface : name of the fontsize : HTML style size if smaller than 5, otherwise pointsize of the fontcolor : font color with either hexidecimal color specification or color constant name, ieclaRed,claYellow,claWhite ... etcbgcolor : background color with either hexidecimal color specification or color constantname : ends font setting105
<strong>TMS</strong> SOFTWARE<strong>TMS</strong> <strong>Pack</strong> <strong>for</strong> <strong>FireMonkey</strong>DEVELOPERS GUIDEExamples : This is a testThis is a testP : paragraph : starts a new paragraph, withleft, right or center alignment. The paragraph background color is set by the optional bgcolorparameter. If bgcolor and bgcolorto are specified,a gradient is displayed ranging from begin to end color. : end of paragraphExample : This is a testExample : This is a testExample : This has a red backgroundExample : This has a yellow backgroundExample : This has a gradientbackground*HR : horizontal line : inserts linebreak with horizontal lineBR : linebreak : inserts a linebreakBODY : body color / background specifier :sets the background color of the HTML text or the background bitmap fileExample : : sets background color to yellow : sets tiled background to file test.bmp : sets a vertical gradient from yellow towhiteIND : indent tagThis is not part of the standard HTML tags but can be used to easily create multicolumn text : indents with "indent" pixelsExample :This will be indented 75 pixels.IMG : image tag : inserts an image at the locationspecifier can be: name of image in a BitmapContainerOptionally, an alignment tag can be included. If no alignment is included, the text alignment withrespect to the image is bottom. Other possibilities are: align="top" and align="middle"The width & height to render the image can be specified as well. If the image is embedded inanchor tags, a different image can be displayed when the mouse is in the image area through theAlt attribute.Examples :This is an image SUB : subscript tag106
<strong>TMS</strong> SOFTWARE<strong>TMS</strong> <strong>Pack</strong> <strong>for</strong> <strong>FireMonkey</strong>DEVELOPERS GUIDE : start subscript text : end subscript textExample : This is 9/16 looks like 9/16SUP : superscript tag : start superscript text : end superscript textUL : list tag : start unordered list tag : end unordered listExample : List item 1List item 2 Sub list item A Sub list item BList item 3LI : list item: new list item specifier can be "square","circle" or "image" bullet. Color sets the color of the square or circle bullet. Imagename sets thePictureContainer image name <strong>for</strong> image to use as bulletSHAD : text with shadow : start text with shadow : end text with shadowZ : hidden text : start hidden text : end hidden textSpecial charactersFollowing standard HTML special characters are supported :< : less than : & : &" : " : non breaking space™ : trademark symbol€ : euro symbol§ : section symbol© : copyright symbol¶ : paragraph symbol107
<strong>TMS</strong> SOFTWARE<strong>TMS</strong> <strong>Pack</strong> <strong>for</strong> <strong>FireMonkey</strong>DEVELOPERS GUIDESamples<strong>TMS</strong> TableView Overview Demo108
<strong>TMS</strong> SOFTWARE<strong>TMS</strong> <strong>Pack</strong> <strong>for</strong> <strong>FireMonkey</strong>DEVELOPERS GUIDE<strong>TMS</strong> TableView LiveBindings Demo 1 & 2These demos are LiveBindings samples, specifically designed in combination with the <strong>TMS</strong>TableView.The demos load a ClientDataSet with a biolife.xml sample data file. The ClientDataSet is thenconnected, in combination with a DataSource, to a BindScope, which is needed to bind data to theListBindings component.109
<strong>TMS</strong> SOFTWARE<strong>TMS</strong> <strong>Pack</strong> <strong>for</strong> <strong>FireMonkey</strong>DEVELOPERS GUIDEThe demos makes use of a T<strong>TMS</strong>FMXBindDBTableViewLink that is created and registered specifically<strong>for</strong> the TableView component. When opening the editor of the BindingsList you will see variousbindings to different elements that are placed on the right side of the TableView. All theseelements have a binding to a specific field and will update when navigating through the list or withthe BindNavigator component.Selecting the <strong>TMS</strong>FMXBindDBTableViewLink1 component will display its properties in the objectinspector.110
<strong>TMS</strong> SOFTWARE<strong>TMS</strong> <strong>Pack</strong> <strong>for</strong> <strong>FireMonkey</strong>DEVELOPERS GUIDEAs with the TrackBar sample in the LiveBindings chapter this link has a SourceComponent and aControlComponent. The difference between this link and the link in the TrackBar sample is, that the<strong>TMS</strong>FMXBindDBTableViewLink component is able to bind multiple fields to multiple elements in theTableView.In these samples you will notice that there is binding to the Caption, Description and the Bitmap inthe TableView. To bind data to these elements, an expression must be added per element to theColumnExpressions collection. Double-clicking on the ColumnExpressions property opens theexpressions editor.For the caption and the Description, the binding has been added to a string field in the DataBase.To return the value <strong>for</strong> the current record, the AsString function must be used in the Sourceexpression. To bind the graphic, the source expression is Self. To know exactly which expression youmust use, you can click on Eval Source which will tell you the type of the data.When starting the application, the list will load the data and display the caption, description andbitmap. When clicking on the list, the navigation in the dataset is automatically handled. This is dueto the initialization of the T<strong>TMS</strong>FMXBindDBTableViewLink that has already taken care of thisfunctionality and has stored the correct values in the PosSource and PosControl expressions.PosSource:PosControl:111
<strong>TMS</strong> SOFTWARE<strong>TMS</strong> <strong>Pack</strong> <strong>for</strong> <strong>FireMonkey</strong>DEVELOPERS GUIDEBy default the tableview has properties <strong>for</strong> the Caption, Description and Bitmap. This can beexpanded to link to multiple fields in the database. After installing the package you will also noticea T<strong>TMS</strong>FMXTableViewEx. This implements an extended item class that introduces a new property:Extra.This property is then linked to an extra element that manually needs to be added through thestylebook editor with the correct name. This is a sample, so this can easily be expanded withmultiple properties <strong>for</strong> multiple elements.Below is the code of the extended list with the extended item property.unit FMX.<strong>TMS</strong>TableViewEx;interfaceusesClasses, FMX.<strong>TMS</strong>TableView, FMX.Objects;typeT<strong>TMS</strong>FMXTableViewItemEx = class(T<strong>TMS</strong>FMXTableViewItem)privateFExtra: string;procedure SetExtra(const Value: string);protectedprocedure UpdateExtra;procedure ApplyEx; override;publicfunction ShapeExtra: TText;publishedproperty Extra: string read FExtra write SetExtra;end;T<strong>TMS</strong>FMXTableViewItemsEx = class(T<strong>TMS</strong>FMXTableViewItems)publicfunction CreateItemClass: TCollectionItemClass; override;end;T<strong>TMS</strong>FMXTableViewEx = class(T<strong>TMS</strong>FMXTableView)protectedfunction GetClassStyleName: String; override;publicfunction CreateItems: T<strong>TMS</strong>FMXTableViewItems; override;end;implementation{ T<strong>TMS</strong>FMXTableViewItemsEx }function T<strong>TMS</strong>FMXTableViewItemsEx.CreateItemClass: TCollectionItemClass;beginResult := T<strong>TMS</strong>FMXTableViewItemEx;end;{ T<strong>TMS</strong>FMXTableViewEx }function T<strong>TMS</strong>FMXTableViewEx.CreateItems: T<strong>TMS</strong>FMXTableViewItems;112
<strong>TMS</strong> SOFTWARE<strong>TMS</strong> <strong>Pack</strong> <strong>for</strong> <strong>FireMonkey</strong>DEVELOPERS GUIDEbeginResult := T<strong>TMS</strong>FMXTableViewItemsEx.Create(Self);end;function T<strong>TMS</strong>FMXTableViewEx.GetClassStyleName: String;beginResult := ClassParent.ClassName + 'style';Delete(Result, 1, 1);end;{ T<strong>TMS</strong>FMXTableViewItemEx }procedure T<strong>TMS</strong>FMXTableViewItemEx.ApplyEx;begininherited;UpdateExtra;end;procedure T<strong>TMS</strong>FMXTableViewItemEx.SetExtra(const Value: string);beginif FExtra Value thenbeginFExtra := Value;if TableView.GetUpdateCount = 0 thenUpdateExtra;end;end;function T<strong>TMS</strong>FMXTableViewItemEx.ShapeExtra: TText;varshp: T<strong>TMS</strong>FMXTableViewItemShape;beginResult := nil;shp := Shape;if Assigned(shp) thenResult := shp.FindStyleResource('itemextra') as TText;end;procedure T<strong>TMS</strong>FMXTableViewItemEx.UpdateExtra;varshp: TText;beginshp := ShapeExtra;if Assigned(shp) thenshp.Text := Extra;end;end.When dropping this T<strong>TMS</strong>FMXTableViewEx on the <strong>for</strong>m, you will notice that it has the sameappearance as the normal T<strong>TMS</strong>FMXTableview. This is because the extra element needs to be addedto the list. Edit the custom style and add a new T<strong>TMS</strong>FMXHTMLText to the itemcenterrectangle so itlooks like the item appearance below:113
<strong>TMS</strong> SOFTWARE<strong>TMS</strong> <strong>Pack</strong> <strong>for</strong> <strong>FireMonkey</strong>DEVELOPERS GUIDESet the stylename of that item to “itemextra” since that is the name that is used in theT<strong>TMS</strong>FMXTableViewEx component to access this element.In the second demo the list is loaded with data from the biolife.xml and displaying an additionalfield in the item:If you open the BindingsList editor and open the BindDBTableViewLink expression editor you willnotice an extra column is now added and linked to the Extra property that is available in thisextended T<strong>TMS</strong>FMXTableViewEx component.114
<strong>TMS</strong> SOFTWARE<strong>TMS</strong> <strong>Pack</strong> <strong>for</strong> <strong>FireMonkey</strong>DEVELOPERS GUIDEThis way of introducing properties can be done <strong>for</strong> other properties and can be combined withvarious elements to allow displaying all fields in the tableview component.<strong>TMS</strong> Instrumentation WorkShop Demo115
<strong>TMS</strong> SOFTWARE<strong>TMS</strong> <strong>Pack</strong> <strong>for</strong> <strong>FireMonkey</strong>DEVELOPERS GUIDE<strong>TMS</strong> PageSlider Demo116
<strong>TMS</strong> SOFTWARE<strong>TMS</strong> <strong>Pack</strong> <strong>for</strong> <strong>FireMonkey</strong>DEVELOPERS GUIDE<strong>TMS</strong> TileList Demo117
<strong>TMS</strong> SOFTWARE<strong>TMS</strong> <strong>Pack</strong> <strong>for</strong> <strong>FireMonkey</strong>DEVELOPERS GUIDE<strong>TMS</strong> TileList LiveBindings DemoThis demo is a LiveBindings sample, specifically designed in combination with the <strong>TMS</strong>TileList. Thedemo loads a ClientDataSet with a biolife.xml sample data file. The ClientDataSet is thenconnected, in combination with a DataSource, to a BindScope, which is needed to bind data to theListBindings component.More in<strong>for</strong>mation <strong>for</strong> LiveBindings and samples can be found at the <strong>TMS</strong> TableView LiveBindingssamples and / or LiveBindings chapter.118
<strong>TMS</strong> SOFTWARE<strong>TMS</strong> <strong>Pack</strong> <strong>for</strong> <strong>FireMonkey</strong>DEVELOPERS GUIDE<strong>TMS</strong> HotSpotImage Demo119
<strong>TMS</strong> SOFTWARE<strong>TMS</strong> <strong>Pack</strong> <strong>for</strong> <strong>FireMonkey</strong>DEVELOPERS GUIDEGeneral <strong>FireMonkey</strong> component usage guidlinesWith the new <strong>FireMonkey</strong> framework, the methodology to create and use components hasdramatically changed. A component now exists of 2 parts.Visual partThe visual part is stored in a .style file, which is compiled to a .res file through an .rc file. The .rcfile is included in the package and must be recompiled whenever a change is made to the .style file.For each component in this set you will find a .style file. In this file, the default layout of thecomponent is stored.You will notice different elements, basic elements such as an arc, ellipse, rectangle …The elements combine and define the layout of a control. The basic elements are called shapes, andare already available by default. The <strong>TMS</strong> Instrumentation Workshop <strong>for</strong> <strong>FireMonkey</strong> takes this newway of styling one step further: custom shapes. In several components you will find custom shapesregistered and useable in a new application, and used in the component by default.Each shape or element can have a StyleName, which is used in the non-visual part of the control <strong>for</strong>interaction. This name is key in the relationship or “style-contract” between style resource andcomponent code.Non-visual partThe non-visual part of the component interacts with the shapes defined in the .style file. This is anormal .pas unit file as was used <strong>for</strong> VCL component, yet little to no painting is done in code. Asexplained above, the visual part is already defined by the style.The component defined in this unit needs to inherit from the TStyledControl class, which can bestyled at designtime. This is the base class <strong>for</strong> all styleable controls, just like the TCustomControlclass was the base class <strong>for</strong> most controls in the VCL framework.Naming conventionIt is always good practice to handle a consistent naming convention, there<strong>for</strong>e all .rc, .pas files and.style files should start with the <strong>FireMonkey</strong> unit scope name “FMX.”, such as the units: FMX.Types,FMX.Dialogs, FMX.Objects …Inside the style file each element can have a StyleName, which can be used in the non-visual part toaddress the resource. Make sure each element has a unique StyleName to avoid mistakes wheninteracting with the component. All combinations of elements must be encapsulated within arectangle element that is invisible by default (through the Fill.Kind and Stroke.Kind = bkNone), andhas the StyleName of the component.If you have a component named TFMXMyFirstControl, the the StyleName of the rectangleencapsulating all other elements must be set to FMXMyFirstControlStyle. The “T” is removed and“Style” is added.StylingEach component inherits from T<strong>TMS</strong>FMXBaseControl which implements a basic Fill and Stroke, andhandles the style resource files that define the default layout of the component. To change thevisuals of the component you no longer have corresponding properties in the object inspector.120
<strong>TMS</strong> SOFTWARE<strong>TMS</strong> <strong>Pack</strong> <strong>for</strong> <strong>FireMonkey</strong>DEVELOPERS GUIDERight-clicking on the component provides two extra menu items that can be used to edit the style ofthe component.Clicking either of these items will automatically drop a StyleBook component on the <strong>for</strong>m whenthere is not yet one available. A StyleBook holds custom and default styles. When the default styleis changed, dropping a new component of the same class will automatically get this changed style asdefined in the default style.- Edit Custom Style: Clicking on this item starts the IDE style editor and copies the defaultstyle of the component. The name of the style is set to the component name on the <strong>for</strong>mand appended with ‘Style1’. After changing properties through the editor, the style is thenapplied to the component. You will notice that the StyleLookUp property is set to the nameof the custom style in the stylebook.- Edit Default Style: Clicking on this item starts the IDE style editor and uses the default styleof the component. As with the Edit Custom Style option, the name of that style is set. Thedifference between these 2 options is that the default style has a generic name and isapplied to all new instances of the component that are dropped on the <strong>for</strong>m. TheStyleLoopup property is not set.121
<strong>TMS</strong> SOFTWARE<strong>TMS</strong> <strong>Pack</strong> <strong>for</strong> <strong>FireMonkey</strong>DEVELOPERS GUIDEThe IDE style editor can be started with these 2 options, or by double-clicking on the StyleBookeditor icon on the <strong>for</strong>m. In this example we have a T<strong>TMS</strong>FMXSlider component that will be alteredwith a custom style. Notice the <strong>TMS</strong>FMXSlider1Style1 name that is used <strong>for</strong> this style. When applyingthis style, you will also notice the StyleLookup property is set to <strong>TMS</strong>FMXSlider1Style1.122
<strong>TMS</strong> SOFTWARE<strong>TMS</strong> <strong>Pack</strong> <strong>for</strong> <strong>FireMonkey</strong>DEVELOPERS GUIDEEach component exists of different styleable elements. Simple click on an element in the editor tochange the appearance.You can also add new elements from the Tool palette.After applying the Style, the component will have the new custom style.Dropping a new T<strong>TMS</strong>FMXSlider component on the <strong>for</strong>m will not adopt this custom style and willhave the default style applied. Editing the default style is done in the same way, yet the name ofthe style differs and each new instance of the T<strong>TMS</strong>FMXSlider adopts the edited default style.123
<strong>TMS</strong> SOFTWARE<strong>TMS</strong> <strong>Pack</strong> <strong>for</strong> <strong>FireMonkey</strong>DEVELOPERS GUIDEGeneral component properties that do not directly define a visual appearance of the component arestill displayed in the Object Inspector. Note though that some properties will affect what isavailable in the style editor! For example, if a component provides a collection of visible itemsdisplayed in the control and it is desirable that the visual appearance of each item can becustomized, style elements (shapes) will be dynamically added or removed and be available in theIDE style editor.In other cases, it is desirable that the appearance <strong>for</strong> a given type of items in a control is identical.This can be represented as a single style element in the style editor. The component will theninternally copy the settings of the style element and apply it to each item displayed in the control.ComponentsMost of the components in the <strong>FireMonkey</strong> framework can be scaled and rotated without loss offunctionality and quality. As our base control implementation inherits from a base class whichsupports these features, all of the controls inside the <strong>TMS</strong> Instrumentation WorkShop set supportscaling and rotation.Scaling: With the Scale property you can specify how large the component must be. The defaultvalue of the X and Y property of the Scale is 1. This means that the default component layout is setat one, if you have a component which has 100 pixels width and height dimensions, setting the scaleX and Y properties to 1.5 will automatically increase the width and height to 150 pixels. Below aresome examples at designtime, which shows the capability of this property.Scale 1.5 Scale X 1.5 Y 1Scale 0.5 Scale X 0.5 Y 2Rotation: The rotation property rotates the component around the center by default, which can bechanged with the rotationcenter property. Rotating the component does not limit interactioncapabilities and functionality.45°124
<strong>TMS</strong> SOFTWARE<strong>TMS</strong> <strong>Pack</strong> <strong>for</strong> <strong>FireMonkey</strong>DEVELOPERS GUIDECross-plat<strong>for</strong>m deployment of applications with <strong>TMS</strong> <strong>Pack</strong> <strong>for</strong> <strong>FireMonkey</strong> componentsThe <strong>FireMonkey</strong> framework supports deployment to Windows, Mac OS-X, iOS and Android. Likewise,the <strong>TMS</strong> <strong>Pack</strong> <strong>for</strong> <strong>FireMonkey</strong> components can be used in applications targeted <strong>for</strong> these 4plat<strong>for</strong>ms. If you have created a <strong>FireMonkey</strong> HD project, you can specify in the Project Managerunder Target plat<strong>for</strong>ms Win32, Win64 or Mac OS-X plat<strong>for</strong>ms. Depending on the chosen plat<strong>for</strong>m,the compiler will generate a binary <strong>for</strong> debug or deployment <strong>for</strong> Windows 32bit, Windows 64bit orMac OS-X. The app will be automatically compiled with the installed <strong>TMS</strong> <strong>Pack</strong> <strong>for</strong> <strong>FireMonkey</strong>components.For iOS and Android, the <strong>FireMonkey</strong> HD project cannot be used. For this plat<strong>for</strong>m, create a new<strong>FireMonkey</strong> Mobile project. The <strong>TMS</strong> <strong>Pack</strong> <strong>for</strong> <strong>FireMonkey</strong> components supports both <strong>FireMonkey</strong>Mobile and <strong>FireMonkey</strong> HD projects and installs the components on the tool palette <strong>for</strong> both targets.As such, when choosing a <strong>FireMonkey</strong> iOS project, the <strong>TMS</strong> <strong>Pack</strong> <strong>for</strong> <strong>FireMonkey</strong> components will alsoappear in the IDE component palette.125