RAE Systems MultiRAE Lite Diffusion QuickStart Guide - Geotech ...
RAE Systems MultiRAE Lite Diffusion QuickStart Guide - Geotech ...
RAE Systems MultiRAE Lite Diffusion QuickStart Guide - Geotech ...
- No tags were found...
You also want an ePaper? Increase the reach of your titles
YUMPU automatically turns print PDFs into web optimized ePapers that Google loves.
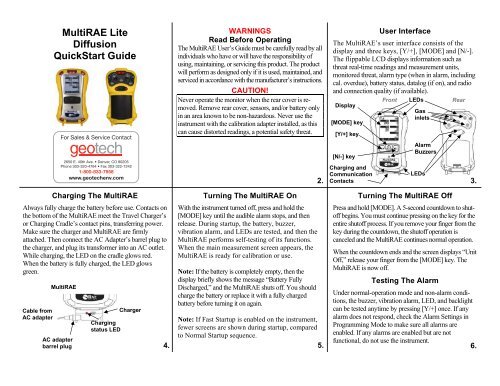
Multi<strong>RAE</strong> <strong>Lite</strong><strong>Diffusion</strong><strong>QuickStart</strong> <strong>Guide</strong>WARNINGSRead Before OperatingThe Multi<strong>RAE</strong> User’s <strong>Guide</strong> must be carefully read by allindividuals who have or will have the responsibility ofusing, maintaining, or servicing this product. The productwill perform as designed only if it is used, maintained, andserviced in accordance with the manufacturer’s instructions.CAUTION!Never operate the monitor when the rear cover is removed.Remove rear cover, sensors, and/or battery onlyin an area known to be non-hazardous. Never use theinstrument with the calibration adapter installed, as thiscan cause distorted readings, a potential safety threat.User InterfaceThe Multi<strong>RAE</strong>’s user interface consists of thedisplay and three keys, [Y/+], [MODE] and [N/-].The flippable LCD displays information such asthreat real-time readings and measurement units,monitored threat, alarm type (when in alarm, includingcal. overdue), battery status, datalog (if on), and radioand connection quality (if available).Front LEDsRearDisplay[MODE] key[Y/+] key[N/-] keyGasinletsAlarmBuzzersCharging andCommunicationLEDs2. Contacts3.Charging The Multi<strong>RAE</strong>Always fully charge the battery before use. Contacts onthe bottom of the Multi<strong>RAE</strong> meet the Travel Charger’sor Charging Cradle’s contact pins, transferring power.Make sure the charger and Multi<strong>RAE</strong> are firmlyattached. Then connect the AC Adapter’s barrel plug tothe charger, and plug its transformer into an AC outlet.While charging, the LED on the cradle glows red.When the battery is fully charged, the LED glowsgreen.Cable fromAC adapterMulti<strong>RAE</strong>AC adapterbarrel plugChargingstatus LEDCharger4.Turning The Multi<strong>RAE</strong> OnWith the instrument turned off, press and hold the[MODE] key until the audible alarm stops, and thenrelease. During startup, the battery, buzzer,vibration alarm, and LEDs are tested, and then theMulti<strong>RAE</strong> performs self-testing of its functions.When the main measurement screen appears, theMulti<strong>RAE</strong> is ready for calibration or use.Note: If the battery is completely empty, then thedisplay briefly shows the message “Battery FullyDischarged,” and the Multi<strong>RAE</strong> shuts off. You shouldcharge the battery or replace it with a fully chargedbattery before turning it on again.Note: If Fast Startup is enabled on the instrument,fewer screens are shown during startup, comparedto Normal Startup sequence.Turning The Multi<strong>RAE</strong> OffPress and hold [MODE]. A 5-second countdown to shutoffbegins. You must continue pressing on the key for theentire shutoff process. If you remove your finger from thekey during the countdown, the shutoff operation iscanceled and the Multi<strong>RAE</strong> continues normal operation.When the countdown ends and the screen displays “UnitOff,” release your finger from the [MODE] key. TheMulti<strong>RAE</strong> is now off.Testing The AlarmUnder normal-operation mode and non-alarm conditions,the buzzer, vibration alarm, LED, and backlightcan be tested anytime by pressing [Y/+] once. If anyalarm does not respond, check the Alarm Settings inProgramming Mode to make sure all alarms areenabled. If any alarms are enabled but are notfunctional, do not use the instrument.5. 6.
CalibrationThe Multi<strong>RAE</strong> can be automatically bump tested andcalibrated using the Auto<strong>RAE</strong> 2 Test and CalibrationSystem (refer to its User’s <strong>Guide</strong> for instructions).Manually calibrate using a fixed-flow regulator (flow ratebetween 0.5 and 1.0 liters per minute) and the suppliedspecial calibration adapter that covers the gas inlet:1. To begin calibration, connect the zero air orcalibration gas cylinder, flow regulator, and calibrationadapter to the Multi<strong>RAE</strong>.2. Enter Programming Mode by pressing and holding[MODE] and [Y/+] simultaneously until the passwordscreen appears.3. Input the 4-digit password. (The default password is“0000.” If you do not know the password, select“Done.”) Then follow the instructions for individualor multiple zero and span calibration.Important! After a bump test or calibration, remove thecalibration adapter to ensure correct readings. 7.Zero & Fresh Air CalibrationThe Multi<strong>RAE</strong> should be zero-calibrated in clean airwith 20.9% oxygen or with a cylinder of clean zero air.In Programming Mode, select “Fresh Air.” Then:Press [Y/+] to start a Fresh Air calibration for the listedsensors. All are fresh-air calibrated at once.To individually zero calibrate sensors:1. Select “Single Sensor Zero” and select a sensor.2. Press [Y/+] to select a sensor to zero calibrate.3. Start the flow of the zero gas, and press [Y/+].4. The screen says, “Zeroing” and counts down.5. When done, it says, “Zero Calibration Passed” (thereading should be 0.0 ppm or very close to it for toxicgas sensors, and 20.9% Vol. for an oxygen sensor).6. Shut off the flow of zero air (if used) and removethe calibration adapter.Note: If your Multi<strong>RAE</strong> is equipped with a CO 2 sensor,it must be zero calibrated using 100% Nitrogen (N 2 ), orisobutylene, instead of fresh air or zero air.Span CalibrationIn Programming Mode, and with “Multi Sensor Span” or“Single Sensor Span” highlighted:1. Press [Y/+]. The screen displays the sensor(s) to becalibrated.· Multi: The list is shown.· Single: Select a sensor and press [Y/+]2. Attach the calibration adapter, and connect thecalibration gas cylinder’s flow regulator to theMulti<strong>RAE</strong>, and start the gas flow.3. Press [Y/+] to start calibration.4. Upon completion, a pass/fail calibration resultappears and the readings are shown (they should bewithin ±10% of the span gas value).5. Turn off the gas and remove the calibrationadapter.8. 9.Bump (Functional) Testing<strong>RAE</strong> <strong>Systems</strong> recommends periodic bump testing toconfirm that the sensors and alarms are functional.Test each sensor with an appropriate test gas in aconcentration not less than the sensor’s low alarmsetting. To pass, each sensor should go at least to alow alarm. With the Multi<strong>RAE</strong> in Normal Mode:1. Connect the calibration gas cylinder, flowregulator, and calibration adapter to theMulti<strong>RAE</strong> and start the gas flow.2. Make sure the unit goes into at least a low alarmfor each of the tested sensors and that the buzzerproduces at least two beeps per second, the LEDlights flash on and off, and the vibration alarmfunctions. The display backlight shouldilluminate and an alarm message should beshown in the display.3. Turn off the gas flow.4. Remove the calibration adapter.Pressing [MODE] repeatedlyallows you to step throughthe screens as shown here.Note: The gray box indicatesthe datalog functions whendatalogging is in Manual mode.When datalogging is inAutomatic mode, this screendoes not appear. Refer to theUser’s <strong>Guide</strong> for informationon selecting Automatic, Manual,or Snapshot datalogging.Basic Menu Navigation In Hygiene Mode10. 11.P/N: M01-4017-000 Rev A 201106


