
Create successful ePaper yourself
Turn your PDF publications into a flip-book with our unique Google optimized e-Paper software.
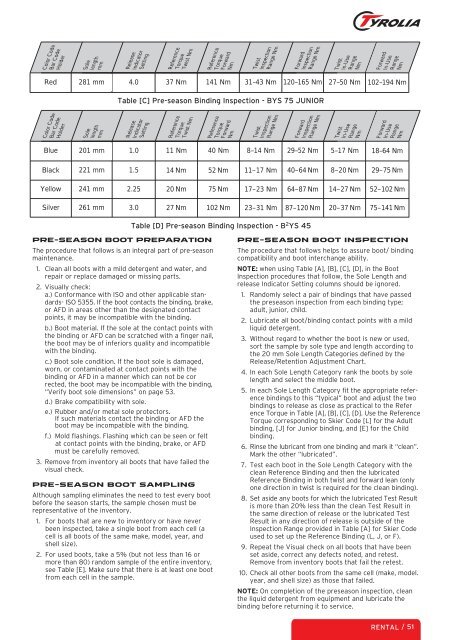
Color Code<br />
Bar Code<br />
Holder<br />
Red<br />
Color Code<br />
Bar Code<br />
Holder<br />
Blue<br />
Black<br />
Sole<br />
length<br />
mm<br />
281 mm<br />
Sole<br />
length<br />
mm<br />
201 mm<br />
Release<br />
Indicator<br />
Reference<br />
Torque<br />
Reference<br />
Torque<br />
PRE-SEASON BOOT PREPARATION<br />
The procedure that follows is an integral part of pre-season<br />
maintenance.<br />
1. Clean all boots with a mild detergent and water, and<br />
repair or replace damaged or missing parts.<br />
2. Visually check:<br />
a.) Conformance with ISO and other applicable standards-<br />
ISO 5355. If the boot contacts the binding, brake,<br />
or AFD in areas other than the designated contact<br />
points, it may be incompatible with the binding.<br />
b.) Boot material. If the sole at the contact points with<br />
the binding or AFD can be scratched with a finger nail,<br />
the boot may be of inferiors quality and incompatible<br />
with the binding.<br />
c.) Boot sole condition. If the boot sole is damaged,<br />
worn, or contaminated at contact points with the<br />
binding or AFD in a manner which can not be cor<br />
rected, the boot may be incompatible with the binding,<br />
“Verify boot sole dimensions” on page 53.<br />
d.) Brake compatibility with sole.<br />
e.) Rubber and/or metal sole protectors.<br />
If such materials contact the binding or AFD the<br />
boot may be incompatible with the binding.<br />
f.) Mold flashings. Flashing which can be.seen or felt<br />
at contact points with the binding, brake, or AFD<br />
must be carefully removed.<br />
3. Remove from inventory all boots that have failed the<br />
visual check.<br />
PRE-SEASON BOOT SAMPLING<br />
Although sampling eliminates the need to test every boot<br />
before the season starts, the sample chosen must be<br />
representative of the inventory.<br />
1. For boots that are new to inventory or have never<br />
been inspected, take a single boot from each cell (a<br />
cell is all boots of the same make, model, year, and<br />
shell size).<br />
2. For used boots, take a 5% (but not less than 16 or<br />
more than 80) random sample of the entire inventory,<br />
see Table [E]. Make sure that there is at least one boot<br />
from each cell in the sample.<br />
Twist Nm<br />
Forward<br />
Nm<br />
Twist<br />
Inspection<br />
Range Nm<br />
Forward<br />
Inspection<br />
4.0 37 Nm 141 Nm 31–43 Nm 120–165 Nm<br />
Table [C] Pre-season Binding Inspection - BYS 75 JUNIOR<br />
Release<br />
Indicator<br />
Setting<br />
Setting<br />
Reference<br />
Torque<br />
Twist Nm<br />
1.0 11 Nm<br />
221 mm 1.5 14 Nm<br />
Range Nm<br />
40 Nm 8–14 Nm 29–52 Nm<br />
52 Nm<br />
11–17 Nm 40–64 Nm<br />
Yellow 241 mm 2.25 20 Nm 75 Nm 17–23 Nm 64–87 Nm<br />
Reference<br />
Torque<br />
Forward<br />
Nm<br />
Twist<br />
Inspection<br />
Range Nm<br />
27–50 Nm<br />
Forward<br />
In-Use<br />
Range<br />
Nm<br />
102–194 Nm<br />
PRE-SEASON BOOT INSPECTION<br />
The procedure that follows helps to assure boot/ binding<br />
compatibility and boot interchange ability.<br />
NOTE: when using Table [A], [B], [C], [D], in the Boot<br />
Inspection procedures that follow, the Sole Length and<br />
release Indicator Setting columns should be ignored.<br />
1. Randomly select a pair of bindings that have passed<br />
the preseason inspection from each binding type;<br />
adult, junior, child.<br />
2. Lubricate all boot/binding contact points with a mild<br />
liquid detergent.<br />
3. Without regard to whether the boot is new or used,<br />
sort the sample by sole type and length according to<br />
the 20 mm Sole Length Categories defined by the<br />
Release/Retention Adjustment Chart.<br />
4. In each Sole Length Category rank the boots by sole<br />
length and select the middle boot.<br />
5. In each Sole Length Category fit the appropriate reference<br />
bindings to this “typical” boot and adjust the two<br />
bindings to release as close as practical to the Refer<br />
ence Torque in Table [A], [B], [C], [D]. Use the Reference<br />
Torque corresponding to Skier Code [L] for the Adult<br />
binding, [J] for Junior binding, and [E] for the Child<br />
binding.<br />
6. Rinse the lubricant from one binding and mark it “clean”.<br />
Mark the other “lubricated”.<br />
7. Test each boot in the Sole Length Category with the<br />
clean Reference Binding and then the lubricated<br />
Reference Binding in both twist and forward lean (only<br />
one direction in twist is required for the clean binding).<br />
8. Set aside any boots for which the lubricated Test Result<br />
is more than 20% less than the clean Test Result in<br />
the same direction of release or the lubricated Test<br />
Result in any direction of release is outside of the<br />
Inspection Range provided in Table [A] for Skier Code<br />
used to set up the Reference Binding (L, J, or F).<br />
9. Repeat the Visual check on all boots that have been<br />
set aside, correct any defects noted, and retest.<br />
Remove from inventory boots that fail the retest.<br />
10. Check all other boots from the same cell (make, model.<br />
year, and shell size) as those that failed.<br />
NOTE: On completion of the preseason inspection, clean<br />
the liquid detergent from equipment and lubricate the<br />
binding before returning it to service.<br />
Twist<br />
In-Use<br />
Range<br />
Nm<br />
5–17 Nm<br />
8–20 Nm<br />
14–27 Nm<br />
29–75 Nm<br />
52–102 Nm<br />
Silver 261 mm 3.0 27 Nm 102 Nm 23–31 Nm 87–120 Nm 20–37 Nm 75–141 Nm<br />
Forward<br />
Inspection<br />
Table [D] Pre-season Binding Inspection - B 2 YS 45<br />
Range Nm<br />
Twist<br />
In-Use<br />
Range<br />
Nm<br />
Forward<br />
In-Use<br />
Range<br />
Nm<br />
18–64 Nm<br />
RENTAL / 51