
You also want an ePaper? Increase the reach of your titles
YUMPU automatically turns print PDFs into web optimized ePapers that Google loves.
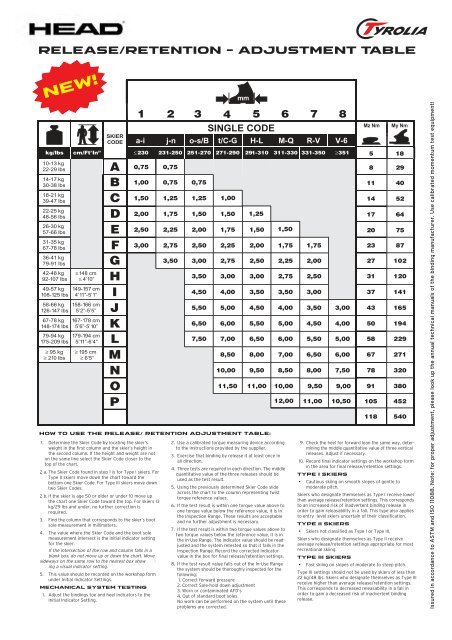
Release/retention - adjustment Table<br />
new!<br />
SKIER<br />
CODE<br />
1<br />
kg/lbs cm/Ft’In” ≤230 231-250 251-270 271-290 291-310 311-330 331-350 ≥351<br />
5 18<br />
10-13 kg<br />
22-29 lbs A 0,75 0,75<br />
8 29<br />
14-17 kg<br />
30-38 lbs B<br />
1,75<br />
2,00<br />
2,50<br />
3,00<br />
3,50 3,00<br />
4,50 4,00<br />
5,50 5,00<br />
1,00 0,75 0,75 11 40<br />
18-21 kg<br />
39-47 lbs C 1,50 1,25 1,25 14 52<br />
22-25 kg<br />
48-56 lbs D 2,00 1,75 1,50 1,50 17 64<br />
26-30 kg<br />
57-66 lbs E 2,50 2,25 2,00 1,75 1,50 1,00<br />
1,25<br />
1,50<br />
20 75<br />
31-35 kg<br />
67-78 lbs F 3,00 2,75 2,50 2,25 2,00 1,75 23 87<br />
36-41 kg<br />
79-91 lbs G 3,50 3,00 2,75 2,50 2,25 27 102<br />
42-48 kg<br />
92-107 lbs<br />
≤148 cm<br />
≤ 4’10” H 3,50 3,00 3,00 2,75 31 120<br />
49-57 kg<br />
108-125 lbs<br />
149-157 cm<br />
4’11”-5’1” I 4,50 4,00 3,50 3,50 37 141<br />
58-66 kg<br />
126-147 lbs<br />
158-166 cm<br />
5’2”-5’5” J 5,50 5,00 4,50 4,00 43 165<br />
67-78 kg<br />
148-174 lbs<br />
167-178 cm<br />
5’6”-5’10” K 6,50 6,00 5,50 5,00 50 194<br />
79-94 kg<br />
175-209 lbs<br />
179-194 cm<br />
5’11”-6’4” L 7,50 7,00 6,50 6,00 58 229<br />
≥ 95 kg<br />
≥ 210 lbs<br />
mm<br />
2 3 4 5 6 7 8<br />
SINGLE CODE<br />
≥ 195 cm<br />
≥ 6’5” M 8,50 8,00 7,00 6,50 6,00 67 271<br />
N 10,00 9,50 8,50 8,00 7,50 78 320<br />
O 11,50 11,00 10,00 9,50 9,00 91 380<br />
P<br />
1. Determine the Skier Code by locating the skier’s<br />
weight in the first column and the skier’s height in<br />
the second column. If the height and weight are not<br />
on the same line select the Skier Code closer to the<br />
top of the chart.<br />
2 a. The Skier Code found in step 1 is for Type I skiers. For<br />
Type II skiers move down the chart toward the<br />
bottom one Skier Code. For Type III skiers move down<br />
two Skier Codes.<br />
2 b. If the skier is age 50 or older or under 10 move up<br />
the chart one Skier Code toward the top. For skiers 13<br />
kg/29 lbs and under, no further correction is<br />
required.<br />
3. Find the column that corresponds to the skier’s boot<br />
sole measurement in millimeters.<br />
4. The value where the Skier Code and the boot sole<br />
measurement intersect is the initial indicator setting<br />
for the skier.<br />
If the intersection of the row and column falls in a<br />
blank box, do not move up or down the chart. Move<br />
sideways on the same row to the nearest box show -<br />
ing a visual indicator setting.<br />
5. This value should be recorded on the workshop form<br />
under Initial Indicator Settings.<br />
Mechanical System Testing<br />
1. Adjust the bindings toe and heel indicators to the<br />
Initial Indicator Setting.<br />
a-i j-n o-s/B t/C-G H-L M-Q R-V V-6<br />
HOW TO USE THE RELEASE/ RETENTION ADJUSTMENT TABLE:<br />
12,00<br />
2. Use a calibrated torque measuring device according<br />
to the instructions provided by the supplier.<br />
3. Exercise that binding by release it at least once in<br />
all direction.<br />
4. Three tests are required in each direction. The middle<br />
quantitative value of the three releases should be<br />
used as the test result.<br />
5. Using the previously determined Skier Code slide<br />
across the chart to the column representing twist<br />
torque reference values.<br />
6. If the test result is within one torque value above to<br />
one torque value below the reference value, it is in<br />
the Inspection Range. These results are acceptable<br />
and no further adjustment is necessary.<br />
7. If the test result is within two torque values above to<br />
two torque values below the reference value, it is in<br />
the In-Use Range. The indicator value should be readjusted<br />
and the system retested so that it falls in the<br />
Inspection Range. Record the corrected indicator<br />
value in the box for final release/retention settings.<br />
8. If the test result value falls out of the In-Use Range<br />
the system should be thoroughly inspected for the<br />
following:<br />
1. Correct forward pressure<br />
2. Correct Sole-hold down adjustment<br />
3. Worn or contaminated AFD’s<br />
4. Out of standard boot soles<br />
No work can be performed on the system until these<br />
problems are corrected.<br />
11,00<br />
10,50<br />
Mz Nm My Nm<br />
105 452<br />
118<br />
540<br />
9. Check the heel for forward lean the same way, determining<br />
the middle quantitative value of three vertical<br />
releases. Adjust if necessary.<br />
10. Record final indicator settings on the workshop form<br />
in the area for final release/retention settings.<br />
TYPE I SKIERS<br />
• Cautious skiing on smooth slopes of gentle to<br />
moderate pitch.<br />
Skiers who designate themselves as Type I receive lower<br />
than average release/retention settings. This corresponds<br />
to an increased risk of inadvertent binding release in<br />
order to gain releasability in a fall. This type also applies<br />
to entry level skiers uncertain of their classification.<br />
TYPE II SKIERS<br />
• Skiers not classified as Type I or Type III.<br />
Skiers who designate themselves as Type II receive<br />
average release/retention settings appropriate for most<br />
recreational skiing.<br />
TYPE III SKIERS<br />
• Fast skiing on slopes of moderate to steep pitch.<br />
Type III settings should not be used by skiers of less than<br />
22 kg/48 lbs. Skiers who designate themselves as Type III<br />
receive higher than average release/retention settings.<br />
This corresponds to decreased releasability in a fall in<br />
order to gain a decreased risk of inadvertent binding<br />
release.<br />
Issured in accordance to ASTM and ISO 11088. Note: for proper adjustment, please look up the annual technical manuals of the binding manufacturer. Use calibrated momentum test equipment!