Create successful ePaper yourself
Turn your PDF publications into a flip-book with our unique Google optimized e-Paper software.
SL 45 AND SR 45<br />
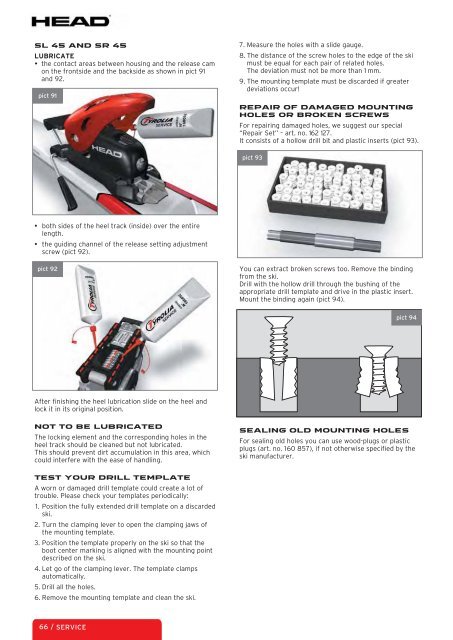
LUBRICATE<br />
• the contact areas between housing and the release cam<br />
on the frontside and the backside as shown in pict 91<br />
and 92.<br />
pict 91<br />
• both sides of the heel track (inside) over the entire<br />
length.<br />
• the guiding channel of the release setting adjustment<br />
screw (pict 92).<br />
pict 92<br />
After finishing the heel lubrication slide on the heel and<br />
lock it in its original position.<br />
NOT TO BE LUBRICATED<br />
The locking element and the corresponding holes in the<br />
heel track should be cleaned but not lubricated.<br />
This should prevent dirt accumulation in this area, which<br />
could interfere with the ease of handling.<br />
TEST YOUR DRILL TEMPLATE<br />
A worn or damaged drill template could create a lot of<br />
trouble. Please check your templates periodically:<br />
1. Position the fully extended drill template on a discarded<br />
ski.<br />
2. Turn the clamping lever to open the clamping jaws of<br />
the mounting template.<br />
3. Position the template properly on the ski so that the<br />
boot center marking is aligned with the mounting point<br />
described on the ski.<br />
4. Let go of the clamping lever. The template clamps<br />
automatically.<br />
5. Drill all the holes.<br />
6. Remove the mounting template and clean the ski.<br />
66 / SERVICE<br />
7. Measure the holes with a slide gauge.<br />
8. The distance of the screw holes to the edge of the ski<br />
must be equal for each pair of related holes.<br />
The deviation must not be more than 1 mm.<br />
9. The mounting template must be discarded if greater<br />
deviations occur!<br />
REPAIR OF DAMAGED MOUNTING<br />
HOLES OR BROKEN SCREWS<br />
For repairing damaged holes, we suggest our special<br />
“Repair Set” – art. no. 162 127.<br />
It consists of a hollow drill bit and plastic inserts (pict 93).<br />
pict 93<br />
You can extract broken screws too. Remove the binding<br />
from the ski.<br />
Drill with the hollow drill through the bushing of the<br />
appropriate drill template and drive in the plastic insert.<br />
Mount the binding again (pict 94).<br />
pict 94<br />
SEALING OLD MOUNTING HOLES<br />
For sealing old holes you can use wood-plugs or plastic<br />
plugs (art. no. 160 857), if not otherwise specified by the<br />
ski manufacturer.


