

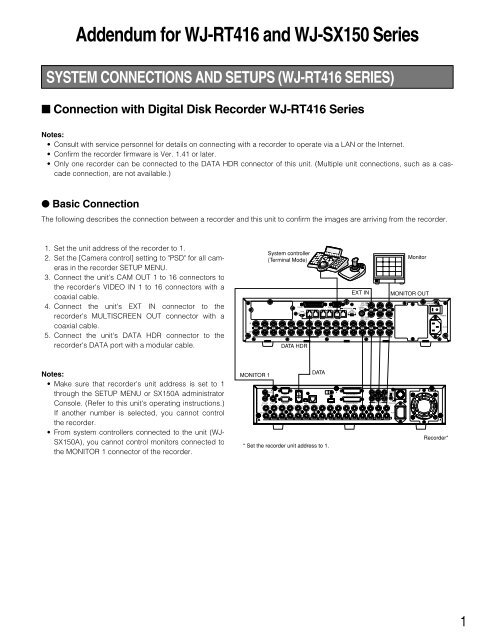
Connection with Digital Disk Recorder WJ-RT416 Series - Panasonic
Connection with Digital Disk Recorder WJ-RT416 Series - Panasonic
Connection with Digital Disk Recorder WJ-RT416 Series - Panasonic
- No tags were found...

Create successful ePaper yourself
Turn your PDF publications into a flip-book with our unique Google optimized e-Paper software.
● To Control a <strong>Recorder</strong> and Cameras via the NetworkThe following describes the connection between a recorder and this unit to control the recorder and camera via the network.1. Set the unit address of the recorder to 5 or higher. (Refer to the recorder's operating instructions.)2. Set the [Camera control] setting to "PSD" for all cameras in the recorder SETUP MENU.3. Connect the unit's CAM OUT 1 to 16 connectors to the recorder's VIDEO IN 1 to 16 connectors <strong>with</strong> coaxial cable.4. Connect the unit's EXT IN connector to the recorder's MULTISCREEN OUT connector <strong>with</strong> a coaxial cable.5. Connect the unit's DATA HDR and DATA 4 connectors to the recorder DATA port <strong>with</strong> a branched modular cable.6. Select the recorder's new unit address, which is set in Step 1, in 600 RECORDERS of SETUP MENU or the <strong>Recorder</strong> windowof <strong>WJ</strong>-SX150A Administrator Console. (Refer to this unit's operating instructions.)System controller(Terminal Mode)MonitorEXT INMONITOR OUTIN1615141312ALARMSERIALRS485(CAMERA)DATA HDR DATA 4 DATA 3 DATA 2 DATA 1LINETERMOFF ON 2 SELECT 411PS•DATA109RS485(CAMERA)8765EXT IN(PLAY IN)CAMERASW INEXT OUT(REC OUT)4334MONITOR OUT2121SIGNAL GNDPOWERAC INOUT161514131211109CAMERA87654321DATA HDRDATA 4(PS·Data)WV-CA48/10KMONITOR 1DATAAUX INSERIALRS485(CAMERA)AUDIO IN/ALARM OUT5 3 1POWERONOFFAUDIO OUTIN6 4 212MONITOR1MONITOR2DATA MODE 10/100BASE-T COPY1 ALARM IN/CONTOROL AUDIO IN SIGNAL GND16 15 14 13 12 11 10 9 8 7 6 5 4 3 2 1OUTAC IN16 1514 13 12 11 10 9 8 7 6 5 4 3 2 1VIDEOHUB/Router<strong>Recorder</strong>*LAN*** Set the recorder's unit address to 5 or larger.** LAN: Local Area NetworkNotes:• Select the PS.Data protocol for the DATA 4 setting. (Refer to this unit's operating instructions.)• If the recorder unit address, set in Step 1, and the recorder setting, set in Step 6, are different, the recorder will not beoperable.• You cannot use a PS.Data system controller <strong>with</strong> these connections.• From system controllers connected to the unit, you cannot control monitors connected to the MONITOR OUT 1 connectorof the recorder.2
● PS·Data <strong>Connection</strong>1. Set the unit address of the recorder to 5 or higher.2. Set the [Camera control] setting to "PSD" for all cameras in the recorder SETUP MENU.3. Connect the unit's CAM OUT 1 to 16 connectors to the recorder's VIDEO IN 1 to 16 connectors <strong>with</strong> coaxial cable.4. Connect the unit's DATA 4 Port connector to the recorder's DATA port <strong>with</strong> branched modular cable.5. Select the recorder's new unit address, which is set in Step 1, in 600 RECORDERS of SETUP MENU or the <strong>Recorder</strong> windowof <strong>WJ</strong>-SX150A Administrator Console. (Refer to this unit's operating instructions.)System controller(Terminal Mode)MonitorMONITOR OUTIN1615141312ALARMSERIALRS485(CAMERA)DATA HDR DATA 4 DATA 3 DATA 2 DATA 1LINETERMOFF ON 2 SELECT 411PS•DATA109RS485(CAMERA)8765EXT IN(PLAY IN)CAMERASW INEXT OUT(REC OUT)4334MONITOR OUT2121SIGNAL GNDPOWERAC INOUT161514131211109CAMERA87654321DATA 4(PS·Data)WV-CA48/10KDATAAUX INSERIALRS485(CAMERA)AUDIO IN/ALARM OUT5 3 1POWERONOFFAUDIO OUTIN6 4 212MONITOR1MONITOR2DATA MODE 10/100BASE-T COPY1 ALARM IN/CONTOROL AUDIO IN SIGNAL GND16 15 14 13 12 11 10 9 8 7 6 5 4 3 2 1OUTAC IN16 1514 13 12 11 10 9 8 7 6 5 4 3 2 1VIDEOMONITOR 1<strong>Recorder</strong>*MonitorSystem controller(PS·Data)* <strong>Recorder</strong> control from system controllers connected to the matrix switcher is not available.Notes:• Select the PS.Data protocol for the DATA 4 setting. (Refer to this unit's operating instructions.)• If the recorder's unit address, set in Step 1, and the recorder setting, set in Step 5, are different, the recorder will not beoperable.• Do not connect the recorder to the DATA HDR port.• From system controllers connected to the unit, you cannot control the recorder.• Only one matrix switcher can be connected in the PS.Data mode.● Settings of Administrator Console and SETUP MENU (OSD)If the <strong>WJ</strong>-SX150A Administrator Console is Ver. 2.03 or later,select "HD300".3
If the firmware of this unit is Ver. 2.03 or later,select "HD300" for "CONTROL" in 600 RECORDER ofSETUP MENU (OSD).600 RECORDERCONTROL ADR EXT IN610 MASTER ---620 SLAVE1 HD300 01 GENLOCK OFF630 SLAVE2 HD300 01 GENLOCK OFF640 SLAVE3 HD100 01650 SLAVE4 OFF GENLOCK OFF--COMMUNICATION STATUS--DATA BIT 7bitPARITY BIT ODDSTOP BIT 1bitBAUD RATE 9600bpsCOMM PORT SERIAL PORT<strong>WJ</strong>-<strong>RT416</strong> SERIES CONTROL (<strong>WJ</strong>-CU950/650 TERMINAL MODE)The matrix switcher can control the following function of the<strong>Digital</strong> <strong>Disk</strong> <strong>Recorder</strong> <strong>WJ</strong>-<strong>RT416</strong> <strong>Series</strong>. The following is theprocedure for the <strong>WJ</strong>-<strong>RT416</strong> <strong>Series</strong> SETUP MENU:Notes:• The following operating procedures are for the terminalmode. If you are using a PS.Data system controller,refer to page 6.• When a Multiplexer board is installed in the matrixswitcher, you can neither connect nor control a <strong>WJ</strong>-<strong>RT416</strong> <strong>Series</strong> recorder. You need to remove the boardfrom the matrix switcher.• Some parts of monitor displays described in this documentmay differ from the actual parts.■ Displaying <strong>WJ</strong>-<strong>RT416</strong> <strong>Series</strong>SETUP MENUTo display the <strong>WJ</strong>-<strong>RT416</strong> <strong>Series</strong> SETUP MENU, follow theprocedure below:1. Confirm that the <strong>WJ</strong>-<strong>RT416</strong> <strong>Series</strong> is correctly andsecurely connected.2. Select the desired monitor.3. Activate the recorder mode.Then, the selected monitornumber, recorder number, and "/HD300" will appear onthe LCD.System Setup 3015On Off5. Press the F1 button.System Setup 301On OffThe <strong>WJ</strong>-<strong>RT416</strong> <strong>Series</strong> SETUP MENU will appear on theactive monitor, and "B" mark will light up beside "On".The following functions and buttons are valid in SETUPMENU.JogDial clockwise: Increases a parameter.JogDial counterclockwise: Decreases a parameter.CAM (SET) button: Executes the selections and displaysa submenu.+ button: Increases a parameter.– button: Decreases a parameter.MON (ESC) button: Returns to the SETUP MENU or theprevious menu.3D joystick upward (D): Moves the cursor up.3D joystick downward (C): Moves the cursor down.3D joystick to the left (A): Moves the cursor to the left.3D joystick to the right (B): Moves the cursor to theright.Mon4 Cam--R4/HD3004. Press the MENU button repeatedly until "System Setup"appears on the LCD.4
6. To end the setting and return to normal view, press theF2 button when the SETUP MENU is displayed. The "B"mark will disappear from the LCD.Note: Both the JogDial and +/– buttons allow users tomove the cursor in the numeric field.● Stopping REC ONLY AlarmRecordingThe operations are the same as for the <strong>WJ</strong>-HD500 <strong>Series</strong>.(Refer to page 20 of "Addendum for WV-CU950/650 and<strong>WJ</strong>-SX150 <strong>Series</strong>".)■ Controlling <strong>Digital</strong> <strong>Disk</strong><strong>Recorder</strong> <strong>WJ</strong>-<strong>RT416</strong> <strong>Series</strong>The following are the operating procedures of the <strong>WJ</strong>-<strong>RT416</strong> <strong>Series</strong> via the system controller.● <strong>Recorder</strong> ModeBefore operating the recorder, it is necessary to activatethe recorder mode.1. Select the desired monitor.2. Press the recorder button. The system will activate therecorder mode.• The images from the recorder are displayed on theactive monitor in multiscreen segment.• The monitor number, camera number, recordernumber, and “/HD300” will appear on LCD.3. To exit the recorder mode, press the recorder button orselect the camera. The monitor number and cameranumber appear on the LCD again.● Multiscreen Segment SwitchingNote: The multiscreen segment patterns can be switchedas follows. (applicable for <strong>WJ</strong>-<strong>RT416</strong>)16 segment (channels 1-16) → 4 segment (channels 1-4) → 4 segment (channels 5-8) → 4 segment (channels9-12) → 4 segment (channels 13-16) → 6 segment(channels 1-6) → 6 segment (channels 7-12) → 9 segment(channels 1-9) → 16 segment (channels 1-16)● Normal PlaybackThe operations are the same as for the <strong>WJ</strong>-HD500 <strong>Series</strong>.(Refer to page 19 of "Addendum for WV-CU950/650 and<strong>WJ</strong>-SX150 <strong>Series</strong>".)Note: Refer to the recorder's operating instructions fordetails and other playback modes.■ Search PlaybackYou can search for recorded images by time and date.Every time you press the SEARCH/T&D SEARCH button inthe recorder mode, the monitor display will change as follows.Live image → Time & Date Search → List Search → Time &Data Search ...The following are the details on LCD display patterns.Search Mode /HD300Thumb Text CopyNote: The thumb and text menus are not available.● Time & Date SearchThe recorder images can be searched by time and date.1. Activate the recorder mode. (Press RECORDER button)2. Press the SEARCH button.3. Enter the camera number and the start date and time.Camera No.StartTime & Date Search05[SEARCH]:List SearchOKMonth-Day-Year10-22-2006 11:30:30Cancel4. The video of the selected date, time, and camera numberis played back.Note: The Factory’s default setting is the current dataand time.● Manual RecordingThe operations are the same as for the <strong>WJ</strong>-HD500 <strong>Series</strong>.(Refer to page 20 of "Addendum for WV-CU950/650 and<strong>WJ</strong>-SX150 <strong>Series</strong>".)5
● List Search1. Activate the recorder mode.2. Press the SEARCH button during the Time & DateSearch screen, then List Search screen appears.3. Enter the camera number, search start date and time,and search end date and time.4. A list appears in accordance <strong>with</strong> the entered information.Select an item from the list, and press the CAM(SET) button.List SearchCamera No. 01Month-Day-YearStart10-21-2006 11:30:30Month-Day-YearEnd10-22-2006 11:30:30Filtering Off[SEARCH]:Time & Date SearchOKCancelCam Quality08 SF07 FQ06 SF05 NQ04 EX03 SF02 FQ01 SF01-24-200601-24-200601-24-200601-24-200601-24-200601-24-200601-24-200601-24-2006Search ListStart10:43:2210:43:2210:43:2210:43:2210:43:2210:43:2210:43:2210:43:22End01-24-200601-24-200601-24-200601-24-200601-24-200601-24-200601-24-200601-24-200610:53:2210:53:2210:53:2210:53:2210:53:2210:53:2210:53:2210:53:22Page 001/002Prev Next Return5. The selected video is played back.<strong>WJ</strong>-<strong>RT416</strong> SERIES CONTROL (PS·DATA)The recorder control details are described in the WV-CU950 / WV-CU650 Operating Instructions.However, when the system controller (WV-CU950 / WV-CU650) is connected to the recorder via the matrix switcher(<strong>WJ</strong>-SX150 <strong>Series</strong>), the following differences will occur.2. Move the cursor to a position to be edited by performingeither of the following:• Move the 3D joystick controller to the right or left.• Rotate the shuttle ring clockwise or counterclockwise.■ Function Only Available <strong>with</strong><strong>WJ</strong>-<strong>RT416</strong> <strong>Series</strong>The following functions are available only when the systemcontroller (WV-CU950 OR WV-CU650) is connected to the<strong>WJ</strong>-<strong>RT416</strong> series via the matrix switcher (<strong>WJ</strong>-SX150 <strong>Series</strong>).● Time & Date Search PlaybackYou can search playback images by entering a desiredrecording date and time.Note: To cancel the entry, press the MON (ESC) or EXITbutton. The LCD display will return to the normal status.Mmm/DD/YYYY HH:MM 12Mar/17/2004 12:00 AM3. Enter the desired date and time by performing either ofthe following:• Rotate the JogDial clockwise or counterclockwise.• Press the + or – button.4. Press the PLAY/PAUSE button. The image <strong>with</strong> thespecified date and time will be played back on theactive monitor.After the image has been played back, the LCD willreturn to the default status.1. Press the SEARCH/T & D SEARCH button while holdingdown the SHIFT button. The time-and-date entry formwill appear on the LCD.Mmm/DD/YYYY HH:MM 12Mar/17/2004 12:00 AM6
<strong>WJ</strong>-<strong>RT416</strong> SERIES CONTROL (<strong>WJ</strong>-CU360C/CJ TERMINAL MODE)Available operations are the same as for the <strong>WJ</strong>-HD500<strong>Series</strong>. (Refer to the unit operating instructions.)This document describes operations applicable to the <strong>WJ</strong>-<strong>RT416</strong> <strong>Series</strong>.For the <strong>WJ</strong>-<strong>RT416</strong> series, only the functions describedbelow are available.● List Search1. Activate the recorder mode.2. Press the INDEX button during the Time & Date Searchscreen, then the List Search screen appears.List Search■ Controlling <strong>Digital</strong> <strong>Disk</strong><strong>Recorder</strong> <strong>WJ</strong>-<strong>RT416</strong> <strong>Series</strong>● Search playbackYou can search playback images using the SEARCH table.Every time you press the INDEX button, the display willchange as follows:Live image → Time & Date Search → List Search → Time &Data Search ...Camera No. 01Month-Day-YearStart10-21-2006 11:30:30Month-Day-YearEnd10-22-2006 11:30:30Filtering Off[SEARCH]:Time & Date SearchOKCancel● Time & Date SearchThe recorder images can be searched by time & date.1. Activate the recorder mode.(Press RECORDER button)2. Press the INDEX button.3. Enter the camera number and the start date and time,and press the SET key.3. Enter the camera number, search start date and time,and search end date and time.4. A list appears in accordance <strong>with</strong> the entered information.Select an item from the list, and press the CAM(SET) button.Search ListTime & Date SearchCamera No. 05Month-Day-YearStart10-22-2006 11:30:30[SEARCH]:List SearchCam Quality08 SF07 FQ06 SF05 NQ04 EX03 SF02 FQ01 SF01-24-200601-24-200601-24-200601-24-200601-24-200601-24-200601-24-200601-24-2006Start10:43:2210:43:2210:43:2210:43:2210:43:2210:43:2210:43:2210:43:22End01-24-200601-24-200601-24-200601-24-200601-24-200601-24-200601-24-200601-24-200610:53:2210:53:2210:53:2210:53:2210:53:2210:53:2210:53:2210:53:22Page 001/002OKCancelPrev Next Return4. The video of the selected date, time, and camera numberis played back.Note: The Factory’s default setting is the current dataand time.5. The selected video is played back.<strong>WJ</strong>-<strong>RT416</strong> SERIES CONTROL (<strong>WJ</strong>-CU360C/CJ PS·Data)Available operations are the same as for the <strong>WJ</strong>-HD500 <strong>Series</strong>. (Refer to the unit operating instruction.)7
COMMUNICATION PROTOCOL (FOR USERS OF <strong>WJ</strong>-<strong>RT416</strong> SERIES)The following commands have been described in the operating instructions of this unit. However, while the <strong>Digital</strong> <strong>Disk</strong><strong>Recorder</strong> <strong>WJ</strong>-<strong>RT416</strong> <strong>Series</strong> is being connected to the unit, the commands will be changed as follows:<strong>Recorder</strong> ControlItemTransmission Command(ASCII)CMD:RmmPnResponse (ASCII)Parameter (ASCII)StopANS:RmmSPnmm = Monitor No.n = 0:Stop playbackn = 1:Stop recordingIndexCMD:RmmSCnANS:RmmSCnn = 0:Search playback*n = 1:Time & date search playback*** Transmission command changes the monitordisplay as follows.Time & date search → List search → Time& date search ...** Date & time entry from matrix switcherappears.Multiscreen segmentswitchingCMD:RmmML ANSmmML Segment pattern change.Transmission command Changes the multiscreensegment pattern as follows.16 segment (1-16ch) → 4 (1-4ch) → 4 (5-8ch) → 4 (9-12ch) → 4 (13-16ch) → 6 (1-6ch) → 6 (7-12ch) → 9 (1-9ch) → 16...<strong>Panasonic</strong> System Solutions Company,Unit Company of <strong>Panasonic</strong> Corporation of North Americawww.panasonic.com/business/For customer support, call 1.800.528.6747Three <strong>Panasonic</strong> Way 2H-2, Secaucus, New Jersey 07094<strong>Panasonic</strong> Sales Company<strong>Panasonic</strong> Puerto Rico, Inc.AVE 65de Inf, Km 9.5 Carolina, PR 00985(787)750-4300<strong>Panasonic</strong> Canada Inc.5770 Ambler Drive, Mississauga, Ontario, L4W 2T3 Canada(905)624-5010http://www.panasonic.ca© <strong>Panasonic</strong> Corporation 2008 N0108-1108 3TR005404BAB Printed in Japan


