How To Install a Ladder-Bar Suspension - Chris Alston's Chassisworks
How To Install a Ladder-Bar Suspension - Chris Alston's Chassisworks
How To Install a Ladder-Bar Suspension - Chris Alston's Chassisworks
- No tags were found...

Create successful ePaper yourself
Turn your PDF publications into a flip-book with our unique Google optimized e-Paper software.
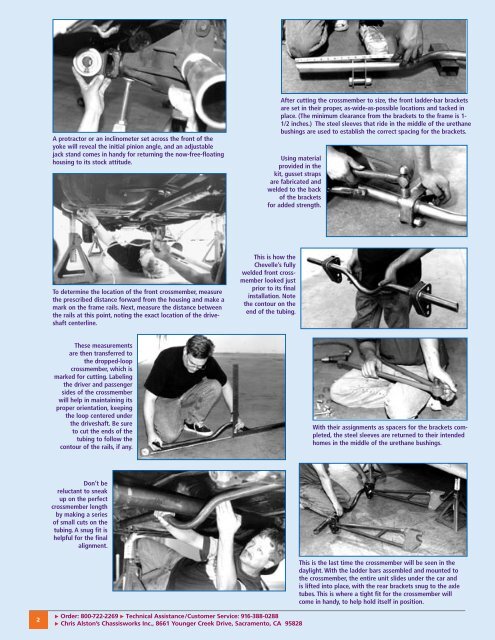
A protractor or an inclinometer set across the front of theyoke will reveal the initial pinion angle, and an adjustablejack stand comes in handy for returning the now-free-floatinghousing to its stock attitude.After cutting the crossmember to size, the front ladder-bar bracketsare set in their proper, as-wide-as-possible locations and tacked inplace. (The minimum clearance from the brackets to the frame is 1-1/2 inches.) The steel sleeves that ride in the middle of the urethanebushings are used to establish the correct spacing for the brackets.Using materialprovided in thekit, gusset strapsare fabricated andwelded to the backof the bracketsfor added strength.<strong>To</strong> determine the location of the front crossmember, measurethe prescribed distance forward from the housing and make amark on the frame rails. Next, measure the distance betweenthe rails at this point, noting the exact location of the driveshaftcenterline.This is how theChevelle’s fullywelded front crossmemberlooked justprior to its finalinstallation. Notethe contour on theend of the tubing.These measurementsare then transferred tothe dropped-loopcrossmember, which ismarked for cutting. Labelingthe driver and passengersides of the crossmemberwill help in maintaining itsproper orientation, keepingthe loop centered underthe driveshaft. Be sureto cut the ends of thetubing to follow thecontour of the rails, if any.With their assignments as spacers for the brackets completed,the steel sleeves are returned to their intendedhomes in the middle of the urethane bushings.Don’t bereluctant to sneakup on the perfectcrossmember lengthby making a seriesof small cuts on thetubing. A snug fit ishelpful for the finalalignment.This is the last time the crossmember will be seen in thedaylight. With the ladder bars assembled and mounted tothe crossmember, the entire unit slides under the car andis lifted into place, with the rear brackets snug to the axletubes. This is where a tight fit for the crossmember willcome in handy, to help hold itself in position.2 Order: 800-722-2269 Technical Assistance/Customer Service: 916-388-0288 <strong>Chris</strong> Alston’s <strong>Chassisworks</strong> Inc., 8661 Younger Creek Drive, Sacramento, CA 95828