VariStrut Adjustment and Tuning Guide - Chris Alston's Chassisworks
VariStrut Adjustment and Tuning Guide - Chris Alston's Chassisworks
VariStrut Adjustment and Tuning Guide - Chris Alston's Chassisworks

You also want an ePaper? Increase the reach of your titles
YUMPU automatically turns print PDFs into web optimized ePapers that Google loves.
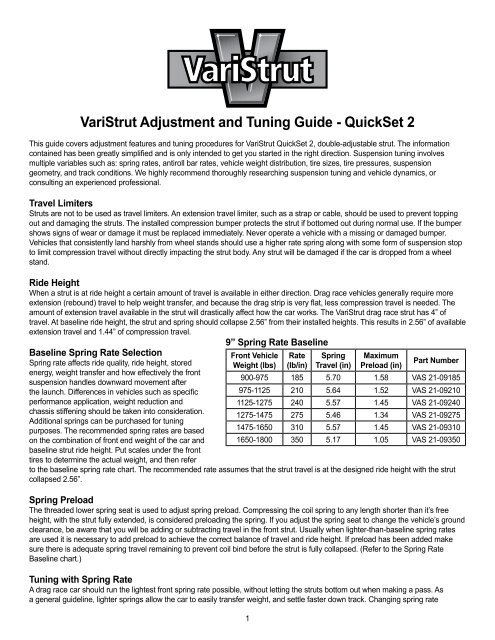
following procedures, only fine adjustments may be needed to tune for specific track conditions.Prior to TestingMake certain that wheelie bars are raised as high as possible while maintaining control <strong>and</strong> eliminating their influence asmuch as possible on damper settings. Begin with struts adjusted to the number 3 position for bump <strong>and</strong> rebound.Initial TestingFirst verify that the vehicle tracks straight before aggressively launching from the line. Begin with light acceleration <strong>and</strong> lowspeeds. If the vehicle tracks <strong>and</strong> drives acceptably at this level, make incremental increases in acceleration <strong>and</strong> top speed until thevehicle is safe at higher speed. Vehicles not tracking straight at speed should verify all chassis settings including but not limited toalignment, bump steer, tire pressures, etc. Once the vehicle drives in a safe manner at speed, move on to test launching.Test launches should consist of only the initial launch with no subsequent gear changes. Begin with low rpm launches <strong>and</strong> graduallyincrease rpm <strong>and</strong> severity if the car launches acceptably. At this time we are only determining that the car launches in a controlledmanner to avoid damaging components or the vehicle. The vehicle should leave in a straight line without extreme wheel st<strong>and</strong>ingor harsh bounces. Sudden, uncontrollable front end lift should be corrected by making suspension instant center adjustments, ifpossible. More gradual front end lift can be corrected by adjusting the strut valving. If the car gradually wheel st<strong>and</strong>s or bouncesviolently, adjust front suspension first, then rear. If there is rear tire shake, wheel hop or excessive body separation, adjust rearsuspension first, then front. If your car is launching severely to the right or left, first check that the rear end is centered <strong>and</strong> there isno preload adjusted into the rear suspension. If the car still launches severely to the right or left, you will have to add preload to therear suspension. If everything checks out okay <strong>and</strong> the car only minimally drives to the right or left, you can stagger the rear shockvalving to correct this.Use of a double-adjustable QuickSet 2 will allow the following procedure.When a vehicle launches slightly toward the right, rebound (shock extension) stiffness is added to the driver side <strong>and</strong> bump(shock compression) stiffness is added to the passenger side. A vehicle launching slightly toward the left would make the oppositeadjustments. It is not recommended to have more than two clicks difference side to side for either bump or rebound. Rear shockadjustments are only applicable to correcting the launch <strong>and</strong> will have little to no effect on down track performance.After the car has been adjusted to launch straight, test launch <strong>and</strong> include the first gear change. Make any required adjustments<strong>and</strong> add the next gear change. Repeat until the car can be launched straight <strong>and</strong> driven at speed safely. The car is now ready forfine tuning to optimum results.Front Strut <strong>Adjustment</strong>Pay close attention to what is happening to the front end during launch. Your goal is to eliminate all jerking or bouncingmovements during launch <strong>and</strong> gear shifts. Ideally the front end should rise in a controlled manner, just enough to keep the reartires loaded, then continue the pass with smooth transitions at all times. Front end rise without any appreciable traction gain iswasted energy that should be used to propel the vehicle forward instead of up. While testing, document your ET’s along withany changes made. If ET does not improve, return to previous settings.Front Rebound (Extension) <strong>Adjustment</strong> OverviewToo light of a rebound (extension) setting allows excessive front end chassis separation <strong>and</strong> may result in the front wheels jerkingviolently off the ground during launch. Also, during gear change, too light a setting allows the car to bounce off its front reboundtravel limiter <strong>and</strong> then bottom out in an oscillating manner. Too firm a setting will prevent the front end from rising sufficiently, limitingthe amount of weight transferred to the rear tires. Adjust the rebound setting in one click increments to control the rate at which thefront end rises at launch <strong>and</strong> during gear changes. While testing, document your ET’s along with any changes made. If ET doesnot improve, return to previous settings.Front Wheels LoseContact with GroundRear Tires Hook ThenLose TractionNo Front End RiseIncreaseReboundStiffnessIncreaseReboundStiffnessDecreaseReboundStiffnessViolent chassis separation <strong>and</strong> may result in jerking the front wheels off the ground.Increase strut rebound stiffness by one, then test again.If weight transfer occurs too quickly the rear tires may hook then lose traction as thefront end begins to travel downward. Slowing the rate at which the front end risesprevents the struts from topping out too quickly <strong>and</strong> increases the duration of time thatthe rear tires benefit from the weight transfer. Increase strut rebound stiffness by one,then test again.Too firm of a damper setting limits the amount of weight transferred to the rear tires,resulting in poor traction. Decrease strut rebound stiffness by one, then test again.
Front Bump (Compression) <strong>Adjustment</strong> OverviewAfter the launch or during a gear change, a firm bump setting will cause the chassis to bounce off the front tire as the chassissettles down. Too light of a bump setting allows the strut to bottom out <strong>and</strong> bounce off the stop travel bumper. Adjust bump inone click increments to control the amount <strong>and</strong> rate at which the front end settles during gear change. While testing, documentyour ET’s along with any changes made. If ET does not improve, return to previous settings.Front“BottomsOut“ AfterLaunchHard FrontEnd Bounce(After Launch orGear Change)IncreaseBumpStiffnessDecreaseBumpStiffnessIf front suspension settles too fast after launch or gear change it may cause the front suspensionto bottom out at the end of its downward travel. If the suspension bottoms out hard enough, reartraction may be lost. Increase strut bump stiffness by one, then test again. If increasing bumpstiffness cannot extend weight transfer duration long enough a higher rate spring should beinstalled.If the tires cause the front end to bounce upon l<strong>and</strong>ing, the struts are too stiff. The front endshould settle in a single, smooth motion. Decrease strut bump stiffness by one, then test again.This can be a very subtle problem. Watch the front tire sidewall as it contacts the ground.Rear Shock <strong>Adjustment</strong> (Double Adjustable)Maintain traction by controlling the rate at which torque <strong>and</strong> weight is transferred to the rear tires. Ideally the rear suspension shouldbe as firm as possible before a loss of traction occurs. Changes to the vehicle such as ride height, tire size, weight distribution, orsuspension link adjustments will alter the instant center location in relation to the vehicle’s center of gravity. Any shift of either theinstant center or center of gravity will usually require a shock setting adjustment to optimize traction. While testing, document yourET’s along with any changes made. If ET does not improve, return to previous settings.Rear EndSquatsVehicleSeparatesfrom Rear EndLoss ofTractionwith MinimalChassisMovementIncrease BumpStiffnessIncreaseReboundStiffnessDecreaseBump/ReboundStiffnessSome vehicles will squat during launches instead of pushing the vehicle forward. To assist inplanting the tires, increase shock bump stiffness by one, then test again.Some suspension geometries plant the tires so forcefully that the rear end of the vehicle risesaway from the housing too rapidly. The vehicle may hook initially, then spin the tires once theshocks are topped out. Slowing the rate at which the rear end rises increases the duration oftime that the rear tires benefit from the improved traction. Increase shock rebound stiffness byone, then test again.A suspension system that is too stiff can hit the tires too hard, causing a loss of traction.Softening the suspension slows the transfer of weight <strong>and</strong> reduces the initial tire shock.Minimal chassis movement makes if very difficult to visually tell if the bump or rebound needsto be decreased. We suggest adjusting bump first <strong>and</strong> watch for a gain or loss in the ET. If ETdoes not improve, return to previous setting, then adjust rebound instead <strong>and</strong> test again.Completion of TestingWhen all adjustments have been completed, reset your wheelie bars as low as possible without affecting your ET.WARRANTY NOTICE:There are NO WARRANTIES, either expressed or implied. Neither the seller nor manufacturer will be liable for any loss, damage or injury, director indirect, arising from the use or inability to determine the appropriate use of any products. Before any attempt at installation, all drawings<strong>and</strong>/or instruction sheets should be completely reviewed to determine the suitability of the product for its intended use. In this connection, the userassumes all responsibility <strong>and</strong> risk. We reserve the right to change specification without notice. Further, <strong>Chris</strong> Alston’s <strong>Chassisworks</strong>, Inc., makesNO GUARANTEE in reference to any specific class legality of any component. ALL PRODUCTS ARE INTENDED FOR RACING AND OFF-ROAD USE AND MAY NOT BE LEGALLY USED ON THE HIGHWAY. The products offered for sale are true race-car components <strong>and</strong>, in allcases, require some fabrication skill. NO PRODUCT OR SERVICE IS DESIGNED OR INTENDED TO PREVENT INJURY OR DEATH.<strong>Chris</strong> Alston’s <strong>Chassisworks</strong>8661 Younger Creek DriveSacramento, CA 95828Phone: 916-388-0288Technical Support: tech@cachassisworks.com899-031-219 REV 02/21/07