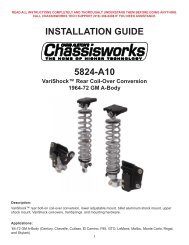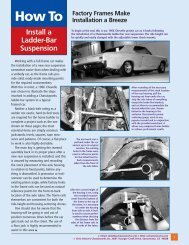
Installation Instructions - Chris Alston's Chassisworks
Installation Instructions - Chris Alston's Chassisworks
Installation Instructions - Chris Alston's Chassisworks

You also want an ePaper? Increase the reach of your titles
YUMPU automatically turns print PDFs into web optimized ePapers that Google loves.
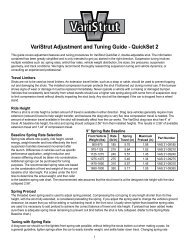
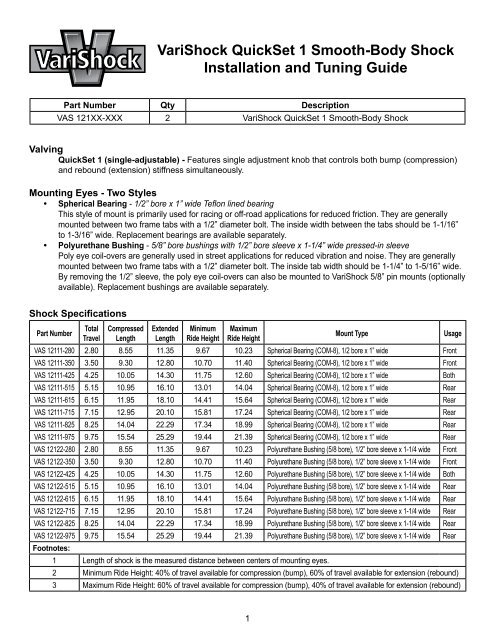
VariShock QuickSet 1 Smooth-Body Shock<strong>Installation</strong> and Tuning GuidePart Number Qty DescriptionVAS 121XX-XXX 2 VariShock QuickSet 1 Smooth-Body ShockValvingQuickSet 1 (single-adjustable) - Features single adjustment knob that controls both bump (compression)and rebound (extension) stiffness simultaneously.Mounting Eyes - Two Styles• Spherical Bearing - 1/2” bore x 1” wide Teflon lined bearingThis style of mount is primarily used for racing or off-road applications for reduced friction. They are generallymounted between two frame tabs with a 1/2” diameter bolt. The inside width between the tabs should be 1-1/16”to 1-3/16” wide. Replacement bearings are available separately.• Polyurethane Bushing - 5/8” bore bushings with 1/2” bore sleeve x 1-1/4” wide pressed-in sleevePoly eye coil-overs are generally used in street applications for reduced vibration and noise. They are generallymounted between two frame tabs with a 1/2” diameter bolt. The inside tab width should be 1-1/4” to 1-5/16” wide.By removing the 1/2” sleeve, the poly eye coil-overs can also be mounted to VariShock 5/8” pin mounts (optionallyavailable). Replacement bushings are available separately.Shock SpecificationsPart NumberTotalTravelCompressedLengthExtendedLengthMinimumRide HeightMaximumRide HeightMount TypeVAS 12111-280 2.80 8.55 11.35 9.67 10.23 Spherical Bearing (COM-8), 1/2 bore x 1” wide FrontVAS 12111-350 3.50 9.30 12.80 10.70 11.40 Spherical Bearing (COM-8), 1/2 bore x 1” wide FrontVAS 12111-425 4.25 10.05 14.30 11.75 12.60 Spherical Bearing (COM-8), 1/2 bore x 1” wide BothVAS 12111-515 5.15 10.95 16.10 13.01 14.04 Spherical Bearing (COM-8), 1/2 bore x 1” wide RearVAS 12111-615 6.15 11.95 18.10 14.41 15.64 Spherical Bearing (COM-8), 1/2 bore x 1” wide RearVAS 12111-715 7.15 12.95 20.10 15.81 17.24 Spherical Bearing (COM-8), 1/2 bore x 1” wide RearVAS 12111-825 8.25 14.04 22.29 17.34 18.99 Spherical Bearing (COM-8), 1/2 bore x 1” wide RearVAS 12111-975 9.75 15.54 25.29 19.44 21.39 Spherical Bearing (COM-8), 1/2 bore x 1” wide RearVAS 12122-280 2.80 8.55 11.35 9.67 10.23 Polyurethane Bushing (5/8 bore), 1/2” bore sleeve x 1-1/4 wide FrontVAS 12122-350 3.50 9.30 12.80 10.70 11.40 Polyurethane Bushing (5/8 bore), 1/2” bore sleeve x 1-1/4 wide FrontVAS 12122-425 4.25 10.05 14.30 11.75 12.60 Polyurethane Bushing (5/8 bore), 1/2” bore sleeve x 1-1/4 wide BothVAS 12122-515 5.15 10.95 16.10 13.01 14.04 Polyurethane Bushing (5/8 bore), 1/2” bore sleeve x 1-1/4 wide RearVAS 12122-615 6.15 11.95 18.10 14.41 15.64 Polyurethane Bushing (5/8 bore), 1/2” bore sleeve x 1-1/4 wide RearVAS 12122-715 7.15 12.95 20.10 15.81 17.24 Polyurethane Bushing (5/8 bore), 1/2” bore sleeve x 1-1/4 wide RearVAS 12122-825 8.25 14.04 22.29 17.34 18.99 Polyurethane Bushing (5/8 bore), 1/2” bore sleeve x 1-1/4 wide RearVAS 12122-975 9.75 15.54 25.29 19.44 21.39 Polyurethane Bushing (5/8 bore), 1/2” bore sleeve x 1-1/4 wide RearFootnotes:1 Length of shock is the measured distance between centers of mounting eyes.2 Minimum Ride Height: 40% of travel available for compression (bump), 60% of travel available for extension (rebound)3 Maximum Ride Height: 60% of travel available for compression (bump), 40% of travel available for extension (rebound)Usage
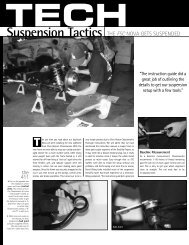
Spring Rate SelectionIf you are unsure of the correct spring rate, check with your chassis builder or component supplier for a recommendation.Mathematical formulas are also available to find an accurate baseline rate from which to start. All formulas will require theinstallation ratio, motion ratio, and individual weights for the front and rear of the vehicle for calculation. If you are unsureof this procedure, check with your chassis builder or component supplier for assistance.<strong>Installation</strong>Read these instructions in their entirety before begin installation.1.2.3.Verify Correct DimensionsIt is the purchaser’s responsibility to physically verify that the VariShock chosen for your vehicle will fitcorrectly. Verify that the shock received has the correct mount types, and meets the length and travelrequirements for your application. If the vehicle’s ride height has been altered, either raised or lowered fromstock, a shock of different length than stock will be required. The required travel measurements can be takenfrom your existing shock or directly from the chassis mounts. Measure your existing shock or chassis mountsat full-compression, full-extension, and at ride height. If measuring from the chassis mounts, the springs mustbe removed from the vehicle to allow free movement. These dimensions can be directly compared to theinformation contained in the Shock Specifications chart on page one. If dimensions are acceptable, proceedwith trial fit and installation.Checking for Binding and Clearance OverviewIt is extremely important to check for binding and adequate clearance before installing the suspensionsprings. This will allow you to more easily move the suspension throughout its entire range of travel. Placethe vehicle on four jack stands so that the suspension hangs freely. With the shocks installed and springsremoved, position a floor jack under the A-arms or rear end housing to raise and lower the suspension. Checkfor binding at every suspension joint, including shock mounts, balljoints, tie rods, and anti-roll bar end links.Front end suspension travel will need to be checked with the steering straight, and also with the steering atfull left- and right-lock. VariShocks are larger in diameter than OEM shocks, so clearance around the shockbody and mounts will be different from factory clearances. Verify that there is at least 1/2” clearance aroundthe entire shock assembly. Modifications to the chassis or its components may be necessary. Failure toensure proper shock clearance and bind-free movement at all possible travel positions will result in damageto the shock and/or chassis.After you have verified the shocks do not bind during travel, install the suspension springs.VariShock Adjustment and Tuning Guide - QuickSet 1This guide covers adjustment features and tuning procedures for VariShock QuickSet 1, single-adjustable, shockabsorbers. The information contained here has been greatly simplified and is only intended to get you started inthe right direction. Suspension tuning involves multiple variables such as: spring rates, antiroll bar rates, vehicleweight distribution, tire sizes, tire pressures, suspension geometry, and track conditions. We highly recommendthoroughly researching suspension tuning and vehicle dynamics, or consulting an experienced professional.Travel LimitersShocks are not to be used as travel limiters. An extension travel limiter, such as a strap or cable, should beused to prevent topping out and damaging the shocks. The installed compression bumper protects the shock ifbottomed out during normal use. If the bumper shows signs of wear or damage it must be replaced immediately.Never operate a vehicle with a missing or damaged bumper. Vehicles that consistently bottom out shocks orland harshly from wheel stands should use a higher rate spring along with some form of suspension stop to limitcompression travel without directly impacting the shock body. Any shock will be damaged if the car is droppedfrom a wheel stand.
Ride HeightWhen a shock is at ride height a certain amount of travel is available in either direction. Depending uponperformance application, shock travel will be reserved in different percentages for compression or extension.Street Baseline: 60-percent Bump, 40-percent ReboundStreet vehicles require more available compression (bump) travel for improved ride quality and unexpected roadhazards. At baseline ride height, the shock and spring should collapse 40-percent from their installed heights.This results in 40-percent of travel available for extension and 60-percent for compression travel.Handling Baseline: 50-percent Bump, 50-percent ReboundHandling performance applications are usually limited to smooth prepared road-course- or autocross-tracks,therefore less compression travel is required. Suspension geometry or track conditions may require the travelpercentages to be shifted to prevent topping- or bottoming-out the shock.Drag Race Baseline: 40-percent Bump, 60-percent ReboundDrag race vehicles generally require more extension (rebound) travel to help weight transfer, and because thedrag strip is very flat, less compression travel is needed. The amount of extension travel available in the shockwill drastically affect how the car works. At baseline ride height, the shock and spring should collapse 60-percent from their installed heights. This results in 60-percent of travel available for extension and 40-percent ofcompression travel.Baseline Spring Rate SelectionSpring rate affects ride quality, ride height, stored energy, weight transfer and how effectively the front suspensionhandles downward movement after drag race launches. Differences in vehicles such as specific performanceapplication, weight reduction and chassis stiffening should be taken into consideration. Additional springs can bepurchased for tuning purposes. The recommended spring rates are based on the combination of weight of the carand baseline ride height.Spring PreloadThe threaded lower spring seat is used to adjust spring preload. Compressing the coil spring to any length shorterthan it’s free height, with the shock fully extended, is considered preloading the spring. If you adjust the springseat to change the vehicle’s ground clearance, be aware that you will be adding or subtracting travel in the shock.Usually when lighter-than-baseline spring rates are used it is necessary to add preload to achieve the correctbalance of travel and ride height. If preload has been added make sure there is adequate spring travel remainingto prevent coil bind before the shock is fully collapsed.Tuning Front Suspension with Spring Rate (Drag Race)A drag race car should run the lightest front spring rate possible, without letting the shocks bottom out whenmaking a pass. As a general guideline, lighter springs allow the car to easily transfer weight, and settle fasterdown track. Changing spring rate affects ride height and the rate at which weight is transferred to the rear tires. Asofter rate makes the front easier to raise during acceleration. A stiffer rate makes the front harder to raise duringacceleration. If you are having trouble getting the front end to rise, you can soften shock valving or change to asofter spring. When using lighter rate springs preload must be added by screwing the lower spring seat upward,compressing the spring to achieve proper ride height. In general terms, the worse a car hooks the more shockextension travel it will need. If you need more extension travel, preload can be removed to lower ride height.Using this method will cause the car to have less ground clearance and reduce the amount of compression travel.If you are going to operate the shock at a ride height shorter than recommended, the upper chassis mountsmust be relocated to correct any major vehicle ride height issues. It may take some work with spring rates andupper mount relocation to get the correct combination of vehicle ride height and front suspension travel for yourapplication.Adjustment FeaturesThe QuickSet 1 valve system features a single adjustment knob that controls overall damping stiffness ofthe shock. Knobs are clearly etched indicating the correct direction of rotation to decrease (-), or increase (+)damping stiffness. There are a total of 16 specific adjustment positions.
Position 1, the softest setting, is found by turning the knobin the counter-clockwise direction until the positive stop islocated. Rotating the knob in the clockwise direction increasesdamping stiffness. Each of the 16 settings is indicated by adetent that can be felt when turning the knob, and an audibleclick as the knob gently locks into position. Only very lightforce is necessary to rotate the knob past each detent. Ifaccess to the adjustment knobs is limited, a 5/64 or 7/64(depending upon model) ball-drive Allen wrench can be usedto adjust the knob. Do not force the knob beyond its intendedstop, doing so will damage the valve mechanism.Note: VariShocks have a substantial range of adjustment withvery little bypass or internal bleed. Due to our minimal-bleeddesign, shocks will feel extremely stiff at some settings whenoperated by hand, whereas other shocks with excessive bleedSymbol Direction Effect+ Clockwise Increase Stiffness- Counter-Clockwise Decrease Stiffnesswill move more freely. Manual comparison should not be performed. A person cannot manually operate the shockat a rate anywhere near real life conditions and any results found in this manner will be meaningless. Prior toshipping, every VariShock is dynamometer (dyno) tested and calibrated throughout an accurate range of shaftspeeds and cylinder pressures found in real-world operation.The Truth About 16- vs. 24-ClicksDon’t be fooled by shocks offering more adjustment clicks. They are actually 1/2-click adjustments. Themanufacturer merely added more detents to the mechanism without increasing the range of adjustment. Thispractice gives more clicks, but the adjustment is so slight that your vehicle will not respond to the change. A 16-position VariShock actually has a broader range of adjustable force with the added benefit of a more manageablenumber of adjustments to try.Tuning Procedures - QuickSet 1VariShock shock absorber’s broad range of adjustment is suitable to the three categories of suspension tuning:ride quality, handling performance, and drag racing. All three tuning categories have the common goal ofcontrolled weight transfer, but have greatly differing vehicle-dynamic requirements. Each will be discussed in thefollowing text. Before proceeding verify that all suspension components, such as control arms, balljoints, andbushings are in acceptable condition and that tire pressures are correctly set.Tuning for Ride Quality - QuickSet 1Tuning for ride quality generally involves lighter spring rates matched with softer shock settings to achieve asmooth and comfortable ride. Testing and adjustment is required to attain desirable results. When properlyadjusted the vehicle should feel settled without continued bouncing (too soft), excessive harshness (too stiff), orfore/aft pitching.Prior to TestingBegin with the shocks adjusted to the number 3 position. The first two settings are generally too soft for street useand are normally used in drag racing applications.Find Harshness ThresholdNoticable ride harshness is generally rapid upward movement of the suspension as the tire travels over rough orbumpy surfaces. Increase shock stiffness by one, then test again. Continue increasing stiffness and testing untilthe vehicle begins to feel harsh over bumps. From this setting, decrease shock stiffness by two. The harshnessthreshold setting may differ from front to rear.Note:Adjusts overall damping stiffness forBump and Rebound simultaneously.
ExcessiveChassisMovementHarshnessandVibrationFore/AftPitching(constantspeed50-70 mph)IncreaseStiffnessDecreaseStiffnessAlter Front-to-Rear StiffnessDifferenceIf vehicle exhibits rapid weight shifts or continues to oscillate more than onesuspension cycle before settling, increase shock stiffness by one, then testagain. As stiffness is increased, road noise and vibration will also increase.Note: Stiffening the shock does not reduce the amount of lean or dive in asustained turn or braking maneuver, but does slow the rate of weight transfer tominimize unexpected changes in the cars handling.If excessive road noise, vibration, or harshness is experienced decrease shockstiffness by one, then test again.If vehicle exhibits fore/aft pitching at highway speeds, the rear shocksshould be stiffened or conversely the front shocks softened. Ideally the rearsuspension should oscillate at a slightly quicker rate than the front to minimizepitching.Tuning for Handling Performance - QuickSet 1Heavier spring rates matched with stiffer shock settings generally contribute to improved handling performanceby reducing chassis movement. Stiffer tuned suspension increases vibration transferred to the vehicle andpassengers, but is usually tolerated for performance gains. When properly adjusted the vehicle should feelresponsive, exhibit balanced cornering grip, and maintain traction over irregular surface conditions. Extensivetesting and adjustment is critically important when operating your vehicle at or near its performance limits. Testingmust be done in a safe and controlled environment, such as a dedicated motorsports facility.Prior to TestingBegin with the shocks adjusted to the number 5 position. The first four settings are generally too soft forperformance applications and are normally used in drag racing or street applications.Find Harshness ThresholdHarshness is vibration transferred to the chassis by rapid upward movement of the suspension as the tire travelsover rough or bumpy surfaces. Increase shock stiffness by one, then test again. Continue increasing stiffnessand testing until the vehicle begins to feel harsh over bumps, or a reduction of traction, cornering, braking oracceleration ability is experienced. From this setting, decrease shock stiffness by one. The harshness thresholdsetting may differ from front to rear.Excessive ChassisMovementReduced Tractionor SkippingShocks BottomingOut(body roll, brake diveor squatting)UndersteerCondition(Neutral throttle)Car turns less thanexpected; commonlyreferred to as push,plow, or tight.IncreaseStiffnessDecreaseStiffnessIncreaseStiffnessChangeStiffnessBias TowardRearIf vehicle exhibits rapid weight shifts, increase shock stiffness by one, thentest again. Note: Stiffening the shock does not reduce the amount of leanor dive in a sustained turn or braking maneuver, but does slow the rate ofweight transfer to minimize unexpected changes in the cars handling.If a reduction in traction during acceleration, braking, or cornering isexperienced decrease shock stiffness by one, then test again. This will bemost noticeable on rough track surfaces.If chassis movement during cornering or braking allows shocks to bottomout, increase shock stiffness by one, then test again. The urethane bumpstop can be used to gauge shock bump travel by sliding it down the pistonrod, against the shock body, then checking its position after testing. Ifincreasing bump stiffness cannot extend weight transfer duration longenough a higher rate spring should be installed.If vehicle exhibits understeer when cornering at neutral throttle, rear shockshould be stiffened or conversely, front shock softened. A slight amount ofundersteer is considered safe and reduces the chances of spinning.
OversteerCondition(Neutral throttle)Car turns more thanexpected; commonlyreferred to as tailhappyor loose.ChangeStiffnessBias TowardFrontIf vehicle exhibits oversteer when cornering at neutral throttle, frontshock should be stiffened or conversely, rear shock softened. Oversteerincreases the vehicles tendency to spin when cornering and requiresdriver experience and skill to manage safely. This condition should beavoided by novice drivers.Tuning for Drag Racing - QuickSet 1Required settings for drag racing applications vary greatly depending upon, vehicle weight, weight distribution,suspension geometry and travel, horsepower, and available traction. A properly tuned drag race suspensionenables the vehicle to launch straight while transferring weight to the rear tires in an efficient, controlled manner.Extensive testing and adjustment is critically important when operating your vehicle at or near its performancelimits. Testing must be done in a safe and controlled environment, such as a dedicated motorsports facility. Itis generally better to tune shocks according to improvements in ET’s (Elapsed Times) rather than for specificoccurrences such as the amount of wheel stand. Due to differences in weight distribution, wheel base, tire size,and horsepower, not all vehicles leave the starting line in the same manner once their suspension has beenoptimized. Watch your ET’s and if your times start to get slower return to the prior adjustment. Once you havecompleted the following procedures, only fine adjustments may be needed to tune for specific track conditions.Prior to TestingMake certain that wheelie bars are raised as high as possible while maintaining control and eliminating theirinfluence as much as possible on damper settings. Begin with shocks adjusted to the number 3 position.Initial TestingFirst verify that the vehicle tracks straight before aggressively launching from the line. Begin with lightacceleration and low speeds. If the vehicle tracks and drives acceptably at this level, make incremental increasesin acceleration and top speed until the vehicle is safe at higher speed. Vehicles not tracking straight at speedshould verify all chassis settings including but not limited to alignment, bump steer, tire pressures, etc. Once thevehicle drives in a safe manner at speed, move on to test launching.Test launches should consist of only the initial launch with no subsequent gear changes. Begin with low rpmlaunches and gradually increase rpm and severity if the car launches acceptably. At this time we are onlydetermining that the car launches in a controlled manner to avoid damaging components or the vehicle. Thevehicle should leave in a straight line without extreme wheel standing or harsh bounces. Sudden, uncontrollablefront end lift should be corrected by making suspension instant center adjustments, if possible. More gradual frontend lift can be corrected by adjusting the shock valving. If the car gradually wheel stands or bounces violently,adjust front suspension first, then rear. If there is rear tire shake, wheel hop or excessive body separation, adjustrear suspension first, then front. If your car is launching severely to the right or left, first check that the rear end iscentered and there is no preload adjusted into the rear suspension. If the car still launches severely to the right orleft, you will have to add preload to the rear suspension. If everything checks out okay and the car only minimallydrives to the right or left, you can stagger the rear shock valving to correct this.When a vehicle launches slightly toward the right, rear shock stiffness is increase on the driver side and shockstiffness is decreased on the passenger side. A vehicle launching slightly toward the left would make the oppositeadjustments. It is not recommended to have more than two clicks difference side to side. Rear shock adjustmentsare only applicable to correcting the launch and will have little to no affect on down track performance.After the car has been adjusted to launch straight, test launch and include the first gear change. Make anyrequired adjustments and add the next gear change. Repeat until the car can be launched straight and driven atspeed safely. The car is now ready for fine tuning to optimum results.
Front Shock AdjustmentPay close attention to what is happening to the front end during launch. Your goal is to eliminate all jerking or bouncingmovements during launch and gear shifts. Ideally the front end should rise in a controlled manner, just enough to keepthe rear tires loaded, then continue the pass with smooth transitions at all times. Front end rise without any appreciabletraction gain is wasted energy that should be used to propel the vehicle forward instead of up. While testing, documentyour ET’s along with any changes made. If ET does not improve, return to previous settings.Single-Adjustable Shock LimitationsThe use of a single-adjustable shock will have limited tuning capability. When adjusting the shock to improverebound (extension) travel issues you are also adjusting bump (compression) stiffness. This may worsen orcreate bump travel issues. As an example using a soft shock setting that improves front end rise and weighttransfer, may be too soft to prevent the shocks from bottoming out as the front end lands. You must decide whichcorrection will best improve component reliability, driveability, and ET. This performance trade-off relationship isunavoidable with a single-adjustable shock. To truly maximize tuning capability a double-adjustable shock shouldbe used.Front Rebound (Extension) Adjustment OverviewToo light of a shock setting allows excessive front end chassis separation and may result in the front wheelsjerking violently off the ground during launch. Also, during gear change, too light a setting allows the car tobounce off its front rebound travel limiter and then bottom out in an oscillating manner. Too firm a setting willprevent the front end from rising sufficiently, limiting the amount of weight transferred to the rear tires. Adjustshock stiffness in one click increments to control the rate at which the front end rises at launch and during gearchanges. While testing, document your ET’s along with any changes made. If ET does not improve, return toprevious settings.Front Wheels LoseContact with GroundRear Tires HookThen Lose TractionNo Front End RiseIncreaseStiffnessIncreaseStiffnessDecreaseStiffnessViolent chassis separation and may result in jerking the front wheels off theground. Increase shock stiffness by one, then test again.If weight transfer occurs too quickly the rear tires may hook then losetraction as the front end begins to travel downward. Slowing the rate atwhich the front end rises prevents the shocks from topping out too quicklyand increases the duration of time that the rear tires benefit from the weighttransfer. Increase shock stiffness by one, then test again. If ET does notimprove, return to previous setting.Too firm of a shock setting limits the amount of weight transferred to the reartires, resulting in poor traction. Decrease shock stiffness by one, then testagain. If ET does not improve, return to previous setting.Front Bump (Compression) Adjustment OverviewAfter the launch or during a gear change, too firm of a setting will cause the chassis to bounce off the front tireas the chassis settles down. Too light of a setting allows the shock to bottom out and bounce off the stop travelbumper. Adjust shock stiffness in one click increments to control the amount and rate at which the front end settlesduring gear change. While testing, document your ET’s along with any changes made. If ET does not improve,return to previous settings.Front“BottomsOut“ AfterLaunchHard FrontEnd Bounce(After Launch orGear Change)IncreaseStiffnessDecreaseStiffnessIf front suspension settles too fast after launch or gear change it may cause thefront suspension to bottom out at the end of its downward travel. If the suspensionbottoms out hard enough, rear traction may be lost. Increase shock stiffness by one,then test again. If increasing shock stiffness cannot extend weight transfer durationlong enough, a higher rate spring should be installed.If the tires cause the front end to bounce upon landing, the shocks are too stiff. Thefront end should settle in a single, smooth motion. Decrease shock stiffness by one,then test again. This can be a very subtle problem. Watch the front tire sidewall as itcontacts the ground.
Rear Shock Adjustment (Single Adjustable)Maintain traction by controlling the rate at which torque and weight is transferred to the rear tires. Ideally the rearsuspension should be as firm as possible before a loss of traction occurs. Changes to the vehicle such as rideheight, tire size, weight distribution, or suspension link adjustments will alter the instant center location in relationto the vehicle’s center of gravity. Any shift of either the instant center or center of gravity will usually require ashock setting adjustment to optimize traction. While testing, document your ET’s along with any changes made. IfET does not improve, return to previous settings.Rear EndSquatsVehicleSeparatesfrom RearEndLoss ofTractionwith MinimalChassisMovementIncreaseStiffnessIncreaseStiffnessDecreaseStiffnessSome vehicles will squat during launches instead of pushing the vehicle forward.To assist in planting the tires, increase shock stiffness by one, then test again. IfET does not improve, return to previous setting.Some suspension geometries plant the tires so forcefully that the rear end of thevehicle rises away from the housing too rapidly. The vehicle may hook initially,then spin the tires once the shocks are topped out. Slowing the rate at which therear end rises increases the duration of time that the rear tires benefit from theimproved traction. Increase shock stiffness by one, then test again. If ET doesnot improve, return to previous setting.A suspension system that is too stiff can hit the tires too hard, causing a loss oftraction. Softening the suspension slows the transfer of weight and reduces theinitial tire shock. Decrease shock stiffness by one, then test again. If ET does notimprove, return to previous setting.Completion of TestingWhen all adjustments have been completed, reset your wheelie bars as low as possible without affecting your ET.WARRANTY NOTICE:There are NO WARRANTIES, either expressed or implied. Neither the seller nor manufacturer will be liable for any loss, damageor injury, direct or indirect, arising from the use or inability to determine the appropriate use of any products. Before any attempt atinstallation, all drawings and/or instruction sheets should be completely reviewed to determine the suitability of the product for itsintended use. In this connection, the user assumes all responsibility and risk. We reserve the right to change specification withoutnotice. Further, <strong>Chris</strong> Alston’s <strong>Chassisworks</strong>, Inc., makes NO GUARANTEE in reference to any specific class legality of anycomponent. ALL PRODUCTS ARE INTENDED FOR RACING AND OFF-ROAD USE AND MAY NOT BE LEGALLY USED ON THEHIGHWAY. The products offered for sale are true race-car components and, in all cases, require some fabrication skill. NO PRODUCTOR SERVICE IS DESIGNED OR INTENDED TO PREVENT INJURY OR DEATH.<strong>Chris</strong> Alston’s <strong>Chassisworks</strong>8661 Younger Creek DriveSacramento, CA 95828Phone: 916-388-0288Technical Support: tech@cachassisworks.com899-031-201 REV 03/01/07