SUNNY BOY 2500 / 3000 - Installation Guide - Sinetech
SUNNY BOY 2500 / 3000 - Installation Guide - Sinetech
SUNNY BOY 2500 / 3000 - Installation Guide - Sinetech
- No tags were found...

You also want an ePaper? Increase the reach of your titles
YUMPU automatically turns print PDFs into web optimized ePapers that Google loves.
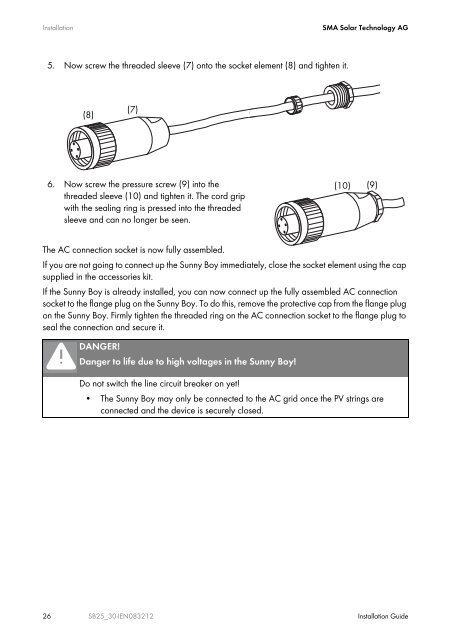
<strong>Installation</strong>SMA Solar Technology AG5. Now screw the threaded sleeve (7) onto the socket element (8) and tighten it.(8)(7)6. Now screw the pressure screw (9) into thethreaded sleeve (10) and tighten it. The cord gripwith the sealing ring is pressed into the threadedsleeve and can no longer be seen.(10)(9)The AC connection socket is now fully assembled.If you are not going to connect up the Sunny Boy immediately, close the socket element using the capsupplied in the accessories kit.If the Sunny Boy is already installed, you can now connect up the fully assembled AC connectionsocket to the flange plug on the Sunny Boy. To do this, remove the protective cap from the flange plugon the Sunny Boy. Firmly tighten the threaded ring on the AC connection socket to the flange plug toseal the connection and secure it.DANGER!Danger to life due to high voltages in the Sunny Boy!Do not switch the line circuit breaker on yet!• The Sunny Boy may only be connected to the AC grid once the PV strings areconnected and the device is securely closed.26 SB25_30-IEN083212 <strong>Installation</strong> <strong>Guide</strong>