

Tne Onrcrrunl WooDWoRKtNG AND Home ... - Wood Tools
Tne Onrcrrunl WooDWoRKtNG AND Home ... - Wood Tools
Tne Onrcrrunl WooDWoRKtNG AND Home ... - Wood Tools

Create successful ePaper yourself
Turn your PDF publications into a flip-book with our unique Google optimized e-Paper software.
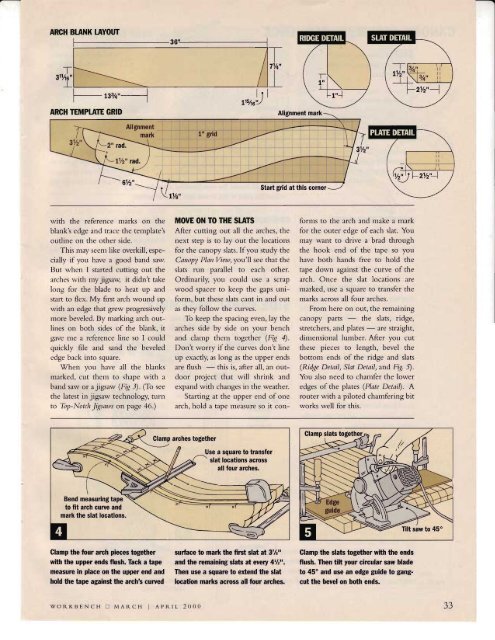
ARCH BLANK LAYOUT-T311/ta"I.\-_______\Ipa,l)l--t---------- I l\l%"-2y2"_)I73V2"Stan gdd at this corner,4) lzn'4with the reference nrarks on theblarrkls edge and tr:rce the tenrplateiorrtlirre t>rt tlrc rltltcl sidt.This nray seenr like overkill, especirllyif vou lr:rve l good blnd sarv.But rvhcu I st:rrted cuttinq out therrrchcs n,ith nry jigsaw, it ciidn't takc'lonLr tirr the blade to heat r,rp ar.rdstill-t to flcx. My first lrch wound uprvith :rn edge that erew ploercssivelynrore beveled. lly nrarkine :rrch outlinesorr both sicies of the blank, itqavc nrc a rcfc'rence linc so I couldclLrickly file ancl slnci the bevelcdc'clge blck into scprare.When you hrve :rll tlre blanksnrarkecl, cut thenl to shape rvitl'r abrnd saw or r jigsar,v (FlC l). (To seethe lirtest ir-r jigsaw technolouy, turnto Tirp-Nolr/iJig.sari,.s on page ,{(r.)MOVE ON TO THE SLATSAftel cutting out all tl.re arcl.res, thenext step is to lay out the loc:rtionsfor the cauopy slats. If 1,ou study theCdrtopl, Plart Vicrt,, you'll see tl-rlt theslats rur-r p:rrallel to each other.Ordin:rrily, you could use r scrf,pwood spaccr to kccp thc uaps unrfornr,but tl'rese slats cant in and out.ls thcy tbllow tlrc ('r.r'vc\.To keep the spacing even, lay thcirrches side by sicle on your benchand chnrp thenr toqether (Fiq 1).l)on't worry if the curves c'lon't lir-reLlp exactly, as long as thc Llpper endslre flush - this is, alter all, rrn outdoorproject that will shrink :urclexp:rnd with clr:urges in the welther.Startine rt the upper end of onelrch, hold a tirpe lreasrlre so it corrfornrsto the arcl-r ancl nrake a nrarkfbr the onter edge of each slat. Youuray want to drive a brad througl-rtl.re hook end of the tape so youl.rrve both hands fi-ee to hold thetrpe down asrainsthe curve of thearch. C)nce the slat locations arerlarked, use r sqLlare to transfer thenrarks across all four :rrches.Frorrr hcrc oll out. thc rcnr:rirringcanopy parts - the slats, ridqe,strecclrers, iurd pl:rtes - are straight,dirnensionll lr.rnrber. After you cutthese pieces to length, bevel thebottonr ends of the ridge lnd sl:rts(Rid,qc Dctnil, Slar Dctail, and Fiq. -1.You rlso rreed to chanrfer the loweredges of the pl:rtes (Platc Dctaif). Arouter with a pilotecl chanrfering bitworks well for this.Use a square to transferslat locations acrossall four arches,Bend measuring tapeto fit arch curve andGlamp the four arch pieces together surface to mark the first slat at 3%"with the upper ends flush. Tack a tape and the remaining slats at euery 4t/2tt.measure in place on the upper end and Then use a square to extend the slathold the tape againsthe arch's curved location marks acrcss all four arches.Glamp the slats together with the endsflush. Then tilt your circular saw bladeto 45' and use an edge guide to gangcutthe bevel on both ends.WORKtsENCH t] MAI{CH APRIL 2000aaJJ


![Til]tl](https://img.yumpu.com/45878240/1/190x245/tiltl.jpg?quality=85)


