

Tne Onrcrrunl WooDWoRKtNG AND Home ... - Wood Tools
Tne Onrcrrunl WooDWoRKtNG AND Home ... - Wood Tools
Tne Onrcrrunl WooDWoRKtNG AND Home ... - Wood Tools

Create successful ePaper yourself
Turn your PDF publications into a flip-book with our unique Google optimized e-Paper software.
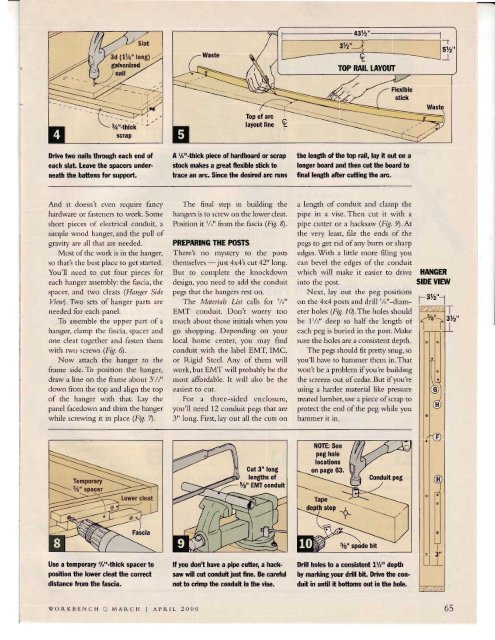
TOP RAIL I.AYOIIDrive two nails through each end ofeach slat. Leave the spacers under.neath the battens for suppott.A %"-thick piece of hardboad or scrapstock makes a grcat flexible stick totrace an arc. Since the desired arc runsthe length of the top rail, lay it out on alonger board and then cut the board tofinal length after cufting the arc.And it doesn't cven recluire fancyhardware or t:rsteners to work. Soureshort pieces of electrical conduit, asimple wood h:uruer, and the pull ofgraviry are ell thrt are needed.Most oithc rvork is in the hanger,so that'.s the best place to get started.Yor,r'll neecl to cut four pieces foreach h:inser assembly: the fascia, thespacer, and two cleats (Han,qr:r SidcViau).-lwo sets of hanger prrts areneeded for each panel.To assemble the upper part of ahalrger, clamp the f:rscia, spacer :rndone cleat toqether rud fasten thetnwith trvo scrcrvs (Fig. 6).Now attach the hanger to theframe side. To position the hanger,draw a line on the franre abottt 3'l,"down fronr the top and align the topof rhe hanger with that. Lry thepanel facedown and shim the har.rgerwhile screwing it in place (FiS. 7).The fir.ral step in building thehangers is to screw on the lower cieat.Position it'l," fror.r'the fascia (ttiq 8)PREPARING THE POSTSThere's no nlystery to the poststhenrsclvcs -..yust 4x4\ cttt 42" long.But to conrplete the knockdowndesign, you need to add the conduitpegs that tl-re hlngers rest on.-fheMatcrials Lr-st calls for ',/"'EMT conduit. l)on't worry toorruch about those initials when yougo shopping. l)eper-rding on yourlocal honre center, you nray firrdconduit with the label EMT, IMC,or Rigid Steel. Any of thenr wiilwork, but EMT will probably be themost affordable. It will also be theeasiesto clrt.For a three-sided enclosure,you'll need 12 conduit pegs that are3" long. First, lay out all the cllts ona length of conduit and clar.np thepipe in a vise. Then cut it with apipe cutter or a hacksaw (Fiq. 9).Atthe very least, file the ends of thepe€is to get rid ofany burrs or sharpedges. lVith a little more filing youcan bevel the edges of the condr'ritwhich will rnake it easier to drive HANGERinto the post.stDE vtEwNext. lay out the peg positionson the 4x4 posts and drill '/'"-dianteterholes (Fiq, 10).The holes shouldbe 1'l:" deep so half the length ofeach peg is buried ir-r the post. Makesllre the holes are a consistent depth.The pegs should fit pretty snug, soyou'll have to harnmer therl in.Thatwont be a problem if you're buildingthe screens out ofcedar. But ifyou reusing a harder material like pressuretreated lurnber, use a piece ofscrap toprotect the end of the peg while youhanrmer it in.a3V""1Cut 3" longlengths of7e" EMT conduatUse a temporary %"-thick spacer toposition the lower cleat the corrrctdistance from the fascia.lf you don't have a pipe cufter, a hacksawwill cril conduit iust fine. Be carefulnot to crimp the conduit in the vise.Drill holes to a consistent 1%" depthby marking your drill bit. Drive the conduitin until it bottoms out in the hole.woRKBENCH tr MARcH I APRIL 2000 65


![Til]tl](https://img.yumpu.com/45878240/1/190x245/tiltl.jpg?quality=85)


