

Tne Onrcrrunl WooDWoRKtNG AND Home ... - Wood Tools
Tne Onrcrrunl WooDWoRKtNG AND Home ... - Wood Tools
Tne Onrcrrunl WooDWoRKtNG AND Home ... - Wood Tools

Create successful ePaper yourself
Turn your PDF publications into a flip-book with our unique Google optimized e-Paper software.
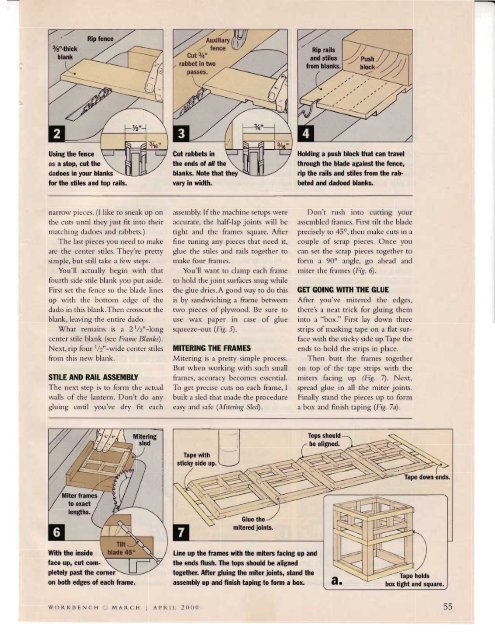
Rlp fenceUsing the fenceas a stop, cut thefor the stiles and top rails.Cut rabbets inthe ends of all thevary in width.Holding a push block that can travelthrcugh the blade againsthe fence,rip the rails and stiles from the rabbetedand dadoed blanks.narrow pieces. (l like to sneak up onthe cuts until they just fit into theirnratcl.rins dadoes and rabbets.)The last pieces you need to makeare the center stiles. They're prettysimple, but still take a few steps.You'll actually begin with thatfourth side stile blank you put aside.First set the fence so the blade linesr.rp with the bottonr edge of thedado in tl.ris blank.Then crosscutheblank, leaving the entire dado.'What renrains is a 2t/2"-longcenter stile blank (see Frame Blanks).Next, rip four l/:"-wide center stilesfrom this new blank.STITE <strong>AND</strong> RAIL ASSEMBLYThe next step is to form the actualwalls of the lantern. Don't do anygluing until you've dry fit eachassembly. If the machine setups wereaccurate, the half-lap joints will betight and the frames square. Afterfine tuning any pieces that need it,glue the stiles and rails together tomake four fiames.You'll want to clar.up each frameto hold the joint sufaces snug whilethe giue dries.A good way to do thisis by sandwiching a frame betweentwo pieces of plywood. lle sure toLlse wax paper in case of gluesqueeze-out (Plg.lMITERING THE FRAMESMitering is a pretty simple process.Ilut when working with such sr.nallfranes, accuracy becomes essential.To get precise cuts on each frame, Ibuilt a sled that made the procedureeasy and safe (Miterirry Slctfi.Don't rush into cutting yourassembled frames. First tilt the bladeprecisely to 45o, then make cuts in acouple of scrap pieces. Once youcan set the scrap pieces together toform a 90o angle, go ahead andrniter the frames (Frg. 6).GET GOING WITH THE GLUEAfter you've mitered the edges,thereh a neat trick for gluing thenrinto a "box." First lay down threestrips of masking tape on a flat surfacewith the sticky side up.tpe theends to hold the strips in place.Then butt the frames togetheron top of the tape strips with themiters facing ry (Fig. f. Next,spread glue in all the rniter joints.Finally stand the pieces up to forma box and finish taping (Fig.7a).With the insideface up, cut completelypast the corneion both edges of each frame.Line up the frames with the miterc facing up andthe ends flush. The tops should be alignedtogethen After gluing the miter joints, stand theassembly up and finish taping to fonn a box.Tape holdswoRKBENcH tr MAI{cH IAPRrL 200t) 55


![Til]tl](https://img.yumpu.com/45878240/1/190x245/tiltl.jpg?quality=85)


