Britflex BEJ Expansion Joints - StonCor Africa
Britflex BEJ Expansion Joints - StonCor Africa
Britflex BEJ Expansion Joints - StonCor Africa
- No tags were found...

You also want an ePaper? Increase the reach of your titles
YUMPU automatically turns print PDFs into web optimized ePapers that Google loves.
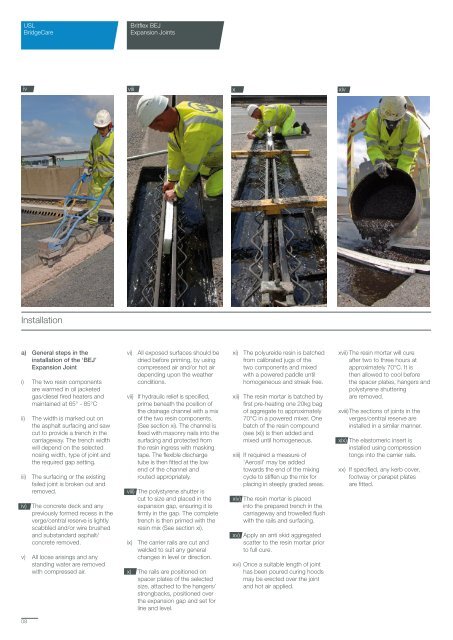
USLBridgeCare<strong>Britflex</strong> <strong>BEJ</strong><strong>Expansion</strong> <strong>Joints</strong>ivviiixxivInstallationa) General steps in theinstallation of the ‘<strong>BEJ</strong>’<strong>Expansion</strong> Jointi) The two resin componentsare warmed in oil jacketedgas/diesel fired heaters andmaintained at 65° - 85°Cii)The width is marked out onthe asphalt surfacing and sawcut to provide a trench in thecarriageway. The trench widthwill depend on the selectednosing width, type of joint andthe required gap setting.iii) The surfacing or the existingfailed joint is broken out andremoved.iv) The concrete deck and anypreviously formed recess in theverge/central reserve is lightlyscabbled and/or wire brushedand substandard asphalt/concrete removed.v) All loose arisings and anystanding water are removedwith compressed air.vi) All exposed surfaces should bedried before priming, by usingcompressed air and/or hot airdepending upon the weatherconditions.vii) If hydraulic relief is specified,prime beneath the position ofthe drainage channel with a mixof the two resin components.(See section xi). The channel isfixed with masonry nails into thesurfacing and protected fromthe resin ingress with maskingtape. The flexible dischargetube is then fitted at the lowend of the channel androuted appropriately.viii) The polystyrene shutter iscut to size and placed in theexpansion gap, ensuring it isfirmly in the gap. The completetrench is then primed with theresin mix (See section xi).ix) The carrier rails are cut andwelded to suit any generalchanges in level or direction.x) The rails are positioned onspacer plates of the selectedsize, attached to the hangers/strongbacks, positioned overthe expansion gap and set forline and level.xi) The polyureide resin is batchedfrom calibrated jugs of thetwo components and mixedwith a powered paddle untilhomogeneous and streak free.xii) The resin mortar is batched byfirst pre-heating one 20kg bagof aggregate to approximately70°C in a powered mixer. Onebatch of the resin compound(see (xi)) is then added andmixed until homogeneous.xiii) If required a measure of‘Aerosil’ may be addedtowards the end of the mixingcycle to stiffen up the mix forplacing in steeply graded areas.xiv) The resin mortar is placedinto the prepared trench in thecarriageway and trowelled flushwith the rails and surfacing.xv) Apply an anti skid aggregatedscatter to the resin mortar priorto full cure.xvi) Once a suitable length of jointhas been poured curing hoodsmay be erected over the jointand hot air applied.xvii) The resin mortar will cureafter two to three hours atapproximately 70°C. It isthen allowed to cool beforethe spacer plates, hangers andpolystyrene shutteringare removed.xviii) The sections of joints in theverges/central reserve areinstalled in a similar manner.xix) The elastomeric insert isinstalled using compressiontongs into the carrier rails.xx) If specified, any kerb cover,footway or parapet platesare fitted.08