SeqScape Software Version 2.1 Quick Reference Card 4332295C
SeqScape Software Version 2.1 Quick Reference Card 4332295C
SeqScape Software Version 2.1 Quick Reference Card 4332295C

Create successful ePaper yourself
Turn your PDF publications into a flip-book with our unique Google optimized e-Paper software.
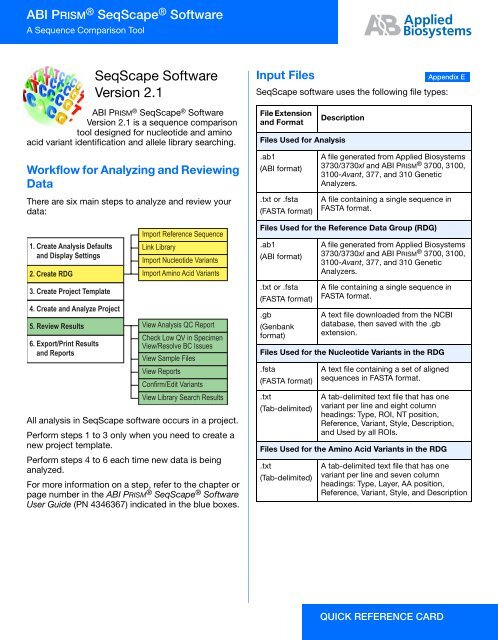
ABI PRISM ® <strong>SeqScape</strong> ® <strong>Software</strong><br />
A Sequence Comparison Tool<br />
<strong>SeqScape</strong> <strong>Software</strong><br />
<strong>Version</strong> <strong>2.1</strong><br />
ABI PRISM ® <strong>SeqScape</strong> ® <strong>Software</strong><br />
<strong>Version</strong> <strong>2.1</strong> is a sequence comparison<br />
tool designed for nucleotide and amino<br />
acid variant identification and allele library searching.<br />
Workflow for Analyzing and Reviewing<br />
Data<br />
There are six main steps to analyze and review your<br />
data:<br />
1. Create Analysis Defaults<br />
and Display Settings<br />
2. Create RDG<br />
3. Create Project Template<br />
4. Create and Analyze Project<br />
5. Review Results<br />
6. Export/Print Results<br />
and Reports<br />
Import <strong>Reference</strong> Sequence<br />
Link Library<br />
Import Nucleotide Variants<br />
Import Amino Acid Variants<br />
View Analysis QC Report<br />
Check Low QV in Specimen<br />
View/Resolve BC Issues<br />
View Sample Files<br />
View Reports<br />
Confirm/Edit Variants<br />
View Library Search Results<br />
All analysis in <strong>SeqScape</strong> software occurs in a project.<br />
Perform steps 1 to 3 only when you need to create a<br />
new project template.<br />
Perform steps 4 to 6 each time new data is being<br />
analyzed.<br />
For more information on a step, refer to the chapter or<br />
page number in the ABI PRISM ® <strong>SeqScape</strong> ® <strong>Software</strong><br />
User Guide (PN 4346367) indicated in the blue boxes.<br />
Input Files<br />
<strong>SeqScape</strong> software uses the following file types:<br />
File Extension<br />
and Format<br />
Description<br />
Files Used for Analysis<br />
.ab1<br />
(ABI format)<br />
.txt or .fsta<br />
(FASTA format)<br />
A file generated from Applied Biosystems<br />
3730/3730xl and ABI PRISM ® 3700, 3100,<br />
3100-Avant, 377, and 310 Genetic<br />
Analyzers.<br />
A file containing a single sequence in<br />
FASTA format.<br />
Files Used for the <strong>Reference</strong> Data Group (RDG)<br />
.ab1<br />
(ABI format)<br />
.txt or .fsta<br />
(FASTA format)<br />
.gb<br />
(Genbank<br />
format)<br />
A file generated from Applied Biosystems<br />
3730/3730xl and ABI PRISM ® 3700, 3100,<br />
3100-Avant, 377, and 310 Genetic<br />
Analyzers.<br />
A file containing a single sequence in<br />
FASTA format.<br />
A text file downloaded from the NCBI<br />
database, then saved with the .gb<br />
extension.<br />
Files Used for the Nucleotide Variants in the RDG<br />
.fsta<br />
(FASTA format)<br />
.txt<br />
(Tab-delimited)<br />
A text file containing a set of aligned<br />
sequences in FASTA format.<br />
A tab-delimited text file that has one<br />
variant per line and eight column<br />
headings: Type, ROI, NT position,<br />
<strong>Reference</strong>, Variant, Style, Description,<br />
and Used by all ROIs.<br />
Files Used for the Amino Acid Variants in the RDG<br />
.txt<br />
(Tab-delimited)<br />
A tab-delimited text file that has one<br />
variant per line and seven column<br />
headings: Type, Layer, AA position,<br />
<strong>Reference</strong>, Variant, Style, and Description<br />
QUICK REFERENCE CARD<br />
Appendix E
Step 1: Create Analysis Defaults and Chapter 3<br />
Display Settings.<br />
1A. Select Tools > <strong>SeqScape</strong> Manager.<br />
1B. Create default analysis settings:<br />
a. Select the Analysis Protocols tab, then click<br />
New.<br />
Page 3-3<br />
Page 2<br />
b. Complete the tabs to specify a name and to<br />
select a basecaller, mixed base settings,<br />
clear range, and filter settings.<br />
c. Click OK.<br />
d. Select the Analysis Defaults tab, then click<br />
New.<br />
Page 3-12<br />
e. Complete the tabs to specify your settings,<br />
then click Save.<br />
1C. Create default display settings:<br />
a. Select the Display Settings tab, then click<br />
New.<br />
b. Complete the tabs to specify a name and<br />
display characteristics for quality values,<br />
electropherograms, and project and<br />
specimen views.<br />
c. Click Save.<br />
Step 2: Create an RDG.<br />
Chapter 4<br />
2A. In the <strong>SeqScape</strong> Manager, select the <strong>Reference</strong><br />
Data Group tab, then click New.<br />
2B. Step through the tabs to name the RDG, import<br />
the reference sequences, define layers and ROIs,<br />
link allele libraries (optional), designate the start<br />
codon, import NT and AA variants, and choose<br />
the variant display styles.<br />
2C. Click OK.<br />
Page 3-18
Step 3: Create a Project Template.<br />
3A. In the <strong>SeqScape</strong> Manager, Select the Project<br />
Templates tab, then select New.<br />
3B. Enter a name for the new template, then in the<br />
drop-down lists select the RDG, analysis defaults<br />
and display settings files you created in the<br />
previous steps.<br />
3C. Click OK.<br />
3D. Close the <strong>SeqScape</strong> Manager.<br />
Step 4: Create and Analyze a Project.<br />
4A. Create a project:<br />
Chapter 6<br />
a. Click (New Project).<br />
Page 6-10<br />
b. Select the project template you created in<br />
step 3, then enter a new name in the Project<br />
Name field.<br />
c. Click New.<br />
Chapter 5<br />
Page 3<br />
4B. Add samples to the project<br />
Page 6-13<br />
automatically:<br />
This requires that you have a common text<br />
delimiter in each sample file name or sample<br />
name. All the samples to be imported<br />
automatically must be stored in a single folder.<br />
a. Click (Import Samples To Project).<br />
b. Enter a delimiter in the Specimen name<br />
delimiter field.<br />
c. If you are using the sample name, deselect<br />
the Use sample file name check box.<br />
d. Select the folder containing the sample files<br />
to add.<br />
e. Click Auto Add. The specimens are created<br />
and the samples are imported automatically.<br />
Specimen name Delimiter<br />
Sample name<br />
f. When you finish adding samples, click OK.<br />
Note: To add specimens and import samples<br />
manually, refer to Page 6-14<br />
.<br />
4C. Click (Analyze Samples).
Step 5: Review Results.<br />
5A. Open the project of interest, then select the<br />
project name in the Navigation pane.<br />
5B. Select a layer in the Active Layer drop-down list.<br />
5C. Check for analysis failures:<br />
a. Click (Report Manager), then select<br />
Analysis QC Report.<br />
Page 7-26<br />
b. If yellow triangles or red circles are present,<br />
verify the data quality and analysis settings.<br />
c. Correct the analysis settings, then reanalyze<br />
the data, if necessary.<br />
5D. Review the data in the project:<br />
a. Select a layer, then check bases with low<br />
quality values. Verify the basecalls of the<br />
consensus sequence.<br />
Page 10-6<br />
Project<br />
Ctrl-drag to reorder columns<br />
Quality values<br />
Chapter 7<br />
Chapter 8<br />
b. Select a segment, then select the Layout tab<br />
to view the segment sequence layout.<br />
Segment<br />
Page 7-11<br />
Double-click header to sort in<br />
ascending or descending order<br />
c. Select a segment, then select the Assembly<br />
tab to view the segment sequence assembly.<br />
Sample quality values<br />
Consensus quality values<br />
Page 7-12<br />
d. Select a sample, then select the desired tab<br />
to view the sample results. Shown below is<br />
the electropherogram data. Page 7-15<br />
Sample Quality values<br />
Page 4<br />
.
5E. Adjust the clear range by:<br />
Page 8-16<br />
Fewer than 50 bases – Select a clear range<br />
widget, [ or ], then drag the widget between<br />
two bases that represents the new location.<br />
More than 50 bases – Place the pointer<br />
between two bases that represents the new<br />
location, right-click, then select the item in<br />
the shortcut menu to set the start or end of<br />
the clear range.<br />
Original widget position<br />
5′ (CR start) widget<br />
3′ (CR end) widget<br />
New widget position<br />
5F. Edit results by changing, deleting, and adding<br />
bases or adding and deleting spaces in a<br />
specimen consensus or sample sequence. The<br />
changes shown below were done either<br />
automatically by the consensus-calling algorithm<br />
or manually by the user.<br />
Consensus sequence User-edited base from A to W.<br />
Black dot indicates a variant<br />
Consensus sequence<br />
Sample sequence<br />
Sample sequence<br />
Consensus-caller edit<br />
User edit<br />
Red dot indicates a<br />
consensus caller edit<br />
5G. Review the Mutations and AA Variants reports to<br />
confirm or edit variants:<br />
a. Select the project name in the navigation<br />
pane, then select a layer in the Active Layer<br />
drop-down list.<br />
b. Click (Report Manager), then select the<br />
Mutations Report or AA Variant Report.<br />
c. Select Window > Tile.<br />
d. Click a hyperlink (blue text) in the report, then<br />
view the data in the project view.<br />
Hyperlinks to Project view<br />
Right-click to show/<br />
hide columns<br />
5H. Review other reports of interest.<br />
5I. Use the Library Search report to view and edit<br />
constant position errors, if applicable:<br />
a. Select the project name in the Navigation<br />
pane, then select an active layer.<br />
b. Click (Report Manager), then select the<br />
Library Search Report.<br />
c. Select Window > Tile.<br />
d. In the Constant Position Errors table of the<br />
report, select a position (hyperlinked blue<br />
text), then view and edit the data in the<br />
project view.<br />
Page 5
5J. Use the Identification pane to view and edit<br />
crucial positions, if applicable:<br />
a. Select the project name in the Navigation<br />
pane, then select a layer in the Active Layer<br />
drop-down list.<br />
b. Select a base in the consensus sequence to<br />
populate the Identification pane.<br />
c. Use the split bar to adjust the height of the<br />
Identification pane.<br />
d. Click (View Column Selector).<br />
The # Diff column displays the number of bases<br />
that differ between the consensus and the allele<br />
sequence<br />
View column selector<br />
Crucial position column<br />
e. Select a crucial position in the Identification<br />
pane. The corresponding consensus base is<br />
highlighted in the view column selector in the<br />
Project view.<br />
f. View and edit the data in the Project view.<br />
Note: The crucial positions in the Identification<br />
pane and the Project view are hyperlinked to each<br />
other. Therefore, sequence edits are automatically<br />
updated in the library search results in the<br />
Identification pane.<br />
www.appliedbiosystems.com<br />
Step 6: Export/Print the Results and Chapter 9<br />
Reports.<br />
Reports can be automatically exported after analysis.<br />
6A. Select Tool > Options.<br />
6B. Complete the General tab:<br />
a. Select the Display Reports after Analysis<br />
check box, if desired.<br />
b. Select the Export Reports after Analysis<br />
check box, then select an export format in<br />
the drop-down list.<br />
c. Define a default location to save the files.<br />
d. Click OK.<br />
Note: To manually export and/or print files, refer<br />
to the pages in the table below.<br />
To … Refer to …<br />
Export data<br />
Export reports<br />
Print data<br />
Print reports<br />
Page 9-3<br />
Page 9-9<br />
Page 9-12<br />
Page 9-16<br />
© Copyright 2003, Applied Biosystems. All rights reserved.<br />
For Research Use Only. Not for use in diagnostic procedures.<br />
ABI PRISM, Applied Biosystems and <strong>SeqScape</strong> are registered trademarks<br />
of Applera Corporation or its subsidiaries in the U.S. and/or certain other<br />
countries.<br />
AB (Design) and Applera are trademarks of Applera Corporation or its<br />
subsidiaries in the U.S. and/or certain other countries.<br />
Part Number 4332295 Rev. C