kit 400/400w â 500/500w standard, processor ... - KÃHTREIBER sro
kit 400/400w â 500/500w standard, processor ... - KÃHTREIBER sro
kit 400/400w â 500/500w standard, processor ... - KÃHTREIBER sro
- No tags were found...

You also want an ePaper? Increase the reach of your titles
YUMPU automatically turns print PDFs into web optimized ePapers that Google loves.
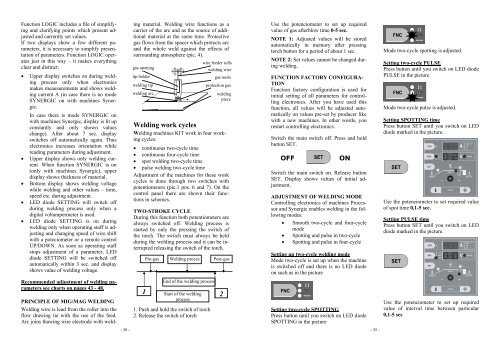
Function LOGIC includes a file of simplifyingand clarifying points which present adjustedand currently set values.If two displays show a few different parameters,it is necessary to simplify presentationof parameters. Function LOGIC operatesjust in this way – it makes everythingclear and distinct:• Upper display switches on during weldingprocess only when electronicsmakes meausurements and shows weldingcurrent A (in case there is no modeSYNERGIC on with machines Synergic.In case there is mode SYNERGIC onwith machines Synergic, display is lit upconstantly and only shown valueschange). After about 7 sec. displayswitches off automatically again. Thuselectronics increases orientation whilereading parameters during adjustment.• Upper display shows only welding current.When function SYNERGIC is on(only with machines Synergic), upperdisplay shows thickness of material.• Bottom display shows welding voltagewhile welding and other values – time,speed etc. during adjustment.• LED diode SETTING will switch offduring welding process only when adigital voltampermeter is used.• LED diode SETTING is on duringwelding only when operating staff is adjustingand changing speed of wire shiftwith a poteciometer or a remote controlUP/DOWN. As soon as operating staffstops adjustment of a parameter, LEDdiode SETTING will be switched offautomatically within 3 sec. and displayshows value of welding voltage.ing material. Welding wire functions as acarrier of the arc and as the source of additionalmaterial at the same time. Protectivegas flows from the spacer which protects arcand the whole weld against the effects ofsurrounding atmosphere (pic. 4).wire feeder rollsgas openingwelding wiretip holdergas noslewelding tipprotection gaswelding arcweldingpieceWelding work cyclesWelding machines KIT work in four workingcycles:• continuous two-cycle time• continuous four-cycle time• spot welding two-cycle time• pulse welding two-cycle timeAdjustment of the machines for these workcycles is done through two switches withpotentiometers (pic.1 pos. 6 and 7). On thecontrol panel there are shown their functionsin schemes.TWO-STROKE CYCLEDuring this function both potentiometers arealways switched off. Welding process isstarted by only the pressing the switch ofthe torch. The switch must always be heldduring the welding process and it can be interruptedreleasing the switch of the torch.Pre-gasWelding procesPost-gasUse the potenciometer to set up requiredvalue of gas afterblow time 0-5 sec.NOTE 1: Adjusted values will be storedautomatically in memory after pressingtorch button for a period of about 1 sec.NOTE 2: Set values cannot be changed duringwelding.FUNCTION FACTORY CONFIGURA-TIONFunction factory configuration is used forinitial setting of all parameters for controllingelectronics. After you have used thisfunction, all values will be adjusted automaticallyon values pre-set by producer likewith a new machines. In other words, yourestart controlling electronics.Switch the main switch off. Press and holdbutton SET.OFF ONSwitch the main switch on. Release buttonSET. Display shows values of initial adjustment.ADJUSTMENT OF WELDING MODEControlling electronics of machines Processorand Synergic enables welding in the followingmodes:• Smooth two-cycle and four-cyclemode• Spotting and pulse in two-cycle• Spotting and pulse in four-cycleSetting up two-cycle welding modeMode two-cycle is set up when the machineis switched off and there is no LED diodeon such as in the pictureMode two-cycle spotting is adjusted.Setting two-cycle PULSEPress button until you switch on LED diodePULSE in the pictureMode two-cycle pulse is adjusted.Setting SPOTTING timePress button SET until you switch on LEDdiode marked in the picture.Use the potenciometer to set required valueof spot time 0,1-5 sec.Setting PULSE timePress button SET until you switch on LEDdiode marked in the picture.Recommended adjustment of welding parameterssee charts on pages 43 - 48.PRINCIPLE OF MIG/MAG WELDINGWelding wire is lead from the roller into theflow drawing tie with the use of the feed.Arc joins thawing wire electrode with weld-1End of the welding processStart of the weldingprocess1. Push and hold the switch of torch2. Release the switch of torch2Setting two-cycle SPOTTINGPress button until you switch on LED diodeSPOTTING in the pictureUse the potenciometer to set up requiredvalue of interval time between particular0,1-5 sec- 38 -- 35 -