Installatiehandleiding en gebruiksaanwijzing Dru Apollo ... - UwKachel
Installatiehandleiding en gebruiksaanwijzing Dru Apollo ... - UwKachel
Installatiehandleiding en gebruiksaanwijzing Dru Apollo ... - UwKachel

Create successful ePaper yourself
Turn your PDF publications into a flip-book with our unique Google optimized e-Paper software.
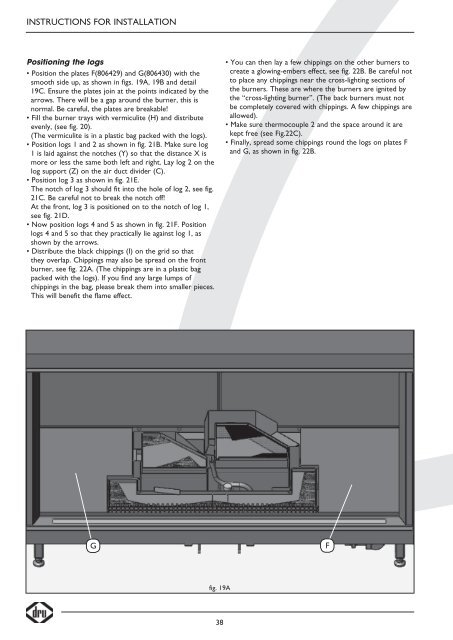
INSTRUCTIONS FOR INSTALLATIONPositioning the logs• Position the plates F(806429) and G(806430) with thesmooth side up, as shown in figs. 19A, 19B and detail19C. Ensure the plates join at the points indicated by thearrows. There will be a gap around the burner, this isnormal. Be careful, the plates are breakable!• Fill the burner trays with vermiculite (H) and distributeev<strong>en</strong>ly, (see fig. 20).(The vermiculite is in a plastic bag packed with the logs).• Position logs 1 and 2 as shown in fig. 21B. Make sure log1 is laid against the notches (Y) so that the distance X ismore or less the same both left and right. Lay log 2 on thelog support (Z) on the air duct divider (C).• Position log 3 as shown in fig. 21E.The notch of log 3 should fit into the hole of log 2, see fig.21C. Be careful not to break the notch off!At the front, log 3 is positioned on to the notch of log 1,see fig. 21D.• Now position logs 4 and 5 as shown in fig. 21F. Positionlogs 4 and 5 so that they practically lie against log 1, asshown by the arrows.• Distribute the black chippings (I) on the grid so thatthey overlap. Chippings may also be spread on the frontburner, see fig. 22A. (The chippings are in a plastic bagpacked with the logs). If you find any large lumps ofchippings in the bag, please break them into smaller pieces.This will b<strong>en</strong>efit the flame effect.• You can th<strong>en</strong> lay a few chippings on the other burners tocreate a glowing-embers effect, see fig. 22B. Be careful notto place any chippings near the cross-lighting sections ofthe burners. These are where the burners are ignited bythe “cross-lighting burner”. (The back burners must notbe completely covered with chippings. A few chippings areallowed).• Make sure thermocouple 2 and the space around it arekept free (see Fig.22C).• Finally, spread some chippings round the logs on plates Fand G, as shown in fig. 22B.GFfig. 19A38