

GREEN HOBBY Assembly Notes for "DAISY" - Green Hobby & Model
GREEN HOBBY Assembly Notes for "DAISY" - Green Hobby & Model
GREEN HOBBY Assembly Notes for "DAISY" - Green Hobby & Model

You also want an ePaper? Increase the reach of your titles
YUMPU automatically turns print PDFs into web optimized ePapers that Google loves.
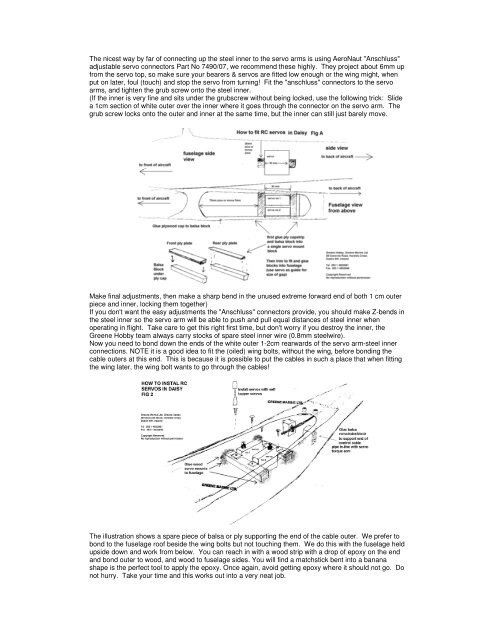
The nicest way by far of connecting up the steel inner to the servo arms is using AeroNaut "Anschluss"<br />
adjustable servo connectors Part No 7490/07, we recommend these highly. They project about 6mm up<br />
from the servo top, so make sure your bearers & servos are fitted low enough or the wing might, when<br />
put on later, foul (touch) and stop the servo from turning! Fit the "anschluss" connectors to the servo<br />
arms, and tighten the grub screw onto the steel inner.<br />
(If the inner is very fine and sits under the grubscrew without being locked, use the following trick: Slide<br />
a 1cm section of white outer over the inner where it goes through the connector on the servo arm. The<br />
grub screw locks onto the outer and inner at the same time, but the inner can still just barely move.<br />
Make final adjustments, then make a sharp bend in the unused extreme <strong>for</strong>ward end of both 1 cm outer<br />
piece and inner, locking them together)<br />
If you don't want the easy adjustments the "Anschluss" connectors provide, you should make Z-bends in<br />
the steel inner so the servo arm will be able to push and pull equal distances of steel inner when<br />
operating in flight. Take care to get this right first time, but don't worry if you destroy the inner, the<br />
<strong>Green</strong>e <strong>Hobby</strong> team always carry stocks of spare steel inner wire (0.8mm steelwire).<br />
Now you need to bond down the ends of the white outer 1-2cm rearwards of the servo arm-steel inner<br />
connections. NOTE it is a good idea to fit the (oiled) wing bolts, without the wing, be<strong>for</strong>e bonding the<br />
cable outers at this end. This is because it is possible to put the cables in such a place that when fitting<br />
the wing later, the wing bolt wants to go through the cables!<br />
The illustration shows a spare piece of balsa or ply supporting the end of the cable outer. We prefer to<br />
bond to the fuselage roof beside the wing bolts but not touching them. We do this with the fuselage held<br />
upside down and work from below. You can reach in with a wood strip with a drop of epoxy on the end<br />
and bond outer to wood, and wood to fuselage sides. You will find a matchstick bent into a banana<br />
shape is the perfect tool to apply the epoxy. Once again, avoid getting epoxy where it should not go. Do<br />
not hurry. Take your time and this works out into a very neat job.


